4049-229C EDV Series.indd - At Andiron Fireplace Shop
4049-229C EDV Series.indd - At Andiron Fireplace Shop
4049-229C EDV Series.indd - At Andiron Fireplace Shop

Create successful ePaper yourself
Turn your PDF publications into a flip-book with our unique Google optimized e-Paper software.
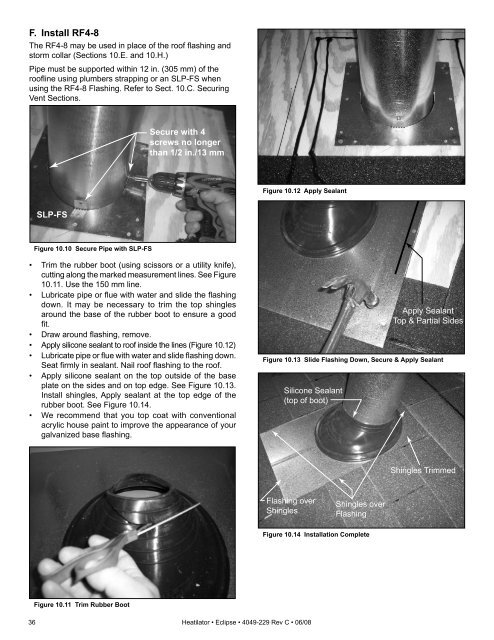
F. Install RF4-8<br />
The RF4-8 may be used in place of the roof fl ashing and<br />
storm collar (Sections 10.E. and 10.H.)<br />
Pipe must be supported within 12 in. (305 mm) of the<br />
roofl ine using plumbers strapping or an SLP-FS when<br />
using the RF4-8 Flashing. Refer to Sect. 10.C. Securing<br />
Vent Sections.<br />
36<br />
SLP-FS<br />
Figure 10.10 Secure Pipe with SLP-FS<br />
Secure with 4<br />
screws no longer<br />
than 1/2 in./13 mm<br />
• Trim the rubber boot (using scissors or a utility knife),<br />
cutting along the marked measurement lines. See Figure<br />
10.11. Use the 150 mm line.<br />
• Lubricate pipe or fl ue with water and slide the fl ashing<br />
down. It may be necessary to trim the top shingles<br />
around the base of the rubber boot to ensure a good<br />
fi t.<br />
• Draw around fl ashing, remove.<br />
• Apply silicone sealant to roof inside the lines (Figure 10.12)<br />
• Lubricate pipe or fl ue with water and slide fl ashing down.<br />
Seat fi rmly in sealant. Nail roof fl ashing to the roof.<br />
• Apply silicone sealant on the top outside of the base<br />
plate on the sides and on top edge. See Figure 10.13.<br />
Install shingles, Apply sealant at the top edge of the<br />
rubber boot. See Figure 10.14.<br />
• We recommend that you top coat with conventional<br />
acrylic house paint to improve the appearance of your<br />
galvanized base fl ashing.<br />
Figure 10.11 Trim Rubber Boot<br />
Figure 10.12 Apply Sealant<br />
Heatilator • Eclipse • <strong>4049</strong>-229 Rev C • 06/08<br />
Figure 10.13 Slide Flashing Down, Secure & Apply Sealant<br />
Silicone Sealant<br />
(top of boot)<br />
Flashing over<br />
Shingles<br />
Shingles over<br />
Flashing<br />
Figure 10.14 Installation Complete<br />
Apply Sealant<br />
Top & Partial Sides<br />
Shingles Trimmed