Owner's Manual - At Andiron Fireplace Shop
Owner's Manual - At Andiron Fireplace Shop
Owner's Manual - At Andiron Fireplace Shop

Create successful ePaper yourself
Turn your PDF publications into a flip-book with our unique Google optimized e-Paper software.
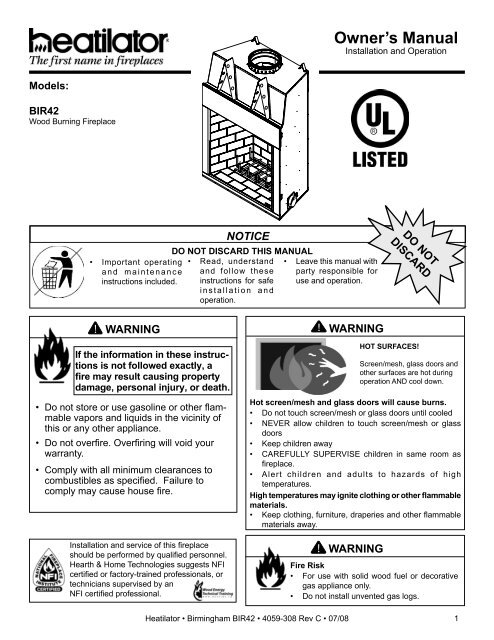
Owner’s <strong>Manual</strong>Installation and OperationModels:BIR42Wood Burning <strong>Fireplace</strong>• Important operatingand maintenanceinstructions included.NOTICEDO NOT DISCARD THIS MANUAL• Read, understandand follow theseinstructions for safeinstallation andoperation.• Leave this manual withparty responsible foruse and operation.DO NOTDISCARDWARNINGIf the information in these instructionsis not followed exactly, afire may result causing propertydamage, personal injury, or death.• Do not store or use gasoline or other fl ammablevapors and liquids in the vicinity ofthis or any other appliance.• Do not overfi re. Overfi ring will void yourwarranty.• Comply with all minimum clearances tocombustibles as specifi ed. Failure tocomply may cause house fi re.Installation and service of this fi replaceshould be performed by qualifi ed personnel.Hearth & Home Technologies suggests NFIcertifi ed or factory-trained professionals, ortechnicians supervised by anNFI certifi ed professional.WARNINGWARNINGHOT SURFACES!Screen/mesh, glass doors andother surfaces are hot duringoperation AND cool down.Hot screen/mesh and glass doors will cause burns.• Do not touch screen/mesh or glass doors until cooled• NEVER allow children to touch screen/mesh or glassdoors• Keep children away• CAREFULLY SUPERVISE children in same room asfi replace.• Alert children and adults to hazards of hightemperatures.High temperatures may ignite clothing or other flammablematerials.• Keep clothing, furniture, draperies and other fl ammablematerials away.Fire Risk• For use with solid wood fuel or decorativegas appliance only.• Do not install unvented gas logs.Heatilator • Birmingham BIR42 • 4059-308 Rev C • 07/081
HEATILATOR WOODBURNING FIREPLACELimited WarrantyAs part of its20-YEAR BUYER PROTECTION PROGRAMAS PART OF ITS 20 YEAR BUYER PROTECTION PROGRAM (“PROGRAM”), HEARTH & HOME TECHNOLOGIESINC. (“HHT”) is pleased to offer a Limited Warranty and a Replacement Parts Advantage covering specifi c components of your Heatilator®woodburning fi replace system ( the “<strong>Fireplace</strong>”), installed in the United States of America or Canada. Dealers and employees of HHT have noauthority to make any warranty or authorize any remedies in addition to or inconsistent with the terms of this Program.Limited WarrantyHHT warrants the following components of your Heatilator woodburning fi replace to be free from original defects in material and workmanshipduring the applicable periods described: fi ve years for the fi rebox assembly, chimney system and roof termination; two years for refractory fireboxliners; and one year for the grate, wire mesh screens, fan system, outside air system, and glass doors. All limited warranty periods run from thedate of initial installation of your <strong>Fireplace</strong> (the “Installation Date”). The Limited Warranty is subject to the conditions, exclusions and limitations ofliability listed below.Replacement Parts AdvantageUnder HHT’s Replacement Parts Advantage, for a period of twenty years from your Installation Date of your <strong>Fireplace</strong>, if available, HHT will provideyou with repair or replacement parts for defective components which are no longer under their applicable Limited Warranty, at 50% of the thencurrent retail list price for such components. HHT shall have no responsibility for freight and labor charges related to such parts.Conditions, Exclusions, & Limitations of LiabilityA. Both the Limited Warranty and Replacement Parts Advantage supplied by HHT apply only while the <strong>Fireplace</strong> is in its location of originalinstallation. HHT’s obligation under this warranty does not extend to damages resulting from (1) installation, operation or maintenance ofthe <strong>Fireplace</strong> not in accordance with the Installation Instructions, Operating Instructions, and the Listing Agent Identifi cation Label furnishedwith the Appliance; (2) installation which does not comply with local building codes; (3) shipping, improper handling, improper operation,abuse, misuse, accident or unworkmanlike repairs; (4) environmental conditions, inadequate ventilation or drafting caused by tight sealingconstruction of the structure, air handling devices such as exhaust fans or forced air furnaces, or other causes; (5) use of fuels other thanthose specifi ed in the Operating Instructions; (6) installation or use of components not supplied with the <strong>Fireplace</strong> or any other componentsnot expressly authorized and approved by HHT; and/or (7) modifi cation of the <strong>Fireplace</strong> not expressly authorized and approved by HHT inwriting. This warranty is limited to only the component parts manufactured or supplied by HHT.B. During the fi rst year of the Limited Warranty, HHT will, at its sole option, repair or replace any covered defective component and will providereplacement parts at no charge. And will pay reasonable labor and freight costs. During the second through the fi fth years of the LimitedWarranty (if applicable), HHT will provide replacement parts free of charge for any covered defective component, but will not pay for freightor labor costs related to the shipment of the parts or the actual repair or replacement. After the fi fth anniversary of the Installation date,HHT’s sole obligation and your exclusive remedy is set forth in HHT’s Replacement Parts Advantage described above. In no event shallHHT be liable for any incidental or consequential damages caused by defects in your <strong>Fireplace</strong>.C. EXCEPT TO THE EXTENT PROVIDED BY LAW, HHT MAKES NO EXPRESS WARRANTIES OTHER THAN THE WARRANTYSPECIFIED HEREIN. THE DURATION OF ANY IMPLIED WARRANTY IS LIMITED TO DURATION OF THE WARRANTY SPECIFIEDABOVE.D. Some states do not allow exclusions or limitations of incidental or consequential damages, so those limitations may not apply to you. Thiswarranty gives you specifi c rights; you may also have other rights which vary from state to state.How to Obtain Service1. To obtain service under this warranty you must:2. Send written notice of the claimed condition to Heatilator Technical Service Department, Hearth & Home Technologies, 1915 W. SaundersStreet, Mt. Pleasant, Iowa 52641-1563. You may also register your claim online at www.heatilator.com.3. Provide proof of purchase, model number, serial number, and manufacturing date code to HHT.4. Provide HHT reasonable opportunity to investigate the claim, including reasonable opportunity to inspect the Appliance prior to any repair orreplacement work and before the Appliance or any component of the Appliance has been removed from the place of original installation.5. Obtain HHT’s consent to any warranty work before the work is done.ADDITIONAL INFORMATION: If you would like information on current HEATILATOR products or want to locate a dealer in your area, call 1-800-927-6841.©2003 Heatilator is a Registered Trademark of Hearth & Home Technologies Inc.4 Heatilator • Birmingham BIR42 • 4059-308 Rev C • 07/08
1Listing and Code ApprovalsA. Appliance CertificationThis fi replace system has been tested and listed in accordancewith UL 127 standards by Underwriters LaboratoriesInc. for installation and operation in the United States.This fi replace may be installed in sleeping rooms EXCEPTin manufactured homes. If installed with a gas log set, provisionsfor the National Fuel Gas Code must be met.This fi replace has been tested and listed for use withthe optional components specifi ed in this manual. Theseoptional components may be purchased separately andinstalled at a later date.NOTICE: The outside air kits must be installed at the time offi replace installation.Heatilator is a registered trademark of Hearth & HomeTechnologies Inc.B. Non-Combustible Materials• Materials which will not ignite and burn, composed of anycombination of the following:- Steel - Iron- Brick - Tile- Concrete - Slate- Glass - Plasters• Materials reported as passing ASTM E 136, StandardTest Method for Behavior of Metals, in a Vertical TubeFurnace at 750° CC. Combustible Materials• Materials made of or surfaced with any of the followingmaterials:- Wood - Compressed paper- Plant fi bers - Plastic• Any material that can ignite and burn; fl ame proofed ornot, plastered or un-plasteredWARNING! Risk of Fire! Hearth & Home Technologiesdisclaims any responsibility for, and the warranty andagency listing will be voided by the actions below.DO NOT:• install or operate damaged fi replace• modify fi replace• install other than as instructed by Hearth & HomeTechnologies• operate the fi replace without fully assembling allcomponents• overfi re• install an unvented gas log set• install any component not approved by Hearth &Home Technologies• install parts or components not Listed or approvedImproper installation, adjustment, alteration, service ormaintenance can cause injury or property damage.For assistance or additional information, consult a qualifi edinstaller, service agency or your dealer.Notice: This fi replace is tested and approved as a decorativefi replace. It should not be factored as a primary heat sourcein residential heating calculations.Heatilator • Birmingham BIR42 • 4059-308 Rev C • 07/085
Mantel2Operating InstructionsHOT SURFACES!User GuideWARNINGScreen/mesh, glass doors and other surfaces are hot during operation AND cool down.Hot screen/mesh and glass doors will cause burns.• Do not touch screen/mesh or glass doors until cooled• NEVER allow children to touch screen/mesh or glass doors• Keep children away• CAREFULLY SUPERVISE children in same room as fi replace.• Alert children and adults to hazards of high temperatures.High temperatures may ignite clothing or other flammable materials.• Keep clothing, furniture, draperies and other fl ammable materials away.If you expect that children may come into contact with this fi replace, we recommend a barrier such as a decorativescreen. See your dealer for suggestions.WARNING! DO NOT operate fi replace before reading and understanding operating instructions. Failure to operate fireplaceaccording to operating instructions could cause fi re or injury.A. Your <strong>Fireplace</strong>Molded Brick PanelsSection 2.H.GrateSection 2.D.Gas Log SetGas Log Lighters(not shown)Section 2.J.Wood FuelSection 2.M.HearthFirescreen(not shown)Section 2.E.Glass Doors(not shown)Section 2.I.Clear SpaceSection 2.L.Outside Air Control HandlesSection 2.G.Turn handle to unlock,pull towards the insideof the fireplace to open.Reverse steps to close & lock.Flue DamperSection 2.F.UP to OpenDOWN to CloseFigure 2.16General Operating PartsHeatilator • Birmingham BIR42 • 4059-308 Rev C • 07/08
B. Seasoned WoodProperly seasoned wood is important for successful operationof your fi replace. Most woodburning fi replace problemsare caused by burning wet, unseasoned wood.Seasoned fi rewood is wood that is cut to size, split and airdried to a moisture content of around 20%.Imagine a wooden bucket that weighs about eight pounds.Fill it with a gallon of water, put it in the fi replace and try toburn it. This sounds ridiculous but that is exactly what youare doing if you burn unseasoned wood.A tree cut down a year ago and not split is likely to havealmost as high a moisture content now as it did when it wascut.Please refer to Section 2.M. for more detail.C. Starting a FireNOTICE: You must establish a good draft to prevent smokespillage into the room.WARNING! Risk of Fire! Keep combustible materials,gasoline and other fl ammable vapors and liquids clear ofthe fi replace.DO NOT:• store fl ammable materials close to the fi replace• use gasoline, lantern fuel, kerosene, charcoal lighterfl uid or similar liquids to start or “freshen up” a fi re inthis fi replace.Keep all fl ammable liquids well away from the fi replace whileit is in use. Combustible materials may ignite.D. GrateThis fi replace is designed to be used with the grate suppliedwith this unit or one approved by HHT. The grate willdeteriorate over time and will need occasional replacement.WARNING! Risk of Fire! Use only the factory-suppliedintegral grate.• Keeps logs in place.• Allows proper air circulation around the fi re.E. FirescreenThe fi rescreen is provided to control sparks. Keep it closedwhen the fi replace is in use.WARNING! Risk of Fire or Burns!• Screen will not prevent burning materials from fallingout.• Screen pulls or handles may be hot.F. Flue Damper• Refer to Figure 2.1 for location of control.• Must be in fully open position (handle up toward the topof the fi replace) during operation of the fi replace.• Before lighting the fi replace, verify fully open position bylooking up from the inside of the fi replace.WARNING! Risk of Fire and Asphyxiation! Opendamper prior to operating fi replace. A closed damperoverfi res the fi replace and will cause smoke and fl amesto spill into the room.• The fi rst three or four fi res should be of moderate size toallow the oils and binders to be burned from the fi replaceand molded brick panel, and paint to cure. You may noticean industrial odor the fi rst few fi res. This is considerednormal.• Use well-seasoned wood (see Section 2.M.).• Open the fl ue damper to a fully open position.• Open outside air.• Place crumpled or twisted paper under the fi replacegrate.• Loosely arrange kindling or small pieces of wood to forma ‘tent’ on the fi replace grate.• Pre-warm the flue to establish a draft to help reduce smokespillage during start-up. Hold a rolled up piece of burningnewspaper under the fl ue damper for a few moments.• Light the crumpled paper to ignite the kindling.• Add small pieces of wood until a hot bed of embers hasbeen established.• Add a minimum of three average size pieces of splitfi rewood, placed to allow combustion air and fl amesbetween them.CAUTION! Odors and vapors released during initial operationmay be irritating to sensitive individuals. Openwindows for air circulation.Heatilator • Birmingham BIR42 • 4059-308 Rev C • 07/08G. Outside Air• Refer to Figure 2.1 for location of controls.• Outside air doors should be in the fully opened positionduring operation of the fi replace.• Before lighting the fi replace, turn both handles & pull outto open. Reverse steps to close and lock.H. Molded Brick Panel• The molded brick panel is shipped separately, but requiredto contain heat and provide an attractive interior.• It will deteriorate over time and will need occasionalreplacement. Small hairline cracks and discoloration arenormal and do not affect its safety.• Cracks in the mortar may occur and do not affect thesafety of the unit. If mortar falls out of the joints and metalis exposed, replace or patch the mortar.• (See Molded Brick Panel Maintenance, Section 3.C.)WARNING! Risk of Fire! DO NOT burn fi replace withoutmolded brick panel. Use only molded brick panel suppliedby Hearth & Home Technologies, Inc.7
I. Glass Doors J. Vented Gas Log Sets & Gas Log Lighters• Glass and screen doors are optional.• Refer to Figure 2.2 for proper use.WARNING! Risk of Fire! Install ONLY doors approved byHearth & Home Technologies, Inc.WARNING! Risk of Fire and Smoke! <strong>Fireplace</strong>s equippedwith doors should be operated only with doors fully openor doors fully closed. If doors are left partly open, gas andfl ame may be drawn out of the fi replace opening.• Optional• Vented gas logs or gas log lighters can be installed inthis fi replace. Follow the instructions provided with theaccessory for operation.WARNING! Risk of Fire or Asphyxiation!• DO NOT install unvented gas logs.• Damper must be locked open.• Gas fl ame may generate fumes.FULLY OPENCORRECTPARTLY OPENINCORRECTK. Optional Components• Other options may be available• Consult your dealer/distributorWARNING! Risk of Fire! DO NOT install and or use anycomponent not approved by Hearth & Home TechnologiesInc.Figure 2.2FULLY CLOSEDCORRECTPARTLY CLOSEDINCORRECTOperating Positions of Bi-fold DoorsL. Clear SpaceWARNING! DO NOT place combustible objects in front ofthe fi replace. High temperatures may ignite clothing, furnitureor draperies.• DO NOT place combustible objects within 48 in. (121.9 cm)of the front of fi replace. See Figure 2.3.• Mantel - avoid placing candles and other heat-sensitiveobjects on mantel or hearth. Heat may damage theseobjects.48 in. (121.9 cm)Clear SpaceFront of <strong>Fireplace</strong>24 in. (61.0 cm)Clear SpaceSides of <strong>Fireplace</strong> OpeningFigure 2.3Clear Space8Heatilator • Birmingham BIR42 • 4059-308 Rev C • 07/08
M. Wood FuelHardwood vs SoftwoodYour fi replace performance depends on the quality of thefi rewood you use.• Seasoned wood contains about 8,000 BTUs per pound .• Hard woods are more dense than soft woods.• Hard woods contain 60% more BTUs than soft woods.• Hard woods require more time to season, burn slower andare harder to ignite.• Soft woods require less time to dry, burn faster and areeasier to ignite.• Start the fi re with soft wood to bring the fi replace up tooperating temperature and to establish draft.• Add hard wood for slow, even heat and longer burntime.Soft woodsHard woods• Douglas Fir • Oak• Pine • Maple• Spruce • Apple• Cedar • Birch• Poplar• Aspen• AlderSeasoned Wood• Cut logs to size• Split to 6 in. (152 mm) or less• Air dry to a moisture content of around 20%- Soft wood - about nine months- Hard wood - about eighteen monthsNOTICE: Seasoning time may vary depending on dryingconditions.Storing WoodSteps to ensure properly seasoned wood:• Stack wood to allow air to circulate freely around andthrough woodpile.• Elevate wood pile off ground to allow air circulationunderneath.• Smaller pieces of wood dry faster. Any piece over 6 in.(152 mm) in diameter should be split.• Wood (whole or split) should be stacked so both ends ofeach peice are exposed to air. More drying occurs throughthe cut ends than the sides.• Store wood under cover to prevent water absorbtionfrom rain or snow. Avoid covering the sides and endscompletely.WARNING! Fire Risk! DO NOT store wood:MoistureWARNING! Risk of Fire!• DO NOT burn wet or green wood.• Wet, unseasoned wood can cause accumulation ofcreosote.The majority of the problems fi replace owners experienceare caused by trying to burn wet, unseasoned wood.• Wet, unseasoned wood requires energy to evaporate thewater instead of heating your home, and• Evaporating moisture cools your chimney, acceleratingformation of creosote.• in front of the fi replace.• in space required for loading or ash removal.Processed Solid Fuel FirelogsManufactured fi relogs may be used with this fi replace.Hearth & Home Technologies Inc. recommends the use ofUL Classifi ed processed fuel fi relogs. Follow the manufacturer’slighting and safety instructions.Using fi relogs may require more frequent chimney inspectionand cleaning.Do not poke or stir the logs while they are burning. Useonly fi relogs that have been evaluated for the application inmanufactured fi replaces and refer to fi relog warnings andcaution markings on packaging prior to use.Heatilator • Birmingham BIR42 • 4059-308 Rev C • 07/089
3Maintainance and ServiceA. Disposal of AshesFrequency: When they reach bottom of grateBy: HomeownerWARNING! Risk of Fire! Ashes could contain hot embers.• Place ashes in a metal container with a tight-fi tting lid.• The closed container should be placed on a noncombustiblefl oor or on the ground, well away from all combustiblematerials, pending fi nal disposal.• If the ashes are disposed of by burial in soil or otherwiselocally dispersed, they should be retained in the closedcontainer until all cinders have thoroughly cooled.B. Chimney Inspection/CleaningFrequency: <strong>At</strong> least twice a year during heating season oras recommended by a certifi ed chimney sweepBy: Certifi ed chimney sweepWARNING! Risk of Fire! Ignited creosote is extremelyHOT. Prevent creosote buildup.Refer to Figure 3.1 to remove/reinstall termination caps.Creosote - Formation and Need for RemovalWhen wood is burned slowly, it produces tar and otherorganic vapors, which combine with expelled moisture toform creosote. The creosote vapors condense in the relativelycool chimney fl ue of a slow-burning fi re. As a result,creosote residue accumulates on the fl ue lining. Whenignited this creosote makes an extremely hot fi re.WARNING! Risk of Fire! A chimney fi re can permanentlydamage your chimney system and nearby structures.In the event of a chimney fi re, Hearth & Home TechnologiesInc. recommends• replacement of the chimney, and• inspection of the adjacent structure to the provisions ofNFPA Level III inspection criteriaThe chimney shall be inspected at least twice a year duringthe heating season to determine when a creosote builduphas occurred.When creosote has accumulated it shall be removed toreduce the risk of a chimney fi re.Remove screws,lift top cover.Top CoverRemove 4 screwsand lift top pan off.Remove 2 screws fromthe front and back andlift the top off.CapCapChimneySlipSectionTR11/TR11T/TR11-TVRound Termination CapST1175Square Termination CapTCT1175Terra CottaTermination CapFigure 3.110Chimney & Termination Cap CleaningHeatilator • Birmingham BIR42 • 4059-308 Rev C • 07/08
C. Check Firebox Molded Brick PanelFrequency: After each ash removalBy: HomeownerWARNING! Risk of Fire! Inspect fi replace molded brickpanel. Crumbling, deteriorated molded brick panel can allowoverheating of surrounding materials.Expansion and contraction will cause minor cracking of themolded brick panel. This is normal. The panel will requireperiodic replacement depending on use.The panels should be replaced if• Cracks exceed ¼ inch (6 mm) in width,• Metal is exposed behind a panel,• Large pieces of panel fall out.D. Inspect GrateFrequency: After each ash removalBy: HomeownerInspect grate for:• Warping or sagging 1-1/2 in. (38 mm) or more• Broken welds• Burn-through of grate barsFor safe operation, replace only with the approved gratefrom Hearth & Homes Technologies Inc.E. Glass CleaningFrequency: As desiredBy: HomeownerCAUTION! Handle glass assembly with care. Glass isbreakable.• Avoid striking, scratching or slamming glass• Avoid abrasive cleaners• Do not clean glass while it is hotClean glass with a non-abrasive commercially availablecleaner or ashes:• Light deposits- Use household glass cleaner• Heavy deposits- Use wood ash on damp cloth or,- Use commercial fi replace glass cleaner (consult withyour dealer)Heatilator • Birmingham BIR42 • 4059-308 Rev C • 07/0811
4Troubleshooting GuideStart Fire Problems Possible Cause SolutionCan’t get fi re startedExcessive smoke or spillageBurns too slowlySmolders, sizzlesNot enough kindling/paper or nokindling/paperDamper closed/not fully openNot enough air for fi re to igniteWood condition is too wet, too largeUse dry kindling, more paper. Arrange kindling & wood forair movement.Open damper.Check for restricted cap/shroud.Check for fl ue blockage.Pre-warm fl ue before starting fi re (refer to starting fi resection).Check for adequate vent height (refer to chimney assemblysection).Open window below the fi replace towards the wind.Open outside air doors.Use dry, seasoned wood (refer to wood fuel section).Bed of coals not established beforeadding woodFlue blockage such as birds’ nests orleaves in termination capStart with paper & kindling to establish bed of coals (refer tostarting fi re section).Have chimney inspected for creosote and cleaned by acertifi ed chimney sweep.Down draft or negative pressureCompetition with exhaust devicesDo not use exhaust fans during start-up (refer to negativepressure section).Open window below the fi replace towards the wind.Fire burns too fast Extremely dry or soft wood Mix in hardwood.Mix in less seasoned wood after fi re is established (refer towood fuel section).No glass doorsAdd glass doors to slow down air fl ow.OverdraftingCheck for correct vent height; too much vertical heightcreates overdrafting.Check location of vent termination (refer to chimneyassembly section).12Heatilator • Birmingham BIR42 • 4059-308 Rev C • 07/08
5Getting StartedA. Typical <strong>Fireplace</strong> SystemInstaller GuideTermination cap(Sections 8.I., 9.E.)Additional lateralsupport for chimneyabove roof (or enclosedin chase) if needed(Section 8.A.)Non-combustibleroof flashing maintainsminimum clearancearound chimneyStorm Collar(Section 9.E.)Chimney penetrates roofpreferably without affectingroof rafters (Section 8.H.)Support strapson rafter supportschimney (not shown)Ceiling firestopon floor of attic(Section 8.D.)Chimney system(Section 8)TransitionCombustibleframing/headeron top ofV-shapedstandoffs(spacers)(Section 6.D.)Offset/Return (with hanger straps)(Section 8.B.)<strong>At</strong>tic insulation shield (not shown) mustbe used here to keep insulation awayfrom chimney if attic is insulated(Section 8.E.)Framing headed offin ceiling joists (Section 8.D.)Enclosed space aboveand around fireplace (Section 6.B.)Mantel and surround (Section 12.E.)Decorative facingand trim (Sections 12.E., 12.G.)Figure 5.1Outside Air(both sides)Typical <strong>Fireplace</strong> SystemProtective metalhearth strip(s) (Section 7.C.)Factory-built fireplaceHearth extension(Sections 12.C., 12.D.)Heatilator • Birmingham BIR42 • 4059-308 Rev C • 07/0813
B. Design and Installation ConsiderationsNOTICE: Check building codes prior to installation.• Installation MUST comply with local, regional, state andnational codes and regulations.• Consult insurance carrier, local building inspector, fi reoffi cials or authorities having jurisdiction over restrictions,installation inspection and permits.Before installing, determine the following:• Where the fi replace is to be installed.• The vent system confi guration to be used.• Gas supply piping.• Framing and fi nishing details.• Whether optional accessories are desired.C. DraftDraft is the pressure difference needed to vent fi replacessuccessfully. When a fi replace is drafting successfully, allcombustion by-products are exiting the home through thechimney.Considerations for successful draft include:• Preventing negative pressure• Location of fi replace and chimneyNOTICE: Hearth & Home Technologies assumes noresponsibility for the improper performance of the fi replacesystem caused by:• Inadequate draft due to environmental conditions• Downdrafts• Tight sealing construction of the structure• Mechanical exhausting devices• Improper positioning of the chimney in a not-recommendedlocation on the roof.D. Negative PressureWARNING! Risk of Asphyxiation! Negative pressure cancause spillage of combustion fumes and soot. Fire mustdraft properly for safe operation.Negative pressure results from the imbalance of air availablefor the fi replace to operate properly. It can be strongestin lower levels of the house.Causes include:• Exhaust fans (kitchen, bath, etc.)• Range hoods• Combustion air requirements for furnaces, water heatersand other combustion appliances• Clothes dryers• Location of return-air vents to furnace or air conditioning• Imbalances of the HVAC air handling system• Upper level air leaks such as:- Recessed lighting- <strong>At</strong>tic hatch- Duct leaksTo minimize the effects of negative air pressure:• Ensure adequate outdoor air for all combustion appliancesand exhaust equipment• Ensure furnace and air conditioning return vents are notlocated in the immediate vicinity of the fi replace• Avoid installing the fireplace near doors, walkways or smallisolated spaces• Recessed lighting should be a “sealed can” design• <strong>At</strong>tic hatches weather stripped or sealed• <strong>At</strong>tic mounted duct work and air handler joints and seamstaped or sealed• Basement installations should be avoidedNOTICE: The fireplace provides some outside air forcombustion. Other methods may be necessary if more airis required.NOTICE: Hearth & Home Technologies Inc. recommends theuse of direct vent appliances in basements.14Heatilator • Birmingham BIR42 • 4059-308 Rev C • 07/08
F. Tools and Supplies NeededBefore beginning the installation be sure the following toolsand building supplies are available:Reciprocating saw Framing materialPliersNon-combustible sealantHammerGlovesPhillips screwdriver Framing squareFlat blade screwdriver Electric drill and bitsPlumb lineSafety glassesLevelTape measure1/2-3/4 in. length, #6 or #8 self-drilling screwsMisc. screws and nailsH. Inspect <strong>Fireplace</strong> and ComponentsWARNING! Risk of Fire and/or Explosion! Damagedparts could impair safe operation. DO NOT install damaged,incomplete or substitute components. Keep fi replacedry.• Remove fi replace from pallet.• Remove fi replace and components from packaging andinspect for damage.• Remove the transition, hearth molded brick panel, screensand grate from inside the unit.• Vent system components, doors, remaining molded brickpanels and mortar are shipped in separate packages.• Report to your dealer any parts damaged in shipment.• Read all the instructions before starting the installation.Follow these instructions carefully during theinstallation to ensure maximum safety and benefit.G. Typical <strong>Fireplace</strong> Components• Hearth Molded brick panel- Molded brick panel kit must be installed, but is soldseparately• Grate Assembly• Transition Assembly (14-11 in.)- Must be installed immediately on top of the fi replace• Outside Air Kits- Duct must be installed, but sold separately16Heatilator • Birmingham BIR42 • 4059-308 Rev C • 07/08
B. ClearancesWARNING! Risk of Fire! You must comply with all minimum air space clearances to combustibles as specifi ed in Figure6.2. DO NOT pack required air spaces with insulation or other materials.Storm CollarRoof Flashing(roof)Shaded areasrepresent2 in. (51 mm) min.air space clearancerequired around pipe(attic)(insulation)<strong>At</strong>ticInsulationShield(ceiling)2 in. (51 mm) min.Offset/Return (securedwith hanger straps)(ceiling)Ceiling FirestopMust have 2 in. (51 mm)minimum clearanceto headerTransitionFigure 6.2Combustible Object48 in.1219 mmAir Space Clearances0 in.to floor1-1/2 in. (38 mm) to back &sides of appliance(except at nailing flangeswhere it is 1/2 in. [13 mm])18Heatilator • Birmingham BIR42 • 4059-308 Rev C • 07/08
C. Sidewalls/Surrounds• Locate adjacent combustible sidewalls a minimum of 24 in. (610 mm) from fi replace opening.• Mantle leg, surround, stub wall, whether combustible or noncombustible, may be constructed as shown in Figure 6.3.Note: Grid depicts 1 inch squares.FLUSHFRONTBRICKFRONT4 in.[102 mm]42 in.[1067 mm]22 3/8 in.[568 mm] 52-7/8 in.(1343 mm)50° angle39° angle19 3/4 in.[500 mm]18 1/2 in.[470 mm]24 in.[610 mm]24 in.[610 mm]Figure 6.3Mantel Leg, Surround or Wall Projection (acceptable on both sides of opening)D. Frame the <strong>Fireplace</strong>Figure 6.4 shows typical framing using combustible materials (2x4 lumber shown).• Observe all required air space clearances to combustible materials as shown in Figure 6.2.2 in. (51 mm)min. air spaceclearancefrom chimney.Note: Framing must beextended straight up,all the way to the ceiling.Header MUST NOT be notched!CBDADD = extra space needed for outside air connection.If outside air duct has no bend, this dimension may bereduced as long as minimum clearances are met.Model # A B * C ** DBIR42 in. 53 7/8 28 3/8 74 1/2 12mm 1368 721 1892 305* If interior of chase will be drywalled, add the thickness to this meaurement.** Adjust header height for raised fl oor under fi replace.Figure 6.4Framing the <strong>Fireplace</strong>Heatilator • Birmingham BIR42 • 4059-308 Rev C • 07/0819
7Installation of <strong>Fireplace</strong>CAUTION! Risk of Cuts/Abrasions. Wear protectivegloves and safety glasses during installation. Sheet metaledges are sharp.A. Things to Consider• Location(s) of outside air kit(s)• Gas line pipingB. Position the <strong>Fireplace</strong>• Place the fi replace on a continuous fl at surface.• Follow framing instructions in Section 6.WARNING! Risk of Fire! Prevent contact with sagging,loose insulation.• DO NOT install against vapor barriers or exposedinsulation.• Secure insulation and vapor barriers.• Provide minimum air space clearances at the sidesand back of the fi replace assembly as outlined inSection 6.C. Place Protective Metal Hearth StripsWARNING! Risk of Fire! Metal hearth strips MUST beinstalled. DO NOT cover metal strips with combustiblematerials. Sparks or embers may ignite fl ooring.• Refer to Figures 7.1 and 7.2.• Locate the two metal hearth strips measuring approximately26 in. x 4 in. (660 mm x 102 mm) included with thisfi replace.• Slide each metal strip 2 in. (51 mm) under front edge offi replace.• Overlap strips in the middle of fi replace opening by 1 in(25 mm) minimum..• Metal strips must extend beyond the front and sides of thefi replace opening by at least 2 in. (51 mm).• Protect the front of a platform elevated above the hearthextension with metal strips (not included with fi replace)per Figure 7.2. See Section 12 for hearth extensionFigure 7.12 in.(51 mm)Figure 7.2Raised Platform2 in.(51 mm)1 in. (25 mm) overlapMinimumMetal strips are placed 2 in. (51 mm)under the front of the fireplace and mustextend beyond the front and sides offireplace opening by 2 in. (51 mm).Position the Protective Metal Hearth StripsTop piece must overlapbottom pieceFloorProtect the Front of an Elevated Platform1 in. (25 mm) min.overlapD. Level <strong>Fireplace</strong>• Level fi replace side-to-side and front-to-back.• Shim with non-combustible material as necessary.• Secure fi replace to framing with nailing fl anges with aminimum of two fasteners per nailing fl ange.• Check fi replace opening for square to ensure proper fi t ofglass doors. Measure diagonals of fi replace opening tomake sure they are equal.20Heatilator • Birmingham BIR42 • 4059-308 Rev C • 07/08
3 ft min. fromtop of uppermostchimney sectionto air inlet.Outside air installedon both sides (rightside not shown)Figure 7.3Outside Air Inlet LocationsNOOutlet blocked bysnow, leaves, etc.NOGarage orcombustibleliquids storageNO<strong>At</strong>tic spaceNOOutlet placedhigher than 3 ftbelow thetermination capYESClear areaoutsidehouse or inventilatedcrawl spaceFactory-builtfireplaceFigure 7.4Outside Air PlacementHeatilator • Birmingham BIR42 • 4059-308 Rev C • 07/0821
E. Install Outside Air Kit• Keep duct runs short and straight to minimizerestriction.• The outside air kits must be installed on both sides of thefi replace.WARNING! Outside air kits must be installed on bothsides of the fi replace to prevent overheating and fi re.• Locate the outside air hoods in a clear area.• Install as shown in Figures 7.3, 7.4 and 7.5.• The air ducts may be run vertically.• The outside air hoods must be at least 3 ft (.91 m) belowthe top of the uppermost chimney section.• The outside air hoods can be painted to match/accent thecolor of the structure.Figure 7.5Outside AirHoodFlexible Duct(not supplied)2 Wire TiesOutside Air InstallationCAUTION! Risk of Fire or Asphyxiation! Do not drawoutside combustion air from wall, fl oor or ceiling cavity,or enclosed spaces such as an attic or garage.• DO NOT place outside air hood close to exhaustvents or chimneys. Fumes or odor could be drawninto the room through the fi replace.• Locate outside air hood to prevent blockage fromleaves, snow/ice, or other debris. Blockages couldcause the unit to overheat.NOTICE: The fireplace provides some outside air forcombustion. Other methods may be necessary if more airis required.22Heatilator • Birmingham BIR42 • 4059-308 Rev C • 07/08
8Chimney AssemblyNOTICE: Chimney performance may vary.• Trees, buildings, roof lines and wind conditions affectperformance.• Chimney height may need adjustment if smoking oroverdraft occurs.Chimney must extendbeyond combustibleroof structureMaintain minimumheight of chimneyabove roofInstall roof flashingaccording to minimumrequirementsOffsets/returnsmay not exceed30° from verticalLock chimneysections togetherfirmly to resistmovementTermination CapAdditionalsupport fortall chimneysStorm CollarMaintain minimumclearances tocombustibles asspecifiedSupport straps for offsets(not shown) must besecured to adequate framingOffsets/returns must besecured with the screwsprovided (outer pipe only)<strong>At</strong>tic shield not shown(see Figure 6.2)Ceiling firestopsare required wherechimney passesthrough ceiling orfloorFigure 8.1 Typical Chimney System - Guidelines for Chimney System InstallationHeatilator • Birmingham BIR42 • 4059-308 Rev C • 07/0823
A. Chimney RequirementsMeasure vertical distances from the base of the fi replaceas shown in Figure 8.2.• Minimum overall straight height 18 ft (5.5 m)• Minimum height with offset/return 18.5 ft (5.64 m)• Maximum height 90 ft (27.43 m)• Maximum chimney length between an offset 20 ft (6.1 m)and return• Maximum distance between chimney35 ft (10.67 m)stabilizers• Maximum unsupported chimney length6 ft (1.83 m)between the offset and return• Maximum unsupported chimney height above 35 ft (10.67 m)the fi replace• Maximum unsupported chimney above roof 6 ft (1.83 m)WARNING! Risk of Fire! You must maintain 2 in. (51 mm)air space clearance to insulation and other combustiblematerials around the chimney system. Failure to do so maycause overheating and fi re.Determine the chimney components needed to completeyour particular installation:• Measure the total vertical height of the fireplace installationfrom the base of the fireplace assembly to the approximatelocation of the bottom of the termination cap.• Subtract the effective height of the fireplace assembly (seeFigure 8.2) from the total vertical height to determine theoverall height of the chimney installation.• Create a schematic for your application similar to Figure8.2 showing components required (referring to Table 8.1).Figure 8.1 identifi es those components and where used.• Install a ceiling firestop whenever the chimney penetratesa fl oor/ceiling.NOTICE: A maximum of one offset and return may beused.CAUTION! Risk of Fire and/or Asphyxiation! DO NOTconnect this fi replace to a chimney fl ue servicing anotherappliance. Do NOT connect to any air distribution ductor system. These actions could cause overheating/fi rein the chimney fl ue, or release of exhaust fumes into theliving areas.Table 8.1HEIGHT OF CHIMNEY COMPONENTS in. mmChimney StabilizerSL11 4-3/4 121Ceiling Firestops6 ft (1.83 m) max.unsupported chimneyabove roofFS538 0 0FS540 0 0Offsets/ReturnsSL1130 18 457Roof FlashingRF570 0 0RF571 0 0Chimney Sections*20 ft (6.10 m) max.pipe between anoffset & returnCeiling firestopSL1106 4-3/4 121SL1112 10-3/4 273SL1118 16-3/4 42535 ft (10.7 m)max. straightunsupportedchimney heightSL1136 34-3/4 883SL1148 46-3/4 1187* Dimensions reflect effective height.97 1/2 in.(2477 mm)EffectiveHeight14-11Transition18.5 ft (5.64 m)min. heightsingle offset-return90 ft (27.4 m)max. heightFigure 8.2Chimney Requirements24Heatilator • Birmingham BIR42 • 4059-308 Rev C • 07/08
B. Using Offsets/Returns• Use an offset/return to bypass overhead obstructions.• An offset and return can be used as a single entity or separated by chimney section(s).WARNING! Risk of Fire! DO NOT use offset/returns greater than 30°. Chimney draft will be restricted and could causeoverheating and fi re.• Measure the shift needed to avoid the overhead obstruction. Refer to dimension A in Figure 8.3.• Find the appropriate A dimension listed in Table 8.2.• The B dimension coinciding with the A dimension measurement in Table 8.2 represents the required vertical clearanceneeded to complete the offset/return.• Read across the chart to fi nd the number of chimney sections/model numbers needed between the offset and return.Figure 8.3AB1-1/4 in. (32 mm)OVERLAPChimney Offset/ReturnExample:Your “A” dimension from Figure 8.3 is 14 1/2 in. (368mm). Using Table 8.2 the dimension closest to, but notless than 14 1/2 in. (368 mm) is 15 3/4 in. (400 mm) usinga 30° offset/return.You determined from the table that you would need36 5/8 in. (930 mm) (Dimension “B”) between the offsetand return.The chimney component that best fi ts your application istwo SL1112s.Table 8.2ABin. mm in. mm SL1106 SL1112 SL1118 SL1136 SL11484 7/8 124 17 7/8 454 - - - - -7 1/4 184 22 559 1 - - - -9 3/4 248 26 1/8 664 2 - - - -10 1/4 260 27 1/4 692 - 1 - - -12 3/4 324 31 3/8 797 1 1 - - -13 1/4 337 32 3/8 822 - - 1 - -15 3/4 400 36 5/8 930 - 2 - - -18 1/8 460 40 3/4 1035 1 2 - - -18 3/4 476 41 3/4 1060 - 1 1 - -21 3/4 552 47 1194 - - 2 - -22 1/4 565 4 8 1219 - - - 1 -24 3/4 629 52 1/8 1324 1 - - 1 -27 3/4 705 57 3/8 1457 - 1 - 1 -28 1/4 718 58 3/8 1483 - - - - 130 3/4 781 62 1/2 1588 1 - - - 133 3/4 857 67 3/4 1721 - 1 - - 136 3/4 933 73 1854 - - 1 - 139 3/4 1010 78 1/8 1984 - - - 2 -41 1/8 1045 82 3/8 2092 1 - - 2 -45 3/4 1162 88 1/2 2248 - - - 1 148 1/8 1222 92 3/4 2356 1 - - 1 151 3/4 1314 98 7/8 2511 - - - - 2Proper assembly of air cooled chimney parts results in an overlap of chimney jointsof 1-1/4 in. (32 mm). Effective length is built into this table.Heatilator • Birmingham BIR42 • 4059-308 Rev C • 07/0825
C. Assemble Chimney SectionsWARNING! Risk of Fire! DO NOT install substitute or damagedchimney components.• Use only those components described in this manual.Substitute or damaged chimney components could impairsafe operation and cause overheating and fi re.• Support the pipe during construction and check to be sureinadvertent loading has not dislodged the chimney sectionfrom the fi replace or at any chimney joint.• <strong>At</strong>tach a straight chimney section or an offset to the topof the fi replace.• Place inner flue to the inside of the chimney section belowit. Place the outer casing outside the outer casing of thechimney section below it. Refer to Figure 8.4.NOTICE: Chimney sections cannot be disassembled oncelocked together. Plan ahead!• Lock chimney sections and/or offsets/returns together bypushing downward until the top section meets the stopbead on the lower section.• Pull on the top section to make sure it is fully engagedand will not separate.• You may use #6 or #8 sheet metal screws no longer than1/2 in. (13 mm) to fasten chimney sections together. DoNOT penetrate inner fl ue.WARNING! Risk of Fire! You MUST use screws (provided)to fasten offset/returns to chimney sections tokeep the chimney parts from twisting. Failure to do socould cause fi re.• Fasten offset/returns to chimney sections. Insert thescrews (provided) through the predrilled holes. Do NOTpenetrate inner fl ue.• Secure chimney returns with hanger straps (provided);fasten to studs or joists.• Vertical straight runs of chimney must be supported every35 ft (10.7 m).Figure 8.4Assembling Chimney Sections26Heatilator • Birmingham BIR42 • 4059-308 Rev C • 07/08
D. Install Ceiling FirestopsCAUTION! Risk of Fire! Ceiling fi restops must be usedwhenever the chimney penetrates a ceiling/fl oor.• Chase construction requires ceiling firestops at each flooror every 10 ft (3.05 m) of clear space.• The ceiling fi restop slows spread of fi re and reduces coldair infi ltration.• Install a ceiling fi restop whenever chimney penetratesceiling/fl oor.• Mark and cut an opening in ceiling as shown inFigure 8.5.• Frame the opening with the same size lumber used in theceiling joists.• Nail the ceiling fi restop to the bottom of the ceiling joistswhen there is a room above/• Use an attic insulation shield if the ceiling is insulated. Theceiling fi restop may then be attached above or below thejoists. Refer to Figure 8.6 and 8.7.ROOM ABOVE (non-insulated ceiling)BCeilng firestop frombottomATTIC ABOVE (insulated ceiling)Ceiling firestop fromtopAWARNING! Risk of Fire! DO NOT seal area betweenfi restop opening and chimney pipe except where theyenter the attic or leave the warm-air envelope of thehome (use 600° F sealant).Note: Use same dimensional lumber for framingceiling firestop and joists.ABCatalog # in. mm in. mmFS538 17 432 17 432FS540 17 432 26 660Figure 8.5Installing the Ceiling FirestopHeatilator • Birmingham BIR42 • 4059-308 Rev C • 07/0827
E. Install <strong>At</strong>tic Insulation ShieldWARNING! Risk of Fire! You MUST install an attic insulationshield when there is any possibility of insulationor other combustible material coming into contact withthe chimney.• DO NOT pack insulation between the chimney andthe attic insulation shield.• Failure to keep insulation and other materials awayfrom chimney pipe could cause fi re.• DO NOT offset chimney inside insulation shield.Bend inward90°Bend remaining tabsto rest against pipe toprevent insulationfrom falling in.Insert threescrewsInstallation of a ceiling fi restop is required• Refer to Figures 8.6 - 8.8.• Roll the shield around the chimney (if chimney is alreadyinstalled) until you have a 3 in. (76 mm) overlap and thethree holes on each side match up (large holes on top).• Insert three screws into the matching holes to form atube.• Bend three tabs on the bottom of the tube inward to 90°to maintain chimney air space as shown in Figure 8.6.• Rest the insulation shield on the ceiling fi restop below.• Bend the three short tabs at the top of the shield inwardto 90° to maintain the 2 in. (51 mm) air space from thechimney.• Bend the remaining top tabs to just meet the pipe.If you wish to make a custom shield or barrier, follow theseguidelines:• Metal is preferred, although any material stiff enough tohold back the insulation can be used.WARNING! Risk of Fire! Use of cardboard or othermaterials that can defl ect under humidity or other environmentalconditions is not recommended.• The shield or barrier must be tall enough to extend abovethe insulation and prevent blown-in insulation from spillinginto the cavity.• The shield should be affi xed to building structure.• Maintain specifi ed air spaces around chimney.• Check instructions and local codes for further details.Figure 8.6Figure 8.7Insulation13 in.(330 mm)InsulationPrepare <strong>At</strong>tic Insulation ShieldPipe6 Tabs bentin 90°Pipe6 Tabs bentin 90°3 in. (76 mm)overlapTabs bent in torest against pipe<strong>At</strong>tic Insulation Shield17 in. (432 mm)diameterCeiling FirestopInsulationInstall <strong>At</strong>tic Insulation Shield Above the CeilingPipeTabs bent in torest against pipe<strong>At</strong>tic Insulation Shield17 in. (432 mm)diameterInsulation13 in.(330 mm)PipeCeiling FirestopFigure 8.8Install <strong>At</strong>tic Insulation Shield Below the Ceiling28Heatilator • Birmingham BIR42 • 4059-308 Rev C • 07/08
F. Cut Out Hole in Roof• Refer to Figure 8.9.• Plumb from roof to center of chimney.• Drive a nail up through roof to mark center of pipe.• Measure to either side of nail and mark the 17 in. x 17 in.(432 mm x 432 mm) opening required.• Measure opening on the horizontal; actual length may belarger depending on roof pitch.• Cut out and frame opening.• Refer to Chapter 25 of the Uniform Building Code forroof framing details.G. Complete InstallationWARNING! Risk of Fire! You MUST maintain 2 in.(51 mm) air space to insulation and other combustible materialsaround the chimney system. Failure to do so couldcause overheating and fi re.• Keep chimney sections from separating or twisting.• You may secure straight chimney sections at the jointswith screws no longer than 1/2 in. (13 mm).H. Install Flashing• Slip the fl ashing over the chimney.• Nail the fl ashing to the roof. Keep gaps between fl ashingplate and roof to a minimum.NOTICE: Roofi ng shingles must be below the fl ashingplate on the lower side of a sloped roof and over thefl ashing plate on the sides and top.• Caulk the fl ashing plate and roof junction as well as thevertical seam on the fl ashing. All nail heads must becaulked with a roofi ng sealant.Figure 8.9Ceiling/<strong>At</strong>tic ConstructionHeatilator • Birmingham BIR42 • 4059-308 Rev C • 07/0829
I. Chimney Termination Requirements• Install a cap approved and listed for this fi replace system.• Locate cap where it will not become plugged by snow or other materials.• Locate cap away from trees or other structures.• The bottom of the termination cap must be at least 3 ft (.91 m) above the roof AND at least 2 ft (.61 m) above any portionof roof within 10 ft (3.05 m) as shown in Figure 8.10.• See below for distance required between caps.Slanted RoofsChimney mustextend 3 ft (.9 m)above the roofChimney must extend 2 ft (.6 m)above any portion of the roof oradjacent structures within10 ft (3 m) of the chimneyFlat RoofsChimney must extend 2 ft (.6 m)above any portion of the roof oradjacent structures within10 ft (3 m) of the chimneyChimney mustextend 3 ft (.9 m)above the roofTermination RequirementsGasTermination18 in.(457 mm)Gas, Wood or FuelOil TerminationBASeeillustrationabove for woodWoodGasFuel OilTerminationGas, Wood or FuelOil Termination20 in. min. *(508 mm)Seeillustrationabove for woodTermination Caps Staggered HeightA Gas Termination Wood or Fuel Oil TerminationB 6 in. (152 mm) min. 20 in. (508 mm) min.Termination Caps Same Height* If using decorative cap cover(s), this distance mayneed to be increased. Refer to the installation instructionssupplied with the decorative cap cover.Multiple Chimney LocationsFigure 8.10 Multiple Chimney Locations30Heatilator • Birmingham BIR42 • 4059-308 Rev C • 07/08
9Chase InstallationsA. Construct the ChaseA chase is a vertical boxlike structure built to enclose thefi replace and/or its vent system. Vertical chimneys thatrun on the outside of a building must be installed inside achase.Construction of the chase may vary with the type of building.These instructions are not substitutes for the requirementsof local building codes. Local building codes MUSTbe checked.A chase should be constructed in the manner of all outsidewalls of the home to prevent cold air drafting problems. Thechase should not break the outside building envelope inany manner. All outer walls need to be insulated.Building codes require false ceiling and ceiling fi restopsat each fl oor of the chase or every 10 ft (3.05 m) of clearspace to control spread of fi re.Walls, ceiling, base plate and cantilever fl oor at the fi rstlevel of the chase should be insulated. See Figure 9.1.Vapor and air infi ltration barriers should be installed in thechase as per regional codes for the rest of the home. Additionally,Hearth & Home Technologies recommends that theinside surfaces be sheet rocked and taped (or the use of anequivalent method) for maximum air tightness.Gas line holes and other openings should be caulked withhigh temperature caulk or stuffed with unfaced fi berglassinsulation. If the fi replace is being installed on a cementslab, we recommend that in cold climates, a sheet ofplywood or other raised platform be placed underneath toprevent conducting cold up into the room.Three examples of chase applications are shown in Figure9.2.1. <strong>Fireplace</strong> and chimney enclosed in an exterior chase.2. Chimney offset through exterior wall and enclosed in chase.3. Chase constructed on roof.Note: In cooler climates, all chase walls should be insulated.1 2 3Round Termination CapFigure 9.2Chase ConstructionsMetal Chase TopCeilingFirestopWARNING! You must install false ceilings and ceiling fi restopsat each fl oor of the chase or every 10 ft (3.05 m) tocontrol spread of fi re.WARNING! Risk of Fire! DO NOT seal area betweenfi restop opening and chimney pipe except where they enterthe attic or leave the warm-air envelope of the home (use600° F sealant).TabsInsulationFalse CeilingCeilingFirestopFalse Ceiling<strong>At</strong>ticInsulationShieldInsulationFalse CeilingChimneyInsulation in theoutside wallsof the chaseWARNING! Risk of Fire! You must maintain a minimum2 in. (51 mm) air space clearance to insulation and othermaterials surrounding the chimney system.• Insulation and other materials must be fi rmly secured toprevent accidental contact with chimney system.• Failure to prevent contact between insulation or othermaterials and chimney system may cause overheatingand fi re.Figure 9.1Chase AssemblyHeatilator • Birmingham BIR42 • 4059-308 Rev C • 07/0831
B. Install <strong>Fireplace</strong> & ChimneyInstall as per Sections 7 and 8.C. Install Chase Top• You MUST use a chase top in a chase installation. Chasetops are available from your Heatilator dealer or may befi eld constructed.• Include a turndown and drip edge to prevent water fromseeping into the chase.• Include a 2 in. (51 mm) soldered, caulked or spun collararound pipe opening to keep water out.• Provide a 1/8 in. (3 mm) gap around the fl ue pipe.• Slope the chase top downward away from the opening.CAUTION! DO NOT caulk the pipe to the chase top collar.Slope Downward(1/4 in. per footminimum)2 in. (51 mm) Collaron Chase TopTurn-downDrip EdgeChase.018 (26 ga) min.GalvanizedChase Top• Caulk all seams to prevent leaks.• Refer to Figure 9.3.Figure 9.3Chase Top Construction32Heatilator • Birmingham BIR42 • 4059-308 Rev C • 07/08
D. Install Termination CapInstall the chimney sections up through the chase enclosure.• Install termination caps following instructions providedwith them.WARNING! Risk of Fire! The minimum overlap of capto pipe (as shown in the following illustrations) MUSTbe met or chimney may separate from cap. Separationallows sparks, heat and embers to escape.NOTICE: The termination cap can be painted with a rustresistantpaint to protect against the effects of corrosionon those parts exposed to the weather.• TR11, TR11-TV Round Termination Cap• TR11T Round Telescoping Termination CapAssemblestorm collararound extendedtermination cappipeonce cap isinstalled.Caulk gaps betweenstorm collar & pipe,and storm collar& chase top.Collar2 in. (51 mm)Minimum HeightChase TopTerminationCapStormCollarDo NOTblock airholes3 clip brackets.Slip over chase collarand attach with screwsprovided.14 1/2 in. (368 mm)MaximumTerminationCapSlipstorm collararound chimney pipebefore terminationcap pipe is snappedinto the chimneypipe.Caulk gaps betweenstorm collar & pipe,and storm collar& chase top.StormCollarDo NOTblock air holes6 in. (153 mm)Minimum top ofchase to top ofchimney pipeChimneyPipeChaseTermination cap pipe and chimney section must overlap 1-1/2 in. (38 mm)Figure 9.5 Installing a TR11T Round Telescoping Termination CapCollar2 in. (51 mm)Minimum HeightChimneyPipe• ST1175 Square Termination CapChase TopChaseTermination cap pipe and chimney section must be snappedtogether to maintain an overlap of 1-1/2 in. (38 mm).Collar2 in. (51 mm)Minimum HeightChase TopTermination CapPlace waterproofcaulk or sealer undereach flange of thetermination cap andon top of each screwto help prevent leaks.Flange4 3/4 in. (121 mm)Maximumtop of chase totop ofchimney sectionFigure 9.4Installing a TR11 & TR11-TV Round Termination CapChaseChimneyPipeTermination cap pipe and chimney section must overlap 1-1/2 in. (38 mm)Figure 9.6Installing an ST1175 Square Termination CapHeatilator • Birmingham BIR42 • 4059-308 Rev C • 07/0833
• TCT1175 Terra Cotta CapCollar2 in. (51 mm)Minimum HeightChase TopTermination CapPlace waterproofsealer under eachflange of the terminationcap and on top ofeach screw to helpprevent leaks.The last section of pipemust stop between 2 in.(51 mm) above top ofchase and 7 in. (178mm) below top of chase2 in. (51 mm)7 in. (178 mm)ChaseChimneyPipeTermination cap pipe and chimney section must overlap 1-1/2 in. (38 mm)Figure 9.7Installing a TCT1175 Terra Cotta Cap34 Heatilator • Birmingham BIR42 • 4059-308 Rev C • 07/08
10 ShroudsA. Radiation Shield• Some shrouds require a radiation shield. Use wherespecifi ed.Ø 17 1/2 in. (444.5 mm) Round Hole to fit over capB. Field Constructed ShroudsWARNING! Risk of Fire! Shrouds must be constructed asspecifi ed. Improper construction may overheat chase top.• Chase top shrouds may be field constructed wherepermitted by regional building codes.NOTICE: Some regional codes require an agency-Listedshroud. Consult your local building offi cials.Figure 10.1 Radiation ShieldLength x Width to fit inside shroud3 in. (76 mm) tall legs• Hearth & Home Technologies Inc. supplies UL listedshrouds. See your dealer for details.• Different shroud designs have been tested for HearthTechnologies fireplace systems using the TR11 and TR11Ttermination caps.• The shrouds must be constructed from a minimum .018in. (26 ga) thick aluminized steel.• The wire mesh is optional but recommended and must be.018 in. thick minimum with mesh no larger than 1/2 in.(13 mm).Open Top Shroud (TR342 & TR11/TR11T caps require radiation shield)3 in (76 mm)minimumMin.Top Dim.Min.Top Dim.Min. OpeningWidthMin.Base Dim.Min.Base Dim.Min. OpeningWidthTR11/11T TR11/11T TVMin. Base Dims.in 32 x 32 26 x 26mm 813 x 813 660 x 660Radiation ShieldRequiredMin. Top Dims.in 29 x 29 23 x 23mm 737 x 737 584 x 584Min. Opening Widthin 26 x 26 20 x 20mm 660 x 660 508 x 508Figure 10.2 Open Top Shroud DimensionsHeatilator • Birmingham BIR42 • 4059-308 Rev C • 07/0835
Mailbox Style Shroud (radiation shield required)Min. Heightabove radiationshieldMin.Base Dim3 in. (76 mm)Min. Opening HeightMin. Base DimMin. Opening WidthTR11/11T TR11/11T TVMin. Base Dims.in 34 x 34 28 x 30mm 864 x 864 711 x 762Min. Height Above Radiation Shieldin 21-1/4 20-1/2mm 540 521Min. Opening Widthin 28 x 28 22 x 24mm 711 x 711 559 x 6103 in. (76 mm) Min.Radiation Shield Heightfrom top of ChaseFigure 10.3 Mailbox Style Shroud DimensionsRoofed Style Shroud (Radiation Shield Required)3 in. (76 mm)RadiationShield HeightMinimumHeight aboveRadiation ShieldTerminationCapRadiation ShieldChase TopMin. Base DimensionMinimumOpeningHeightMinimumBase DimensionMin. Opening WidthTR11/11T TR11/11T TVMin. Base Dims.in 34 x 34 34 x 34mm 864 x 864 864 x 864Min. Height Above Radiation Shieldin 16 16mm 406 406Min. Opening Widthin 28 28mm 711 711Min. Opening Heightin 12 12mm 305 305Figure 10.4 Roofed Style Shroud Dimensions36Heatilator • Birmingham BIR42 • 4059-308 Rev C • 07/08
11Installation of Molded Brick PanelA. Install Hearth Molded Brick Panel• Place hearth panel into the fi replace.B. Install Side Molded Brick Panel/Traditional• If a gas line is to be installed, remove the knockouts inthe inner fi rebox and in the outer shell on the side ofyour choice. Refer to dimension drawings for location ofknockouts and Section 13.A. for gas provisions.• Do NOT remove screen rods.• Refer to Figure 11.1.• Install lower side panel, tapered edge to the front. Alignthe front edge with the front of the column (or butted tothe surround if installed).• Install two T-brackets stem down into mortar line, do nottighten.• Install upper side panel in the unit, tapered edge tothe front. Position the bottom of panel behind the T-brackets.• Install two T-brackets stem up into mortar lines, one onits side on the front edge, do not tighten.• Install two Z-brackets in the mortar lines across the top.Tighten these and all previously installed brackets.• Install second side panel following the steps above.Note: Use T-brackets as templates and drill pilotholes into the inner shell with the drill bit provided.Side panels must be installed fi rst.C. Install Back Molded Brick Panel/Traditional• Refer to Figure 11.1.• Set the grate brackets in place, 26.5 in. (673 mm) centerto center.• Install the lower back panel. Center from side to side.• Install three T-brackets stem down into mortar line to holdlower back in position. Do not tighten.• Install upper back panel. Position bottom of panel behindthe previously installed T-brackets.• Install two T-brackets stem side up into mortar line, do nottighten• Install two Z-brackets in the mortar lines across the top.Tighten these and all previously installed brackets.FrontUpper SideMolded Brick PanelUpper BackMolded Brick PanelRight SideMolded Brick Panelremoved forclarityLower SideMolded Brick PanelLower BackMolded Brick PanelHearth Molded Brick PanelFigure 11.1 Traditional Molded Brick PanelHeatilator • Birmingham BIR42 • 4059-308 Rev C • 07/0837
D. Install Side Molded Brick Panel - Herringbone• If a gas line is to be installed, remove the knockouts inthe inner fi rebox and in the outer shell on the side ofyour choice. Refer to dimension drawings for location ofknockouts and Section 13.A. for gas provisions.• Do NOT remove screen rods.• Refer to Figure 11.2.• Install lower side panel, tapered edge to the front. Alignthe front edge with the front of the column (or butted tothe surround if installed).• Install two T-brackets stem down into mortar line, do nottighten.• Install upper side panel in the unit, tapered edge tothe front. Position the bottom of panel behind the T-brackets.• Install two T-brackets stem up into mortar lines, one Y-bracket on the front edge as shown. Do not tighten.• Install two Z-brackets in the mortar lines across the top.Tighten these and all previously installed brackets.• Install second side panel following the steps above.Note: Use T-brackets as templates and drill pilot holes intothe inner shell with the drill bit provided. Side panels mustbe installed fi rst.E. Install Back Molded Brick Panel - Herringbone• Refer to Figure 11.2.• Set the grate brackets in place, 26.5 in. (673 mm) centerto center.• Install the lower back panel. Center from side to side.• Install two T-brackets stem down into mortar line to holdlower back in position. Do not tighten.• Install upper back panel. Position bottom of panel behindthe previously installed T-brackets.• Install three T-brackets stem side up into mortar line, donot tighten• Install two Z-brackets in the mortar lines across the top.Tighten these and all previously installed brackets.FrontUpper SideMolded Brick PanelUpper BackMolded Brick PanelLower BackMolded Brick PanelLower SideMolded Brick PanelGrate BracketsHearth Molded Brick PanelFigure 11.2 Herringbone Molded Brick Panel38Heatilator • Birmingham BIR42 • 4059-308 Rev C • 07/08
F. Install MortarNote: Mortar is applied after facing materialsare installed.Tools Required:Mortar bagDrillTrowel3/32 drill bit (provided)Mixing bucketPhillips screwdriverSponge or spray bottle Joint striker Drill with mixing attachment (optional)Bucket of waterThe mortar material provided should be suffi cient to completethe installation of the molded brick panels withoutconsiderable waste.• Mix approximately 1/3 of the mortar material with 1/2gallon of water in the mixing bucket. Stir the mixture withthe mixing attachment and drill. The consistency shouldallow the material to be squeezed from the mortar bag butnot too runny.• Fill the mortar bag with the prepared mixture.• Apply mortar by squeezing the material from the mortarbag into the joint lines. If fi lling a vertical line, start from the top and work down. Apply slowly. Mixture should befl ush or higher than the panel surface.• Mix more material as necessary to fi nish the job and thenlet the unit set until fi rm, may take two hours or more.• Thoroughly clean the bag, tools and mixing bucket.• Use a joint striker and strike the material in the joints. Theexcess material should fall off somewhat dry.• Sweep the loose material off the fl oor of the unit.•Final cleanup with sponge and water.• VERY IMPORTANT: Allow the mortar 72 hours to curebefore operating the fireplace.Mortar will be applied afterfinishing material isinstalled. Mortar will beapplied between finishingmaterials and moldedbrick edges, bottom andsides.The seam betweenfinishing materials andfirebox top must be sealedwith non-combustiblesealant.The noncombustible finishingmaterial across the top offireplace opening will be evenwith lower edge of metal face.Noncombustible finishingmaterials MUST overlapside faces by 1 1/4 in. (32 mm)to cover the edges of thepanels. Finished openingshould be 38 x 42 in. (965 x1067 mm) to allow for doorinstallation.The surface of the finished hearth extension andthe surface of the hearth panel should be level.Figure 11.3 Facing Materials and MortarG. Install Screens• Remove one screen rod by removingone screw (near the center of the topfront). Pull rod out of the hole. Keepthe screw.• Lay one screen panel flat and slide theround end of the rod through the ringsstarting at the handle side of screen.Leave the last ring off the rod.• Insert the rod through the hole in thebracket. Slip the last ring over the rodon the other side of the bracket.• Fasten the fl at end of the screen rodback in place using the screw removedearlier.• Repeat for the other screen panel.Round end of Rod through rings,then into Screen Rod ClipCenter of <strong>Fireplace</strong> OpeningFigure 11.4 Install ScreensTop of <strong>Fireplace</strong>InsideFireboxRod ScreenClipHeatilator • Birmingham BIR42 • 4059-308 Rev C • 07/0839
12 FinishingA. Non-Combustible Materials• Materials which will not ignite and burn, composed of anycombination of the following:- Steel - Iron- Brick - Tile- Concrete - Slate- Glass - Plasters• Materials reported as passing ASTM E 136, StandardTest Method for Behavior of Metals, in a Vertical TubeFurnace at 750° CB. Combustible Materials• Materials made of or surfaced with any of the followingmaterials:- Wood - Compressed paper- Plant fi bers - Plastic• Any material that can ignite and burn; fl ame proofed ornot, plastered or un-plastered• You MUST use a hearth extension with this fi replace.• This fi replace has been tested and approved for use witha hearth extension insulated to a minimum R value of2.32.• The hearth extension material MUST be covered with tile,stone or other non-combustible material.• Manufactured hearth materials will usually have a publishedR value (resistance to heat) or k value (conductivity ofheat). Refer to the formula in Table 12.1 to convert a kvalue to an R value,• Refer to Table 12.2 for hearth extension insulationalternatives.C. Hearth ExtensionWARNING! Risk of fire! High temperatures, sparks, embersor other burning material falling from the fi replace mayignite fl ooring or concealed combustible surfaces.• Metal hearth strips MUST be installed (Section 7.C.).• Hearth extensions MUST be installed exactly asspecifi ed.Table 12.1R = 1/k x inches of thickness12 in.(305 mm)66 in.(1676 mm)(R value of hearth must beequal to or greater than 2.32)42 in.(1067 mm)Figure 12.1 Hearth Extension Dimensions12 in.(305 mm)20 in. (508 mm)MinimumTable 12.2Hearth Extension Insulation Alternatives-Total minimum R Value must equal 2.32Materialk per inchthickR per inchthickMinimum thickness requiredHearth & Home HX3, HX4 (Micore 300) 0.49 2.06 1 in. (25.4 mm)USG Micore 160 0.39 2.54 1 in.(25.4 mm)USG Durock Cement Board 1.92 0.52 4 in. (101.6 mm)Cement Mortar 5.0 0.20 10 in. (254 mm)Common Brick 5.0 0.20 10 in. (254 mm)Ceramic Tile 12.50 0.08 25-3/4 in. (654 mm)Armstrong Privacy Guard Plus 0.46 2.18 1 in. (25.4 mm)Marble 14.3 to 20.0 0.07 to 0.05 29-1/2 to 41 in. (749.3 to 1041.4 mm)40Heatilator • Birmingham BIR42 • 4059-308 Rev C • 07/08
Non-combustible SealantAfter completing the framing and applying the facing materialsover the framing, a bead of non-combustible sealantmust be used to close off any gaps at the top and sidesbetween the fi replace and hearth.Non-combustible SealantFigure 12.6 Place Non-combustible SealantFlush Hearth Extension FramingRefer to Figures 12.7 and 12.8.The bottom of the fireplace opening is3-3/4 in. (95.3mm) above the bottom ofthe fireplace. Finished hearth must NOTextend above this level.Bottom of<strong>Fireplace</strong> OpeningFinishedFloor30 in. Min.Hearth ExtensionFigure 12.7 Flush Hearth Extension1 in. (25.4 mm)MicoreNoncombustible Finishing MaterialProtective MetalHearth StripFigure 12.8 Flush Hearth Extension Side View42Heatilator • Birmingham BIR42 • 4059-308 Rev C • 07/08
D. Finishing MaterialRefer to Sections 12.A. and Sections 12.B. for combustible/noncombustiblematerials. Refer to Figure 12.10 fornoncombustible zone.WARNING! Risk of Fire! You must maintain clearances.• Use only non-combustible framing material belowstandoffs.• Sheetrock, wood or other combustibles must NOT be usedas sheathing or facing in the noncombustible zone.• DO NOT cover metal fi replace front with combustiblematerials.• Install combustible materials only to specifi ed clearanceson top front and side edges.These surfacesmay be coveredwith non-combustiblematerial.Non-combustiblesealant.• Complete framing and apply facing material (drywall) overframing.• A bead of 300-deg F minimum non-combustible sealantmust be used to close off any gaps at the top and sidesbetween the fireplace and facing to prevent cold airleaks.• Large gaps can be bridged with fi berglass rope gasket.• Only non-combustible materials may be used to cover themetal fi replace front.Figure 12.9 Noncombustible FacingNote: Mortar is applied after facing materialsare installed. Refer to Section 11.F.Finished combustible wall2 x 4 stud wall2 x 4 header, flush withfront of stand-offsCombustible materialNon-combustibledecorative facing(up to full brick depth)Continuous,non-combustible sealantTile, stone or othernon-combustible materialHearthRefractoryBottom of fireplace openingand finished hearth may bethe same height1 in. Micoreor equivilentinsulation &1/2 in. DurockMetal strips are placed 2 in. (51 mm)under the front of the fireplace and mustextend beyond the front and sides offireplace opening by 2 in. (51 mm)Floor constructed of wood orother combustible materialFigure 12.10 Decorative FacingHeatilator • Birmingham BIR42 • 4059-308 Rev C • 07/0843
E. Combustible Mantel• See Figure 12.11.• A combustible mantel may be positioned no lower than 22 in. (508 mm) above the top of the fi replace opening.• A combustible mantel may have a maximum depth of 12 in. (305 mm).• Combustible trim and mantels cannot be placed within 6 in. (152 mm) of the fi replace opening (sides).• Combustible materials projecting more than 1-1/2 in. (38 mm) shall not be placed within 12 in. (305 mm) from the top ofthe fi replace opening.• Combustible trim must not cover the metal surfaces of the fi replace.• Mantel clearance is in accordance with Section 7-3.3.3 of ANSI/NFPA211.Combustible Wall7 ft (2134 mm)minimumfloor to ceilingNoncombustible Decorative Facing2 x 4 stud headerStandoffs12 in./305 mm MAXIMUM22 in./559 mm MINIMUMMeasured from top of fireplace openingSeal joint withnon-combustible sealantFigure 12.11 Clearances to Mantels or other Combustibles above <strong>Fireplace</strong>44Heatilator • Birmingham BIR42 • 4059-308 Rev C • 07/08
F. Sidewalls/Surrounds• Adjacent combustible sidewalls must be located aminimum of 24 in. (305 mm) from the fi replace opening.• Combustible mantel legs, surrounds and stub walls maybe constructed per Figure 12.12.18 1/2 in.[470 mm]BRICKFRONT4 in.[102 mm]19 3/4 in.[500 mm]39° angleNote: Grid depicts 1 inch squares.FLUSHFRONT42 in.[1067 mm]22 3/8 in.[568 mm] 52-7/8 in.(1343 mm)24 in.[610 mm]50° angle24 in.[610 mm]Figure 12.12 Combustible Mantel Leg or Wall Projections (Acceptable on both sides of opening)Heatilator • Birmingham BIR42 • 4059-308 Rev C • 07/0845
13 AccessoriesA. Gas Log/Lighter ProvisionWARNING! Fire and/or Asphyxiation Risk! Use with solidwood fuel or decorative gas appliance only. Gas fi re generatesfumes.• DO NOT install unvented gas logs• Damper must be locked fully open when gas logs areinstalledA certifi ed gas log lighter or decorative gas log set can beinstalled in this fi replace.• Maximum input is 150,000 BTU/hr.• Decorative gas appliance must be certified to ANSI Z21.60“Standard for Decorative Gas Appliances for Installationin Vented <strong>Fireplace</strong>s”.• Must be installed in accordance with the National FuelGas Code, ANSI Z223.1.• A gas log set must incorporate a gas shutoff.• Gas log set requires the damper to be locked fully open. • A listed automatic damper system with safety interlock maybe used in this fireplace with only compatible, listed gas logsets. See damper system manufacturer’s instructions.• Knockouts are provided on both sides of the fi replace for1/2 in. (13 mm) iron pipe.• A locating dimple (see Figure 13.2) is located on both sidesof the fi replace in the molded brick panels for drilling a 1in. (25 mm) diameter hole for installation of a gas line.After the panel is installed, drill the hole for the gas line.• Seal panel around pipe with fi replace mortar or a hightemperature, noncombustible sealant.B. Wood Burning InsertsWARNING! Risk of Fire! Improper installation of woodinserts may cause fi replace or chimney system to overheat.If a wood burning insert is being installed in this fi replace,Hearth & Home Technologies recommends full reline of thechimney.• Cooling air openings at the top of the chimney must notbe obstructed in any manner.• Hearth & Home Technologies recommends securing thereline at the top of the flue and using the cap certifi ed foruse with this fi replace system.RefractoryFireboxSeal withfireplace mortaror non-combustiblesealantGas LineRepackInsulationKnockoutOuter Shellof <strong>Fireplace</strong>Maintain air clearanceto combustibles.Gas Line4 in.(102 mm)Figure 13.1 Gas Line InstallationCombustibleMaterials1 1/2 in. (38 mm)air space aroundpipeCombustible materialsmay be located at zeroclearance to gas linebeyond 4 in. (102 mm)from fireplace side.Gas LineDimpleGas LineDimpleFigure 13.2 Gas Line Dimples46Heatilator • Birmingham BIR42 • 4059-308 Rev C • 07/08
14Reference MaterialsA. <strong>Fireplace</strong> Dimensions37 1/8 in.943 mm11 in.281 mm74° TYP.27 1/2 in.699 mm97 1/2in.2477 mm74 1/8 in.1883 mmGas LineKnockout54 in.1372 mm70 3/4 in.1797 mmGas LineKnockout5 in.129 mm6 7/8 in.175 mm38 in.965 mm6 7/8 in.175 mm5 in.129 mm16 1/8 in.408 mm11 1/8 in.282 mm42 in.1067 mm52 7/8 in.1343 mm3 3/4 in.97 mm11 1/8 in.282 mm16 1/8 in.408 mmHeatilator • Birmingham BIR42 • 4059-308 Rev C • 07/0847
B. Optional Components66 in.(1676 mm)20 in.(508 mm)HX4 Hearth Extension1/2 in.(13 mm)ID6 Insulated Duct42 in.(1067 mm)6 in. (152.4 mm) i.d.DFG4042 Series Glass Doors(optional)DFS4042 Series Screen Doors(optional)UD6 Uninsulated Duct42 in.(1067 mm)6 in. (152.4 mm) i.d.See your Heatilator dealer for a complete list of optional components.48Heatilator • Birmingham BIR42 • 4059-308 Rev C • 07/08
C. Chimney ComponentsThe following pictures show only those chimney components which may be safely used with this fi replace.Catalog # DescriptionSL1106 Chimney Section - 6 in. (152 mm) longSL1112 Chimney Section - 12 in. (305 mm) longSL1118 Chimney Section - 18 in. (457 mm) longSL1136 Chimney Section - 36 in. (914 mm) longSL1148 Chimney Section - 48 in. (1219 mm) longSL11 Chimney StabilizerSL1130 Chimney Offset/Return - 30 degFS538 Ceiling Firestop - StraightFS540 Ceiling Firestop - 30 degAS10 SL1100 Straight <strong>At</strong>tic Insulation Shield, 24 in. (610 mm)JB577 Chimney Joint BandCB576 Chimney BracketRF570 Roof Flashing - Flat to 6/12 PitchRF571 Roof Flashing - 6/12 to 12/12 PitchTR11 Round Termination CapTR11T Round Telescoping Termination CapTR11TV Round Telescoping Termination Cap-Top VentTCT1175 Terra Cotta Termination CapST1175 Square Termination CapCT56 Chase TopLDS33 Decorative Shroud - 3 ft x 3 ft (.91 m x .91 m)LDS46 Decorative Shroud - 4 ft x 6 ft (1.22 m x 1.83 m)LDS-BV Decorative Shroud - 26 in. x 26 in. (660 mm x 660 mm)Field Constructed Shrouds (See “Woodburning TerminationCap”)CT-11A Adapter-May be used with the following copper capsCT-KingCT-QueenCT-Bishop ICT-Bishop IICT-Knight ICT-Pawn11 in.(279 mm)AChimney SectionsABCatalog # in mm in mmSL1106 6 152 4-3/4 121SL1112 12 305 10-3/4 273SL1118 18 457 16-3/4 425SL1136 36 914 34-3/4 883SL1148 48 1219 46-3/4 1187BA = Actual LengthB = Effective Length (length ofchimney part after it hasbeen snapped to another)20-3/4 in.(527 mm)InsideDiameter11 in.(279 mm)Outside Diameter13 in.(330 mm)13 in.(330 mm)SL11 Vent StabilizerHeatilator • Birmingham BIR42 • 4059-308 Rev C • 07/0849
InsideDiameter11 in.(279 mm)A21 in.(533 mm)OutsideDiameter13 in.(330 mm)B17 in. (432 mm)SL1130 Offset/ReturnCatalog # A BFS538 0-deg. 17 in. 432 mmFS540 30-deg. 26 in. 660 mmAssembledDiameter: 17 in./432 mmHeight: 24 in./610 mm15-1/4 in.(387 mm)AS10 Straight <strong>At</strong>tic Insulation Shield13 in.(330 mm)2 in.(51 mm)29 in.(737 mm)25-1/4 in.(641 mm)RF570 Roof FlashingJB577 Chimney Joint Band15-1/4in.(387 mm)13 in.(330 mm)CB576 Chimney Joint Band39-7/8 in.(1013 mm)28 in.(711 mm)RF571 Roof Flashing50 Heatilator • Birmingham BIR42 • 4059-308 Rev C • 07/08
15-3/4 in.(400 mm)31-3/4 in.(806 mm)TR11 - Round Termination Cap34-5/8 in.(879 mm)32-3/8 in.(822 mm)TR11-TV - Round Termination Cap34-3/8 in.(873 mm)TR11T - Round Telescoping Termination CapTR-TVK14-3/4 in.(375 mm)10 3/4 in.23 in.(584 mm)23 in.(584 mm)ST1175 - Square Termination Cap26 in.20 in.(508 mm)17 in.(432 mm)9-3/8 in.(238 mm)CT11-A Adapter9-1/4 in.(235 mm)TCT1175 - Terra Cotta CapHeatilator • Birmingham BIR42 • 4059-308 Rev C • 07/0851
13-3/8 in.(340 mm)72 in.(1829 mm)36 in.(914 mm)2 in.(51 mm)CT56 Chase TopEDCBALDS-BV Decorative ShroudCatalog # A B C D Ein. 26 12-1/2 15-1/2 22 23LDS-BVmm 660 318 394 533 58452 Heatilator • Birmingham BIR42 • 4059-308 Rev C • 07/08
This page intentionally left blank.Heatilator • Birmingham BIR42 • 4059-308 Rev C • 07/0853
D. Service PartsService PartsBIR421 234576891110171923131822121615211411201154Heatilator • Birmingham BIR42 • 4059-308 Rev C • 07/08
Service PartsBIR42IMPORTANT: THIS IS DATED INFORMATION. When requesting service or replacementparts for your appliance please provide model number and serial number. All parts listedin this manual may be ordered from an authorized dealer.ITEM DESCRIPTION SERIAL # PART NUMBERStockedat Depot1 Transition Assembly 4059-044 N2 Outer Transiton Assembly 24377 N3 Inner Transiton Collar 4059-148 N4 Damper Blade Assembly 4059-030 N5 Damper Control 35159 N6 Outside Air Collar Assembly Qty 2 req 4059-037 N7 OA Door Qty 2 req 4059-049 N8 Screen Rod Qty 2 req 4059-312 YScreen Rod Clips Qty 2 req 4059-111 N9 Firescreen Assembly Qty 2 req 4059-028 Y10 Grate Assembly GR29 N11 Hearth Molded Brick Panel 4059-033 NTraditional Molded Brick Panel12 Lower Left Panel 4059-350 N13 Upper Left Panel 4059-351 N14 Lower Right Panel 4059-352 N15 Upper Right Panel 4059-353 N16 Lower Rear Panel 4059-354 N17 Upper Rear Panel 4059-355 NHerringbone Molded Brick Panel18 Lower Left Panel 4059-357 N19 Upper Left Panel 4059-358 N20 Lower Right Panel 4059-359 N21 Upper Right Panel 4059-360 N22 Lower Rear Panel 4059-361 N23 Upper Rear Panel 4059-362 NRefractory Fastener PackContains:25 #6 X 1 1/2” Panhead screw, 3/32” Drill Bit, 17T- Brackets, 2 Y-Brackets, 6 Clips,4059-043 NMortar 25 LB Box 4059-316 NOutside Air Hood Qty 2 req 4059-051 NHeatilator • Birmingham BIR42 • 4059-308 Rev C • 07/0855
E. Contact InformationHearth & Home Technologies Inc.1915 W. Saunders StreetMt. Pleasant, Iowa 52641www.heatilator.comPlease contact your Heatilator dealer with any questions or concerns.For the number of your nearest Heatilator dealer, please visit www.heatilator.com.– NOTES –• Important operatingand maintenanceinstructions included.CAUTIONDO NOT DISCARD THIS MANUAL• Read, understandand follow theseinstructions for safeinstallation andoperation.• Leave this manual withparty responsible foruse and operation.DO NOTDISCARDThis product may be covered by one or more of the following patents: (United States) 4593510, 4686807, 4766876,4793322, 4811534, 5000162, 5016609, 5076254, 5113843, 5191877, 5218953, 5263471, 5328356, 5341794, 5347983,5429495, 5452708, 5542407, 5601073, 5613487, 5647340, 5688568, 5762062, 5775408, 5890485, 5931661, 5941237,5947112, 5996575, 6006743, 6019099, 6048195, 6053165, 6145502, 6170481, 6237588, 6296474, 6374822, 6413079,6439226, 6484712, 6543698, 6550687, 6601579, 6672860, 6688302B2, 6715724B2, 6729551, 6736133, 6748940,6748942, 6769426, 6774802, 6796302, 6840261, 6848441, 6863064, 6866205, 6869278, 6875012, 6880275, 6908039,6919884, D320652, D445174, D462436; (Canada) 1297749, 2195264, 2225408, 2313972; (Australia) 780250, 780403,1418504 or other U.S. and foreign patents pending.56Heatilator • Birmingham BIR42 • 4059-308 Rev C • 07/08