SuperDuct Four-Wire Duct Smoke Detector - UTCFS Global Security ...
SuperDuct Four-Wire Duct Smoke Detector - UTCFS Global Security ...
SuperDuct Four-Wire Duct Smoke Detector - UTCFS Global Security ...

You also want an ePaper? Increase the reach of your titles
YUMPU automatically turns print PDFs into web optimized ePapers that Google loves.
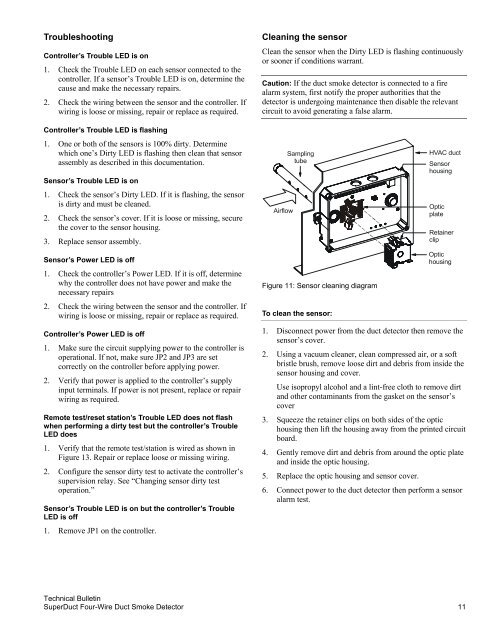
TroubleshootingController’s Trouble LED is on1. Check the Trouble LED on each sensor connected to thecontroller. If a sensor’s Trouble LED is on, determine thecause and make the necessary repairs.2. Check the wiring between the sensor and the controller. Ifwiring is loose or missing, repair or replace as required.Controller’s Trouble LED is flashing1. One or both of the sensors is 100% dirty. Determinewhich one’s Dirty LED is flashing then clean that sensorassembly as described in this documentation.Sensor’s Trouble LED is on1. Check the sensor’s Dirty LED. If it is flashing, the sensoris dirty and must be cleaned.2. Check the sensor’s cover. If it is loose or missing, securethe cover to the sensor housing.3. Replace sensor assembly.Sensor’s Power LED is off1. Check the controller’s Power LED. If it is off, determinewhy the controller does not have power and make thenecessary repairs2. Check the wiring between the sensor and the controller. Ifwiring is loose or missing, repair or replace as required.Controller’s Power LED is off1. Make sure the circuit supplying power to the controller isoperational. If not, make sure JP2 and JP3 are setcorrectly on the controller before applying power.2. Verify that power is applied to the controller’s supplyinput terminals. If power is not present, replace or repairwiring as required.Remote test/reset station’s Trouble LED does not flashwhen performing a dirty test but the controller’s TroubleLED does1. Verify that the remote test/station is wired as shown inFigure 13. Repair or replace loose or missing wiring.2. Configure the sensor dirty test to activate the controller’ssupervision relay. See “Changing sensor dirty testoperation.”Sensor’s Trouble LED is on but the controller’s TroubleLED is off1. Remove JP1 on the controller.Cleaning the sensorClean the sensor when the Dirty LED is flashing continuouslyor sooner if conditions warrant.Caution: If the duct smoke detector is connected to a firealarm system, first notify the proper authorities that thedetector is undergoing maintenance then disable the relevantcircuit to avoid generating a false alarm.AirflowSamplingtubeFigure 11: Sensor cleaning diagramTo clean the sensor:HVAC ductSensorhousingOpticplateRetainerclipOptichousing1. Disconnect power from the duct detector then remove thesensor’s cover.2. Using a vacuum cleaner, clean compressed air, or a softbristle brush, remove loose dirt and debris from inside thesensor housing and cover.Use isopropyl alcohol and a lint-free cloth to remove dirtand other contaminants from the gasket on the sensor’scover3. Squeeze the retainer clips on both sides of the optichousing then lift the housing away from the printed circuitboard.4. Gently remove dirt and debris from around the optic plateand inside the optic housing.5. Replace the optic housing and sensor cover.6. Connect power to the duct detector then perform a sensoralarm test.Technical Bulletin<strong>Super<strong>Duct</strong></strong> <strong>Four</strong>-<strong>Wire</strong> <strong>Duct</strong> <strong>Smoke</strong> <strong>Detector</strong> 11