Applied aeronautics; the airplane - Beeldbibliotheek
Applied aeronautics; the airplane - Beeldbibliotheek
Applied aeronautics; the airplane - Beeldbibliotheek
- No tags were found...

You also want an ePaper? Increase the reach of your titles
YUMPU automatically turns print PDFs into web optimized ePapers that Google loves.
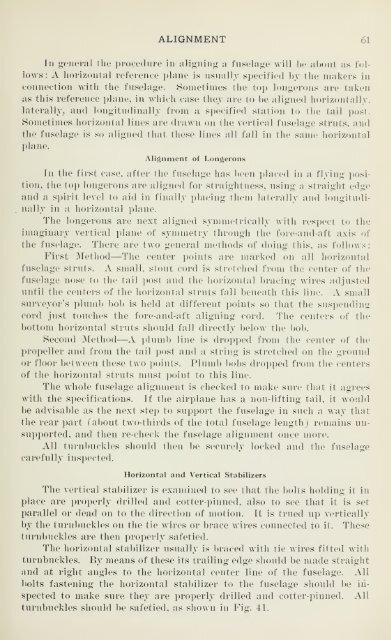
:ALIGNMENT 61In general <strong>the</strong> procedni'e in aligning a fuselage will lie about as follows:A horizontal reference plane is nsnally specified by <strong>the</strong> makers inconnection with <strong>the</strong> fuselage. Sometiuies <strong>the</strong> top longerons are takenas this reference plane, in which case <strong>the</strong>y are to be aligned horizontally,laterally, and longitudinally from a specified station to <strong>the</strong> tail post.Sometimes horizontal lines are drawn on <strong>the</strong> vertical fuselage struts, and<strong>the</strong> fuselage is so aligned that <strong>the</strong>se lines all fall in <strong>the</strong> same horizontalplane.Alignment of LongeronsIn <strong>the</strong> first case, after <strong>the</strong> fuselage has been placed in a flying position,<strong>the</strong> top longerons are aligned for straightness, using a straight edgeand a spirit level to aid in finally placing <strong>the</strong>m laterally and longitudinallyin a liorizontal plane.The longerons are next aligned symmetrically with respect to <strong>the</strong>imaginai'y vertical plane of symmetry through <strong>the</strong> fore-and-aft axis of<strong>the</strong> fuselage. There are two general methods of doing this, as followsFirst Method—The center points are mai'ked on all horizontalfuselage struts. A small, stout cord is stretched from <strong>the</strong> center of <strong>the</strong>fuselage nose to <strong>the</strong> tail post and <strong>the</strong> horizontal bracing wires adjusteduntil <strong>the</strong> centers of <strong>the</strong> horizontal struts fall beneath this line. A smallsurveyor's plumb bob is held at different points so that <strong>the</strong> suspendingcord just touches <strong>the</strong> fore-and-aft aligning cord. The centers of <strong>the</strong>bottom horizontal struts should fall directly below <strong>the</strong> bob.Second Method—A plumb line is dropped from <strong>the</strong> center of <strong>the</strong>propeller and from <strong>the</strong> tail post and a string is stretched on <strong>the</strong> groundor floor between <strong>the</strong>se two points. Plumb bobs dropped from <strong>the</strong> centersof <strong>the</strong> horizontal struts must point to this line.The whole fuselage alignment is checked to make sure that it agreeswith <strong>the</strong> specifications. If <strong>the</strong> <strong>airplane</strong> has a nou-liftiug tail, it wouldbe advisable as <strong>the</strong> next step to support <strong>the</strong> fuselage in such a way that<strong>the</strong> rear part (about two-thirds of <strong>the</strong> total fuselage length) remains unsupported,and <strong>the</strong>n re-check tlie fuselage alignment once more.All turnbuckles should <strong>the</strong>n be securely locked and <strong>the</strong> fuselagecarefully inspected.Horizontal and VerticalStabilizersThe vertical stabilizer is examined to see that tlie bolts holding it inplace are properly drilled and cotter-pinned, also to see that it is setparallel or dead on to <strong>the</strong> direction of motion. It is trued up verticallyby <strong>the</strong> turnbuckles on <strong>the</strong> tie wires or brace wires connected to it. Theseturnbuckles are <strong>the</strong>n properly safetied.The horizontal stabilizer usually is braced with tie wires fitted withturnbuckles. By means of <strong>the</strong>se its trailing edge should be made straightand at right angles to <strong>the</strong> horizontal center line of <strong>the</strong> fuselage. Allbolts fastening <strong>the</strong> horizontal stabilizer to <strong>the</strong> fuselage should be inspectedto make sure <strong>the</strong>y are properly drilled and cotter-pinned. Allturnbuckles should be safetied, as shown iu Fig. 41.