Iris V1.1 Baseboard - Toradex
Iris V1.1 Baseboard - Toradex
Iris V1.1 Baseboard - Toradex

Create successful ePaper yourself
Turn your PDF publications into a flip-book with our unique Google optimized e-Paper software.
<strong>Iris</strong> <strong>V1.1</strong> <strong>Baseboard</strong>Datasheet
<strong>Iris</strong> Carrier Board DatasheetRevision HistoryDate Doc. Rev. <strong>Iris</strong> Version Changes20-Jan-11 Rev. 0.9 V1.0 Preliminary Release24-Mar-11 Rev. 0.91 V1.0 FF RS-232 header (X13), chapter 2.2.910 –May-11 Rev. 1.0 <strong>V1.1</strong> Transition to <strong>Iris</strong> 1.1Various chapters: the <strong>Iris</strong> assembly image have been updatedChapter 2.1: the connector X5 has been eliminated, name changed forX18, X6 to JP1 and JP2 respectively.Chapter 2.2.3: “LVDS Power Jumper (X5)” eliminated. All the otherchapters’ numbers have been updated accordingly.Chapter 2.2.3: Jumper name changed from X6 to JP2Chapter 2.2.4: the LVDS connector pin-out has been modified.Chapter 2.2.13: Jumper name changed from X18 to JP1Chapter 2.4.2: Pin-out changes in the connector X3Chapter 4: correction in the assembly option table15-Sep-11 Rev. 1.1 <strong>V1.1</strong> Chapter 2.2.13: SD boot assembly option informationChapter 4: SD boot assembly option information added to the table andto the pictureChapter 8: RoHS Compliance information addedVarious corrections14-Oct-11 Rev. 1.2 <strong>V1.1</strong> Chapter 1.2.3: correction in the maximum power provided by the 3.3Vpower railChapter 2.1: added the information about the RTC batteries supported14-Nov-11 Rev. 1.3 <strong>V1.1</strong> Changed Disclaimer09-Jan-13 Rev. 1.4 <strong>V1.1</strong> Updated links to <strong>Toradex</strong> websites<strong>Toradex</strong> AG l Altsagenstrasse 5 l 6048 Horw l Switzerland l +41 41 500 48 00 l www.toradex.com l info@toradex.com Page | 2
<strong>Iris</strong> Carrier Board DatasheetContents1. Introduction ..................................................................................................................... 51.1. Reference Documents ................................................................................................................. 51.1.1 Colibri Computer Modules ............................................................................................... 51.1.2 Colibri modules migration guide ...................................... Error! Bookmark not defined.1.2. Features ....................................................................................................................................... 51.2.1 Overview .......................................................................................................................... 51.2.2 Block Diagram ................................................................................................................. 61.2.3 Power Supply .................................................................................................................. 61.2.4 Installation ....................................................................................................................... 62. <strong>Iris</strong> Interfaces .................................................................................................................. 72.1. Top Side Connectors: Physical Drawing ...................................................................................... 72.2. Top Side Connectors: Pin Assignments ...................................................................................... 82.2.1 Colibri SODIMM Connector (X1) ..................................................................................... 82.2.2 DVI-I Connector (X4) ....................................................................................................... 82.2.3 Central Tab Jumper (JP2) ............................................................................................... 92.2.4 LVDS Connector (X7)...................................................................................................... 92.2.5 Audio Header (X9)......................................................................................................... 102.2.6 USB Micro A/B (X12)..................................................................................................... 102.2.7 USB Type A (X11) ......................................................................................................... 102.2.8 FF RS-232 header (X13) ............................................................................................... 102.2.9 STD/BT RS-232 header (X14) ...................................................................................... 102.2.10 Ethernet connector (X15) .............................................................................................. 112.2.11 Extension Connector (X16) ........................................................................................... 112.2.12 Power Supply connector (X17)...................................................................................... 132.2.13 Boot Mode header (JP1) ............................................................................................... 132.2.14 Touch Connector (X19) ................................................................................................. 132.3. Bottom Side Connectors: Physical Drawing .............................................................................. 132.4. Bottom Side Connectors: Pin Assignment ................................................................................. 142.4.1 DVI FFC connector (X2) ................................................................................................ 142.4.2 RGB Connector (X3) ..................................................................................................... 152.4.3 Micro SD Card Holder (X10) ......................................................................................... 162.5. LEDs........................................................................................................................................... 173. Functional ..................................................................................................................... 183.1. Display interfaces ....................................................................................................................... 184. Assembly Options ......................................................................................................... 204.1. <strong>Iris</strong> Assembly Options - Top ....................................................................................................... 204.2. <strong>Iris</strong> Assembly Options - Bottom .................................................................................................. 21<strong>Toradex</strong> AG l Altsagenstrasse 5 l 6048 Horw l Switzerland l +41 41 500 48 00 l www.toradex.com l info@toradex.com Page | 3
<strong>Iris</strong> Carrier Board Datasheet5. Mechanical Data ........................................................................................................... 225.1. Dimensions ................................................................................................................................ 225.1.1 <strong>Iris</strong> Dimensions Top ....................................................................................................... 225.1.2 <strong>Iris</strong> Dimensions Bottom.................................................................................................. 236. Electrical Characteristics ............................................................................................... 247. PCB Versions ............................................................................................................... 248. RoHS Compliance ........................................................................................................ 24<strong>Toradex</strong> AG l Altsagenstrasse 5 l 6048 Horw l Switzerland l +41 41 500 48 00 l www.toradex.com l info@toradex.com Page | 4
<strong>Iris</strong> Carrier Board Datasheet1. Introduction<strong>Iris</strong> is a carrier board for the Colibri family of computer-on-modules. <strong>Iris</strong> supports all modules in theColibri product family, and includes support for the additional/enhanced functionality on the ColibriT20, the <strong>Toradex</strong> module which feature the NVIDIA® Tegra 2 processor.1.1. Reference DocumentsFor detailed technical information about suitable computer modules, please refer to the documentslisted below.1.1.1 Colibri Computer ModulesAn overview of the Colibri product family:http://www.toradex.com/products/colibri-arm-modules1.2. Features1.2.1 Overview<strong>Iris</strong> provides the following features and communication interfaces:• USB Type-A and OTG Micro-AB connectors for host and host/client• RJ45 Ethernet• Micro SD card slot• Digital (TDMS) and Analog (VGA) interfaces on a single DVI-I connector• LVDS interface• Digital RGB interface• Audio out on 3.5mm stereo jack• Microphone in and line in on audio header• SSP, I2C, 4 ADCs, 4 PWMs and 8 GPIOs on header• STD, BT and FF TTL level UART on header• BT and FF RS-232 interfaces• Real-time clock with battery backup• Resistive touch screen connector<strong>Toradex</strong> AG l Altsagenstrasse 5 l 6048 Horw l Switzerland l +41 41 500 48 00 l www.toradex.com l info@toradex.com Page | 5
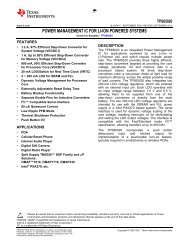
<strong>Iris</strong> Carrier Board Datasheet1.2.2 Block DiagramPowerconnectorSPI I2C ADCs DIOsPWMsExtension headerSTDUARTBTUARTFFUARTTouchconnectorAudio in/micPowertake offColibri ModuleUSB Type AFF UART RS232(10 way header)Ethernet andmagnetics(RJ 45)DVI and VGA(Tegra only)RGB to VGADACMicro SD cardslotUSB OTG(micro-AB)BT UART RS232(10 way header)Audio Out(3.5mm jacksand header)DVI-IDigital RGB(40 way FFCheader)3.3V and 5VsuppliesRTC backupbatteryDigital-to-LVDSinterface(DF13 header)1.2.3 Power Supply<strong>Iris</strong> has a wide input voltage range of 6-27V DC.Fig.1 <strong>Iris</strong> Block DiagramThe on-board power supply provides the following supplies (maximum power).5V / 3.5A(17.5W)3.3V / 2.5A (8.25W)The supply is protected against reverse input voltage polarity and short circuits.1.2.4 InstallationFollow these steps for a quick start:1. Insert a Colibri Module in the SODIMM socket X1 on <strong>Iris</strong>2. Plug in a monitor on the corresponding connector X4, a keyboard and a mouse on the USBport3. Connect an external power supply to the board by the X17 connector (6-27V, 3W min,depending on your peripherals)4. The system will start as soon as the power supply is connected. Two LEDs will light to indicatethe presence of the 3.3V and 5V voltage railsNow the preinstalled operating system will boot.For detailed documentation of the software as well as for the latest bootloader and software imagesplease refer to the Colibri website:http://www.toradex.com/products/colibri-arm-modules<strong>Toradex</strong> AG l Altsagenstrasse 5 l 6048 Horw l Switzerland l +41 41 500 48 00 l www.toradex.com l info@toradex.com Page | 6
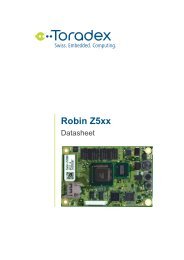
<strong>Iris</strong> Carrier Board Datasheet2. <strong>Iris</strong> Interfaces2.1. Top Side Connectors: Physical DrawingX19JP1 X20X17BAT 1X16X1X13X7X9JP2X14SW1X4X11 X8 X12X15Fig.2 <strong>Iris</strong> connectors – Top SideRef Description RemarksX1X4JP2X7X8X9X11X12X13X14X15X16X17Colibri SODIMM connectorDVI-I connectorCentral Tab jumperLVDS connectorAudio JackAudio headerUSB Type AUSB Micro A/B (Host/Device)FF RS-232 headerSTD/BT RS-232 headerEthernet connectorExtension connectorPower Supply connectorJP1 Boot Mode header Not populatedX19Touch connectorX20 3.3/5V header Not populatedBAT1 12mm Battery holder Supported batteries: BR1216, CR1216, BR1220, CL1220, CR1220,BR1225SW1Reset Button<strong>Toradex</strong> AG l Altsagenstrasse 5 l 6048 Horw l Switzerland l +41 41 500 48 00 l www.toradex.com l info@toradex.com Page | 7
<strong>Iris</strong> Carrier Board Datasheet2.2. Top Side Connectors: Pin Assignments2.2.1 Colibri SODIMM Connector (X1)Type: SODIMM 200 Socket.Manufacturer: Tyco Electronics-1473005-1.For the pin out of the Colibri module please refer to the Colibri Datasheet.2.2.2 DVI-I Connector (X4)PinDescription1 TMDS_DATA2_N2 TMDS_DATA2_P3 GND4 NC5 NC6 DDC_CLK7 DDC_DATA8 CRT_VSYNC9 TMDS_DATA1_N10 TMDS_DATA1_P11 GND12 NC13 NC14 +5V15 GND16 HOTPLUG_DETECT17 TMDS_DATA0_N18 TMDS_DATA0_P19 GND20 NC21 NC22 GND23 TMDS_CLK_P24 TMDS_CLK_NC1C2C3C4C5CRT_REDCRT_GREENCRT_BLUECRT_HSYNCAGND<strong>Toradex</strong> AG l Altsagenstrasse 5 l 6048 Horw l Switzerland l +41 41 500 48 00 l www.toradex.com l info@toradex.com Page | 8
<strong>Iris</strong> Carrier Board Datasheet2.2.3 Central Tab Jumper (JP2)Jumper JP2 should be configured based upon the Ethernet controller which is present on the installedColibri module.Jumper positionDescription1-2 Use this configuration for DM9000E on PXA2702-3 Use this configuration for DM9000A/ASIX on other modules2.2.4 LVDS Connector (X7)Connector type: DF13A-20DP-1.25v(56)Pin Signal Name Description1 LVDS_5V 5V power supply pin2 LVDS_3.3V 3.3V power supply pin3 GND4 SEL1 Connected to LVDS_3.3V or GND via assembly option. The default assembly is GND5 LVDS_OUT0_N The negative LVDS output number 06 GND7 LVDS_OUT0_P The positive LVDS output number 08 LVDS_OUT1_N The negative LVDS output number 19 GND10 LVDS_OUT1_P The positive LVDS output number 111 LVDS_OUT2_N The negative LVDS output number 212 GND13 LVDS_OUT2_P The positive LVDS output number 214 LVDS_CLK_N The negative LVDS clock signal15 GND16 LVDS_CLK_P The positive LVDS clock signal17 BL_ON Back Light control signal18 GND19 SEL2 Connected to LVDS_5V, LVDS_3.3V or GND via assembly option. The default assembly is5V20 SEL3 Connected to LVDS_3.3V or GND via assembly option. The default assembly is LVDS_3.3VRemarks:• The Signals SEL1, SEL2, SEL3 can be configured to be connected to LVDS_5V, LVDS_3.3Vor GND. By default the resistors R37, R42 and R44 have been populated. For the location ofthese resistors please refer to the section 4.• Please use the pins 1 and 2 as power supply pins (max 0.9A) and the SEL1, SEL2, SEL3 assetting pins.<strong>Toradex</strong> AG l Altsagenstrasse 5 l 6048 Horw l Switzerland l +41 41 500 48 00 l www.toradex.com l info@toradex.com Page | 9
<strong>Iris</strong> Carrier Board Datasheet2.2.5 Audio Header (X9)Connector type: 1x5 Pin Header Male, 2.54mmPinDescription1 Audio AVCC2 Microphone IN3 Line IN R4 Line IN L5 Audio AGND2.2.6 USB Micro A/B (X12)Pin Description Voltage Remarks1 V BUS USB FILT +5V2 USB N3 USB P4 USB ID CON5 GNDRemarks:• This USB connector can be used for host and client2.2.7 USB Type A (X11)The USB interface is able to support USB 2.0 high speed and operate at a maximum 480Mbit/s,depending upon the Colibri module being used.Pin Description Voltage1 VCC USB +5V2 USB N3 USB P4 GND2.2.8 FF RS-232 header (X13)The Full Function (FF) RS-232 connector is a 10 way (2 rows x 5 way) 2.54mm pitch header capableof being connected to an industry standard DTK/INTEL 10 way IDC to 9 way D-type male connector.PinSignal Name1 RS232_A_ DCD2 RS232_A_ DSR3 RS232_A_ RXD4 RS232_A_ RTS5 RS232_A_ TXD6 RS232_A_ CTS7 RS232_A_ DTR8 RS232_A_ RI9 GND10 NC2.2.9 STD/BT RS-232 header (X14)Connector type: 2 rows x 5 way Pin Header Male, 2.54mm<strong>Toradex</strong> AG l Altsagenstrasse 5 l 6048 Horw l Switzerland l +41 41 500 48 00 l www.toradex.com l info@toradex.com Page | 10
<strong>Iris</strong> Carrier Board DatasheetPinSignal Name1 RS232_C_RXD2 NC3 RS232_B_RXD4 RS232_B_RTS5 RS232_B_TXD6 RS232_B_CTS7 RS232_C_TXD8 NC9 GND10 NCRemarks:• The RS232 serial transceivers can be shut down via two GPIOs which have been connectedto the ForceOFF# pin. This is needed in order to use the RS232 signals that are on theextension connector at logic level. The following table shows the SODIMM pin assignment ofthe GPIOs reserved for this purpose:SODIMM Pin Number Disabled Header102 X13104 X142.2.10 Ethernet connector (X15)Connector type: RJ-45Pin Signal Name I/O Type Voltage Pull-up/Pull-down1 ETH_TX0_P O +3.3V 50R to ETH_AVCC2 ETH_TX0_N O +3.3V 50R to ETH_AVCC3 ETH_RXI_P I +3.3V4 ETH_AVCC (CT_TXD) PWR5 ETH_AGND (CT_RXD) PWR6 ETH_RXI_N I +3.3V7 NC8 SHIELD9 +3.3V PWR10 ETH_LINK_ACT I +3.3V11 ETH_SPEED I +3.3V12 +3.3V PWRS1 SHIELDS2 SHIELD2.2.11 Extension Connector (X16)Connector type: 2x20 Pin Header Male, 2.54mm<strong>Toradex</strong> AG l Altsagenstrasse 5 l 6048 Horw l Switzerland l +41 41 500 48 00 l www.toradex.com l info@toradex.com Page | 11
<strong>Iris</strong> Carrier Board DatasheetPin Signal Name I/O Type Voltage Pull-up/Pull-down1 RESET_EXT# I +3.3V2 GND PWR3 GND PWR4 RESET_OUT# O +3.3V5 I2C_SDA I/O +3.3V 4.7K to 3.3V6 12C_SCL I/O +3.3V 4.7K to 3.3V7 GND PWR8 SSPSCLK I/O +3.3V9 SSPFRM I/O +3.3V10 SSPRXD I +3.3V11 SSPTXD O +3.3V12 +5V PWR +5V13 PIN_98 (GPIO) I/O +3.3V14 PIN_133 (GPIO) I/O +3.3V15 PIN_103 (GPIO) I/O +3.3V16 PIN_101 (GPIO) I/O +3.3V17 PIN_97 (GPIO) I/O +3.3V18 PIN_85 (GPIO) I/O +3.3V19 PIN_79 (GPIO) I/O +3.3V20 PIN_45 (GPIO) I/O +3.3V21 GND PWR22 ANALOG_IN3 I +3.3V23 ANALOG_IN2 I +3.3V24 ANALOG_IN1 I +3.3V25 ANALOG_IN0 I +3.3V26 AUDIO_AGND PWR27 UART_A_ TXD O +3.3V28 UART_A_ RXD I +3.3V29 UART_B_ CTS I +3.3V30 UART_B_ RTS O +3.3V31 UART_B_ RXD I +3.3V32 UART_B_ TXD O +3.3V33 +3.3V PWR +3.3V34 UART_C_ RXD I +3.3V35 UART_C_ TXD O +3.3V36 GND PWR37 PWM_A O +3.3V38 PWM_B O +3.3V39 PWM_C O +3.3V40 PWM_D O +3.3VRemarks:• The PWM_A signal has also been routed to the RGB display connector (X3) to providebacklight brightness control for connected LCD displays; for this reason a populated zero ohm<strong>Toradex</strong> AG l Altsagenstrasse 5 l 6048 Horw l Switzerland l +41 41 500 48 00 l www.toradex.com l info@toradex.com Page | 12
<strong>Iris</strong> Carrier Board Datasheetresistor (R84) has been placed before connector X16. Please refer to the section 4 for theposition of R84.• Since the Colibri PXA3XX does not support the PWM_D signal, pin 152 of the SODIMMconnector has been connected to the PWM_D line through a not assembled 0ohm resistor(R110). Please refer to the section 4 for the position of R110.• The signal ANALOG_IN3 is also used as the TOUCH_WIPER signal for the Touch (X19) andthe RGB connector (X3). For this reason a populated 0ohm resistor (R88) has been placedbetween the signals ANALOG_IN3 and TOUCH_WIPER. This resistor can be removed in theevent the fourth analog signal is required and the TOUCH_WIPER signal (for 5 wire resistivetouch screen panels) is not. Please refer to the section 4 for the position of R88.2.2.12 Power Supply connector (X17)Connector type: Tyco 284512-2Pin Description Voltage / range1 GND_IN2 PWR_IN 6 – 27V2.2.13 Boot Mode header (JP1)This is an unpopulated 2.54mm pin which provides the signals required to boot the Colibri T20 moduleinto recovery mode (this is not functional on the Colibri PXAxxx modules). The pin assignment isdescribed in the following table:Pin Signal Name Remarks1 RECOVERY By shorting the pin 1-2 the Colibri will boot in Recovery boot mode.2 GND3 SD_BOOT By shorting the pin 2-3 the Colibri will boot in SD boot mode.Remarks:• In order to use the SD Boot (only with Colibri T20) the resistors R109, R111, R112and R113need to be populated with a value of 100 R. For the location of these resistors please refer tothe section 4.2.2.14 Touch Connector (X19)Connector type: Hirose DF13C-6P-1.25V(51)Pin Signal Name1 GND2 TOUCH_TSMY3 TOUCH_TSPY4 TOUCH_TSMX5 TOUCH_TSPX6 TOUCH_WIPERRemarks:• For further information about the 5-wire resistive touch interface, please refer to our developersite:http://developer.toradex.com/knowledge-base/5-wire-resistive-touch-interface2.3. Bottom Side Connectors: Physical Drawing<strong>Toradex</strong> AG l Altsagenstrasse 5 l 6048 Horw l Switzerland l +41 41 500 48 00 l www.toradex.com l info@toradex.com Page | 13
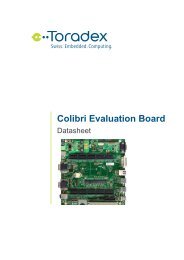
<strong>Iris</strong> Carrier Board DatasheetX2X3X10Fig.3 <strong>Iris</strong> connectors – Bottom SideRef. Description RemarksX2X3X10DVI FFC connectorRGB connectorMicro SD Card Holder2.4. Bottom Side Connectors: Pin Assignment2.4.1 DVI FFC connector (X2)Connector type: Molex 52435-2471Pin Signal Name I/O Type Voltage Pull-up/Pull-down1 GND PWR2 TMDS_CLK_P I +3.3V3 TMDS_CLK_N I +3.3V4 GND PWR5 TMDS_DATA0_P I +3.3V6 TMDS_DATA0_N I +3.3V7 GND PWR8 TMDS_DATA1_P I +3.3V9 TMDS_DATA1_N I +3.3V10 GND PWR11 TMDS_DATA2_P I +3.3V12 TMDS_DATA2_N I +3.3V13 NC<strong>Toradex</strong> AG l Altsagenstrasse 5 l 6048 Horw l Switzerland l +41 41 500 48 00 l www.toradex.com l info@toradex.com Page | 14
<strong>Iris</strong> Carrier Board Datasheet14 HOTPLUG_DETECT O +3.3V15 DDC_CLK I +5V 1.8KR to +5V16 DDC_DATA I +5V 1.8KR to +5V17 GND PWR18 CRT_RED I +3.3V19 GND PWR20 CRT_GREEN I +3.3V21 GND PWR22 CRT_BLUE I +3.3V23 CRT_VSYNC I +3.3V24 CRT_HSYNC I +3.3V2.4.2 RGB Connector (X3)The RGB display interface uses the unified display interface pin out, for which there are a wide varietyof displays of different sizes and resolutions available which will connect directly via a 40 way FFC.Connector type: Omron XF2M-4015-1APin Signal Name I/O Type Voltage Pull-up/Pull-down1 GND PWR2 GND PWR3 +3.3V PWR +3.3V4 +3.3V PWR +3.3V5 BL_ON O +3.3V6 PWM_A O +3.3V7 RESET_OUT# O +3.3V8 LCD_D_5 O +3.3V9 LCD_D_4 O +3.3V10 LCD_D_3 O +3.3V11 LCD_D_2 O +3.3V12 LCD_D_1 O +3.3V13 LCD_D_0 O +3.3V14 GND PWR15 LCD_D_11 O +3.3V16 LCD_D_10 O +3.3V17 LCD_D_9 O +3.3V18 LCD_D_8 O +3.3V19 LCD_D_7 O +3.3V20 LCD_D_6 O +3.3V21 GND PWR22 LCD_D_17 O +3.3V23 LCD_D_16 O +3.3V24 LCD_D_15 O +3.3V25 LCD_D_14 O +3.3V26 LCD_D_13 O +3.3V27 LCD_D_12 O +3.3V28 LCD_PCLK_WR O +3.3V<strong>Toradex</strong> AG l Altsagenstrasse 5 l 6048 Horw l Switzerland l +41 41 500 48 00 l www.toradex.com l info@toradex.com Page | 15
<strong>Iris</strong> Carrier Board Datasheet29 GND PWR30 LCD_LCLK_A0 O +3.3V31 LCD_FCLK_RD O +3.3V32 LCD_BIAS O +3.3V33 Connected to 3.3V or GND via assembly option.The default assembly is GND34 Connected to 3.3V or GND via assembly option.The default assembly is GNDOO+3.3V/GND+3.3V/GND35 GND PWR36 +3.3V PWR +3.3V37 TOUCH_TSPY O +3.3V38 TOUCH_TSMX O +3.3V39 TOUCH_TSMY O +3.3V40 TOUCH_TSPX O +3.3V2.4.3 Micro SD Card Holder (X10)Pin Signal Name I/O Type Voltage Pull-up/Pull-down1 MM_DAT_2 I/O +3.3V 68k to +3.3V2 MM_DAT_3 I/O +3.3V 68k to +3.3V3 MM_CMD I +3.3V 33K to +3.3V4 +3.3V PWR +3.3V5 MM_CLK I +3.3V6 GND PWR7 MM_DAT_0 I/O +3.3V 68k to +3.3V8 MM_DAT_1 I/O +3.3V 68k to +3.3VCD1/2 MM_CDS1/2 SHIELD<strong>Toradex</strong> AG l Altsagenstrasse 5 l 6048 Horw l Switzerland l +41 41 500 48 00 l www.toradex.com l info@toradex.com Page | 16
<strong>Iris</strong> Carrier Board Datasheet2.5. LEDsThere are two LEDs on the top side of the PCB; they are tuned on if the power supply circuit iscorrectly providing 3.3 and 5V power rails.LED 1LED 2TOP SIDEFig.4 LED PositionsRef. DescriptionLED1 3.3VLED2 5V<strong>Toradex</strong> AG l Altsagenstrasse 5 l 6048 Horw l Switzerland l +41 41 500 48 00 l www.toradex.com l info@toradex.com Page | 17
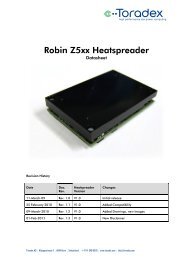
<strong>Iris</strong> Carrier Board Datasheet3. Functional3.1. Display interfacesThere are many options for connecting LCD panels and monitors, with the following three interfacessupported:- 18 bit digital RGB- LVDS- DVI-I (Digital TDMS and Analog VGA)The following image shows the Display interface architecture that has been implemented on <strong>Iris</strong>DVIColibri DVI/VGA FFCconnector(Tegra T20 only)VGAVGA DACVGAVGA source selection(zero ohm link assembly option)VGADVI-I connector18 bit LVDS converter(NS DS90C363B)LVDSLVDS connector(DF13 20 way 1mm pitch)Digital RGBColibri digital RGB interfaceDigital RGB FFCFig.5 Display Interface ArchitectureThe combination of display interfaces which are available are dependent upon the Colibri modulewhich is installed:• The Colibri T20 is able to drive two independent displays on the following combination ofdisplay interfaces:- DVI and VGA- DVI and LVDS- DVI and RGB<strong>Toradex</strong> AG l Altsagenstrasse 5 l 6048 Horw l Switzerland l +41 41 500 48 00 l www.toradex.com l info@toradex.com Page | 18
<strong>Iris</strong> Carrier Board Datasheet• The Colibri PXAxxx are able to drive single display on the following display interfaces:- RGB- LVDS- VGAIt is possible to select, using an assembly option, whether the VGA output from the Colibri T20 FFC orVGA DAC (generated from the RGB interface) is connected to the analogue VGA of the DVI-Iinterface.The following table describes these assembly options:Solution SelectedUse the internal RGB to VGAUse the Colibri T20 FFC VGA signalsResistors to assembleR14, R15, R16, R19, R20R17, R18, R21, R22, R23The default configuration connects the output of the on-board VGA DAC to the DVI-I connector.Please refer to section 4 for resistor locations.<strong>Toradex</strong> AG l Altsagenstrasse 5 l 6048 Horw l Switzerland l +41 41 500 48 00 l www.toradex.com l info@toradex.com Page | 19
<strong>Iris</strong> Carrier Board Datasheet4. Assembly OptionsThis section describes the assembly options that can be used to configure different features andfunctional options.The following table lists all the assembly options that have been described in the previous pages ofthis document.Solution Selected Assembly option Section n. PCB sideSEL1 to LVDS_3.3V Disassemble R44 and assemble R40 2.2.4 TopSEL2 to LVDS_3.3V Disassemble R37 and assemble R41 2.2.4 TopSEL2 to GND Disassemble R37 and assemble R45 2.2.4 TopSEL3 to GND Disassemble R46 and assemble R42 2.2.4 TopPWM_A not used for the RGB connector Disassemble the resistor R84 2.2.11 TopANALOG_IN3 Disassemble the resistor R88 2.2.11 TopPWM_D for PXA3XX modules Assemble the resistor R110 2.2.11 BottomUse the internal RGB to VGA R14, R15, R16, R19, R20 3.1 BottomUse the Colibri T20 FFC VGA signals R17, R18, R21, R22, R23 3.1 BottomSD Boot (only with Colibri T20) Assemble 100 Ω resistors R109, R111, R112, R113 2.2.13 Bottom4.1. <strong>Iris</strong> Assembly Options - TopR63R91R43R75R63R75R43R91R88R88R37R45R41R46 R42R84R44 R40R37R45R41R46 R42R84R44 R40Fig.6 <strong>Iris</strong> Assembly Options – Top Side<strong>Toradex</strong> AG l Altsagenstrasse 5 l 6048 Horw l Switzerland l +41 41 500 48 00 l www.toradex.com l info@toradex.com Page | 20
<strong>Iris</strong> Carrier Board Datasheet4.2. <strong>Iris</strong> Assembly Options - BottomFig.7 <strong>Iris</strong> Assembly Options – Bottom Side<strong>Toradex</strong> AG l Altsagenstrasse 5 l 6048 Horw l Switzerland l +41 41 500 48 00 l www.toradex.com l info@toradex.com Page | 21
<strong>Iris</strong> Carrier Board Datasheet5. Mechanical Data5.1. Dimensions5.1.1 <strong>Iris</strong> Dimensions TopFig.8 <strong>Iris</strong> Dimensions – Top Side<strong>Toradex</strong> AG l Altsagenstrasse 5 l 6048 Horw l Switzerland l +41 41 500 48 00 l www.toradex.com l info@toradex.com Page | 22
<strong>Iris</strong> Carrier Board Datasheet5.1.2 <strong>Iris</strong> Dimensions BottomFig.9 <strong>Iris</strong> Dimensions – Bottom Side<strong>Toradex</strong> AG l Altsagenstrasse 5 l 6048 Horw l Switzerland l +41 41 500 48 00 l www.toradex.com l info@toradex.com Page | 23
<strong>Iris</strong> Carrier Board Datasheet6. Electrical CharacteristicsSymbol Description Min Typ Max UnitPWR_IN Main power supply voltage 6 24 27 VGND_IN Main power supply current 0 6 AV_BACKUP Optional RTC battery voltage 2.3 3 3.6 VI_(+5V)I_(+3.3V)total current for external devices at +5v rail:X16 Pin 12X20 Pin 1USB connectors / USB headertotal current for external devices at +3.3V:X16 Pin 33X20 Pin 32.5 A1.5 AI_Pin(X16) Current for a single power pin of connector X16 0.5 AI_Pin(X20) Current for a single power pin of connector X20 0.5 AI_Pin(X11) Current for a single power pin of connector X11 0.5 AI_Pin(X12) Current for a single power pin of connector X12 0.5 AI_Pin(X16) Current for a single power pin of connector X16 1 AI_Pin(X20) Current for a single power pin of connector X20 1 A7. PCB VersionsRevision history of the <strong>Iris</strong> PCB is as follows:• <strong>Iris</strong> V1.0: Initial design• <strong>Iris</strong> <strong>V1.1</strong>From the version 1.0 to 1.1 the following changes have been made:• The connector X5 has been eliminated• The LVDS connector pin-out has been modified in order to have the BL_ON signal on it and inorder to have more power supply and settings (SEL1, SEL2, SEL3) combination• The connector X3 pin-out has been modified in order to solve some compatibility issues thatare present across the unified family interface LCD panels• The connectors X18 and X6 have been renamed respectively with JP1 and JP2• The diode D9 has been eliminated (shorted)• The 5V reference voltage for the DVI-I ESD protection diodes has been disconnected• The pull-up resistors for the DDC_DATA and DDC_CLOCK signals have been connected to avoltage line protected against back-feeding.8. RoHS ComplianceThe <strong>Iris</strong> baseboard complies with the European Union’s Directive 2002/95/EC: "Restrictions ofHazardous Substances".<strong>Toradex</strong> AG l Altsagenstrasse 5 l 6048 Horw l Switzerland l +41 41 500 48 00 l www.toradex.com l info@toradex.com Page | 24
<strong>Iris</strong> Carrier Board DatasheetDisclaimer:Copyright © <strong>Toradex</strong> AG. All rights reserved. All data is for information purposes only and notguaranteed for legal purposes. Information has been carefully checked and is believed to be accurate;however, no responsibility is assumed for inaccuracies.Brand and product names are trademarks or registered trademarks of their respective owners.Specifications are subject to change without notice.<strong>Toradex</strong> AG l Altsagenstrasse 5 l 6048 Horw l Switzerland l +41 41 500 48 00 l www.toradex.com l info@toradex.com Page | 25