Arthroscopic Shoulder Repair Using the Smith & Nephew KINSA ...
Arthroscopic Shoulder Repair Using the Smith & Nephew KINSA ...
Arthroscopic Shoulder Repair Using the Smith & Nephew KINSA ...
You also want an ePaper? Increase the reach of your titles
YUMPU automatically turns print PDFs into web optimized ePapers that Google loves.
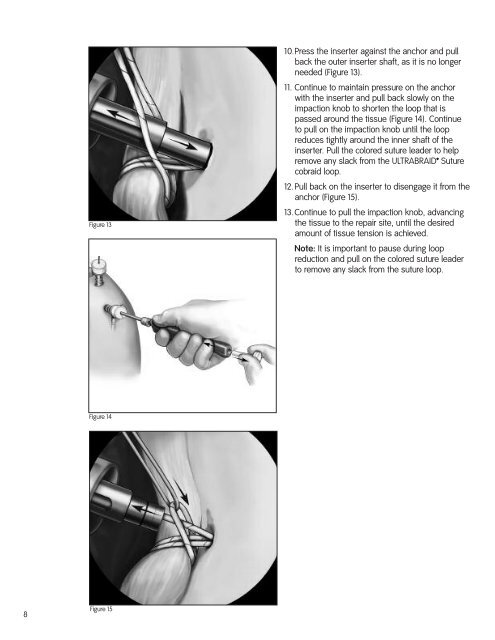
Figure 1310.Press <strong>the</strong> inserter against <strong>the</strong> anchor and pullback <strong>the</strong> outer inserter shaft, as it is no longerneeded (Figure 13).11. Continue to maintain pressure on <strong>the</strong> anchorwith <strong>the</strong> inserter and pull back slowly on <strong>the</strong>impaction knob to shorten <strong>the</strong> loop that ispassed around <strong>the</strong> tissue (Figure 14). Continueto pull on <strong>the</strong> impaction knob until <strong>the</strong> loopreduces tightly around <strong>the</strong> inner shaft of <strong>the</strong>inserter. Pull <strong>the</strong> colored suture leader to helpremove any slack from <strong>the</strong> ULTRABRAID Suturecobraid loop.12.Pull back on <strong>the</strong> inserter to disengage it from <strong>the</strong>anchor (Figure 15).13.Continue to pull <strong>the</strong> impaction knob, advancing<strong>the</strong> tissue to <strong>the</strong> repair site, until <strong>the</strong> desiredamount of tissue tension is achieved.Note: It is important to pause during loopreduction and pull on <strong>the</strong> colored suture leaderto remove any slack from <strong>the</strong> suture loop.Figure 148Figure 15


