Arthroscopic Shoulder Repair Using the Smith & Nephew KINSA ...
Arthroscopic Shoulder Repair Using the Smith & Nephew KINSA ...
Arthroscopic Shoulder Repair Using the Smith & Nephew KINSA ...

You also want an ePaper? Increase the reach of your titles
YUMPU automatically turns print PDFs into web optimized ePapers that Google loves.
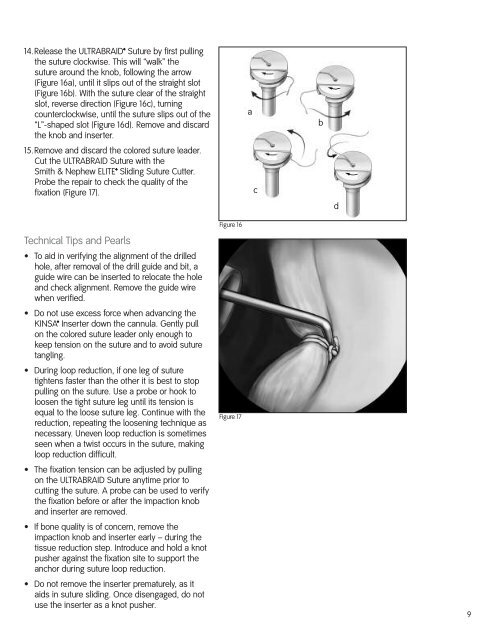
14.Release <strong>the</strong> ULTRABRAID Suture by first pulling<strong>the</strong> suture clockwise. This will “walk” <strong>the</strong>suture around <strong>the</strong> knob, following <strong>the</strong> arrow(Figure 16a), until it slips out of <strong>the</strong> straight slot(Figure 16b). With <strong>the</strong> suture clear of <strong>the</strong> straightslot, reverse direction (Figure 16c), turningcounterclockwise, until <strong>the</strong> suture slips out of <strong>the</strong>“L”-shaped slot (Figure 16d). Remove and discard<strong>the</strong> knob and inserter.15.Remove and discard <strong>the</strong> colored suture leader.Cut <strong>the</strong> ULTRABRAID Suture with <strong>the</strong><strong>Smith</strong> & <strong>Nephew</strong> ELITE Sliding Suture Cutter.Probe <strong>the</strong> repair to check <strong>the</strong> quality of <strong>the</strong>fixation (Figure 17).acbdTechnical Tips and Pearls• To aid in verifying <strong>the</strong> alignment of <strong>the</strong> drilledhole, after removal of <strong>the</strong> drill guide and bit, aguide wire can be inserted to relocate <strong>the</strong> holeand check alignment. Remove <strong>the</strong> guide wirewhen verified.• Do not use excess force when advancing <strong>the</strong><strong>KINSA</strong> Inserter down <strong>the</strong> cannula. Gently pullon <strong>the</strong> colored suture leader only enough tokeep tension on <strong>the</strong> suture and to avoid suturetangling.• During loop reduction, if one leg of suturetightens faster than <strong>the</strong> o<strong>the</strong>r it is best to stoppulling on <strong>the</strong> suture. Use a probe or hook toloosen <strong>the</strong> tight suture leg until its tension isequal to <strong>the</strong> loose suture leg. Continue with <strong>the</strong>reduction, repeating <strong>the</strong> loosening technique asnecessary. Uneven loop reduction is sometimesseen when a twist occurs in <strong>the</strong> suture, makingloop reduction difficult.• The fixation tension can be adjusted by pullingon <strong>the</strong> ULTRABRAID Suture anytime prior tocutting <strong>the</strong> suture. A probe can be used to verify<strong>the</strong> fixation before or after <strong>the</strong> impaction knoband inserter are removed.• If bone quality is of concern, remove <strong>the</strong>impaction knob and inserter early – during <strong>the</strong>tissue reduction step. Introduce and hold a knotpusher against <strong>the</strong> fixation site to support <strong>the</strong>anchor during suture loop reduction.• Do not remove <strong>the</strong> inserter prematurely, as itaids in suture sliding. Once disengaged, do notuse <strong>the</strong> inserter as a knot pusher.Figure 16Figure 179