KilnLoq probe and Extraction device - Webshop, Gas Analysis ...
KilnLoq probe and Extraction device - Webshop, Gas Analysis ...
KilnLoq probe and Extraction device - Webshop, Gas Analysis ...

Create successful ePaper yourself
Turn your PDF publications into a flip-book with our unique Google optimized e-Paper software.
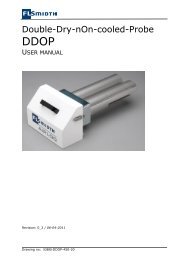
Unit Operation Instruction<strong>KilnLoq</strong> <strong>probe</strong> & EXDIn the kiln centre line, away from the affects of the raw material feeders <strong>and</strong> away from theaffects of any air blaster’s etc.At an angle of approx. 0-10° downwards towards the gas intake. See drawing “EXD:<strong>Extraction</strong> <strong>device</strong>”8.2.2 INSTALLATION OF EXTRACTION DEVICEThe <strong>Extraction</strong> Device must be positioned thus the bolt flange fits the mating flange. Thetwo adjustable support feet under the <strong>Extraction</strong> Device must be adjusted thus it is inhorizontal position along <strong>and</strong> across the vessel. The <strong>Extraction</strong> Device must now be boltedto the mating flange <strong>and</strong> fundament.8.2.3 CONNECTION OF AIR HOSES.See layout drawing “KILNLOQ: P&I Diagram”The <strong>Extraction</strong> Device needs compressed air for the pneumatic cylinders, flange cleaningsystem <strong>and</strong> for cleaning the <strong>KilnLoq</strong> <strong>probe</strong>. From the factory all hoses are connected on the<strong>Extraction</strong> Device <strong>and</strong> only have to be connected to the Probe Cleaning Panel. All four hosesare at the end tagged with small metal plates an must be connected according to followingtable<strong>Extraction</strong> Device“BB1” <strong>KilnLoq</strong> <strong>probe</strong> under filter house“BB2” <strong>KilnLoq</strong> <strong>probe</strong> at snap connector“AS2” <strong>Extraction</strong> Device at pneumatic cylinders“AS3” <strong>Extraction</strong> Device at flange cleanerProbe Cleaning Panel10 mm bulkhead labelled “BB1” (instrumentair)10 mm bulkhead labelled “BB2” (instrumentair)10 mm bulkhead labelled “AS2” (instrumentair)½” union labelled “AS3” or plants working air(cheap air)IMPORTANT!The flexible hoses must be mechanical protected <strong>and</strong> installed thus bends are avoided.8.2.4 INSTALLATION OF PIPE LINES FOR COOLING WATERSee layout drawing “KILNLOQ: P&I Diagram”The two 1” unions tagged “WL1” <strong>and</strong> “WL2” must be connected to the unions with sametags on the Water Control Panel. The fixed pipe line must be carried out in 1” galvanizedtube. No insulation is required. Lines must be connected according to following table:<strong>Extraction</strong> DeviceWater Control Panel1” union labelled “WL1” 1” union labelled “WL1”1” union labelled “WL2” 1” union labelled “WL2”8.2.5 INSTALLATION OF HEATED SAMPLE LINESee layout drawing “KILNLOQ: P&I Diagram”The heated sample hose is from the factory installed on the <strong>KilnLoq</strong> <strong>probe</strong>. For furtherinformation see “System manual”8.2.6 INSTALLATION OF SIGNAL AND POWER CABLESIn the bottom of the <strong>Extraction</strong> Device there is a stainless terminal box. The box is equippedwith cable gl<strong>and</strong>s for needed cables. Cables must be connected according to section “Cablelist” in “System manual”.Page 16 of 27