Front-mounted external venetian blind type R 6/10
Front-mounted external venetian blind type R 6/10
Front-mounted external venetian blind type R 6/10
- No tags were found...

Create successful ePaper yourself
Turn your PDF publications into a flip-book with our unique Google optimized e-Paper software.
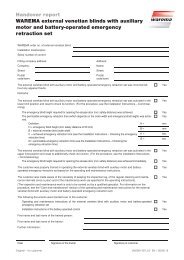
WAREMA front-<strong>mounted</strong> <strong>external</strong> <strong>venetian</strong> <strong>blind</strong>Types R6/R<strong>10</strong>Instructions for use and maintenanceTo be handed over to the userValid from 01 April 2008Document number [B866866_0] – EN
Introduction1 Introduction1.1 Information on safetyIt is important to follow these instructions in the interestsof personal safety. Failure to comply with theseinstructions when operating the product may result inpersonal injury and/or property damage. Failure to complywith these instructions relieves WAREMA of liability.Warnings are marked with these symbols inthe instructions.• Read through the instructions carefullybefore use.• Keep the instructions for use until youdispose of the product.• Include these instructions if you pass theproduct on to a new owner.• Please observe all safety, operating, andmaintenance instructions.1.2 Information on the target group andapplication of these instructionsTarget groupThese instructions are intended for use by a trained user.ContentsThese instructions contain important information on theoperation and maintenance of this item. They describe theoperation of the front-<strong>mounted</strong> <strong>external</strong> <strong>venetian</strong> <strong>blind</strong>,<strong>type</strong> R6/R<strong>10</strong>, with crank or motor operation. Other drivesand alternative solutions are not dealt with.Follow the additional operating note in models with aninsect screen roller <strong>blind</strong> or insect screen swivel frame.Permissible activitiesNo other alterations, additions to or conversions of, ormaintenance work, are to be carried out on the productother than as described in these instructions without thewritten approval of WAREMA. In the event of problemswith the product, you will find details of possible causesand their solutions in the instructions. If necessary,contact your WAREMA dealer. Only problems with nospecific information may be rectified by the user.1.3 Intended useThe WAREMA front-<strong>mounted</strong> <strong>external</strong> <strong>venetian</strong> <strong>blind</strong> is anexterior sun shading product that may only be used for theintended purpose (e.g. to protect against summer heatand glare and to provide privacy).Inappropriate use may result in significant danger. Do notplace additional strain on the front-<strong>mounted</strong> <strong>external</strong><strong>venetian</strong> <strong>blind</strong>, such as that from suspended objects, anddo not operate the <strong>blind</strong>s beyond their mechanical limitsas this may damage the product or cause it to fall and istherefore not permitted.The intended use also includes observing theseinstructions and the care and maintenance conditions.1.4 Meanings of symbols and signsSafety information and symbols are contained in theappropriate parts of the text.SymbolUse/explanationDANGERIdentifies an imminent danger that couldresult in death or serious injury if notprevented.WARNINGIdentifies a potential danger that may result indeath or serious injury if not prevented.CAUTIONIdentifies a potential danger that may result inminor injury or property damage if notprevented.Read the instructions for use andmaintenance.NoteImportant information on how to proceed andon the content of these instructions.Activity/step•List[B866866_0] - EN / 01.04.08 Page 2 of 12 Subject to change without notice.
Product information2 Product information2.2 Technical data2.1 Parts descriptionElectric drive data981234ParameterValueRated load torque 6 to 19 NmRevolutions23/26 rpmLine voltage230 V AC / 50 HzCurrent consumption 0.41 to 0.97 APower94 to 218 WDegree of protection IP 54Short-term operation (S2) 4 minutesSafety class 2Limit switch range 67 to 97 revolutionsTab. 1: Electric drive data (overview)752.3 Product identification<strong>10</strong>1 Box 6 Handle rail 12 Side panel 7 Insect screen 13 Guide rail 8 Plaster base 24 Slats 9 Plaster base plate 25 Bottom rail <strong>10</strong> Cord tassel 1Fig. 1:6Parts overview of the front-<strong>mounted</strong> <strong>external</strong><strong>venetian</strong> <strong>blind</strong> (example: R<strong>10</strong> P)dd200001260The product has a CE mark.12Only for models with an insect screen roller <strong>blind</strong>Only for P model.[B866866_0] - EN / 01.04.08 Page 3 of 12 Subject to change without notice.
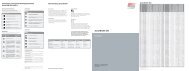
Product information2.4 Wind speed limitsFor <strong>external</strong> <strong>venetian</strong> <strong>blind</strong>s, the use of wind speed limits(see Tab. 2) depends on the particular product <strong>type</strong>. If thewind speed limits are reached, the unit must be retracted.Basis for Tab. 2:1. Slat facade distance: ≤ <strong>10</strong>0 mm2. Slat thickness: ≥ 0.4 mmDetails on Beaufortnumber (m/s inbrackets)Width up to 1500mmWidth up to 2000mmWidth up to 2500mmWidth up to 3000mmWidth up to 4000mmTab. 2:Beaded slatwith rails (slatwidth up to 80mm)7(13.5 – 17.4)7(13.5 – 17.4)7(13.5 – 17.4)7(13.5 – 17.4)6(<strong>10</strong>.5 – 13.4)Recommended wind speed limitsFlat slat withrails (slat widthup to 80 mm)7(13.5 – 17.4)6(<strong>10</strong>.5 – 13.4)6(<strong>10</strong>.5 – 13.4)6(<strong>10</strong>.5 – 13.4)5(7.5 – <strong>10</strong>.4)2.5 CE conformityThe product conforms to CE and meets the requirementsof the relevant European guidelines.CE conformity is certified, and WAREMA holds thecorresponding declaration. To maintain this state and toensure that the product can be safely installed and putinto operation, you as the fitter must adhere to theinstallation instructions.Name: WAREMA Renkhoff SEYear of declaration of conformity: 2008Headoffice:Hans-Wilhelm-Renkhoff-Straße 297828 MarktheidenfeldGermanyStandard: DIN EN 13659Product: External <strong>venetian</strong> <strong>blind</strong>Intended use:For outdoor installationWind class: 0 3Noise emission level 4 : < 70 dB (A)34Specification of wind class 0, since standard test standscannot be used in the applicable test standard due tomechanical inadequacies of the test description.Depending on the model and the installation location, theproduct can be used up to the wind speed limits specifiedabove (Tab. 2).In a standard installation of the product on a test stand, thenoise emission level is
Operation3 Operation NOTEIf using a model with an insect screen roller <strong>blind</strong> orinsect screen swivel frame, also adhere to theseparate operating note. NOTEOnly operate the <strong>external</strong> <strong>venetian</strong> <strong>blind</strong> if it is intechnically perfect condition. Stop operating theproduct immediately if the <strong>blind</strong> makes unusualnoises or moves in an atypical fashion. Inform yourqualified specialist.3.1 <strong>Front</strong>-<strong>mounted</strong> <strong>external</strong> <strong>venetian</strong> <strong>blind</strong> with crank operationCAUTIONProduct damage from incorrect operation!• Avoid bending the crank rod excessively.This makes it hard to move the rod andcauses excessive wear.• When you reach the limit position, do notcontinue turning the crank forcefully onceyou detect a resistance.Extending/retracting with a crank• Turn the crank clockwise oranti-clockwise.The <strong>external</strong> <strong>venetian</strong> <strong>blind</strong>moves in the selected direction.The <strong>external</strong> <strong>venetian</strong> <strong>blind</strong> canbe stopped at any position.Slow the turning motion of thecrank before you reach thelimit positions. The <strong>external</strong><strong>venetian</strong> <strong>blind</strong> should not banghard against the top barrier. Donot turn any further when youfeel a resistance.Tilting with a crank• Turn the crank clockwise oranti-clockwise.The slat tilt changes.[B866866_0] - EN / 01.04.08 Page 5 of 12 Subject to change without notice.
Operation3.2 <strong>Front</strong>-<strong>mounted</strong> <strong>external</strong> <strong>venetian</strong> <strong>blind</strong> with an electric motorExtending/retracting or tilting with a rotary or pushbutton switch• Press and hold the (UP)button or (DOWN) button.Or• Turn the toggle to the left orright and hold.The slat position changes orthe <strong>external</strong> <strong>venetian</strong> <strong>blind</strong>moves in the selected direction.The <strong>external</strong> <strong>venetian</strong> <strong>blind</strong>stops when the button or toggleis released.The <strong>blind</strong>s can be stopped atany position. The limit stop ofthe <strong>external</strong> <strong>venetian</strong> <strong>blind</strong> islimited in both directions ofmovement, i.e. the <strong>external</strong><strong>venetian</strong> <strong>blind</strong> automaticallystops at this point.Extending/retracting or tilting with a snap-in switch• Press the (UP) button or(DOWN) button.Or• Turn the toggle to the left orright.The slat position changes orthe <strong>external</strong> <strong>venetian</strong> <strong>blind</strong>moves in the selected direction.The <strong>external</strong> <strong>venetian</strong> <strong>blind</strong> isstopped by pressing the stopbutton, pressing the button forthe opposite direction or turningback the toggle.The <strong>blind</strong>s can be stopped atany position. The limit stop ofthe <strong>external</strong> <strong>venetian</strong> <strong>blind</strong> islimited in both directions ofmovement, i.e. the <strong>external</strong><strong>venetian</strong> <strong>blind</strong> automaticallystops at this point.Extending/retracting with an <strong>external</strong> control unitA wide range of control devices is available for our sunprotection systems to give you optimum control of the<strong>external</strong> <strong>venetian</strong> <strong>blind</strong>. Please contact your qualifiedspecialist for further information.Instructions on how to operate this feature are contained ina separate manual.Information for motor runtimeThe motors used in these products are not intended forcontinuous operation. The integrated thermal protection willswitch the motor off after approx. 4 minutes. The productwill be ready for use again after approx. <strong>10</strong>-15 minutes.CAUTIONProduct damage!The <strong>external</strong> control unit may fail underextreme conditions (e.g. power failure ordefects).• Set the <strong>external</strong> control unit to manual if youare going to be away.[B866866_0] - EN / 01.04.08 Page 6 of 12 Subject to change without notice.
General safety information4 General safety informationThe following safety and danger warnings are intended tosafeguard your health as well as protect the product.Please read the following points carefully.Damage resulting from inappropriate use or the failure toobserve these instructions or safety information is notcovered by the guarantee. Liability will not be acceptedfor consequential damage!Operation during a storm• Retract the <strong>blind</strong>s if the windspeed limits are exceeded(see Tab. 2). NOTEA backup power supply isrecommended for windyregions with frequentpower failures.Operation in cold weather• Avoid applying force duringoperation. The <strong>external</strong><strong>venetian</strong> <strong>blind</strong> may freezeup. The product may beused again after thawing.CAUTIONProduct damage!• Do not extend orretract the <strong>external</strong><strong>venetian</strong> <strong>blind</strong>during snowfall or ifthere is a danger offrost.What to do in winter• Switch off the automaticmechanism. The <strong>external</strong><strong>venetian</strong> <strong>blind</strong> may freezeup.WARNINGRisk of injury andproduct damage!• Set the automaticcontrol to manual ifyou are going to beaway.Limit access to the control elements• Never let children play withthe operating elements (e.g.the hand-held radiotransmitter or push buttonswitch).• Keep children away fromthe remote controls.Projection areaThe projection area must beclear of obstacles and people.Risk of crushing/injury• Do not reach into movingparts when extending orretracting the product (suchas the bottom rail).• Keep people away from theproduct while it is in motion• Do not reach between theslats.[B866866_0] - EN / 01.04.08 Page 7 of 12 Subject to change without notice.
Care5 Care/maintenance5.2 Care instructions5.1 General information on care andmaintenanceProper and regular care and maintenance and the use oforiginal spare parts only are essential for fault-freeoperation and a long product life.DANGERRisk of injury from operation of the <strong>external</strong><strong>venetian</strong> <strong>blind</strong> when it is out of view.• Disconnect the <strong>external</strong> <strong>venetian</strong> <strong>blind</strong> fromthe automatic control and/or power. NOTEEnsure that the <strong>external</strong> <strong>venetian</strong> <strong>blind</strong> is not movedduring maintenance and repair work in its directproximity – e.g. window-cleaning.Disconnect the product from the power supply.To ensure the longest possiblelife, we recommend you cleanthe surface of the productregularly and at least once ayear.Replacement claims based onthese cleaning and careinstructions cannot be honouredbecause the effectiveness ofthese measures depends on alarge number of factors that varyfrom case to case.• Clean the <strong>external</strong> <strong>venetian</strong> <strong>blind</strong> regularly. Observethe "Cleaning Procedures" table.Cleaning procedureUse suitable cleaning products on thesurfaces.Remove dust and soiling from the guide rails.DANGERRisk of injury and falling!• Do not rest climbing aids against theproduct.• Climbing equipment must rest on a solidfoundation and offer good support andsufficient carrying capacity.• Never hold on to the product for support orreach into the slats.• Check the operating elements, lifting tapes andguiding nipples for visible wear and damage.• Check the installation substructure for damage.• Check that the <strong>external</strong> <strong>venetian</strong> <strong>blind</strong> is functioningproperly. Watch the product as it travels the full rangeof movement and look out for any unusual behaviouror noises.• Have any damage repaired by a qualified specialistas soon as you can.CAUTIONProduct could be damaged by incorrectcleaning!• Do not use high pressure washers,abrasive cleansers or sponges, andsolvents such as alcohol or benzene.• Do not support yourself on the product orparts of the product. Do not bend the slats.[B866866_0] - EN / 01.04.08 Page 8 of 12 Subject to change without notice.
Maintenance/warranty5.3 Maintenance instructionsDANGERThe product must be maintainedregularly and at least once ayear.Inspection and maintenancework is only to be carried out byan appropriate qualifiedspecialist. We recommend youtake out a maintenanceagreement with a qualifiedspecialist.Risk of injury through irregular maintenance!• Check the <strong>external</strong> <strong>venetian</strong> <strong>blind</strong> regularlyfor signs of wear and damage, e.g. on themotor cable or lifting tape.6 WarrantySubject to the statutory period of limitation for warrantyclaims. This requires regular maintenance. The warrantydoes not include wear parts or optical changes in line withthe <strong>type</strong> of material used (e.g. bleaching of surfacescaused by UV rays).Wear parts are Gear drive Crank, crank rod Lifting tape Tilting tape Bearings• Do not continue using <strong>external</strong> <strong>venetian</strong><strong>blind</strong>s that require repair.DANGERElectric shock!When inspecting or maintaining electrical parts,the closure must be de-energised and lockedout.• Check the <strong>external</strong> <strong>venetian</strong> <strong>blind</strong> for visible wear,damage to the motor cable and to ensure it issecurely attached (e.g. check that screws have afirm hold).• Check the function and the switch-off points on the<strong>external</strong> <strong>venetian</strong> <strong>blind</strong>.• Check the lifting tapes and guiding nipples forvisible wear or damage.• Check that the guide elements are firmly seated.• Change the battery on systems with remote control.• Inform the user of operating risks (e.g. icing).• Alert the user to the attachment of the label.[B866866_0] - EN / 01.04.08 Page 9 of 12 Subject to change without notice.
Spare parts/removal7 Spare parts/repairsCAUTIONPersonal injury or property damage resultingfrom inappropriate repairs.• The product should only be repaired by aspecialist.To ensure that your product operates properly on acontinuous basis and to avoid changing its approvedstatus, use WAREMA spare parts only. Please contact aqualified specialist for further information.8 Removal/disposalCAUTIONPersonal injury or property damage resultingfrom improper removal.• The product should only be removed by aspecialist.Removal and re-installation of the product must beundertaken by a qualified specialist in accordance withcurrent guidelines and standards. Be sure to ask themanufacturer for any missing documents beforecommencing removal or re-installation.Should the product no longer be required, ensure that itis disposed of correctly in accordance with the relevantregulations.[B866866_0] - EN / 01.04.08 Page <strong>10</strong> of 12 Subject to change without notice.
Troubleshooting9 TroubleshootingCAUTIONPersonal injury or property damage resultingfrom troubleshooting.• Problems with no reference to a qualifiedspecialist may be rectified independently.• Other problems are only to be dealt with bya qualified specialist.Problem Possible causes RemedyMotor is not operating. Motor is malfunctioning.Motor change (specialist only) On-site motor connection is incorrect. Motor thermal protection switch hastriggered There is no current In the upward direction, the motorswitches off when the allowable torquelimit is exceeded (only with comfortswitch-off for icing)Reconnect as per wiring diagram(electricians only)Wait <strong>10</strong> to 15 minutes, then try againCheck the power fuse (electriciansonly)Issue a short downward command;When the unit moves down: stop theunit and check whether its path isblocked.If so: clear the blockage and issue adownward commandIf the motor stops again: teach-in themotor again for this product(specialists only)Bottom rail does not move to limitpositions A higher-level control command ispresent Motor switch-off positions are incorrect Guide rails are soiledAwait switch on/off delayReadjust the motor (specialists only)Remove soiling[B866866_0] - EN / 01.04.08 Page 11 of 12 Subject to change without notice.
TroubleshootingProblem Possible causes RemedyCrank rod is difficult or impossibleto turn Mechanism is blocked or defectiveReplace the gear drive (specialistsonly)Slats cannot be adjusted, <strong>external</strong><strong>venetian</strong> <strong>blind</strong> does not move upExternal <strong>venetian</strong> <strong>blind</strong> extendsand retracts erraticallyCoupled <strong>blind</strong> reacts with a delayor not at allBottom rail is resting on thetension bracket (only if additionalwind protection is in use) Crank or pivot bearing is defective Hexagonal input shaft is not aligned Hexagonal input shaft is too short forthe drive Lifting tape is torn Lifting tape is torn Blockage in the vicinity of the guide Blockage in the vicinity of the tiltingtape Coupling of turning stem is missing Fixing screw of the coupling tube isloose Tension bracket is installed too highReplace the pivot bearing (specialistsonly)Rework the drilled hole (specialistsonly)Replace the pivot bearing (specialistsonly)Replace the lifting tape (specialistsonly)Replace the lifting tape (specialistsonly)Retract (extend) the <strong>blind</strong> a shortdistance and then extend (retract) itagain.If the fault occurs again: Fully retractthe <strong>external</strong> <strong>venetian</strong> <strong>blind</strong> and informthe specialist.Slide coupling tube onto turning bar ofdrive <strong>blind</strong> and tighten fixing screw(specialists only)Tighten the fixing screw (specialistsonly)Correct the tension bracket position(specialists only)Tab. 3:Overview of possible problemsThis technical documentation contains copyrighted Company stampcompany information. All rights reserved.The information in this documentation and the productitself are subject to change without notice. All brands andproduct names mentioned in this documentation aretrademarks or registered trademarks of the respectiveholder.Considerable care was taken in producing the text andgraphics in this documentation. No liability is accepted forany errors which may nevertheless exist in thisdocumentation nor for the consequences of any sucherrors.© 2009, WAREMA Renkhoff SE, Hans-Wilhelm-Renkhoff-Straße 2, 97828 Marktheidenfeldhttp://www.warema.de • E-mail: info@warema.de