DELUXE SCHEDULE BUILDER OVERVIEW - Rediker Software, Inc.
DELUXE SCHEDULE BUILDER OVERVIEW - Rediker Software, Inc.
DELUXE SCHEDULE BUILDER OVERVIEW - Rediker Software, Inc.

Create successful ePaper yourself
Turn your PDF publications into a flip-book with our unique Google optimized e-Paper software.
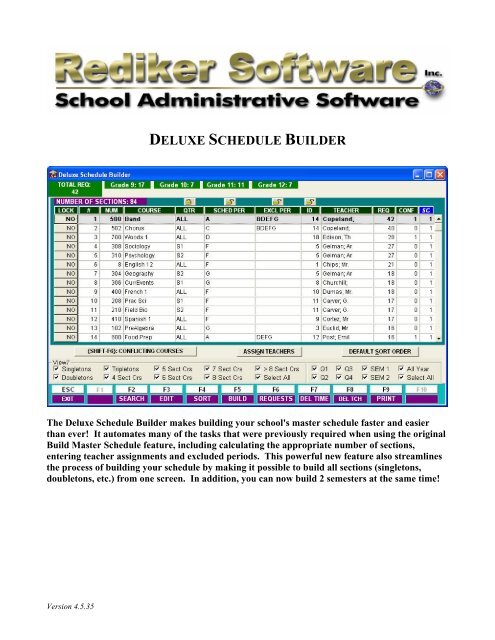
<strong>DELUXE</strong> <strong>SCHEDULE</strong> <strong>BUILDER</strong>The Deluxe Schedule Builder makes building your school's master schedule faster and easierthan ever! It automates many of the tasks that were previously required when using the originalBuild Master Schedule feature, including calculating the appropriate number of sections,entering teacher assignments and excluded periods. This powerful new feature also streamlinesthe process of building your schedule by making it possible to build all sections (singletons,doubletons, etc.) from one screen. In addition, you can now build 2 semesters at the same time!Version 4.5.35
SCHEDULING BUILDING OUTLINE/CHECKLISTThe following guide is designed to outline the basics of the schedule building process using the SDSB.Create a new year and run Beginning in the New Year.Add any new students or staff to the Data Base. If you know you are going to have staffopenings but have yet to fill those positions, we recommend that you create “place holder staff”called New English, New Math, etc. When you hire teachers to fill these positions, you can gointo Database New Files and edit that staff record.Check Block Rotation.Add any new courses that will be offered in the upcoming school year.Enter course requests for all students. Our schedule builders use student requests as thefoundation for suggesting the number of sections for each course, the meeting times for thosesections, etc. It is very important that you have entered the majority if not all of your studentrequests prior to entering the Builder.Perform simple tallies and print it (optional).At this point, you are ready to access the Deluxe Schedule Builder.Set number of sections per course. The program will automatically calculate the number ofsections you need per course based on student requests and optimum size.Input Preferred Teachers and Excluded Periods (if you did this last year, you will not have tore-enter information but you may want to verify the information and make any needed changes).Assigning preferred teachers to courses from this screen allows you to automatically assignteachers inside the Build Schedule screen. It is also allows you to assign excluded periods byteacher.Enter the Builder (Build Schedule). You will be seeing all active courses with sections in thisscreen.Assign Teachers to sections based on the preferred teacher list. Click on the Assign Teachersbutton. This will take the entries you made in the Preferred Teachers screen and place them intothe builder. You should assign teachers prior to building.Designate any semester or quarter courses that must during a specific semester/quarter.Set any fixed sections (e.g. sections that must meet at a specific time).Use the desired mode (interactive, automatic or a combination) to build meeting times. Youmay elect to build all sections all at once or only a specific group of courses (e.g. singletons,semester, course number range, grade level).<strong>Rediker</strong> <strong>Software</strong> <strong>Inc</strong>. Technical Support800-882-29942
Print a list of all courses after building by both Teacher and Sched Per. The list by Teacherwill show which courses and you how many courses the teachers would be teaching in a row.The list by period will give you an idea of which courses are meeting opposite each other.Create the section list. This writes the information in the builder back to the Master Course listup until this point mostly everything you have been doing has been confined to the Builder.Run perform scheduling to load students into sections.Review the totals for each grade level in the scheduling log.Review other reports (staff master schedule, section lists, partial student schedule) andmake any necessary changes. You may want to go back into the builder to make changes oryou can make changes directly in the section list.If needed, you may need to unschedule and reschedule students. Make sure that you make anAdministrator’s Plus backup prior to unscheduling and rescheduling. In case your changes donot work, you can always go back to what you had before.Look over each student’s schedule and adjust as needed. There will come a point where youhave done everything that you can on a global scale (e.g. changes to meeting times, teachers,etc.) and now you will need to go through students’ schedules by hand and make any necessarychanges.Enjoy your summer because you are done!!!!<strong>Rediker</strong> <strong>Software</strong> <strong>Inc</strong>. Technical Support800-882-29943
ACCESSING THE <strong>DELUXE</strong> <strong>SCHEDULE</strong> <strong>BUILDER</strong>To access the Deluxe Schedule Builder, click Build on the Shortcut Bar or choose number 8 – BuildMaster Schedule from the Navigation Menu.<strong>Rediker</strong> <strong>Software</strong> <strong>Inc</strong>. Technical Support800-882-29944
A menu will come up asking you which Schedule Builder you want to use.OPTION #1:CLASSIC <strong>SCHEDULE</strong> <strong>BUILDER</strong>Brings up the original schedule builder where you input your Fixed Singletons, Singletons,Doubletons, etc. on separate screens.OPTION #2:<strong>DELUXE</strong> <strong>SCHEDULE</strong> <strong>BUILDER</strong>Accesses the Deluxe Schedule builder. This is the program that is featured in this document.OPTION #3:SUPER <strong>DELUXE</strong> <strong>SCHEDULE</strong> <strong>BUILDER</strong>Opens up the Super Deluxe Schedule Builder. This is the newest addition to <strong>Rediker</strong> <strong>Software</strong>’sscheduling tools.Highlight Deluxe Schedule Builder, click Next.<strong>Rediker</strong> <strong>Software</strong> <strong>Inc</strong>. Technical Support800-882-29945
The Build Master Schedule Specifications will appear.USE MINIMUM NUMBER OF PERIODS?Setting this specification to Yes, causes the program to try to put as many sections in the least amountof periods possible. This is recommended because it places courses with fewer sections in the sameperiods, thus allowing courses with more sections to be distributed evenly among a greater number ofperiods.SPECIFICATION #1:MAXIMUM NUMBER OF PERIODS?Tells the builder how many periods you want to build. The builder uses this setting to determine howmany actual class periods you wish to build (A-X). There may be other periods (such as homeroom orlunch) that are not actually being built. These periods can be given letters that are beyond the maxperiod setting.SPECIFICATION #2:SPECIFICATIONS #3 & #4: START/END GRADE?Allows you to control which grade levels to consider when the conflict matrix is created.INCLUDE ACTIVE/INACTIVE STUDENTS?This specification allows you to control which students’ course requests will be considered when theconflict matrix is created.SPECIFICATION #5:SPECIFICATION #6:WARN BEFORE DELETING MEETING TIMES?Setting this specification to Yes causes a warning message to appear before meeting times are actuallydeleted.Once you have selected the specifications you want, click Done.<strong>Rediker</strong> <strong>Software</strong> <strong>Inc</strong>. Technical Support800-882-29946
WHAT IS THE MATRIX FILE AND WHY IS IT IMPORTANT?Scheduling Plus bases its section placement decisions on the conflict matrix and teacher availability.The conflict matrix is created based on students’ course requests. The builder uses this information tosuggest periods that have the least probability of causing conflicts.After accepting the specifications, the program will automatically create a course matrix file. The fileis created and stored in the user’s directory. It is only necessary to build this file once unless courserequests or specifications change.If a matrix file already exists, you will be asked whether or not you want to replace it. As long as youhave not made any changes to student course requests or specifications #3, 4 or 5 (start grade, endgrade and active/inactive settings) you do not have to rebuild the matrix file.Upon leaving the schedule builder you will be asked whether or not you want to delete the matrix file.If you plan on using the builder again without changing specifications or requests, choose not to deletethis file.<strong>Rediker</strong> <strong>Software</strong> <strong>Inc</strong>. Technical Support800-882-29947
The Deluxe Schedule Builder main menu will appear.OPTION #1:SET NUMBER OF SECTIONS PER COURSECalculates how many sections per course you will need. This option must be used first.This calculation is based on the number of requests and the optimum size of the course. If you prefer,you may manually enter the desired number of sections for a course.Note: Once you have Set Number of Sections, you will want to go to Option 4 (PreferredTeachers & Excluded Periods). Even if you used the program in the past, it is recommendedverify your Preferred Teach information and make any needed changes.OPTION #2:BUILD <strong>SCHEDULE</strong>Suggests the best meeting time for each section.OPTION #3:CREATE SECTION LISTCreates a new section list based on the sections and times suggested in the builder. This option shouldbe used last.OPTION #4:PREFERRED TEACHERS AND EXCLUDED PERIODSEnter which teachers you would like to teach each section. This option should be used second. Youcan also enter periods that specific teachers cannot teach.OPTION #5:INSPECT/CHANGE SPECIFICATIONSBrings you back to the Build Schedule specifications.OPTION #6:SUPER <strong>DELUXE</strong> <strong>SCHEDULE</strong> <strong>BUILDER</strong>Opens up the Super Deluxe Schedule Builder. This is the newest addition to <strong>Rediker</strong> <strong>Software</strong>’sscheduling tools.To begin building your schedule, highlight option 1 and click Next.<strong>Rediker</strong> <strong>Software</strong> <strong>Inc</strong>. Technical Support800-882-29948
SET NUMBER OF SECTIONS PER COURSEYou will be seeing all your active courses in the screen regardless of whether or not they haverequests, however only courses with section values will appear in the builder.By default, this list is sorted primarily by number of sections and secondarily by number of requests.Initially you will have zero sections for each course so in reality the list is sorted by number ofrequests.It is recommended that you click on Start Over With All Courses when you first enter this screen.This will clear out last year’s entries and bring in any new courses that you might be offering this year.It will also remove any courses that are inactive. If this is your first time using the builder, you do notneed to click on Start Over With All Courses.Helpful Hint: The F Keys• F2 Add: Allows you to add a new course to this list.• F4 Req: Displays the students who have requested a highlighted course.• F5 Calc: Calculates the number of sections for all the courses in the list.• F6 Search: Allows you to search the list for a specific course.• F7 Del All: Deletes all the courses from this list.• F8 Del Crs: Deletes the “current course” from this list. Current course will behighlighted.• F9 Print: Generates a print out of this list.• F10 Accept: Accepts and saves the list.Pages 6 and 7 of this document explain how to use the F4 [REQ] and F6 [SEARCH] functions. To goright to how to calculate sections, skip to page 8.<strong>Rediker</strong> <strong>Software</strong> <strong>Inc</strong>. Technical Support9800-882-2994
F6: SEARCHUsing F6 allows you to search the list for a specific course.• Click or press F6.• Type the Course Number and press Enter.Once you press Enter, the course you searched for will be highlighted.<strong>Rediker</strong> <strong>Software</strong> <strong>Inc</strong>. Technical Support800-882-299410
F4: REQUESTSUsing F4 will bring up a list of the students who have requested the course.• Highlight the course for which you want to see the roster.• Click or press F4.As you can see from the list, 13 students have requested this course.<strong>Rediker</strong> <strong>Software</strong> <strong>Inc</strong>. Technical Support800-882-299411
SET NUMBER OF SECTIONS PER COURSE (CONTINUED)One of the new features of the Deluxe Builder is that it will calculate the number of sections you needfor each course automatically. Click or press the F5 key or click the Calculate button and thecomputer will automatically calculate the number of sections per course based on the number ofrequests and the optimum size.You can still hand enter the number of sections you want for each course by simply double-clicking inthe # of sections column and typing in the value.<strong>Rediker</strong> <strong>Software</strong> <strong>Inc</strong>. Technical Support800-882-299412
If you need to change the number of sections, double click in the # of Sections column and edit thevalues. Once you have made your adjustments, click F10.<strong>Rediker</strong> <strong>Software</strong> <strong>Inc</strong>. Technical Support800-882-299413
OPTIMUM SIZESOptimum sizes are used by the Perform Scheduling program to limit the sizes of your sections. Theselimits could be based on teacher or room requirements. Adjusting your optimum section sizes basedon the actual number of requests in a given school year may also result in better balanced sections.For example, if you look at PE 11/12, in the screen shot below, there are 3 sections for 83 students,adjusting the optimum size of the course from 18 to 28 will allow for a better balance between thesections.To edit the Opt Sizes, you can click in the Opt Size column and manually edit the optimum sizes percourse or you can let computer adjust the optimum sizes for all courses in the list.Helpful Hint:If you really need to change your optimum sizes, the best place to do this is directly in your mastercourse list. To get there go to Scheduling Enter Courses and choose View/Edit Courses andSections. Look up the course and edit the optimum size there.However, if you would like the computer to adjust your optimum sizes, click on Utilities.<strong>Rediker</strong> <strong>Software</strong> <strong>Inc</strong>. Technical Support800-882-299414
The Master Course Optimum Size Utilities menu will appear. You should go down this menu inorder.OPTION #1:SET CURRENT MASTER COURSE OPTIMUM SIZES AS THE DEFAULTSSaves the current optimum sizes in your master course list to a temporary file. This option should beused first. The file will be retained so that you can restore these defaults if needed.OPTION #2:ADJUST OPTIMUM SIZES BASED ON RQ AND # OF SECTIONSRecalculates the optimum sizes for all courses.OPTION #3:TRANSFER <strong>BUILDER</strong> OPTIMUM SIZES TO THE MASTER COURSE LISTSaves the recalculated optimum sizes back to the master course list.OPTION #4:VIEW DEFAULT MASTER COURSE OPTIMUM SIZESShows the default values that you saved using Option #1.OPTION #5:REVERT MASTER COURSE OPTIMUM SIZES TO THE DEFAULTSRestores your default values back to the master course list.<strong>Rediker</strong> <strong>Software</strong> <strong>Inc</strong>. Technical Support800-882-299415
Once you have made adjustments to the optimum sizes, you can print this list to use it as a referencewhen you assign preferred teachers. Click F9 to print this list.<strong>Rediker</strong> <strong>Software</strong> <strong>Inc</strong>. Technical Support800-882-299416
After you have printed the list, click F10 to exit the Set Number of Sections screen.If you have made any changes to the Optimum Sizes and did not click on the Transfer Option on theOptimum Size menu, you will see this message upon exiting. Clicking Yes will write the new optimumsizes to the Master Course list. If you click No the optimum sizes will revert back to their originalamounts.<strong>Rediker</strong> <strong>Software</strong> <strong>Inc</strong>. Technical Support800-882-299417
PREFERRED TEACHERSAssigning preferred teachers for courses allows you to link teachers to the courses you would like themto teach. Once the information is entered, one click assigns teachers to sections in the build schedulescreen.Helpful Hint: This list gets saved in your school year folder. When it is time to schedulenext year, you will not have to re-enter this information. At most, you will just have tomodify it.<strong>Rediker</strong> <strong>Software</strong> <strong>Inc</strong>. Technical Support800-882-299418
To Assign a Teacher to a Course• Highlight the course and choose the teacher(s) you want to teach the course.• Click on the arrow pointing to the rightOnce the teacher is added, highlight the teacher’s name and either double click to increase the numberof sections or just click the plus sign.Helpful Hint: Use the list that you printed from Set Number of Sections as yourguide. It will show you many sections of each course you need so that you canassign teachers accordingly.<strong>Rediker</strong> <strong>Software</strong> <strong>Inc</strong>. Technical Support800-882-299419
You may have teachers that cannot teach particular period(s). You can enter their excluded periods inthe Excluded Period screen.Click on the Excluded Periods radio button.<strong>Rediker</strong> <strong>Software</strong> <strong>Inc</strong>. Technical Support800-882-299420
Highlight the teacher and then click Edit [F3].Type in the excluded periods for the teacher and click Save [F10]. This will bring you back to thepreferred teachers list.<strong>Rediker</strong> <strong>Software</strong> <strong>Inc</strong>. Technical Support800-882-299421
The excluded periods will appear next to the teacher name. Every time you select this teacher you willsee the excluded periods.There may be courses for which you need to assign more than one teacher. When multiple teachers areassigned, you can control the number of sections each teacher can teach by highlighting the teacherand selecting the number of periods.<strong>Rediker</strong> <strong>Software</strong> <strong>Inc</strong>. Technical Support800-882-299422
Once you are finished entering the preferred teachers and excluded periods, click Save [F10] to savethis list and exit this screen.To print this list by either teacher or course, click F9.<strong>Rediker</strong> <strong>Software</strong> <strong>Inc</strong>. Technical Support800-882-299423
BUILD <strong>SCHEDULE</strong>When you first enter the Build Schedule screen you will see all of the sections that you calculated inSet Number of Sections.The default sort order will present the singletons followed by the doubletons, etc. The secondary sortis the number of requests in decreasing order. You can sort the list by clicking on the header of anycolumn.Helpful Hint: The F Keys• F2 Search: Allows you to search the list for a specific course.• F3 Edit: Places your cursor in the first editable column of a highlighted course.• F4 Sort: Provides you with options on how to sort the list.• F5 Build: Suggests the best meeting time for all the courses in the list and placesthose times in the Scheduled Periods column.• F6 Requests: Displays the students who have requested a highlighted course.• F7 Del Time: Deletes all the times from the Scheduled Periods column.• F8 Del Tch: Removes all the teachers from the Teacher column.• F9 Print: Generates a print out of this list.<strong>Rediker</strong> <strong>Software</strong> <strong>Inc</strong>. Technical Support800-882-299424
The Deluxe Schedule Builder allows you to schedule all year, semester one, semester two and quartercourses at one time. By default, all semester sections will be listed as semester one.To Change the Semester or Quarter Designation of a Course• Click on the QTR column twice to sort this list by QTR in descending order and if the columnis locked, unlock it.• Click in the QTR field and select the appropriate semester or quarter.• Arrow down the column to make your changes.Once you are finished changing the quarter designation, click F10. You will see a recalculatingschedule pop-up. After the recalculation, lock the QTR column.<strong>Rediker</strong> <strong>Software</strong> <strong>Inc</strong>. Technical Support800-882-299425
If you set your Preferred Teachers list, you can have the program instantly assign those teachers totheir corresponding sections in the builder. All of the teachers that you linked with courses will appearin the Teacher column. Their excluded periods will appear in the Excluded Period column.To Assign Teachers• Click the Assign Teachers button.Helpful Hint:You can always manually enter teachers or change teachers on this screen.• Unlock the ID column• Type in the ID of the teacher you want to teach the class.If you do not have a teacher for a section, the teacher field can be left blank and the builder willassign the best meeting time for that course based only on student requests.<strong>Rediker</strong> <strong>Software</strong> <strong>Inc</strong>. Technical Support800-882-299426
Once you have assigned your teachers, you can build your schedule. The first courses you will need toplace are your fixed sections.To Schedule a Fixed Section• Use F2 (SEARCH) to easily find the course in the list.• Double click in the Scheduled Period column.• Type in the meeting time(s).• Click F10.• Lock the time by clicking the NO in the Lock column and changing it to YES.Once you have set your Fixed Sections, click Default Sort Order. This is will put singletons at the topsorted by number of requests, followed by doubletons sorted by number of requests, etc.Helpful Hint:Locked courses automatically appear before other courses in their category. Physics andAP Environmental Science are both Singletons and they will appear before the othersingletons.<strong>Rediker</strong> <strong>Software</strong> <strong>Inc</strong>. Technical Support800-882-299427
To start building your schedule it is recommended that you lock all columns except the Sched Percolumn. This is for ease in data entry. You can use your arrow keys to scroll up and down the columnand enter your periods accordingly.At any time you can click or press F5 Build and have the program automatically assign meeting times,but you may want to use our interactive feature to schedule your singletons.To View Just the Singletons• Click the Select All check box to uncheck all the boxes.• Click the Singletons check box to view just the singletons.Helpful Hint:Regardless of what sections you are looking at, do not forget to click Default Sort Order. This willallow you to focus on the courses with most requests first and if you choose F5 we will build fromthe top of the list so Sort Order is IMPORTANT.<strong>Rediker</strong> <strong>Software</strong> <strong>Inc</strong>. Technical Support800-882-299428
To Schedule Interactively• Double click in the Sched Per column of the course.• Type in the meeting time if you know it or click or press F6 [Lookup].Since Band can only meet A or C (the teacher cannot teach periods B, D, E, F and G), period A isselected for the Band meeting time.Chorus can be built interactively by clicking on F6.<strong>Rediker</strong> <strong>Software</strong> <strong>Inc</strong>. Technical Support800-882-299429
The lookup window shows both teacher and student conflicts for each of the seven periods.REMINDER:After you select the period youshould click on F10 to make theprogram recalculate conflicts.PER:Lists each of your periods.Helpful Hint: The symbols next to the period mean different things.@: This period is excluded for this teacher.*: This section is currently scheduled in that period.CONFLICTS:Displays the total number of potential conflicts in each period. A potential conflict is when a studentrequests two courses that if scheduled during the same meeting time would create a conflict in his orher schedule. (See the following page for more information about this column.)BALANCE:Displays the number of students by grade level who have requested a course whose sections havealready been given a meeting time. There are 23 seniors that have requested a course meeting F and Gperiods and 13 freshmen, 6 sophomores, 10 juniors and 11 seniors that have a requested coursemeeting A period.SECT:Shows the number of sections already scheduled in a given period. There are two sections scheduledfor both period F and G and one section scheduled for period A.Helpful Hint: When scheduling singletons it is recommended that you select a period that already hasthe most sections and the fewest conflicts.Because of excluded periods and teacher availability, the only time this course can meet is C period.So you would highlight “C” and click Select.<strong>Rediker</strong> <strong>Software</strong> <strong>Inc</strong>. Technical Support800-882-299430
CONFLICTS – IN DETAILHelpful Hint:To see what courses are causing the conflicts in any given period, highlight the period and clickF6 [Lookup].<strong>Rediker</strong> <strong>Software</strong> <strong>Inc</strong>. Technical Support800-882-299431
The next course on the list is Sociology. It is a semester course.As you can see, there is one section scheduled into periods A and C and two sections scheduled intoperiods F and G. Of these periods, only F and G do not have any conflicts, so Sociology should bescheduled into either of these periods. In this example, period F was chosen.The next course is Ancient History, also a semester course.<strong>Rediker</strong> <strong>Software</strong> <strong>Inc</strong>. Technical Support800-882-299432
Helpful Hint:If you have semester or trimester courses and are going use the F5 Build option……It is recommended that you build your first semester and all year courses and then bring in your secondsemester courses and enter the corresponding meeting times.Once you have built your Semester 1 courses, simply check the box to bring in your Semester 2 courses andenter the corresponding meeting times.NOTE:The builder does not take into account either linked courses or courses with prerequisisites whendetermining meeting times.<strong>Rediker</strong> <strong>Software</strong> <strong>Inc</strong>. Technical Support800-882-299433
At any point, you can use F5 [Build] to have the program automatically assign meeting times to yourcourses.<strong>Rediker</strong> <strong>Software</strong> <strong>Inc</strong>. Technical Support800-882-299434
To print a hard copy of this list, click or press F9 [Print].When you are finished with the builder, click Esc or close the window.<strong>Rediker</strong> <strong>Software</strong> <strong>Inc</strong>. Technical Support800-882-299435
CREATE SECTION LISTEverything that you have done to this point has been confined to the Builder. In order to see how thisschedule is going to work in the real world, you will have to transfer this data to the section list.• Select Option 3 (Create Section List) from the Deluxe Schedule Builder Main Menu.SPECIFICATION #1:ADD TO OR REPLACE EXISTING SECTION LIST?Setting this specification to Replace erases your existing section list and replaces it with a new one.This section list will be what you currently have in the Builder.Setting this specification to Add To adds sections to your existing section list. Due to that fact that youcan now schedule all semesters and quarters at one time, it is highly unlikely that you will use Add To.If, however, you have a K through 12 school and you have two different schedules to build, you willbuild the first schedule and use Replace. Then build the second one and use Add To. This will ensurethat neither section list will be erased.SPECIFICATION #2:INCLUDE WHICH SECTIONS?Check the boxes you want to include in the section list, by default all of the boxes are checked.Once you have created your section list, your next step is Perform Scheduling. We recommend thatinitially you schedule over the optimum (specification 1: Random Scheduling) and that you partiallyschedule students (option 3: Perform Scheduling…students will be partially scheduled).Closing Thoughts:In general, once the section list has been created, most users will not have to return to the builder.Changes made to meeting times, teachers, etc. can be made in Enter Courses. For example, sayyou blocked off FG for Physics and its lab with the intention of putting PE opposite the lab onalternating days. After creating your section list you could adjust the meeting time for Physics toFG1 (G1 being the lab) and adjust the meeting time for PE to G2345.After you have made any adjustments to the section list, the only way to see how your scheduleworks is to perform scheduling. You may have more tweaking to do, but performing schedulingmay help you identify the courses whose meeting times might need to be changed.The Perform Scheduling log, partially scheduled student report, staff master schedule and a sectionlist by time are good reports to look at when trying to determine where you need to make scheduleadjustments.IF YOU HAVE ANY QUESTIONS OR NEED ASSISTANCE, PLEASE DO NOT HESITATE TOCALL REDIKER TECH SUPPORT AT 800-882-2994.<strong>Rediker</strong> <strong>Software</strong> <strong>Inc</strong>. Technical Support800-882-299436