- Page 1 and 2: MUSIC SYNTHESIZER/REALTIME CONTROL/
- Page 3 and 4: 92-469- 3 IMPORTANT SAFETY INSTRUCT
- Page 5 and 6: (2)AC-2 WARNING PRECAUTIONS PLEASE
- Page 7: Contents Introductory Section Intro
- Page 11 and 12: S 7 8 VWX YZ 4 5 MNO PQR 1 2 DEF GH
- Page 13 and 14: MUSIC SYNTHESIZER REALTIME CONTROL
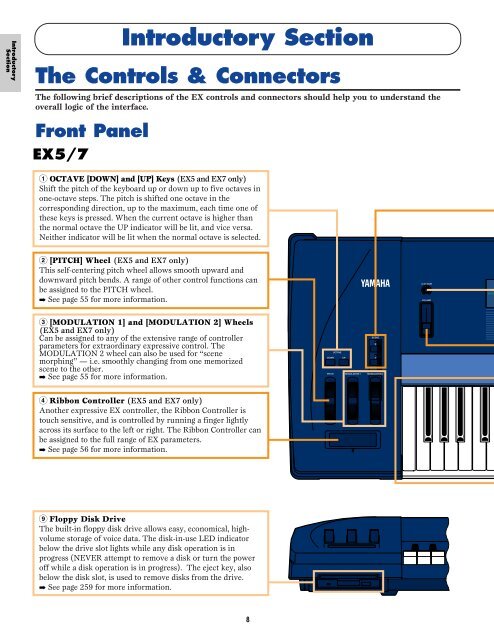
- Page 15 and 16: EX5R A D INPUT VOICE PERFORM SONG P
- Page 17 and 18: External Controllers In addition to
- Page 19 and 20: ■ Mixing Console In addition to t
- Page 21 and 22: ■ External Sampling Sources The S
- Page 23 and 24: EX5/5R/7 The EX5R Tone Generator wi
- Page 25 and 26: The Supplied Disks, Demos & Factory
- Page 27 and 28: Restoring the Factory Set Data In a
- Page 29 and 30: Extended Synthesis Over the years Y
- Page 31 and 32: ■ Controllers & Modifiers The inp
- Page 33 and 34: AN Synthesis (Analog Physical Model
- Page 35 and 36: ■ FDSP Voice Element Structure In
- Page 37 and 38: 2 Select a Voice or Performance In
- Page 39 and 40: Normal Voices & Drum Voices AWM voi
- Page 41 and 42: PITCH The PITCH stage determines th
- Page 43 and 44: ■ Element Configuration Voice Ele
- Page 45 and 46: AN+FDSP Voices (EX5 and EX5R only)
- Page 47 and 48: ■ Relative & Absolute Controller
- Page 49 and 50: The Power of the Performance Mode T
- Page 51 and 52: ■ Arpeggiator Accompaniment The E
- Page 53 and 54: Performance Store Procedure To stor
- Page 55 and 56: The Controllers In addition to the
- Page 57 and 58: Scene Switching & Morphing The SCEN
- Page 59 and 60:
The source controllers are: The des
- Page 61 and 62:
● The Arpeggiator 4-track arpeggi
- Page 63 and 64:
● Step The Step record mode lets
- Page 65 and 66:
The EX Effect System The EX effect
- Page 67 and 68:
Effects In the Performance Mode In
- Page 69 and 70:
Sampling The EX Sample mode lets yo
- Page 71 and 72:
■ Recording the Sample After maki
- Page 73 and 74:
4 Specify a pattern or sample If yo
- Page 75 and 76:
Voice Mode Voice Play Mode Voice Pl
- Page 77 and 78:
Press [EDIT] key on the panel while
- Page 79 and 80:
■ Mono/Poly Selects whether the v
- Page 81 and 82:
■ Wave Play Switches how the wave
- Page 83 and 84:
[F3]: PITCH The Pitch parameters ad
- Page 85 and 86:
■ Time Scale The Time Scale funct
- Page 87 and 88:
■ High/Low Gain Vel (High/Low Gai
- Page 89 and 90:
HPF (High Pass Filter) The HPF pass
- Page 91 and 92:
[F5]: DCF (Dynamic Control Filter)
- Page 93 and 94:
LPF6(Low Pass Filter 6): -6dB/oct l
- Page 95 and 96:
[F8]: EG (Filter Envelope Generator
- Page 97 and 98:
■ Level KeyFollow Sets the Level
- Page 99 and 100:
■ Decay Level Vel (Decay Level Ve
- Page 101 and 102:
■ Fade Sets the fade-in effect of
- Page 103 and 104:
■ Sync The parameters for LFO2 Sy
- Page 105 and 106:
■ Dest Depth (Destination Depth)
- Page 107 and 108:
[F7]: REV (Reverb) Sets various par
- Page 109 and 110:
[F8]: EG (Pitch Envelope Generator)
- Page 111 and 112:
■ Attack Time Sets the amount of
- Page 113 and 114:
■ AN Priority Determines the prio
- Page 115 and 116:
■ VCO1/2 PitchScale Sets the Pitc
- Page 117 and 118:
■ Bank In the COM PARAM screen (e
- Page 119 and 120:
[F8]: EG (Filter Envelope Generator
- Page 121 and 122:
■ Release Time This sets the amou
- Page 123 and 124:
■ LFO1 Delay Sets the delay of th
- Page 125 and 126:
■ BP High (Break Point High) Sets
- Page 127 and 128:
■ Pickup Type Sets the type of pi
- Page 129 and 130:
■ Freq (Frequency) Sets the centr
- Page 131 and 132:
■ LFO Depth (Low Frequency Oscill
- Page 133 and 134:
■ Decay Time Sets the EG decay ti
- Page 135 and 136:
07: Self FM Self FM lets you add ex
- Page 137 and 138:
■ Drive Sets the depth of the mod
- Page 139 and 140:
■ PEG Depth (Pitch Envelope Gener
- Page 141 and 142:
■ Overdrive Sets the amount of th
- Page 143 and 144:
3 (When setting the layers more tha
- Page 145 and 146:
■ Sample Play Sets the way in whi
- Page 147 and 148:
[F4]: FILT (Filter) There are four
- Page 149 and 150:
5Press [ENTER]. The following pop-u
- Page 151 and 152:
Basic Steps for Wave Edit (Creating
- Page 153 and 154:
[F7]: MIX Sets the mix (output), pa
- Page 155 and 156:
5 Press [YES] to execute the job.
- Page 157 and 158:
Performance Number Bank Program Num
- Page 159 and 160:
About the E (Edit) mark Whenever an
- Page 161 and 162:
■ Arp Sw (Arpeggio Switch) Turns
- Page 163 and 164:
[F7]: CTRL (Controller) These setti
- Page 165 and 166:
■ MIDI Pan/Vol (MIDI Pan/Volume)
- Page 167 and 168:
wide: This curve decreases the volu
- Page 169 and 170:
Port (Portamento) Settings related
- Page 171 and 172:
Knob ■ Knob To TG (Knob To Tone G
- Page 173 and 174:
5 Press [ENTER]. The following pop-
- Page 175 and 176:
Sample Mode Sample Play Mode This m
- Page 177 and 178:
■ Trigger Level When “level”
- Page 179 and 180:
Sample Edit Mode In the Sample Edit
- Page 181 and 182:
■ Fraction Finely adjusts the len
- Page 183 and 184:
4 Press [ENTER]. The following pop-
- Page 185 and 186:
Song Mode Song Play Mode This mode
- Page 187 and 188:
Song Control Song playback is contr
- Page 189 and 190:
■ Clk (Clock Shift) The Clock Shi
- Page 191 and 192:
■ Tr (Track Number) Indicates the
- Page 193 and 194:
Song Record Mode In Song Record mod
- Page 195 and 196:
For Pattern Play Effects (PFX) Trac
- Page 197 and 198:
8Change the pattern numbers you wan
- Page 199 and 200:
■ Time Signature Displays the tim
- Page 201 and 202:
Inputting Staccato and Slurs Move t
- Page 203 and 204:
■ CAT (Channel After Touch) Adjus
- Page 205 and 206:
[F2]: PFX (Pattern Play Effects Tra
- Page 207 and 208:
Press [JOB] key on the panel while
- Page 209 and 210:
[F3]: JOB2 Press [F3] (JOB2) and JO
- Page 211 and 212:
■ Track Select the track that wil
- Page 213 and 214:
■ Streng (Quantize Strength) When
- Page 215 and 216:
■ Track Sets the track where Move
- Page 217 and 218:
5. Transpose This job lets you tran
- Page 219 and 220:
Pattern Mode Pattern Play Mode This
- Page 221 and 222:
Steps for Setting the Play Effects
- Page 223 and 224:
Pattern Record Mode In Pattern Reco
- Page 225 and 226:
5Select the track (Tr1-8) for recor
- Page 227 and 228:
3Move the cursor to the location of
- Page 229 and 230:
1. Copy Pattern This job copies all
- Page 231 and 232:
8. Time Stretch This job expands or
- Page 233 and 234:
■ Events Sets the type of event t
- Page 235 and 236:
■ Streng (Quantize Strength) ❏
- Page 237 and 238:
8. Shift Event This job replaces al
- Page 239 and 240:
Track Section These settings are us
- Page 241 and 242:
[F2]: PFX (Play Effects) These sett
- Page 243 and 244:
In the following modes, the arpeggi
- Page 245 and 246:
Arpeggio Record Mode In Arpeggio Re
- Page 247 and 248:
The Procedure for Step Recording 1
- Page 249 and 250:
Arpeggio Job Mode Here are various
- Page 251 and 252:
3. Copy Track This job copies all d
- Page 253 and 254:
1. Copy Measure This job copies all
- Page 255 and 256:
6. Chord Sort This job “sorts”
- Page 257 and 258:
■ Measure ❏ Settings: 01~16 (fo
- Page 259 and 260:
Disk Mode In Disk mode you can tran
- Page 261 and 262:
■ 6. SONG A “SONG” file handl
- Page 263 and 264:
6 Press [ENTER]. The following pop-
- Page 265 and 266:
[F8]: ARP (Arpeggio) Saves all of t
- Page 267 and 268:
■ Sample destination data (To) Th
- Page 269 and 270:
[F5]: MKDIR (Make Directory) This o
- Page 271 and 272:
■ Controller Reset Sets whether t
- Page 273 and 274:
[F7]: FILT (Filter) Sets whether or
- Page 275 and 276:
■ Device No (Device Number) Sets
- Page 277 and 278:
■ Word Clock Sets whether the EX
- Page 279 and 280:
Precautions When Purchasing DRAM SI
- Page 281 and 282:
3Support the EXIDO1 with your hand
- Page 283 and 284:
3Unplug the 2-pin power cable from
- Page 285 and 286:
How to Install the Optional Board/
- Page 287 and 288:
7Turn over the EXIDO1 and place fac
- Page 289 and 290:
6Connect the ASIB1 power cable that
- Page 291 and 292:
Troubleshooting The following table
- Page 293 and 294:
Only one note sounds at a time. ●
- Page 295 and 296:
Specifications KEYBOARD Number of K
- Page 297 and 298:
Dcy 1/2 Level (Decay 1/2 Level) ...
- Page 299 and 300:
MIDI Trns Ch ......................
- Page 301 and 302:
Thru ..............................
- Page 304:
M.D.G., EMI Division, ©Yamaha Corp


![Premere il pulsante [SONG] - Yamaha](https://img.yumpu.com/50419553/1/184x260/premere-il-pulsante-song-yamaha.jpg?quality=85)

