the Custom Loaf - Breville
the Custom Loaf - Breville
the Custom Loaf - Breville

You also want an ePaper? Increase the reach of your titles
YUMPU automatically turns print PDFs into web optimized ePapers that Google loves.
22<br />
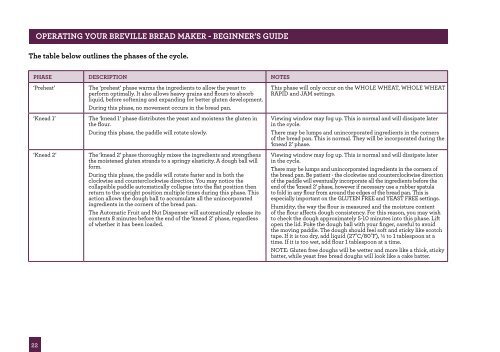
OPERATING yOUR BREvILLE BREAd MAKER - BEGINNER’S GUIdE<br />
The table below outlines <strong>the</strong> phases of <strong>the</strong> cycle.<br />
PHASE dESCRIPTION NOTES<br />
‘Preheat’ The ‘preheat’ phase warms <strong>the</strong> ingredients to allow <strong>the</strong> yeast to<br />
perform optimally. It also allows heavy grains and flours to absorb<br />
liquid, before softening and expanding for better gluten development.<br />
During this phase, no movement occurs in <strong>the</strong> bread pan.<br />
‘Knead 1’ The ‘knead 1’ phase distributes <strong>the</strong> yeast and moistens <strong>the</strong> gluten in<br />
<strong>the</strong> flour.<br />
During this phase, <strong>the</strong> paddle will rotate slowly.<br />
‘Knead 2’ The ‘knead 2’ phase thoroughly mixes <strong>the</strong> ingredients and streng<strong>the</strong>ns<br />
<strong>the</strong> moistened gluten strands to a springy elasticity. A dough ball will<br />
form.<br />
During this phase, <strong>the</strong> paddle will rotate faster and in both <strong>the</strong><br />
clockwise and counterclockwise direction. You may notice <strong>the</strong><br />
collapsible paddle automatically collapse into <strong>the</strong> flat position <strong>the</strong>n<br />
return to <strong>the</strong> upright position multiple times during this phase. This<br />
action allows <strong>the</strong> dough ball to accumulate all <strong>the</strong> unincorporated<br />
ingredients in <strong>the</strong> corners of <strong>the</strong> bread pan.<br />
The Automatic Fruit and Nut Dispenser will automatically release its<br />
contents 8 minutes before <strong>the</strong> end of <strong>the</strong> ‘knead 2’ phase, regardless<br />
of whe<strong>the</strong>r it has been loaded.<br />
This phase will only occur on <strong>the</strong> WHOLE WHEAT, WHOLE WHEAT<br />
RAPID and JAM settings.<br />
Viewing window may fog up. This is normal and will dissipate later<br />
in <strong>the</strong> cycle.<br />
There may be lumps and unincorporated ingredients in <strong>the</strong> corners<br />
of <strong>the</strong> bread pan. This is normal. They will be incorporated during <strong>the</strong><br />
‘knead 2’ phase.<br />
Viewing window may fog up. This is normal and will dissipate later<br />
in <strong>the</strong> cycle.<br />
There may be lumps and unincorporated ingredients in <strong>the</strong> corners of<br />
<strong>the</strong> bread pan. Be patient - <strong>the</strong> clockwise and counterclockwise direction<br />
of <strong>the</strong> paddle will eventually incorporate all <strong>the</strong> ingredients before <strong>the</strong><br />
end of <strong>the</strong> ‘knead 2’ phase, however if necessary use a rubber spatula<br />
to fold in any flour from around <strong>the</strong> edges of <strong>the</strong> bread pan. This is<br />
especially important on <strong>the</strong> GLUTEN FREE and YEAST FREE settings.<br />
Humidity, <strong>the</strong> way <strong>the</strong> flour is measured and <strong>the</strong> moisture content<br />
of <strong>the</strong> flour affects dough consistency. For this reason, you may wish<br />
to check <strong>the</strong> dough approximately 5-10 minutes into this phase. Lift<br />
open <strong>the</strong> lid. Poke <strong>the</strong> dough ball with your finger, careful to avoid<br />
<strong>the</strong> moving paddle. The dough should feel soft and sticky like scotch<br />
tape. If it is too dry, add liquid (27°C/80°F), ½ to 1 tablespoon at a<br />
time. If it is too wet, add flour 1 tablespoon at a time.<br />
NOTE: Gluten free doughs will be wetter and more like a thick, sticky<br />
batter, while yeast free bread doughs will look like a cake batter.