Manual (PDF) - Univers by FTE - Select your country
Manual (PDF) - Univers by FTE - Select your country
Manual (PDF) - Univers by FTE - Select your country

You also want an ePaper? Increase the reach of your titles
YUMPU automatically turns print PDFs into web optimized ePapers that Google loves.
English<br />
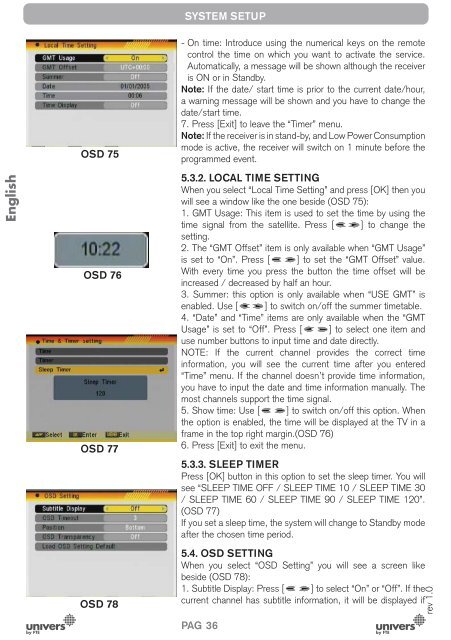
OSD 75<br />
OSD 76<br />
OSD 77<br />
OSD 78<br />
SYSTEM SETUP<br />
- On time: Introduce using the numerical keys on the remote<br />
control the time on which you want to activate the service.<br />
Automatically, a message will be shown although the receiver<br />
is ON or in Stand<strong>by</strong>.<br />
Note: If the date/ start time is prior to the current date/hour,<br />
a warning message will be shown and you have to change the<br />
date/start time.<br />
7. Press [Exit] to leave the “Timer” menu.<br />
Note: If the receiver is in stand-<strong>by</strong>, and Low Power Consumption<br />
mode is active, the receiver will switch on 1 minute before the<br />
programmed event.<br />
5.3.2. LOCAL TIME SETTING<br />
When you select “Local Time Setting” and press [OK] then you<br />
will see a window like the one beside (OSD 75):<br />
1. GMT Usage: This item is used to set the time <strong>by</strong> using the<br />
time signal from the satellite. Press [ ] to change the<br />
setting.<br />
2. The “GMT Offset” item is only available when “GMT Usage”<br />
is set to “On”. Press [ ] to set the “GMT Offset” value.<br />
With every time you press the button the time offset will be<br />
increased / decreased <strong>by</strong> half an hour.<br />
3. Summer: this option is only available when “USE GMT” is<br />
enabled. Use [ ] to switch on/off the summer timetable.<br />
4. “Date” and “Time” items are only available when the “GMT<br />
Usage” is set to “Off”. Press [ ] to select one item and<br />
use number buttons to input time and date directly.<br />
NOTE: If the current channel provides the correct time<br />
information, you will see the current time after you entered<br />
“Time” menu. If the channel doesn’t provide time information,<br />
you have to input the date and time information manually. The<br />
most channels support the time signal.<br />
5. Show time: Use [ ] to switch on/off this option. When<br />
the option is enabled, the time will be displayed at the TV in a<br />
frame in the top right margin.(OSD 76)<br />
6. Press [Exit] to exit the menu.<br />
5.3.3. SLEEP TIMER<br />
Press [OK] button in this option to set the sleep timer. You will<br />
see “SLEEP TIME OFF / SLEEP TIME 10 / SLEEP TIME 30<br />
/ SLEEP TIME 60 / SLEEP TIME 90 / SLEEP TIME 120”.<br />
(OSD 77)<br />
If you set a sleep time, the system will change to Stand<strong>by</strong> mode<br />
after the chosen time period.<br />
5.4. OSD SETTING<br />
When you select “OSD Setting” you will see a screen like<br />
beside (OSD 78):<br />
1. Subtitle Display: Press [ ] to select “On” or “Off”. If the<br />
current channel has subtitle information, it will be displayed if<br />
PAG. 36<br />
rev 1.0