KODAK Photo Printer 6850
KODAK Photo Printer 6850
KODAK Photo Printer 6850

Create successful ePaper yourself
Turn your PDF publications into a flip-book with our unique Google optimized e-Paper software.
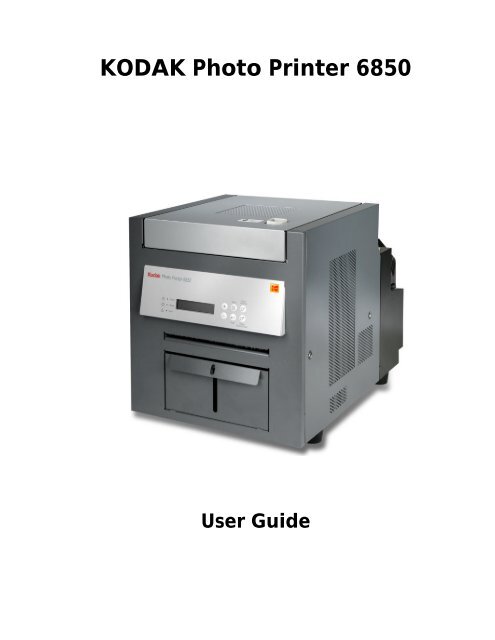
<strong>KODAK</strong> <strong>Photo</strong> <strong>Printer</strong> <strong>6850</strong><br />
User Guide
Eastman Kodak Company<br />
343 State Street<br />
Rochester, New York 14650<br />
© Eastman Kodak Company, 2005<br />
Kodak is a trademark of Eastman Kodak Company.<br />
ENERGY STAR is a U.S. registered trademark.<br />
Part Number 4J0939_US
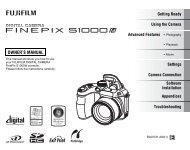
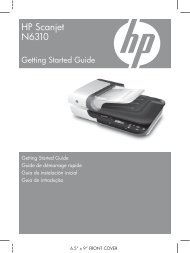
1. Filter openings<br />
2. Cover release<br />
3. Upper cover<br />
4. Operator panel<br />
5. Print exit slot (print catcher not shown)<br />
6. Trim tray<br />
7. USB connector<br />
8. Paper door<br />
9. Data plate (location may vary)<br />
10. Serial number/Bar code label<br />
(location may vary)<br />
11. Power connector<br />
12. Power switch<br />
1<br />
Front<br />
Rear<br />
A161_3004AC<br />
12<br />
Product Overview<br />
May 4, 2005 i<br />
11<br />
10<br />
9<br />
2<br />
3<br />
4<br />
6<br />
7<br />
5<br />
8
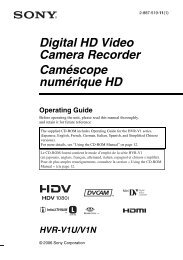
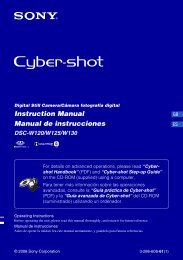
Product Overview<br />
Internal View with Ribbon Installed<br />
Internal View with Ribbon Removed<br />
ii May 4, 2005<br />
1<br />
2<br />
1. Thermal head<br />
2. Stripper plate<br />
3<br />
4<br />
5<br />
3. Cleaning roller, rear<br />
4. Platen roller<br />
5. Cleaning roller, front
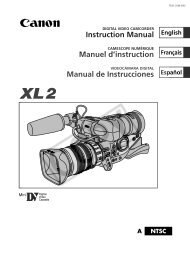
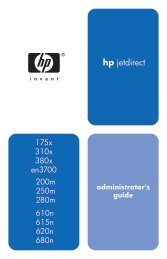
Operator Panel<br />
Kodak <strong>Photo</strong> <strong>Printer</strong> <strong>6850</strong><br />
Power<br />
Ready<br />
Error<br />
Paper<br />
Advance<br />
Menu<br />
Enter Paper<br />
Rewind/Clear<br />
Product Overview<br />
May 4, 2005 iii
Table of Contents<br />
1 Setting Up the <strong>Printer</strong><br />
Package Contents .............................................................................................................................................1-1<br />
Before You Begin .............................................................................................................................................1-2<br />
Recommended Air Flow Clearances ...........................................................................................................1-2<br />
Removing the Packing Material ........................................................................................................................1-3<br />
Installing the Trim Tray....................................................................................................................................1-4<br />
Installing the Print Catcher...............................................................................................................................1-4<br />
Loading the Ribbon..........................................................................................................................................1-5<br />
Connecting the Cables ......................................................................................................................................1-7<br />
Connecting the Power Cable.......................................................................................................................1-7<br />
Connecting the USB Cable ..........................................................................................................................1-8<br />
Turning On the <strong>Printer</strong>.....................................................................................................................................1-8<br />
Loading the Paper ............................................................................................................................................1-9<br />
Making a Test Print ........................................................................................................................................1-11<br />
Online User Guide..........................................................................................................................................1-11<br />
2 Installing the <strong>Printer</strong> Driver Software<br />
Installing the <strong>Printer</strong> Driver..............................................................................................................................2-1<br />
Customizing <strong>Printer</strong> Properties.........................................................................................................................2-2<br />
Customizing Printing Preferences.....................................................................................................................2-2<br />
Uninstalling the <strong>Printer</strong> and <strong>Printer</strong> Driver .......................................................................................................2-3<br />
3 Calibrating the <strong>Printer</strong><br />
Installing the Calibration Software....................................................................................................................3-1<br />
Using the Calibration Utility ..............................................................................................................................3-1<br />
Uninstalling the Calibration Software................................................................................................................3-8<br />
Resolving Calibration Error Messages ..............................................................................................................3-8<br />
4 Operating the <strong>Printer</strong><br />
Making Prints...................................................................................................................................................4-1<br />
Handling and Storing Prints .............................................................................................................................4-1<br />
Understanding the Operator Panel Lights .........................................................................................................4-1<br />
Using Setup Mode to Review <strong>Printer</strong> Settings ....................................................................................................4-2<br />
Accessing the <strong>Printer</strong> Settings.....................................................................................................................4-2<br />
May 4, 2005 v
Table of Contents<br />
5 Maintaining the <strong>Printer</strong><br />
Cleaning the Cabinet.........................................................................................................................................5-1<br />
Performing Routine Maintenance.....................................................................................................................5-1<br />
Cleaning the Thermal Head and Stripper Plate ...........................................................................................5-2<br />
Cleaning the Platen Roller ..........................................................................................................................5-3<br />
Cleaning the Cleaning Rollers.....................................................................................................................5-3<br />
6 Troubleshooting<br />
Resolving Potential Problems ...........................................................................................................................6-1<br />
Resolving Operator Panel Error Messages........................................................................................................6-2<br />
Clearing a Paper Jam........................................................................................................................................6-3<br />
Method 1 ...................................................................................................................................................6-3<br />
Method 2 ...................................................................................................................................................6-3<br />
Recovering from a Power Interruption.............................................................................................................6-4<br />
Appendix A: Important <strong>Printer</strong> Information<br />
System Requirements .......................................................................................................................................A-1<br />
<strong>Printer</strong> Specifications .......................................................................................................................................A-1<br />
<strong>Printer</strong> Supplies ...............................................................................................................................................A-2<br />
Paper and Ribbon ......................................................................................................................................A-2<br />
Handling and Storing the Paper and Ribbon.........................................................................................A-2<br />
Thermal <strong>Printer</strong> Cleaning Kit ......................................................................................................................A-3<br />
Packing and Transporting the <strong>Printer</strong>...............................................................................................................A-3<br />
ENERGY STAR Partner......................................................................................................................................A-3<br />
Getting Help .....................................................................................................................................................A-3<br />
Appendix B: Safety and Regulatory Information<br />
Important Safety Information ...........................................................................................................................B-1<br />
Safety Labels.....................................................................................................................................................B-2<br />
Regulatory and Safety Compliance....................................................................................................................B-3<br />
Safety .........................................................................................................................................................B-3<br />
Electromagnetic Compatibility (EMC) ........................................................................................................B-3<br />
Noise Emission...........................................................................................................................................B-4<br />
Disposal.....................................................................................................................................................B-4<br />
Index<br />
vi May 4, 2005
1 Setting Up the <strong>Printer</strong><br />
Package Contents<br />
61_3000BC<br />
6<br />
7<br />
The <strong>KODAK</strong> <strong>Photo</strong> <strong>Printer</strong> <strong>6850</strong> is packaged with the following items:<br />
5<br />
1. <strong>Printer</strong><br />
1<br />
2. <strong>KODAK</strong> Thermal <strong>Printer</strong> Cleaning Kit<br />
3. Trim Tray (not installed)<br />
4. Print Catcher (not installed)<br />
5. (4) <strong>6850</strong> Power Cable (1 US, 1 Europe, 1 Australia, 1 China)<br />
6. USB Cable<br />
7. (2) Paper Flange<br />
8. User Guide and software CD, not pictured (in some countries, the User<br />
Guide is provided on the CD, not in printed form)<br />
May 4, 2005 1-1<br />
4<br />
2<br />
3
Setting Up the <strong>Printer</strong><br />
Before You Begin<br />
Recommended Air<br />
Flow Clearances<br />
IMPORTANT: Your <strong>KODAK</strong> <strong>Photo</strong> <strong>Printer</strong> comes with several power cables.<br />
Be sure to select the correct power cable required for your<br />
country.<br />
Have the following items available before you begin your printer setup:<br />
• <strong>KODAK</strong> <strong>Photo</strong> Print Kit 6800/4R or <strong>KODAK</strong> <strong>Photo</strong> Print Kit 6800/6R which<br />
contains the correct paper and ribbon for the best print quality and print<br />
life from your printer. See Appendix A for details on the <strong>Photo</strong> Print Kit<br />
(sold separately).<br />
USB cable (included).<br />
IMPORTANT: The printer weighs 56 lb (25 kg) and is heavier at the front<br />
than at the back. Use caution when lifting or moving the<br />
printer.<br />
If you plan to set up the printer in a restricted space, such as in a cabinet,<br />
refer to the following illustration for the recommended air flow clearances for<br />
this type of setup.<br />
10 mm<br />
50 mm<br />
50 mm<br />
50 mm<br />
1-2 May 4, 2005
Removing the Packing Material<br />
Tape<br />
90˚<br />
Setting Up the <strong>Printer</strong><br />
The printer is packaged with protective inserts that prevent damage during<br />
shipping. Remove these inserts before using the printer. Keep the carton and<br />
packing inserts; reinstall them when repacking and transporting the printer.<br />
1. Remove the tape from the upper cover.<br />
2. Slide the cover release toward you, then open the upper cover carefully.<br />
IMPORTANT: Cover does not open beyond a 90° angle.<br />
May 4, 2005 1-3
Setting Up the <strong>Printer</strong><br />
Installing the Trim Tray<br />
3. Remove the packing material.<br />
Installing the Print Catcher<br />
Print<br />
catcher<br />
Trim tray<br />
Print exit<br />
slot<br />
The trim tray collects paper trimmings that are generated when the printer<br />
cuts the prints.<br />
Slide the trim tray into the printer as shown.<br />
CAUTION:<br />
There are sharp cutter blades inside the printer. Do not insert<br />
hands or objects.<br />
IMPORTANT: To keep your prints dust-free and to prevent paper jams,<br />
empty the trim tray each time you change the paper.<br />
The print catcher collects the finished prints as they exit the printer.<br />
Attach the print catcher from the print exit slot as shown.<br />
1-4 May 4, 2005
Loading the Ribbon<br />
Wrapper<br />
90˚<br />
Setting Up the <strong>Printer</strong><br />
Have a <strong>KODAK</strong> <strong>Photo</strong> Print Kit 6800/4R or <strong>KODAK</strong> <strong>Photo</strong> Print Kit 6800/6R<br />
available. These kits contain the correct size ribbon for your printer. See<br />
Appendix A for details on the <strong>Photo</strong> Print Kits (sold separately).<br />
To load the ribbon into the printer:<br />
1. Slide the cover release toward you, then open the upper cover carefully.<br />
IMPORTANT: Cover does not open beyond a 90° angle.<br />
CAUTION:<br />
The thermal head becomes extremely hot during normal<br />
operation. Do not touch it.<br />
2. If you are replacing a ribbon, remove the used ribbon from the printer.<br />
NOTE: Images remain on the ribbon after printing. If you need to maintain<br />
confidentiality, dispose of the used ribbon appropriately.<br />
3. Insert your fingers into the holes in the plastic on the end of the ribbon.<br />
Remove the plastic cover from the ribbon.<br />
IMPORTANT: Do not remove the wrapper from the ribbon at this time.<br />
May 4, 2005 1-5
Setting Up the <strong>Printer</strong><br />
Thumb wheel<br />
Lugs Notches<br />
Take-up spool<br />
Supply spool<br />
Bar code<br />
Label<br />
4. Push the bar code end of the supply spool into the spool holder on the<br />
right.<br />
5. Place the left side of the supply spool into the spool holder on the left.<br />
6. Rotate the thumb wheel until the lugs on the spool holder lock into the<br />
notches on the supply spool.<br />
7. Remove the label and wrapper from the ribbon.<br />
8. Push the right side of the take-up spool into the spool holder on the<br />
right.<br />
9. Place the left side of the take-up spool into the spool holder on the left.<br />
10. Adjust the take-up spool until the lugs on the spool holder lock into the<br />
notches on the take-up spool.<br />
11. If there is any slack in the ribbon, remove it by turning the supply spool.<br />
IMPORTANT: Slack in the ribbon can cause a paper jam when making<br />
prints.<br />
1-6 May 4, 2005
Connecting the Cables<br />
Connecting the Power<br />
Cable<br />
OFF<br />
A<br />
Setting Up the <strong>Printer</strong><br />
12. Close the upper cover by pressing on the center of the cover until it clicks<br />
in place.<br />
If you plan to install the printer driver software on your computer, you will<br />
need to install the software before you connect the cables. See Chapter 2 ,<br />
Installing the <strong>Printer</strong> Driver Software.<br />
IMPORTANT: You must install the printer driver software before<br />
connecting the cables or your printer will not work.<br />
You may have received more than one power cable with your printer. Be sure<br />
to use the correct power cable required for your country.<br />
1. Check that the power switch is turned off ( ).<br />
CAUTION:<br />
The power outlet must be grounded. An ungrounded outlet can<br />
cause fire, electric shock, or harmful interference to nearby<br />
electrical devices.<br />
2. Connect the power cable to the power connector on the back of the<br />
printer and to a grounded power outlet.<br />
May 4, 2005 1-7
Setting Up the <strong>Printer</strong><br />
Connecting the USB<br />
Cable<br />
OFF<br />
Turning On the <strong>Printer</strong><br />
OFF<br />
ON<br />
Use the included USB cable.<br />
1. Check that the power switch is turned off ( ).<br />
2. Connect the USB cable to the USB connector on the back of the printer<br />
and to the USB connector on the computer.<br />
1. Press the power switch to on ( | ).<br />
On the operator panel, the orange Power light and the green Ready<br />
light illuminate, and the Ready message appears when the printer is<br />
initialized.<br />
2. To turn off the printer, press the power switch to off ( ).<br />
1-8 May 4, 2005
Loading the Paper<br />
Label<br />
Green paper flange<br />
Lugs<br />
Notches<br />
Black paper flange<br />
Setting Up the <strong>Printer</strong><br />
Have a <strong>KODAK</strong> <strong>Photo</strong> Print Kit 6800/4R or <strong>KODAK</strong> <strong>Photo</strong> Print Kit 6800/6R<br />
available. These kits contain the correct size paper for your printer. See<br />
Appendix A for details on the <strong>Photo</strong> Print Kits (sold separately).<br />
IMPORTANT: To keep your prints dust-free and to prevent paper jams,<br />
empty the trim tray each time you change the paper.<br />
To load the paper into the printer:<br />
1. Remove the plastic cover from the new paper roll.<br />
IMPORTANT: Do not remove the label from the paper roll until you have<br />
successfully loaded the paper into the printer.<br />
2. Attach the paper flanges to each end of the paper roll.<br />
a. Line up the lugs on the green paper flange with the notches on the left<br />
side of the paper roll.<br />
b. Place the green paper flange on the left side of the paper roll.<br />
c. Place the black paper flange on the right side of the paper roll.<br />
NOTE: Be sure to match up the lugs on the green paper flange with the<br />
notches on the left side of the paper roll. If you do not attach the<br />
paper flange properly, the paper roll will not fit into the printer.<br />
3. Open the paper door.<br />
The operator panel displays the Cover Open message.<br />
4. Set the paper roll into the printer according to the green and black<br />
arrows on the label.<br />
5. Remove the label from the paper roll.<br />
May 4, 2005 1-9
Setting Up the <strong>Printer</strong><br />
Paper guide<br />
Red line<br />
Paper feeding knob<br />
Kodak <strong>Photo</strong> <strong>Printer</strong> <strong>6850</strong><br />
Power<br />
Ready<br />
Error<br />
Alignment<br />
marks<br />
Pinch roller<br />
Paper<br />
Menu<br />
Advance<br />
Enter Paper<br />
Rewind/Clear<br />
6. Align the edge of the paper with the alignment marks on the paper guide.<br />
7. Insert the paper under the pinch roller.<br />
IMPORTANT: Do not advance the paper past the red line or you may<br />
cause the paper to jam.<br />
8. Advance the paper to the red line by turning the paper feeding knob.<br />
9. Carefully close the paper door.<br />
The operator panel displays the Paper Empty message.<br />
10. Press Paper Advance to load the paper into the printer.<br />
The printer advances the paper, then cuts and discharges about<br />
24 in. (61 cm) of blank paper. This reduces the possibility of<br />
fingerprints or other damage to the prints. It does not decrease the<br />
750 4 x 6 in. (10 x 15 cm) print capacity of the paper roll (see<br />
page A-2).<br />
The operator panel displays the Ready message.<br />
1-10 May 4, 2005
Making a Test Print<br />
Kodak <strong>Photo</strong> <strong>Printer</strong> <strong>6850</strong><br />
Power<br />
Ready<br />
Error<br />
Online User Guide<br />
1<br />
Paper<br />
Menu Advance<br />
Enter Paper<br />
Rewind/Clear<br />
2 3<br />
Setting Up the <strong>Printer</strong><br />
Make a test print to check that the printer is installed and set up correctly.<br />
1. Press Menu once until Test Print Mode appears.<br />
2. Press Enter to start printing the test print.<br />
3. Press Clear to return to Ready after the test print is printed.<br />
For more information on using the operator panel in Setup mode, see “Using<br />
Setup Mode to Review <strong>Printer</strong> Settings” on page 4-2.<br />
This User Guide and the Quick Setup Guide are also provided on the CD that<br />
came with your printer. The Guides are in PDF format; ADOBE ACROBAT<br />
Reader (also provided) is required to read them.<br />
Follow the on-screen directions to install ADOBE ACROBAT Reader if you do<br />
not already have it installed on your system.<br />
May 4, 2005 1-11
2 Installing the <strong>Printer</strong><br />
Driver Software<br />
Installing the <strong>Printer</strong> Driver<br />
A printer driver is software that allows the operating software to access the<br />
printer features.<br />
The WINDOWS 2000/XP <strong>6850</strong> printer driver requires the following:<br />
Operating System Service Pack Minimum Memory<br />
WINDOWS 2003 Server SP1 512 MB<br />
WINDOWS 2000 Professional SP3 128 MB<br />
WINDOWS 2000 Server SP3 256 MB<br />
WINDOWS 2000 Advanced Server SP3 256 MB<br />
WINDOWS XP Home SP1 128 MB<br />
WINDOWS XP Professional SP1 128 MB<br />
The printer driver also requires a functional USB port to communicate with<br />
the printer. The printer is compliant with the USB 2.0 protocol.<br />
NOTE: If your equipment only supports the USB 1.1 protocol, data<br />
communication to the printer will be slower and may affect print<br />
times.<br />
IMPORTANT: You must have Administrator privileges to install the<br />
printer driver.<br />
NOTE: The driver installer automatically uninstalls older versions of the<br />
6800 printer driver.<br />
1. Insert the CD that came with the printer into your CD-ROM drive.<br />
The CD Browser launches automatically. If it does not, double-click<br />
the Kodak68xx.exe file in the CD root directory.<br />
2. Select your language.<br />
3. Click Software.<br />
NOTE: Before installing the software, read the <strong>Printer</strong> Driver Readme file for<br />
important information and updates about the software.<br />
4. Click <strong>Printer</strong> Driver to start the installer.<br />
5. Follow the on-screen instructions to install the printer driver.<br />
May 4, 2005 2-1
Installing the <strong>Printer</strong> Driver Software<br />
Customizing <strong>Printer</strong> Properties<br />
The <strong>Printer</strong> Properties dialog box displays options for setting the printer<br />
properties.<br />
1. For your operating system, do the following:<br />
2. Right-click the printer icon for your printer model.<br />
3. Select Properties.<br />
4. Adjust the printer settings appropriately for your printer.<br />
Customizing Printing Preferences<br />
WINDOWS 2000 WINDOWS XP<br />
Select Start > Settings > <strong>Printer</strong>s. Select Start > <strong>Printer</strong>s and Faxes.<br />
The Printing Preferences dialog box displays options for setting how your<br />
printer will print.<br />
1. For your operating system, do the following:<br />
WINDOWS 2000 WINDOWS XP<br />
Select Start > Settings > <strong>Printer</strong>s. Select Start > <strong>Printer</strong>s and Faxes.<br />
2. Right-click the printer icon for your printer model.<br />
3. Select Printing Preferences.<br />
4. On the Layout tab, click Advanced.<br />
The Advanced Options dialog box appears.<br />
5. Adjust the printing preferences appropriately for your printer.<br />
2-2 May 4, 2005
Installing the <strong>Printer</strong> Driver Software<br />
Uninstalling the <strong>Printer</strong> and <strong>Printer</strong> Driver<br />
IMPORTANT: You must have Administrator privileges to uninstall the<br />
printer and printer driver.<br />
1. For your operating system, do the following:<br />
WINDOWS 2000 WINDOWS XP<br />
Select Start > Settings ><br />
<strong>Printer</strong>s.<br />
The <strong>Printer</strong>s dialog box appears.<br />
2. Right-click the printer you want to remove and select Delete.<br />
3. Click Yes to delete the printer.<br />
4. Select File > Server Properties.<br />
5. Select Drivers.<br />
6. Highlight the printer driver you want to remove and click Remove.<br />
7. Click Yes to delete the printer driver.<br />
8. Click Close.<br />
Select Start > <strong>Printer</strong>s and<br />
Faxes.<br />
The <strong>Printer</strong>s and Faxes dialog<br />
box appears.<br />
May 4, 2005 2-3
3 Calibrating the <strong>Printer</strong><br />
The <strong>KODAK</strong> Calibration Utility (calibration utility) allows the <strong>KODAK</strong> <strong>Photo</strong><br />
<strong>Printer</strong> to produce the best possible color response. <strong>Printer</strong> calibration<br />
adjusts the response of the printer so that a specific data input value yields a<br />
specific color density output. When a printer is properly calibrated, it<br />
generates the correct density for each given data value.<br />
Your <strong>KODAK</strong> <strong>Photo</strong> <strong>Printer</strong> is shipped with default factory calibration values.<br />
You should be able to set up your printer and begin printing right away<br />
without having to first calibrate the printer. However, if you are dissatisfied<br />
with the color of your prints, follow the steps in this chapter to calibrate your<br />
printer.<br />
Installing the Calibration Software<br />
1. Insert the CD that came with the printer into your CD-ROM drive.<br />
The CD Browser launches automatically. If it does not, double-click<br />
the Kodak68xx.exe file in the CD root directory.<br />
2. Select your language.<br />
Using the Calibration Utility<br />
3. Click Software.<br />
NOTE: Before installing the software, read the Calibration Software Readme<br />
file for important information and updates about the software.<br />
4. Click Calibration Software to start the installer.<br />
5. Follow the on-screen instructions to install the calibration software.<br />
Before you use the calibration utility, make sure you are familiar with how<br />
your <strong>KODAK</strong> <strong>Photo</strong> <strong>Printer</strong> operates.<br />
Calibrate your printer whenever the color balance of prints does not look<br />
right. You may also want to calibrate your printer after it has been serviced.<br />
Easy Cal is a five-step process that quickly calibrates your printer using the<br />
Visual Gray Balance method. Before using Easy Cal, start the calibration utility.<br />
May 4, 2005 3-1
Calibrating the <strong>Printer</strong><br />
1. Select Start > Programs > <strong>KODAK</strong> Calibration Utility.<br />
The following dialog box appears.<br />
2. Select Easy Cal > Begin.<br />
The following dialog box appears.<br />
3. Click Proceed.<br />
The following dialog box appears.<br />
3-2 May 4, 2005
Calibrating the <strong>Printer</strong><br />
4. Select your printer from the <strong>Printer</strong> Model list.<br />
If the printer you want to calibrate is on the list, select it and<br />
go to Step 8.<br />
If the printer you want to calibrate does not appear in the list,<br />
continue with Step 5.<br />
5. Click Locate Export Modules Folder.<br />
A file selection dialog box appears.<br />
6. Browse to C:/WINNT/Kodak/Plug-Ins (Printing) folder.<br />
NOTE: The exact path to the export module folder may differ depending on<br />
your operating system.<br />
7. Select the folder that the export module is in, and then click OK.<br />
8. Click Next.<br />
The following dialog box appears.<br />
9. Confirm that the printer model listed is the printer you want to calibrate.<br />
If the printer model you want to calibrate is listed, go to Step 13.<br />
If you want to calibrate a different printer model than the one that is<br />
listed, continue with Step 10.<br />
May 4, 2005 3-3
Calibrating the <strong>Printer</strong><br />
10. Click Select <strong>Printer</strong>.<br />
The following dialog box appears.<br />
NOTE: The appearance of this dialog box may vary, depending on your<br />
printer setup and the media file you selected.<br />
11. From the <strong>Printer</strong> ID: list, select your printer ID.<br />
NOTE: Click Blink to Identify to locate a specific printer if you have more<br />
than one printer. The Ready light on the operator panel of the printer<br />
will blink five times.<br />
NOTE: Click Update if you want to update the printer information on the<br />
dialog box. You may need to do this if your printer is accidentally<br />
shut off.<br />
12. Click OK to close the dialog box.<br />
13. Click Next.<br />
The following dialog box appears.<br />
3-4 May 4, 2005
Calibrating the <strong>Printer</strong><br />
14. Check that the printer setup listed is the printer setup you want to use for<br />
calibration.<br />
If the printer setup listed is the correct printer setup for your printer,<br />
go to Step 19.<br />
If you want a different printer setup than what is listed, continue with<br />
Step 15.<br />
15. Click Change Setup.<br />
The following dialog box appears.<br />
NOTE: The appearance of this dialog box may vary, depending on your<br />
printer export module.<br />
16. Click Select to change the media file for your printer.<br />
A file selection dialog box appears.<br />
17. Select the media file and then click OK.<br />
18. Click OK to close the dialog box.<br />
19. Click Next.<br />
The following dialog box appears.<br />
May 4, 2005 3-5
Calibrating the <strong>Printer</strong><br />
20. Check that the <strong>Printer</strong> and <strong>Printer</strong> Setup information are correct.<br />
If the information is not correct and you have more than one media<br />
file, click Back and go to Step 15.<br />
If the information is correct, click Next to send the default table to the<br />
printer.<br />
NOTE: The previous table is overwritten.<br />
The following dialog box appears.<br />
21. Click <strong>Printer</strong> Status to find out more information about your printer.<br />
The following dialog box appears.<br />
NOTE: Click Update if you want to update the information on the <strong>Printer</strong><br />
Status dialog box. You may need to do this if your printer is<br />
accidentally shut off.<br />
3-6 May 4, 2005
22. Click OK to close the dialog box.<br />
Calibrating the <strong>Printer</strong><br />
23. Click Print.<br />
The information is processed and the calibration test print is printed<br />
on the specified printer. Processing may take several minutes.<br />
The following dialog box appears.<br />
24. Look at the test print and determine which cluster appears the most<br />
neutral (has the least amount of color).<br />
25. Enter the number of the most neutral cluster in the Cluster Number box<br />
(in a range from 201-249).<br />
26. Click Done.<br />
The printer calibration begins. When calibration is complete, the<br />
following dialog box appears.<br />
27. Click Quit to close the Calibration Utility. Your printer is now calibrated.<br />
May 4, 2005 3-7
Calibrating the <strong>Printer</strong><br />
Uninstalling the Calibration Software<br />
You can remove the calibration software from your computer in two ways:<br />
Select Start > Programs > <strong>KODAK</strong> Calibration Utility ><br />
Uninstall <strong>KODAK</strong> Calibration Utility and follow the directions to<br />
uninstall the software.<br />
Select Start > Settings > Control Panel > Add/Remove Programs ><br />
<strong>KODAK</strong> Calibration Utility and follow the directions to remove the<br />
software.<br />
Resolving Calibration Error Messages<br />
Refer to the following table to resolve errors reported during the printer<br />
calibration process. If the problem persists, contact your <strong>KODAK</strong> Service<br />
Representative.<br />
Error Message Description or Cause Possible Solution<br />
The printer cannot be found. The printer selected cannot be<br />
located.<br />
The media file, which<br />
identifies the ribbon and<br />
paper characteristics of the<br />
media you are using, cannot<br />
be found or is corrupt.<br />
The selected file will not work<br />
with this printer. Please<br />
choose another.<br />
The media file cannot be located or is<br />
corrupt.<br />
An inappropriate media file was<br />
selected for the printer.<br />
Check that the printer cables are secure.<br />
Check that the printer is turned on.<br />
Select another printer. See Step 10 on<br />
page 3-4.<br />
Click OK to locate the media file using the<br />
File Selection dialog box. See Step 16 on<br />
page 3-5. Right-click the media file, and<br />
then select Properties. If the Read-only<br />
check box is selected, clear the check<br />
box. This is the only file which cannot be<br />
Read-only.<br />
Uninstall then reinstall the calibration<br />
software. See “Uninstalling the Calibration<br />
Software” on page 3-8 and “Installing the<br />
Calibration Software” on page 3-1.<br />
3-8 May 4, 2005
Error Message Description or Cause Possible Solution<br />
Cannot load DLLs. Insufficient<br />
memory.<br />
Cannot load the file<br />
SDKColorMatch.dll.<br />
Please reinstall the software.<br />
Cannot load the file<br />
SDKUsbCtrl.dll.<br />
Please reinstall the software.<br />
Cannot open the USB port.<br />
Please check the printer<br />
cables and power.<br />
Cannot access the file or read<br />
the data.<br />
Parameter error, such as<br />
undefined tag or insufficient<br />
data.<br />
The printer with the selected<br />
ID number cannot be found.<br />
There is not enough memory available<br />
for the calibration software to load all<br />
the necessary DLLs.<br />
A file required by the calibration<br />
software is missing or corrupt.<br />
A file required by the calibration<br />
software is missing or corrupt.<br />
The software is unable to<br />
communicate with the printer.<br />
A file required by the calibration<br />
software is missing or corrupt.<br />
An internal error has occurred within<br />
the calibration software.<br />
The calibration software is unable to<br />
find the printer with the selected<br />
<strong>Printer</strong> ID.<br />
The printer is not ready. The printer is not ready for<br />
calibration.<br />
Calibrating the <strong>Printer</strong><br />
Close any other open programs to free up<br />
memory.<br />
Reboot the computer then run only the<br />
calibration software.<br />
Uninstall then reinstall the calibration<br />
software. See “Uninstalling the Calibration<br />
Software” on page 3-8 and “Installing the<br />
Calibration Software” on page 3-1.<br />
Uninstall then reinstall the calibration<br />
software. See “Uninstalling the Calibration<br />
Software” on page 3-8 and “Installing the<br />
Calibration Software” on page 3-1.<br />
Check that the printer cables are secure.<br />
Check that the printer is turned on and the<br />
operator panel Ready light is illuminated.<br />
Power the printer off then on.<br />
Reboot your computer.<br />
Uninstall then reinstall the calibration<br />
software. See “Uninstalling the Calibration<br />
Software” on page 3-8 and “Installing the<br />
Calibration Software” on page 3-1.<br />
Close the calibration software and try<br />
calibrating the printer again.<br />
Uninstall then reinstall the calibration<br />
software. See “Uninstalling the Calibration<br />
Software” on page 3-8 and “Installing the<br />
Calibration Software” on page 3-1.<br />
Check the Kodak Web site for an updated<br />
version of the calibration software.<br />
Close the calibration software.<br />
Check that the printer cables are secure.<br />
Check that the printer is turned on and the<br />
operator panel Ready light is illuminated.<br />
Run the calibration software and try<br />
choosing the printer again.<br />
Check that the printer cables are secure.<br />
Check that the printer is turned on and the<br />
operator panel Ready light is illuminated.<br />
May 4, 2005 3-9
Calibrating the <strong>Printer</strong><br />
Error Message Description or Cause Possible Solution<br />
The printer is busy. The printer is not ready for<br />
calibration.<br />
The ribbon is advancing. The printer is not ready for<br />
calibration.<br />
The operator panel is in use. The printer is not ready for<br />
calibration.<br />
The printer is initializing. The printer is not ready for<br />
calibration.<br />
Wait a few minutes until the operator<br />
panel Ready light is illuminated.<br />
If this message continues to occur, power<br />
the printer off and then on.<br />
Wait a few minutes until the operator<br />
panel Ready light is illuminated.<br />
If this message continues to occur, power<br />
the printer off and then on.<br />
Press the Clear button to return to Ready.<br />
If this message continues to occur, power<br />
the printer off and then on.<br />
Wait a few minutes until the operator<br />
panel Ready light is illuminated.<br />
If this message continues to occur, power<br />
the printer off and then on.<br />
Paper error. The paper is empty or not loaded. Load the paper. See See “Loading the Paper”<br />
on page 1-9.<br />
Paper empty. The paper is empty. Reload the paper. See See “Loading the<br />
Paper” on page 1-9.<br />
Ribbon empty. The ribbon is empty. Reload the ribbon. See See “Loading the<br />
Ribbon” on page 1-5.<br />
Paper jam. The paper is stuck in the printer or<br />
paper path.<br />
Cover open. The upper cover is open or not<br />
latched.<br />
<strong>Printer</strong> error: 2500. Please<br />
call for service.<br />
<strong>Printer</strong> error 2504. Please call<br />
for service.<br />
Clear the paper jam. See See “Clearing a<br />
Paper Jam” on page 6-3.<br />
Close the upper cover by pressing on the<br />
center of the cover until it clicks.<br />
_ Contact your <strong>KODAK</strong> Service Representative.<br />
Have available:<br />
the error code number<br />
the printer model number and serial<br />
number (listed on the printer data plate)<br />
_ Contact your <strong>KODAK</strong> Service Representative.<br />
Have available:<br />
the error code number<br />
the printer model number and serial<br />
number (listed on the printer data plate)<br />
3-10 May 4, 2005
Error Message Description or Cause Possible Solution<br />
USB communication error. The software is unable to<br />
communicate with the printer.<br />
Calibrating the <strong>Printer</strong><br />
Check the USB cable connection.<br />
Replace the USB cable.<br />
Try using a different USB port on the<br />
computer.<br />
If the printer is connected through a USB<br />
hub, try connecting directly to the<br />
computer.<br />
May 4, 2005 3-11
4 Operating the <strong>Printer</strong><br />
Making Prints<br />
Handling and Storing Prints<br />
You make prints using photo printing software applications. For<br />
application-specific printing information, see the user’s guide or online Help<br />
for the software application.<br />
For best results:<br />
Make sure hands are clean and free of food, oil, and grease.<br />
Store prints in a cool, dry environment free of chemical contamination.<br />
Store prints at temperatures below 72° F (25° C) for extended periods.<br />
Store prints at a relative humidity between 30% and 50%.<br />
Avoid exposure to high-intensity light sources, particularly fluorescent light<br />
and sunlight, which are rich in ultraviolet radiation.<br />
Avoid exposure to vinyl items (those made of polyvinyl chloride, PVC) and<br />
any plastic that contains plasticizer. If you use transparent sleeves, make<br />
sure that they are not PVC-based.<br />
Understanding the Operator Panel Lights<br />
Light Color <strong>Printer</strong> Status<br />
Power Orange The printer power is on.<br />
Ready Green The printer is ready to make prints.<br />
Error Red An error has occurred. See the message on the operator panel, then see<br />
“Resolving Operator Panel Error Messages” on page 6-2.<br />
May 4, 2005 4-1
Operating the <strong>Printer</strong><br />
Using Setup Mode to Review <strong>Printer</strong> Settings<br />
Accessing the <strong>Printer</strong><br />
Settings<br />
Use the operator panel to review printer settings in Setup mode.<br />
Kodak <strong>Photo</strong> <strong>Printer</strong> <strong>6850</strong><br />
Power<br />
Ready<br />
Error<br />
1. Press Menu to enter Setup Mode.<br />
2. Press Menu repeatedly to scroll through the printer settings.<br />
3. Press +/- to scroll through selections.<br />
4. Press Enter to initiate an action or accept a change.<br />
5. Press Clear to exit Setup Mode.<br />
<strong>Printer</strong> settings<br />
are displayed here<br />
Paper<br />
Menu Advance<br />
Enter Paper<br />
Rewind/Clear<br />
Press Menu repeatedly to scroll through the printer settings in the following<br />
order.<br />
<strong>Printer</strong> Setting Operator Panel Display Action Required<br />
<strong>Printer</strong> ready Ready None. The printer is on and ready to make prints.<br />
Making a test print Test Print Mode Press Enter to make a test print. See “Making a Test Print” on<br />
page 1-11.<br />
Check remaining Remain = XXX/YYY None. XXX represents how many remaining prints you can make<br />
paper status<br />
with the current paper roll. YYY represents the total number of<br />
prints on a paper roll. The counter is reset each time you press<br />
Paper Rewind.<br />
Checking the ribbon DonorRemain = XX[%] None. XX[%] represents the percentage of the installed ribbon that<br />
status<br />
is available for making prints.<br />
Checking the printer Printed = XXXXX None. XXXXX represents the total number of prints made since the<br />
total print count<br />
printer was manufactured. This counter cannot be reset.<br />
Checking the printer<br />
firmware version<br />
Main Firm = None. The printer control firmware version number is displayed.<br />
Checking the image<br />
processing firmware<br />
version<br />
DSP Firm = None. The image processing firmware version is displayed.<br />
4-2 May 4, 2005<br />
3<br />
4<br />
1,2<br />
5
5 Maintaining the <strong>Printer</strong><br />
Cleaning the Cabinet<br />
Performing Routine Maintenance<br />
To ensure good printer performance and high-quality prints, keep the printer<br />
and its environment clean and dust-free.<br />
Clean the exterior cabinet and filter openings regularly to eliminate dust<br />
build-up and to prevent dirt from entering the printer.<br />
CAUTION:<br />
Never use abrasives or harsh chemicals to clean any part of the<br />
printer. Do not allow any foreign objects or liquids to fall or<br />
spill inside the printer. Fire or electric shock could result. If<br />
any foreign object enters the printer, turn off the printer power<br />
immediately, remove the power cord, and contact your <strong>KODAK</strong><br />
Service Representative.<br />
1. Wipe the exterior cabinet, print catcher, and trim tray with a damp,<br />
lint-free cloth.<br />
2. Vacuum the filter openings to remove dust.<br />
To maintain good print quality:<br />
1. Clean the stripper plate, platen roller, and cleaning rollers monthly,<br />
using the alcohol pads included in the <strong>KODAK</strong> Thermal <strong>Printer</strong> Cleaning<br />
Kit.<br />
2. Only clean the thermal head if directed to do so by a <strong>KODAK</strong> Service<br />
Representative. Do not include the thermal head in your monthly<br />
cleaning process.<br />
NOTE: If there is paper or ribbon loaded in the printer, remove it before<br />
performing maintenance procedures.<br />
CAUTION:<br />
Alcohol is a flammable liquid. It can cause eye irritation and<br />
dry skin. Prolonged or repeated skin contact may cause drying,<br />
cracking or irritation. Wash your hands with soap and water<br />
following any maintenance procedures where you use alcohol<br />
pads. For additional information, see the Material Safety Data<br />
Sheet (MSDS).<br />
May 4, 2005 5-1
Maintaining the <strong>Printer</strong><br />
Cleaning the Thermal<br />
Head and Stripper<br />
Plate<br />
Stripper plate<br />
90˚<br />
Thermal head<br />
In the United States for health, safety, and environment information, call<br />
585-722-5151. Customers outside the U.S. can contact their local <strong>KODAK</strong><br />
Service Representative.<br />
CAUTION:<br />
Fingerprints can damage the thermal head, which looks like a<br />
glass bar. Never touch it with your bare hands or fingers.<br />
1. Make sure the power switch is turned off ( ).<br />
2. Slide the cover release toward you, then open the upper cover carefully.<br />
IMPORTANT: Cover does not open beyond a 90° angle.<br />
CAUTION:<br />
The thermal head becomes extremely hot during normal<br />
operation. Wait approximately five minutes to begin cleaning<br />
the head after you open the upper cover.<br />
3. Remove an alcohol pad from its packaging. Move the pad along the<br />
entire length of the thermal head, in one direction only. When you clean<br />
the thermal head:<br />
– Apply firm, even pressure.<br />
– Make three passes along the thermal print head.<br />
– Use a clean part of the pad for each pass.<br />
4. Use another clean alcohol pad to wipe the edge of the stripper plate.<br />
5-2 May 4, 2005
Cleaning the Platen<br />
Roller<br />
Platen roller<br />
Cleaning the Cleaning<br />
Rollers<br />
Rear cleaning roller<br />
Front cleaning roller<br />
Maintaining the <strong>Printer</strong><br />
1. Remove an alcohol pad from its packaging. Wipe the rubber section of<br />
the platen roller with the pad.<br />
2. Rotate the roller to clean the entire surface.<br />
3. Allow the alcohol to dry completely (about five minutes) before you<br />
resume printing.<br />
It is essential to keep the cleaning rollers clean to prevent dirt from<br />
transferring back onto the prints and to keep the printer operating correctly.<br />
IMPORTANT: There are two cleaning rollers in the printer. They are not<br />
interchangeable. Clean them separately to prevent<br />
reinstalling them in the wrong position.<br />
1. Remove the rear cleaning roller by pulling up on the black knob.<br />
2. Remove an alcohol pad from its packaging. Wipe the rubber section of<br />
the roller with the pad.<br />
3. Reinstall the rear cleaning roller in the printer. Push the black knob until<br />
the roller clicks into place.<br />
CAUTION:<br />
There are sharp cutter blades inside the front roller area. Do<br />
not insert hands or objects.<br />
4. Repeat steps 1 - 3 to remove, clean, and reinstall the front cleaning<br />
roller.<br />
May 4, 2005 5-3
Maintaining the <strong>Printer</strong><br />
5. Close the upper cover by pressing on the center of the cover until it<br />
clicks in place.<br />
6. Allow the alcohol to dry completely (about five minutes) before you<br />
resume printing.<br />
5-4 May 4, 2005
6 Troubleshooting<br />
Resolving Potential Problems<br />
Problem Description or Cause Possible Solution<br />
Paper jam; error light is on,<br />
printer does not operate<br />
The paper is stuck in the<br />
printer.<br />
Clear the paper jam. See “Clearing a Paper Jam”<br />
on page 6-3.<br />
Prints have linear streaks The thermal head is dirty. Clean the thermal head. See “Cleaning the<br />
Thermal Head and Stripper Plate” on page 5-2.<br />
If the problem persists, the heating element may<br />
be damaged. Contact your <strong>KODAK</strong> Service<br />
Representative.<br />
Prints have streaks made up of<br />
small dots<br />
Print size or aspect ratio is not<br />
what you expected<br />
The cleaning rollers are dirty. Clean the cleaning rollers. See “Cleaning the<br />
Cleaning Rollers” on page 5-3.<br />
The image file or printing<br />
options need to be adjusted in<br />
your photo printing software<br />
application.<br />
In your photo printing software application:<br />
Use the Fit to Page or Clip options (may not<br />
be offered by all photo printing<br />
applications).<br />
Adjust the image size to match the paper<br />
size.<br />
Make sure the Portrait / Landscape setting<br />
matches the orientation of the picture.<br />
For details, see the photo printing<br />
application online Help.<br />
NOTE: It is not necessary to adjust the image<br />
resolution (dpi) to match the printer<br />
resolution. The printer driver<br />
automatically scales your image to<br />
match the printer resolution.<br />
May 4, 2005 6-1
Troubleshooting<br />
Problem Description or Cause Possible Solution<br />
Insufficient Memory errors occur<br />
on your computer (not on the<br />
printer) after making a substantial<br />
number of prints<br />
Your computer is low on RAM<br />
and/or disk caching memory.<br />
This can happen when you are<br />
manipulating (rotating,<br />
scaling, retouching, etc.)<br />
high-resolution images<br />
(>72 dpi).<br />
Resolving Operator Panel Error Messages<br />
Kodak <strong>Photo</strong> <strong>Printer</strong> <strong>6850</strong><br />
Power<br />
Ready<br />
Error<br />
Paper<br />
Menu Advance<br />
Enter Paper<br />
Rewind/Clear<br />
Minimize the number of images that are open<br />
at the same time.<br />
Purge the contents of the clipboard often.<br />
Close all applications except the photo<br />
printing software application.<br />
See the photo printing software application<br />
online Help for tips on memory optimization.<br />
See page A-1 for recommended system<br />
requirements.<br />
Refer to the following table to resolve errors reported on the operator panel.<br />
If the problem persists, contact your <strong>KODAK</strong> Service Representative.<br />
Error Message Description or Cause Possible Solution<br />
Paper Empty The paper is empty or is not loaded. Load the paper. See “Loading the Paper”<br />
on page 1-9.<br />
Ribbon Empty The ribbon is empty or is not loaded. Load the ribbon. See “Loading the Ribbon”<br />
on page 1-5.<br />
Paper Jam XX The paper is stuck in the printer or paper<br />
path.<br />
See “Clearing a Paper Jam” on page 6-3.<br />
Cover Open The upper cover is open or not latched. Close the upper cover by pressing on the<br />
center of the cover until it clicks.<br />
Data Error There is a communication problem<br />
between the printer and host computer.<br />
Check the host computer.<br />
Mecha Error XX The printer has a mechanical problem. Contact your <strong>KODAK</strong> Service<br />
Control Error XX The printer has a system control problem.<br />
Representative. Have available:<br />
TempSensErr XX The printer has a problem with the<br />
the error code number (XX)<br />
Sensor Error XX<br />
temperature sensor.<br />
The printer has a sensor problem.<br />
the printer model number and serial<br />
number (listed on the printer data<br />
plate)<br />
6-2 May 4, 2005
Clearing a Paper Jam<br />
Method 1<br />
Kodak <strong>Photo</strong> <strong>Printer</strong> <strong>6850</strong><br />
Power<br />
Ready<br />
Error<br />
Kodak <strong>Photo</strong> <strong>Printer</strong> <strong>6850</strong><br />
Power<br />
Ready<br />
Error<br />
Paper<br />
Menu Advance<br />
Enter Paper<br />
Rewind/Clear<br />
Paper<br />
Menu<br />
Advance<br />
Enter Paper<br />
Rewind/Clear<br />
Troubleshooting<br />
If the Paper Jam message is displayed on the operator panel, there are two<br />
methods that you can use to try to clear the paper jam.<br />
1. Press Paper Rewind until the Paper Empty message appears.<br />
2. Press Paper Advance to re-load the paper into the printer.<br />
The printer advances the paper, then cuts and discharges about 20 in.<br />
(508 mm) of blank paper. This reduces the possibility of fingerprints<br />
or other damage to the prints (see page A-2).<br />
The operator panel displays the Ready message.<br />
Method 2 If the Paper Jam message is still displayed on the operator panel:<br />
1. Turn off the printer and open the upper cover.<br />
2. Remove the ribbon from the printer.<br />
CAUTION:<br />
Prevent damage to the printer. Do not pull abruptly on the<br />
paper.<br />
3. Slowly and carefully pull the jammed paper out of the printer.<br />
4. Cut off any damaged or printed areas of the paper.<br />
NOTE: Do not damage or mark any of the rollers.<br />
May 4, 2005 6-3
Troubleshooting<br />
Kodak <strong>Photo</strong> <strong>Printer</strong> <strong>6850</strong><br />
Power<br />
Ready<br />
Error<br />
Paper<br />
Menu<br />
Advance<br />
Enter Paper<br />
Rewind/Clear<br />
5. Close the upper cover and turn on the printer.<br />
6. Press Paper Rewind to rewind the paper into the printer.<br />
If the Paper Jam message still appears on the operator panel, press<br />
Paper Rewind again.<br />
7. Open the upper cover and reload the ribbon. See “Loading the Ribbon”<br />
on page 1-5.<br />
8. Close the cover.<br />
9. Reload the paper. See “Loading the Paper” on page 1-9.<br />
NOTE: If the Paper Jam message is still displayed on the operator panel, and<br />
you are at the end of a paper roll, it is possible that a segment of<br />
paper is too short to automatically exit the printer. Remove the front<br />
cleaning roller (see “Cleaning the Cleaning Rollers” on page 5-3)<br />
and remove the segment of paper.<br />
Recovering from a Power Interruption<br />
CAUTION:<br />
If the printer loses power while printing, the printer stops with<br />
the thermal head positioned against the platen roller. The<br />
platen roller could be deformed and damaged if the thermal<br />
head is left in this position.<br />
If a power outage occurs:<br />
1. Open the upper cover immediately to release the pressure on the platen<br />
roller. Leave the cover open until power is restored.<br />
2. When power is restored, restart the printer by following the procedure<br />
for “Clearing a Paper Jam” on page 6-3.<br />
3. Submit your print job again.<br />
6-4 May 4, 2005
Appendix A: Important<br />
<strong>Printer</strong><br />
Information<br />
System Requirements<br />
<strong>Printer</strong> Specifications<br />
Personal computer with MICROSOFT WINDOWS 2000 or<br />
MICROSOFT WINDOWS XP Operating System<br />
Minimum 1.0 GHz PENTIUM III Microprocessor<br />
Minimum 128 MB of RAM<br />
Minimum 2 GB of available hard disk space<br />
NOTE: You may need up to 256 MB of RAM and 10 GB of hard disk space for<br />
acceptable performance with some imaging applications on high<br />
performance, multi-tasking operating systems.<br />
USB High Speed (2.0) compliant host device<br />
Dimensions Width<br />
11.4 in. (290 mm)<br />
Depth<br />
19.6 in. (496 mm)<br />
Height<br />
13.6 in. (346 mm)<br />
Weight<br />
56 lbs (25 kg)<br />
(without ribbon and paper)<br />
Operating Temperature 50 to 95° F (+10 to +35° C)<br />
environment<br />
Relative Humidity 20 to 80%<br />
Power Voltage/Frequency (auto 90 V to 132 V / 48 Hz to 62 Hz<br />
detection of the following ranges)<br />
180 V to 264 V / 48 Hz to 62 Hz<br />
Power consumption 320 watts maximum<br />
Print size <strong>KODAK</strong> <strong>Photo</strong> <strong>Printer</strong> <strong>6850</strong>:<br />
4 x 6 in. (10 x 15 cm)<br />
6 x 8 in. (15 x 20 cm) with border<br />
6 x 8 in. (15 x 20 cm) borderless<br />
A-1
Important <strong>Printer</strong> Information<br />
<strong>Printer</strong> Supplies<br />
Paper and Ribbon Each <strong>Photo</strong> Print Kit contains the correct media set (roll-feed paper and<br />
ribbon) for your printer model. <strong>Photo</strong> Print Kits are sold separately.<br />
IMPORTANT: For best results, replace both the paper and ribbon at the<br />
same time.<br />
Handling and Storing the<br />
Paper and Ribbon<br />
Printing time<br />
(after file download)<br />
4 x 6 in. (10 x 15 cm) - 8 seconds<br />
6 x 8 in. (15 x 20 cm) - 14 seconds<br />
<strong>KODAK</strong> <strong>Photo</strong> Print Kit 6800 / 4R Specifications<br />
Storage specifications 86° F (30° C) or lower<br />
60% relative humidity or lower<br />
Capacity 750 prints, paper and ribbon*<br />
Paper and ribbon width 6 in. (15 cm)<br />
Ribbon patch length 4 in. (10 cm)<br />
<strong>KODAK</strong> <strong>Photo</strong> Print Kit 6800 / 6R Specifications<br />
Storage specifications 86° F (30° C) or lower<br />
60% relative humidity or lower<br />
Capacity* 750 - 4 x 6 in. prints, paper, and ribbon** or<br />
375 - 6 x 8 in. prints, paper, and ribbon**<br />
Paper and ribbon width 6 in. (152 mm)<br />
Ribbon patch length 8 in. (203 mm)<br />
* Paper and ribbon rolls contain material to make the stated print quantity.<br />
Printing of mixed 4 x 6 in. and 6 x 8 in. sizes may yield fewer prints per roll.<br />
** The paper roll contains a small amount of additional paper to allow for the<br />
extra feed when loading the paper and to minimize end-of-roll impressions.<br />
For the best quality prints, carefully handle and store your paper and ribbon:<br />
To avoid fingerprints, handle the ribbon by the spool ends; do not touch<br />
the ribbon material. Do not touch the glossy side of the paper.<br />
Store the paper and ribbon away from direct sunlight.<br />
A-2 May 4, 2005
Thermal <strong>Printer</strong><br />
Cleaning Kit<br />
Important <strong>Printer</strong> Information<br />
Use the <strong>KODAK</strong> Thermal <strong>Printer</strong> Cleaning Kit when performing routine<br />
maintenance on the printer (see page 5-1). One Thermal <strong>Printer</strong> Cleaning Kit<br />
is included with your printer.<br />
CAUTION:<br />
Alcohol is a flammable liquid. It can cause eye irritation and<br />
dry skin. Wash your hands with soap and water following any<br />
maintenance procedures where you use alcohol pads.<br />
Packing and Transporting the <strong>Printer</strong><br />
ENERGY STAR Partner<br />
Getting Help<br />
<strong>KODAK</strong> Thermal <strong>Printer</strong> Cleaning Kit<br />
Catalog number 172-1117<br />
Contents Individually packaged alcohol pads (10)<br />
WARNING:<br />
Do not ship the paper and ribbon in the printer. Doing so<br />
may cause physical damage to the printer during shipping.<br />
Ship paper and ribbon separately.<br />
1. Remove the paper and ribbon from the printer.<br />
2. Reinstall the packing materials (see page 1-3).<br />
3. Repack the printer in the original packing box. See the<br />
packing/unpacking instructions included with the box.<br />
As an ENERGY STAR Partner, Eastman Kodak Company has determined that<br />
this product meets the ENERGY STAR Guidelines for energy efficiency.<br />
Help with your printer is available from the following sources:<br />
Troubleshooting section in this manual, Chapter 6.<br />
Your <strong>KODAK</strong> Service Representative.<br />
May 4, 2005 A-3
Appendix B: Safety and<br />
Regulatory<br />
Information<br />
Important Safety Information<br />
CAUTION:<br />
Use of controls or adjustments, or performance of procedures<br />
other than those specified in this manual may result in injury<br />
and/or damage to the printer.<br />
The power outlet should be easily accessible and installed near the<br />
printer.<br />
Position the power cable so that it cannot be pulled on or tripped over.<br />
Never allow the power cable to contact hot surfaces.<br />
The power outlet must be grounded. An ungrounded outlet can cause<br />
fire, electric shock, or harmful interference to nearby electrical devices.<br />
Use only the power cable provided with the printer.<br />
Do not operate the printer with a damaged power cable.<br />
Always unplug the power cable from the printer before cleaning or when<br />
the printer is not in use.<br />
If the printer has been dropped or damaged, be sure a qualified service<br />
person examines the printer before you use it.<br />
Do not block the filter openings on the printer cabinet.<br />
Do not expose the printer to moisture or water.<br />
Do not allow any foreign objects or liquids to fall or spill inside the<br />
printer. Fire or electric shock could result.<br />
The thermal head becomes extremely hot during normal operation. Do<br />
not touch it.<br />
Alcohol pads are used to clean the thermal head and other internal<br />
printer components. In the United States for health, safety, and<br />
environment information, call 585-722-5151. Customers outside the<br />
U.S. can contact their local <strong>KODAK</strong> Service Representative.<br />
May 4, 2005 B-1
Safety and Regulatory Information<br />
Safety Labels<br />
CAUTION HOT SURFACE<br />
To avoid burns, use caution when closing the cover.<br />
CAUTION HOT SURFACE<br />
The thermal head becomes extremely hot<br />
during normal operation. Do not touch it.<br />
P/N 2J5452<br />
1641132183<br />
CAUTION SHARP OBJECTS<br />
The metal edges of the printer may be sharp.<br />
CAUTION SHARP CUTTER BLADE<br />
There are sharp cutter blades inside the printer. Do not<br />
insert hands or objects.<br />
This label is posted behind the trim tray.<br />
Please observe the important safety warnings that are posted on the printer.<br />
P/N 2J5439<br />
1641132233<br />
B-2 May 4, 2005<br />
P/N 2J5451<br />
1641132182
Regulatory and Safety Compliance<br />
Safety and Regulatory Information<br />
Safety Complies with UL 60950 Third Edition—CAN/CSA C22.2<br />
No. 60950 Third Edition<br />
EN 60950-1<br />
IEC 60950<br />
Tested for Norwegian IT Power systems 240V phase to phase<br />
Electromagnetic<br />
Compatibility (EMC)<br />
NOTE: This equipment has been tested and found to comply with the limits<br />
for a Class A digital device, pursuant to part 15 of the FCC rules. These<br />
limits are designed to provide reasonable protection against<br />
interference when the equipment is operated in a commercial<br />
environment. This equipment generates, uses, and can radiate radio<br />
frequency energy and, if not installed and used in accordance with<br />
the instruction manual, may cause interference to radio<br />
communications. Operation of this equipment in a residential area is<br />
likely to cause interference in which case the user will be required to<br />
correct the interference at his or her own expense.<br />
Requirements of the EMC directive 89/336/EEC were met through compliance<br />
with the following:<br />
EN 55022: 94 (class B) with Amendments A1:95 and A2:97<br />
EN 55024: 98 ITE Immunity includes the following:<br />
EN 61000-4-2 ESD<br />
EN 61000-4-3 Radiated RF immunity<br />
EN 61000-4-4 EFT<br />
EN 61000-4-5 Surge<br />
EN 61000-4-6 Conducted RF immunity<br />
EN 61000-4-11 Voltage dips and interruptions<br />
EN 61000-3-2 Harmonics<br />
EN 61000-3-3 Flicker<br />
"Changes or modifications not expressly approved by the party responsible for<br />
compliance could void the user’s authority to operate the equipment."<br />
This is a Class A product based on the standard of the Voluntary Control<br />
Council for Interference from Information Technology Equipment (VCCI). If<br />
this is used near a radio or television receiver in a domestic environment, it<br />
may cause radio interference. Install and use the equipment according to the<br />
instruction manual.<br />
May 4, 2005 B-3
Safety and Regulatory Information<br />
Noise Emission The operator-position noise emission value is less than 70 dB(A).*<br />
* Average value specified in accordance to JIS Z8731<br />
Disposal This product contains a small amount of lead in the solder on the circuit<br />
boards. Disposal of this material may be regulated due to environmental<br />
considerations. For disposal or recycling information, please contact your<br />
local authorities. In the USA, contact the Electronics Industry Alliance at<br />
www.eiae.org.<br />
In the European Union, this symbol indicates that when the<br />
last user wishes to discard this product, it must be sent to<br />
appropriate facilities for recovery and recycling. Contact<br />
your local <strong>KODAK</strong> Representative or refer to<br />
www.kodak.com/go/recycle for additional information on<br />
the collection and recovery programs available for this<br />
product.<br />
B-4 May 4, 2005
Index<br />
A<br />
air flow clearances, 1-2<br />
C<br />
cabinet, cleaning, 5-1<br />
cables<br />
connecting, 1-7<br />
power, 1-7<br />
USB, 1-8<br />
calibrating the printer, 3-1<br />
calibration errors, 3-8<br />
calibration software<br />
installing, 3-1<br />
uninstalling, 3-8<br />
calibration utility, 3-1<br />
checking<br />
paper status, 4-2<br />
ribbon status, 4-2<br />
cleaning<br />
cabinet, 5-1<br />
cleaning rollers, 5-3<br />
platen roller, 5-3<br />
stripper plate, 5-2<br />
thermal head, 5-2<br />
cleaning rollers, cleaning, 5-3<br />
clearing paper jam, 6-3<br />
connecting cables, 1-7<br />
contents, package, 1-1<br />
D<br />
disposal, B-4<br />
E<br />
electromagnetic compatibility, B-3<br />
EMC, B-3<br />
error messages<br />
calibration, 3-8<br />
operator panel, 6-2<br />
H<br />
handling<br />
paper, A-2<br />
prints, 4-1<br />
ribbon, A-2<br />
help with your printer, A-3<br />
humidity<br />
paper and ribbon specifications, A-2<br />
printer specifications, A-1<br />
I<br />
installing<br />
calibration software, 3-1<br />
paper, 1-9<br />
print catcher, 1-4<br />
printer driver, 2-1<br />
ribbon, 1-5<br />
trim tray, 1-4<br />
K<br />
<strong>KODAK</strong> <strong>Photo</strong> Print Kit, A-2<br />
<strong>KODAK</strong> Thermal <strong>Printer</strong> Cleaning Kit, A-3<br />
L<br />
labels, safety, B-2<br />
loading<br />
paper, 1-9<br />
ribbon, 1-5<br />
M<br />
maintenance<br />
cabinet, 5-1<br />
cleaning rollers, 5-3<br />
<strong>KODAK</strong> Thermal <strong>Printer</strong> Cleaning Kit, A-3<br />
platen roller, 5-3<br />
stripper plate, 5-2<br />
thermal head, 5-2<br />
N<br />
noise emission spec, B-4<br />
May 4, 2005 I-1
Index<br />
O<br />
online user guide, 1-11<br />
operator panel<br />
error messages, 6-2<br />
lights, 4-1<br />
making a test print, 4-2<br />
Paper Advance, loading paper, 1-10<br />
printer settings, 4-2<br />
Ready message, 4-2<br />
setup mode, 4-2<br />
ordering supplies, A-2<br />
output tray<br />
See print catcher, 1-4<br />
P<br />
package contents, 1-1<br />
packing material, removing, 1-3<br />
packing the printer, A-3<br />
paper<br />
handling and storing, A-2<br />
loading, 1-9<br />
reordering, A-2<br />
specifications, A-2<br />
Paper Advance, operator panel, 1-10<br />
paper jam, clearing, 6-3<br />
paper status, checking, 4-2<br />
platen roller, cleaning, 5-3<br />
power<br />
cable, 1-7<br />
interruption, recovering, 6-4<br />
requirements, A-1<br />
turning on, 1-8<br />
print catcher, 1-4<br />
printer<br />
calibrating, 3-1<br />
operating, 4-1<br />
preferences, customizing, 2-2<br />
properties, customizing, 2-2<br />
setting up, 1-1<br />
settings, 4-2<br />
specifications, A-1<br />
printer disposal, B-4<br />
printer driver<br />
installing, 2-1<br />
uninstalling, 2-3<br />
printer problems, resolving, 6-1<br />
printing<br />
making prints, 4-1<br />
test print, 4-2<br />
prints<br />
handling and storing, 4-1<br />
making, 4-1<br />
problems, 6-1<br />
R<br />
radio frequency compliance, B-3<br />
Ready message, operator panel, 4-2<br />
recycling, B-4<br />
reordering supplies, A-2<br />
ribbon<br />
handling and storing, A-2<br />
loading, 1-5<br />
reordering, A-2<br />
specifications, A-2<br />
ribbon status, checking, 4-2<br />
S<br />
safety<br />
compliance, B-3<br />
tips, B-1<br />
warning labels, B-2<br />
setting up the printer, 1-1<br />
setup mode, 4-2<br />
software<br />
installing<br />
calibration software, 3-1<br />
printer driver, 2-1<br />
uninstalling<br />
calibration software, 3-8<br />
printer driver, 2-3<br />
specifications<br />
paper and ribbon, A-2<br />
printer, A-1<br />
storing<br />
prints, 4-1<br />
ribbon, A-2<br />
stripper plate, cleaning, 5-2<br />
supplies, printer, A-2<br />
support, A-3<br />
switch, power, 1-8<br />
system requirements, A-1<br />
T<br />
temperature<br />
paper and ribbon specifications, A-2<br />
printer specifications, A-1<br />
test print, making, 1-11<br />
thermal head, cleaning, 5-2<br />
I-2 May 4, 2005
transporting the printer, A-3<br />
trim tray, 1-4<br />
troubleshooting<br />
clearing paper jam, 6-3<br />
error messages, operator panel, 6-2<br />
potential problems, 6-1<br />
power interruption, 6-4<br />
U<br />
uninstalling<br />
calibration software, 3-8<br />
printer driver, 2-3<br />
unpacking, 1-3<br />
USB cable, connecting, 1-8<br />
Index<br />
May 4, 2005 I-3