e - Spotlight Promotions
e - Spotlight Promotions
e - Spotlight Promotions
- No tags were found...

You also want an ePaper? Increase the reach of your titles
YUMPU automatically turns print PDFs into web optimized ePapers that Google loves.
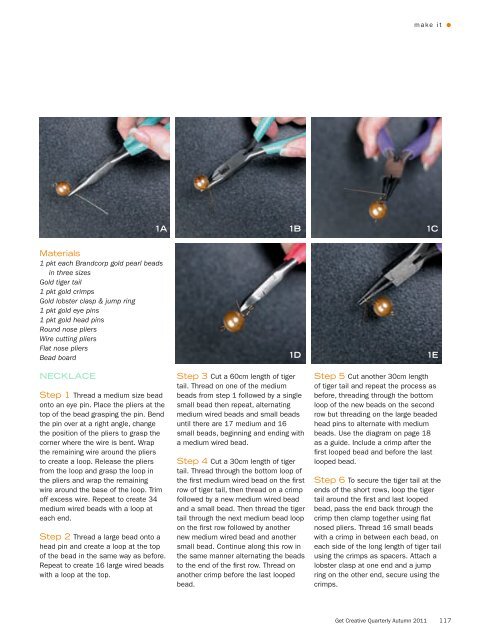
make it •1A1B1CMaterials1 pkt each Brandcorp gold pearl beadsin three sizesGold tiger tail1 pkt gold crimpsGold lobster clasp & jump ring1 pkt gold eye pins1 pkt gold head pinsRound nose pliersWire cutting pliersFlat nose pliersBead boardNECKLACEStep 1 Thread a medium size beadonto an eye pin. Place the pliers at thetop of the bead grasping the pin. Bendthe pin over at a right angle, changethe position of the pliers to grasp thecorner where the wire is bent. Wrapthe remaining wire around the pliersto create a loop. Release the pliersfrom the loop and grasp the loop inthe pliers and wrap the remainingwire around the base of the loop. Trimoff excess wire. Repeat to create 34medium wired beads with a loop ateach end.Step 2 Thread a large bead onto ahead pin and create a loop at the topof the bead in the same way as before.Repeat to create 16 large wired beadswith a loop at the top.1DStep 3 Cut a 60cm length of tigertail. Thread on one of the mediumbeads from step 1 followed by a singlesmall bead then repeat, alternatingmedium wired beads and small beadsuntil there are 17 medium and 16small beads, beginning and ending witha medium wired bead.Step 4 Cut a 30cm length of tigertail. Thread through the bottom loop ofthe first medium wired bead on the firstrow of tiger tail, then thread on a crimpfollowed by a new medium wired beadand a small bead. Then thread the tigertail through the next medium bead loopon the first row followed by anothernew medium wired bead and anothersmall bead. Continue along this row inthe same manner alternating the beadsto the end of the first row. Thread onanother crimp before the last loopedbead.1EStep 5 Cut another 30cm lengthof tiger tail and repeat the process asbefore, threading through the bottomloop of the new beads on the secondrow but threading on the large beadedhead pins to alternate with mediumbeads. Use the diagram on page 18as a guide. Include a crimp after thefirst looped bead and before the lastlooped bead.Step 6 To secure the tiger tail at theends of the short rows, loop the tigertail around the first and last loopedbead, pass the end back through thecrimp then clamp together using flatnosed pliers. Thread 16 small beadswith a crimp in between each bead, oneach side of the long length of tiger tailusing the crimps as spacers. Attach alobster clasp at one end and a jumpring on the other end, secure using thecrimps.Get Creative Quarterly Autumn 2011 117