e - Spotlight Promotions
e - Spotlight Promotions
e - Spotlight Promotions
- No tags were found...

You also want an ePaper? Increase the reach of your titles
YUMPU automatically turns print PDFs into web optimized ePapers that Google loves.
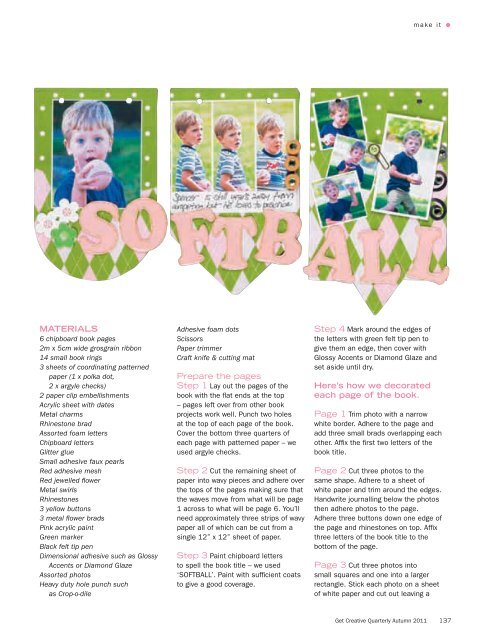
make it •Materials6 chipboard book pages2m x 5cm wide grosgrain ribbon14 small book rings3 sheets of coordinating patternedpaper (1 x polka dot,2 x argyle checks)2 paper clip embellishmentsAcrylic sheet with datesMetal charmsRhinestone bradAssorted foam lettersChipboard lettersGlitter glueSmall adhesive faux pearlsRed adhesive meshRed jewelled flowerMetal swirlsRhinestones3 yellow buttons3 metal flower bradsPink acrylic paintGreen markerBlack felt tip penDimensional adhesive such as GlossyAccents or Diamond GlazeAssorted photosHeavy duty hole punch suchas Crop-o-dileAdhesive foam dotsScissorsPaper trimmerCraft knife & cutting matPrepare the pagesStep 1 Lay out the pages of thebook with the flat ends at the top– pages left over from other bookprojects work well. Punch two holesat the top of each page of the book.Cover the bottom three quarters ofeach page with patterned paper – weused argyle checks.Step 2 Cut the remaining sheet ofpaper into wavy pieces and adhere overthe tops of the pages making sure thatthe waves move from what will be page1 across to what will be page 6. You’llneed approximately three strips of wavypaper all of which can be cut from asingle 12” x 12” sheet of paper.Step 3 Paint chipboard lettersto spell the book title – we used‘SOFTBALL’. Paint with sufficient coatsto give a good coverage.Step 4 Mark around the edges ofthe letters with green felt tip pen togive them an edge, then cover withGlossy Accents or Diamond Glaze andset aside until dry.Here’s how we decoratedeach page of the book.Page 1 Trim photo with a narrowwhite border. Adhere to the page andadd three small brads overlapping eachother. Affix the first two letters of thebook title.Page 2 Cut three photos to thesame shape. Adhere to a sheet ofwhite paper and trim around the edges.Handwrite journalling below the photosthen adhere photos to the page.Adhere three buttons down one edge ofthe page and rhinestones on top. Affixthree letters of the book title to thebottom of the page.Page 3 Cut three photos intosmall squares and one into a largerrectangle. Stick each photo on a sheetof white paper and cut out leaving aGet Creative Quarterly Autumn 2011 137