7872 Scanner Upgrade to Scanner/Scale
7872 Scanner Upgrade to Scanner/Scale
7872 Scanner Upgrade to Scanner/Scale
- No tags were found...

Create successful ePaper yourself
Turn your PDF publications into a flip-book with our unique Google optimized e-Paper software.
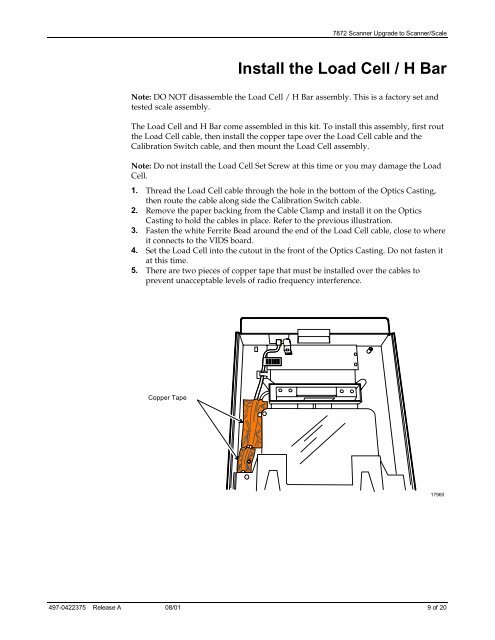
<strong>7872</strong> <strong>Scanner</strong> <strong>Upgrade</strong> <strong>to</strong> <strong>Scanner</strong>/<strong>Scale</strong>Install the Load Cell / H BarNote: DO NOT disassemble the Load Cell / H Bar assembly. This is a fac<strong>to</strong>ry set andtested scale assembly.The Load Cell and H Bar come assembled in this kit. To install this assembly, first routthe Load Cell cable, then install the copper tape over the Load Cell cable and theCalibration Switch cable, and then mount the Load Cell assembly.Note: Do not install the Load Cell Set Screw at this time or you may damage the LoadCell.1. Thread the Load Cell cable through the hole in the bot<strong>to</strong>m of the Optics Casting,then route the cable along side the Calibration Switch cable.2. Remove the paper backing from the Cable Clamp and install it on the OpticsCasting <strong>to</strong> hold the cables in place. Refer <strong>to</strong> the previous illustration.3. Fasten the white Ferrite Bead around the end of the Load Cell cable, close <strong>to</strong> whereit connects <strong>to</strong> the VIDS board.4. Set the Load Cell in<strong>to</strong> the cu<strong>to</strong>ut in the front of the Optics Casting. Do not fasten itat this time.5. There are two pieces of copper tape that must be installed over the cables <strong>to</strong>prevent unacceptable levels of radio frequency interference.Copper Tape17960497-0422375 Release A 08/01 9 of 20