

May/June 2010 - O Scale Trains Magazine Online
May/June 2010 - O Scale Trains Magazine Online
May/June 2010 - O Scale Trains Magazine Online
- No tags were found...

Create successful ePaper yourself
Turn your PDF publications into a flip-book with our unique Google optimized e-Paper software.
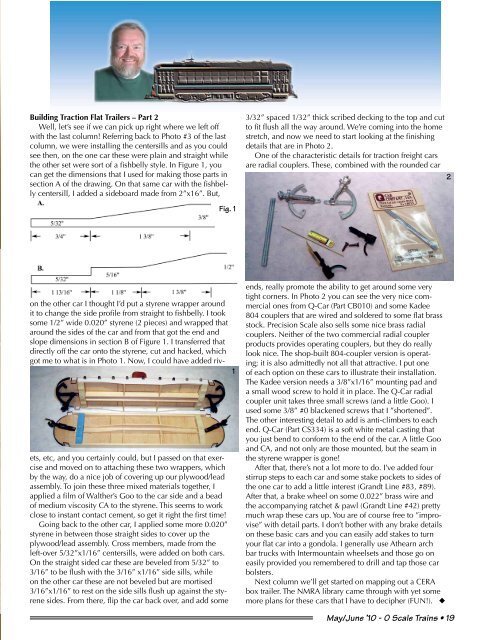
Building Traction Flat Trailers – Part 2Well, let’s see if we can pick up right where we left offwith the last column! Referring back to Photo #3 of the lastcolumn, we were installing the centersills and as you couldsee then, on the one car these were plain and straight whilethe other set were sort of a fishbelly style. In Figure 1, youcan get the dimensions that I used for making those parts insection A of the drawing. On that same car with the fishbellycentersill, I added a sideboard made from 2”x16”. But,3/32” spaced 1/32” thick scribed decking to the top and cutto fit flush all the way around. We’re coming into the homestretch, and now we need to start looking at the finishingdetails that are in Photo 2.One of the characteristic details for traction freight carsare radial couplers. These, combined with the rounded car2Fig. 1on the other car I thought I’d put a styrene wrapper aroundit to change the side profile from straight to fishbelly. I tooksome 1/2” wide 0.020” styrene (2 pieces) and wrapped thataround the sides of the car and from that got the end andslope dimensions in section B of Figure 1. I transferred thatdirectly off the car onto the styrene, cut and hacked, whichgot me to what is in Photo 1. Now, I could have added rivets,etc, and you certainly could, but I passed on that exerciseand moved on to attaching these two wrappers, whichby the way, do a nice job of covering up our plywood/leadassembly. To join these three mixed materials together, Iapplied a film of Walther’s Goo to the car side and a beadof medium viscosity CA to the styrene. This seems to workclose to instant contact cement, so get it right the first time!Going back to the other car, I applied some more 0.020”styrene in between those straight sides to cover up theplywood/lead assembly. Cross members, made from theleft-over 5/32”x1/16” centersills, were added on both cars.On the straight sided car these are beveled from 5/32” to3/16” to be flush with the 3/16” x1/16” side sills, whileon the other car these are not beveled but are mortised3/16”x1/16” to rest on the side sills flush up against the styrenesides. From there, flip the car back over, and add some1ends, really promote the ability to get around some verytight corners. In Photo 2 you can see the very nice commercialones from Q-Car (Part CB010) and some Kadee804 couplers that are wired and soldered to some flat brassstock. Precision <strong>Scale</strong> also sells some nice brass radialcouplers. Neither of the two commercial radial couplerproducts provides operating couplers, but they do reallylook nice. The shop-built 804-coupler version is operating;it is also admittedly not all that attractive. I put oneof each option on these cars to illustrate their installation.The Kadee version needs a 3/8”x1/16” mounting pad anda small wood screw to hold it in place. The Q-Car radialcoupler unit takes three small screws (and a little Goo). Iused some 3/8” #0 blackened screws that I ”shortened”.The other interesting detail to add is anti-climbers to eachend. Q-Car (Part CS334) is a soft white metal casting thatyou just bend to conform to the end of the car. A little Gooand CA, and not only are those mounted, but the seam inthe styrene wrapper is gone!After that, there’s not a lot more to do. I’ve added fourstirrup steps to each car and some stake pockets to sides ofthe one car to add a little interest (Grandt Line #83, #89).After that, a brake wheel on some 0.022” brass wire andthe accompanying ratchet & pawl (Grandt Line #42) prettymuch wrap these cars up. You are of course free to ”improvise”with detail parts. I don’t bother with any brake detailson these basic cars and you can easily add stakes to turnyour flat car into a gondola. I generally use Athearn archbar trucks with Intermountain wheelsets and those go oneasily provided you remembered to drill and tap those carbolsters.Next column we’ll get started on mapping out a CERAbox trailer. The NMRA library came through with yet somemore plans for these cars that I have to decipher (FUN!). u<strong>May</strong>/<strong>June</strong> ’10 - O <strong>Scale</strong> <strong>Trains</strong> • 19


