

May/June 2010 - O Scale Trains Magazine Online
May/June 2010 - O Scale Trains Magazine Online
May/June 2010 - O Scale Trains Magazine Online
- No tags were found...

Create successful ePaper yourself
Turn your PDF publications into a flip-book with our unique Google optimized e-Paper software.
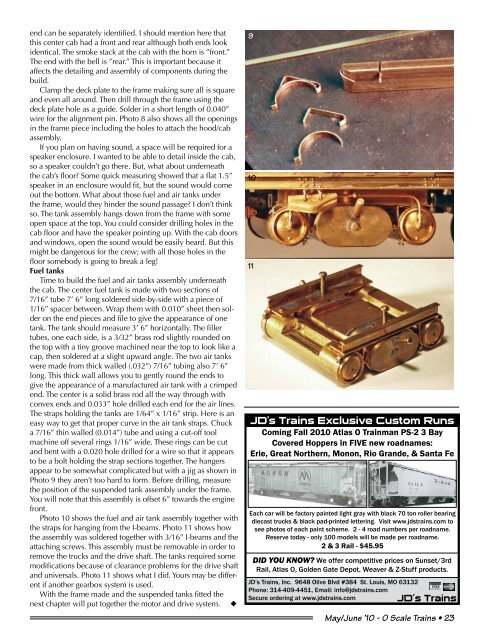
end can be separately identified. I should mention here thatthis center cab had a front and rear although both ends lookidentical. The smoke stack at the cab with the horn is ”front.”The end with the bell is ”rear.” This is important because itaffects the detailing and assembly of components during thebuild.Clamp the deck plate to the frame making sure all is squareand even all around. Then drill through the frame using thedeck plate hole as a guide. Solder in a short length of 0.040”wire for the alignment pin. Photo 8 also shows all the openingsin the frame piece including the holes to attach the hood/cabassembly.If you plan on having sound, a space will be required for aspeaker enclosure. I wanted to be able to detail inside the cab,so a speaker couldn’t go there. But, what about underneaththe cab’s floor? Some quick measuring showed that a flat 1.5”speaker in an enclosure would fit, but the sound would comeout the bottom. What about those fuel and air tanks underthe frame, would they hinder the sound passage? I don’t thinkso. The tank assembly hangs down from the frame with someopen space at the top. You could consider drilling holes in thecab floor and have the speaker pointing up. With the cab doorsand windows, open the sound would be easily heard. But thismight be dangerous for the crew; with all those holes in thefloor somebody is going to break a leg!Fuel tanksTime to build the fuel and air tanks assembly underneaththe cab. The center fuel tank is made with two sections of7/16” tube 7’ 6” long soldered side-by-side with a piece of1/16” spacer between. Wrap them with 0.010” sheet then solderon the end pieces and file to give the appearance of onetank. The tank should measure 3’ 6” horizontally. The fillertubes, one each side, is a 3/32” brass rod slightly rounded onthe top with a tiny groove machined near the top to look like acap, then soldered at a slight upward angle. The two air tankswere made from thick walled (.032”) 7/16” tubing also 7’ 6”long. This thick wall allows you to gently round the ends togive the appearance of a manufactured air tank with a crimpedend. The center is a solid brass rod all the way through withconvex ends and 0.033” hole drilled each end for the air lines.The straps holding the tanks are 1/64” x 1/16” strip. Here is aneasy way to get that proper curve in the air tank straps. Chucka 7/16” thin walled (0.014”) tube and using a cut-off toolmachine off several rings 1/16” wide. These rings can be cutand bent with a 0.020 hole drilled for a wire so that it appearsto be a bolt holding the strap sections together. The hangersappear to be somewhat complicated but with a jig as shown inPhoto 9 they aren’t too hard to form. Before drilling, measurethe position of the suspended tank assembly under the frame.You will note that this assembly is offset 6” towards the enginefront.Photo 10 shows the fuel and air tank assembly together withthe straps for hanging from the I-beams. Photo 11 shows howthe assembly was soldered together with 3/16” I-beams and theattaching screws. This assembly must be removable in order toremove the trucks and the drive shaft. The tanks required somemodifications because of clearance problems for the drive shaftand universals. Photo 11 shows what I did. Yours may be differentif another gearbox system is used.With the frame made and the suspended tanks fitted thenext chapter will put together the motor and drive system. u91011JD’s <strong>Trains</strong> Exclusive Custom RunsComing Fall <strong>2010</strong> Atlas O Trainman PS-2 3 BayCovered Hoppers in FIVE new roadnames:Erie, Great Northern, Monon, Rio Grande, & Santa FeEach car will be factory painted light gray with black 70 ton roller bearingdiecast trucks & black pad-printed lettering. Visit www.jdstrains.com tosee photos of each paint scheme. 2 - 4 road numbers per roadname.Reserve today - only 100 models will be made per roadname.2 & 3 Rail - $45.95DID YOU KNOW? We offer competitive prices on Sunset/3rdRail, Atlas O, Golden Gate Depot, Weaver & Z-Stuff products.JD’s <strong>Trains</strong>, Inc. 9648 Olive Blvd #384 St. Louis, MO 63132Phone: 314-409-4451, Email: info@jdstrains.comSecure ordering at www.jdstrains.com JD’s <strong>Trains</strong><strong>May</strong>/<strong>June</strong> ’10 - O <strong>Scale</strong> <strong>Trains</strong> • 23


