

QB Series - Rice Lake Weighing Systems
QB Series - Rice Lake Weighing Systems
QB Series - Rice Lake Weighing Systems

Create successful ePaper yourself
Turn your PDF publications into a flip-book with our unique Google optimized e-Paper software.
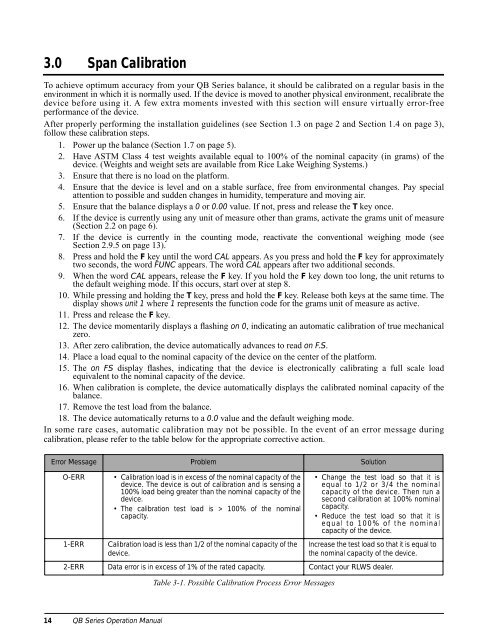
3.0 Span CalibrationTo achieve optimum accuracy from your <strong>QB</strong> <strong>Series</strong> balance, it should be calibrated on a regular basis in theenvironment in which it is normally used. If the device is moved to another physical environment, recalibrate thedevice before using it. A few extra moments invested with this section will ensure virtually error-freeperformance of the device.After properly performing the installation guidelines (see Section 1.3 on page 2 and Section 1.4 on page 3),follow these calibration steps.1. Power up the balance (Section 1.7 on page 5).2. Have ASTM Class 4 test weights available equal to 100% of the nominal capacity (in grams) of thedevice. (Weights and weight sets are available from <strong>Rice</strong> <strong>Lake</strong> <strong>Weighing</strong> <strong>Systems</strong>.)3. Ensure that there is no load on the platform.4. Ensure that the device is level and on a stable surface, free from environmental changes. Pay specialattention to possible and sudden changes in humidity, temperature and moving air.5. Ensure that the balance displays a 0 or 0.00 value. If not, press and release the T key once.6. If the device is currently using any unit of measure other than grams, activate the grams unit of measure(Section 2.2 on page 6).7. If the device is currently in the counting mode, reactivate the conventional weighing mode (seeSection 2.9.5 on page 13).8. Press and hold the F key until the word CAL appears. As you press and hold the F key for approximatelytwo seconds, the word FUNC appears. The word CAL appears after two additional seconds.9. When the word CAL appears, release the F key. If you hold the F key down too long, the unit returns tothe default weighing mode. If this occurs, start over at step 8.10. While pressing and holding the T key, press and hold the F key. Release both keys at the same time. Thedisplay shows unit 1 where 1 represents the function code for the grams unit of measure as active.11. Press and release the F key.12. The device momentarily displays a flashing on 0, indicating an automatic calibration of true mechanicalzero.13. After zero calibration, the device automatically advances to read on F.S.14. Place a load equal to the nominal capacity of the device on the center of the platform.15. The on FS display flashes, indicating that the device is electronically calibrating a full scale loadequivalent to the nominal capacity of the device.16. When calibration is complete, the device automatically displays the calibrated nominal capacity of thebalance.17. Remove the test load from the balance.18. The device automatically returns to a 0.0 value and the default weighing mode.In some rare cases, automatic calibration may not be possible. In the event of an error message duringcalibration, please refer to the table below for the appropriate corrective action.Error Message Problem SolutionO-ERR1-ERR• Calibration load is in excess of the nominal capacity of thedevice. The device is out of calibration and is sensing a100% load being greater than the nominal capacity of thedevice.• The calibration test load is > 100% of the nominalcapacity.Calibration load is less than 1/2 of the nominal capacity of thedevice.• Change the test load so that it isequal to 1/2 or 3/4 the nominalcapacity of the device. Then run asecond calibration at 100% nominalcapacity.• Reduce the test load so that it isequal to 100% of the nominalcapacity of the device.Increase the test load so that it is equal tothe nominal capacity of the device.2-ERR Data error is in excess of 1% of the rated capacity. Contact your RLWS dealer.Table 3-1. Possible Calibration Process Error Messages14 <strong>QB</strong> <strong>Series</strong> Operation Manual


