BUILT-IN TRIM KIT INSTALLATION INSTRUCTION
BUILT-IN TRIM KIT INSTALLATION INSTRUCTION
BUILT-IN TRIM KIT INSTALLATION INSTRUCTION
- No tags were found...

Create successful ePaper yourself
Turn your PDF publications into a flip-book with our unique Google optimized e-Paper software.
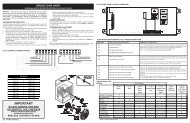
41. Fold or cut the front edge of the template,along the front guide line. Place the templateflush along the front edge of the cutout floor,aligning the center line of the template with thecenter line of the cutout floor. Mark the centerpositions with an awl or center punch for theanti-tip bracket location as shown.51. Remove the one existing screw from the left sideof the microwave oven.2. Connect the side duct to the upper duct asshown.a) Insert projecting tabs of the upper duct intothe holes of the side duct.b) Bend the tabs up as shown.NOTE: Remove any oil or dirt on the surface ofthe microwave oven before the ducts are attached.Upper Duct3 TabsSide Duct3 HolesCutout Floor2. Remove the template and drill two holes forthe anti-tip bracket.a) b)1 2" Screws (2)Anti-Tip Bracket3. Peel off the backing of the double sided tape.Attach the side duct and upper duct assemblyon the microwave cabinet. Press down firmlyon the ducts. Fasten the duct assembly to theleft side of the cabinet with one existing screw.3. Install the anti-tip bracket onto the cutoutfloor using two 1 /2" screws.Existing Screw (1)2