Eberspacher 7 Day Timer without Relay (English) - PDF Format.
Eberspacher 7 Day Timer without Relay (English) - PDF Format.
Eberspacher 7 Day Timer without Relay (English) - PDF Format.
- No tags were found...

Create successful ePaper yourself
Turn your PDF publications into a flip-book with our unique Google optimized e-Paper software.
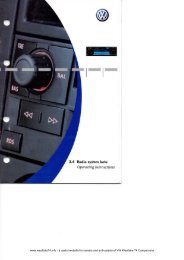
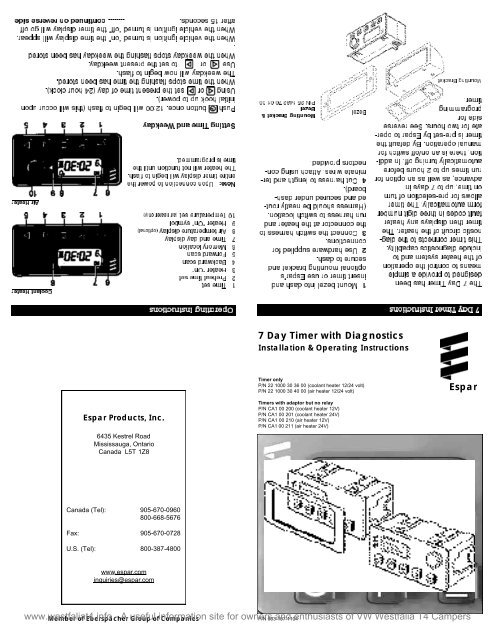
7 <strong>Day</strong> <strong>Timer</strong> with DiagnosticsInstallation & Operating Instructions<strong>Timer</strong> onlyP/N 22 1000 30 36 00 (coolant heater 12/24 volt)P/N 22 1000 30 40 00 (air heater 12/24 volt)EsparEspar Products, Inc.6435 Kestrel RoadMississauga, OntarioCanada L5T 1Z8<strong>Timer</strong>s with adaptor but no relayP/N CA1 00 200 (coolant heater 12V)P/N CA1 00 201 (coolant heater 24V)P/N CA1 00 210 (air heater 12V)P/N CA1 00 211 (air heater 24V)Canada (Tel): 905-670-0960800-668-5676Fax: 905-670-0728U.S. (Tel): 800-387-4800www.espar.cominquiries@espar.comwww.westfaliat4.info Member of Eberspächer - A useful Group of information Companies site for owners P/N 603-107-1104 and enthusiasts of VW Westfalia T4 Campers
Operating InstructionsChanging the Time or <strong>Day</strong>Push and hold button until the time display begins to flash.Continue to set the time as listed in setting time and weekday.Using the <strong>Timer</strong> with the Vehicle Ignition “Off”Push button.will appear on the display as well as the operation countdown timer.The running time is factory set to a maximum of 120 minutes. Thisrunning time can be reset once or permanently as desired.Adjusting Preheat Time OncePress button.The will appear in the display and the preselected run time willappear in the display (maximum time of 120 minutes).Use the or to adjust the desired run time.Adjusting the Heater Preheat Time Permanently(Maximum Preheat Time of 120 minutes)Push and hold (about 3 seconds) until the display lights up andflashes. Release button.Use or to set the new fixed preheat time.When the display goes off the new preheat time is set.Note: At the end of a preheat cycle the timer will turn the heater off.The heater will complete a cool down cycle and turn itself off.To Use Preset Start TimesPress the button until the desired memory locationappears in the display.The heater will start at the day and time displayed.The display will go off in 15 seconds. The memory locationnumber will stay displayed (1, 2 or 3).Note: When preset is chosen this symbol will flash red.To Turn Heater “Off” - All ModesPress the button once.The heat signal to the heater will be turned “off”.The heater will do a normal cooldown and turn itself “off”.EsparNote: When the vehicle ignition is turned “on” the time of day and day ofthe week will appear in the timer display. This will stay on as long as thevehicle ignition is “on”.Note: When the vehicle lights are turned “on” the timer backlight will come“on” also.Note: This timer is equipped to display fault code numbers if the heatershould shut down due to an operating fault. The fault code will show in thetimer display next to the flashing heat wave symbol. This applies to all currentmodel heaters when the blue diagnostic wire is connected.Note: If the timer is purchased <strong>without</strong> the harness kit, the following heaterswill need a load relay installed (D8LC, D7W, D12W, D24W and D30W),These heaters carry a load on the switch wire. (i.e. fuel metering pump orsolenoid valve).Using the Heater Manually with the Vehicle Accessory “On”Note:An outside temperature sensor is available as an optionPush button.The symbol will appear in the display next to the time of day.The time of day will remain displayed during ignition on operation.The heater will function continually as long as the vehicle ignition is “on”.When the vehicle ignition is turned “off” the heater will continue tooperate for an addtional 15 minutes.The run time can be altered by pressing the or buttons.The heater can be turned off by pressing button.Set Preheat Times into MemoryPress button until the desired memory location is shown in thedisplay (Three memory locations are available).Using the or buttons set the desired preheat start time of day.When the time stops flashing the time of day is set.Using the or buttons set the desired day of the week.When the day of the week stops flashing the day is set.Coolant Heater <strong>Timer</strong> ConnectionsWiring Connections at connectorTerminal 1 Power from vehicle dash lightsTerminal 2 Heater switch wire - yellow wireTerminal 4 Connect to vehicle groundTerminal 6 Temperature setting “+” (air only)Terminal 8 Heater diagnostic lead - blue wireTerminal 9 Temperature setting “-” (air only)Terminal 10 To vehicle “ACC” accessory for continuous overnight useTerminal 11 Positive power from heater - red “+”Terminal 12 Ground lead from heater - brown “-”Terminal 3,5,7 Left blank, not requiredAir Heater <strong>Timer</strong> Connectionsaa) Power from battery”+”b) Switch control to heaterc) Power from battery”-”d) Diagnostics from heatere) To vehicle dimmer switch for light displayf) To vehicle ignition accessories for continuousoperation of heatera) Power from battery ”+”b) Switch control to heaterc) Power from battery ”-”d) Diagnostics from heatere) Temperature setting “+”f) Temperature setting “-”g) To vehicle dimmer switch for light displayh) To vehicle ignition accessories for continuous operation of heaterwww.westfaliat4.info - A useful information site for owners and enthusiasts of VW Westfalia T4 Campers