Yotta 3 E Series SAS/SATA RAID Subsystem Hardware ... - Axus
Yotta 3 E Series SAS/SATA RAID Subsystem Hardware ... - Axus
Yotta 3 E Series SAS/SATA RAID Subsystem Hardware ... - Axus
- No tags were found...

Create successful ePaper yourself
Turn your PDF publications into a flip-book with our unique Google optimized e-Paper software.
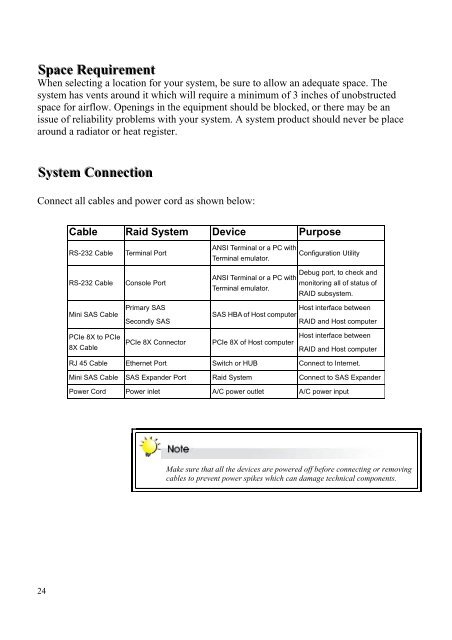
Space RequiirementtWhen selecting a location for your system, be sure to allow an adequate space. Thesystem has vents around it which will require a minimum of 3 inches of unobstructedspace for airflow. Openings in the equipment should be blocked, or there may be anissue of reliability problems with your system. A system product should never be placearound a radiator or heat register.Syssttem ConnecttiionConnect all cables and power cord as shown below:Cable Raid System Device PurposeRS-232 CableRS-232 CableMini <strong>SAS</strong> CableTerminal PortConsole PortPrimary <strong>SAS</strong>Secondly <strong>SAS</strong>ANSI Terminal or a PC withConfiguration UtilityTerminal emulator.Debug port, to check andANSI Terminal or a PC withmonitoring all of status ofTerminal emulator.<strong>RAID</strong> subsystem.Host interface between<strong>SAS</strong> HBA of Host computer<strong>RAID</strong> and Host computerPCIe 8X to PCIe8X CablePCIe 8X ConnectorPCIe 8X of Host computerHost interface between<strong>RAID</strong> and Host computerRJ 45 Cable Ethernet Port Switch or HUB Connect to Internet.Mini <strong>SAS</strong> Cable <strong>SAS</strong> Expander Port Raid System Connect to <strong>SAS</strong> ExpanderPower Cord Power inlet A/C power outlet A/C power inputMake sure that all the devices are powered off before connecting or removingcables to prevent power spikes which can damage technical components.24