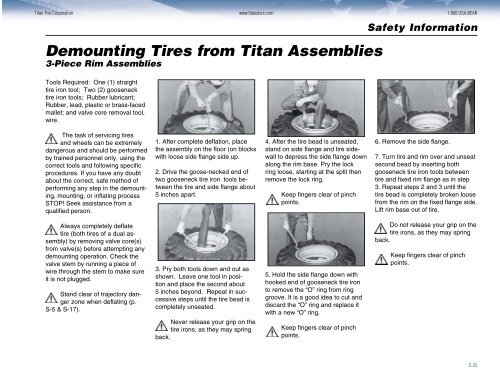
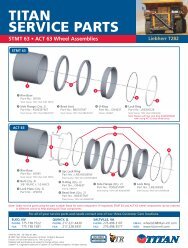
<strong>Titan</strong> Tire Corporation www.titanstore.com 1.800.USA.BEARDemounting Tires from <strong>Titan</strong> Assemblies3-Piece Rim AssembliesTools Required: One (1) straighttire iron tool; Two (2) goosenecktire iron tools; Rubber lubricant;Rubber, lead, plastic or brass-facedmallet; and valve core removal tool,wire.Safety InformationThe task of servicing tiresand wheels can be extremelydangerous and should be performedby trained personnel only, using thecorrect tools and following specificprocedures. If you have any doubtabout the correct, safe method ofperforming any step in the demounting,mounting, or inflating processSTOP! Seek assistance from aqualified person.1. After complete deflation, placethe assembly on the floor (on blockswith loose side flange side up.2. Drive the goose-necked end oftwo gooseneck tire iron tools betweenthe tire and side flange about5 inches apart.4. After the tire bead is unseated,stand on side flange and tire sidewallto depress the side flange downalong the rim base. Pry the lockring loose, starting at the split thenremove the lock ring.Keep fingers clear of pinchpoints.6. Remove the side flange.7. Turn tire and rim over and unseatsecond bead by inserting bothgooseneck tire iron tools betweentire and fixed rim flange as in step3. Repeat steps 2 and 3 until thetire bead is completely broken loosefrom the rim on the fixed flange side.Lift rim base out of tire.Always completely deflatetire (both tires of a dual assembly)by removing valve core(s)from valve(s) before attempting anydemounting operation. Check thevalve stem by running a piece ofwire through the stem to make sureit is not plugged.Stand clear of trajectory dangerzone when deflating (p.S-5 & S-17).3. Pry both tools down and out asshown. Leave one tool in positionand place the second about5 inches beyond. Repeat in successivesteps until the tire bead iscompletely unseated.Never release your grip on thetire irons, as they may springback.5. Hold the side flange down withhooked end of gooseneck tire ironto remove the “O” ring from ringgroove. It is a good idea to cut anddiscard the “O” ring and replace itwith a new “O” ring.Keep fingers clear of pinchpoints.Do not release your grip on thetire irons, as they may springback.Keep fingers clear of pinchpoints.S-25
1.800.USA.BEAR www.titanstore.com <strong>Titan</strong> Tire CorporationSafety InformationMounting Tires on <strong>Titan</strong> Assemblies3-Piece Rim AssembliesTools Required: One (1) straighttire iron tool; Two (2) goosenecktire iron tools; Rubber lubricant;Rubber, lead, plastic or brass-facedmallet; and safety cage.The task of servicing tiresand wheels can be extremelydangerous and should be performedby trained personnel only, using thecorrect tools and following specificprocedures. If you have any doubtabout the correct, safe method ofperforming any step in the demounting,mounting, or inflating processSTOP! Seek assistance from aqualified person.1. Clean the rim base and allcomponents thoroughly with a wirebrush to facilitate inspection, maintenanceand mounting.Clean all dirt and rust from inter-lockingfaces of multi-piecerim components particularly thegutter sections which hold the lockring and “O” ring in place. Failureto adequately clean all componentswill inhibit efforts to inspect, maintain,and reassemble the tire andwheel correctly.2. Inspect rim base and wheel componentsfor cracks, wear, corrosionand damage.Parts that are cracked, worn,pitted with corrosion, or damagedmust be destroyed and replacewith good parts.In situations where part conditionis suspect or in doubt destroythe part, discard and replacewith good part.Do not, under any circumstances,attempt to rework,weld, heat, or braze any rim base orwheel components.Verify that the replacementparts are the correct size andtype and manufacturer for the wheelbeing assembled.3. After the rim and wheel componentinspection is complete, and rimbase and wheel components areverified to be in good usable condition,repaint all bare metal with arust inhibitor to retard detrimentaleffects of corrosion.Follow procedures and safetyprecautions of the paint manufacturer.4. Inspect the tire for wear, cracks,tears, punctures and other damage.Tires with excessive or unevenwear, cracks, tears, punctures, blistersor other damage may explodeduring inflation or service and tireshould be destroyed and replacedwith good tire of correct size, typeand manufacturer for assembly,machine, and application.If in doubt of the conditionof the rim base, wheel components,or tire - STOP - contactthe manufacturer or distributor forassistance.Make sure parts are clean, repaintedif necessary, and have beeninspected for damage and cracks,before proceeding with mounting.Parts that are cracked, worn,pitted with corrosion, or damagedmust be rendered unusable,discarded, and replaced with goodparts.5. Install valve spud on rim.Follow valve spud manufacturer’srecommendations andinstallation instructions.6. Place rim base on blocks withfixed flange side down. Lubricateboth bead seats of the tire withvegetable base lubricant.Place tire over rim base.Never use petroleum-basedlubricant; use vegetable-basedlubricant only.7. Place side flange over rim baseand push straight down with handsas far as possible. Make sure sideflange does not bind on rim base.First, double check to makesure correct parts are beingassembled, then proceed.Keep fingers clear of pinchpoints.S-26