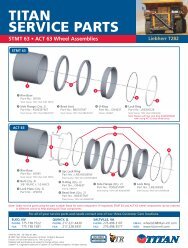
MOUNTING & DEMOUNTING SAFETY INFORMATION - Titan
MOUNTING & DEMOUNTING SAFETY INFORMATION - Titan
MOUNTING & DEMOUNTING SAFETY INFORMATION - Titan
- No tags were found...

You also want an ePaper? Increase the reach of your titles
YUMPU automatically turns print PDFs into web optimized ePapers that Google loves.
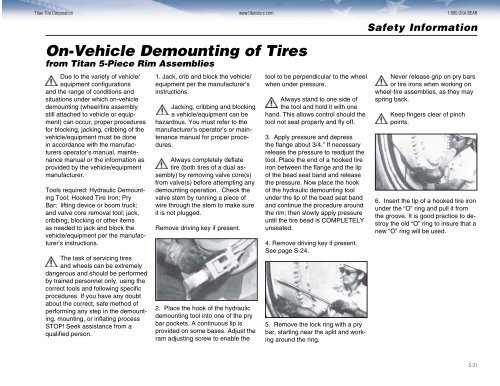
<strong>Titan</strong> Tire Corporation www.titanstore.com 1.800.USA.BEAROn-Vehicle Demounting of Tiresfrom <strong>Titan</strong> 5-Piece Rim AssembliesDue to the variety of vehicle/equipment configurationsand the range of conditions andsituations under which on-vehicledemounting (wheel/tire assemblystill attached to vehicle or equipment)can occur, proper proceduresfor blocking, jacking, cribbing of thevehicle/equipment must be donein accordance with the manufacturersoperator’s manual, maintenancemanual or the information asprovided by the vehicle/equipmentmanufacturer.Tools required: Hydraulic DemountingTool; Hooked Tire Iron; PryBar; lifting device or boom truck;and valve core removal tool; jack,cribbing, blocking or other itemsas needed to jack and block thevehicle/equipment per the manufacturer’sinstructions.The task of servicing tiresand wheels can be extremelydangerous and should be performedby trained personnel only, using thecorrect tools and following specificprocedures. If you have any doubtabout the correct, safe method ofperforming any step in the demounting,mounting, or inflating processSTOP! Seek assistance from aqualified person.1. Jack, crib and block the vehicle/equipment per the manufacturer’sinstructions.Jacking, cribbing and blockinga vehicle/equipment can behazardous. You must refer to themanufacturer’s operator’s or maintenancemanual for proper procedures.Always completely deflatetire (both tires of a dual assembly)by removing valve core(s)from valve(s) before attempting anydemounting operation. Check thevalve stem by running a piece ofwire through the stem to make sureit is not plugged.Remove driving key if present.2. Place the hook of the hydraulicdemounting tool into one of the prybar pockets. A continuous lip isprovided on some bases. Adjust theram adjusting screw to enable thetool to be perpendicular to the wheelwhen under pressure.Always stand to one side ofthe tool and hold it with onehand. This allows control should thetool not seat properly and fly off.3. Apply pressure and depressthe flange about 3/4.” If necessaryrelease the pressure to readjust thetool. Place the end of a hooked tireiron between the flange and the lipof the bead seat band and releasethe pressure. Now place the hookof the hydraulic demounting toolunder the lip of the bead seat bandand continue the procedure aroundthe rim; then slowly apply pressureuntil the tire bead is COMPLETELYunseated.4. Remove driving key if present.See page S-24.5. Remove the lock ring with a prybar, starting near the split and workingaround the ring.Safety InformationNever release grip on pry barsor tire irons when working onwheel-tire assemblies, as they mayspring back.Keep fingers clear of pinchpoints.6. Insert the tip of a hooked tire ironunder the “O” ring and pull it fromthe groove. It is good practice to destroythe old “O” ring to insure that anew “O” ring will be used.S-31