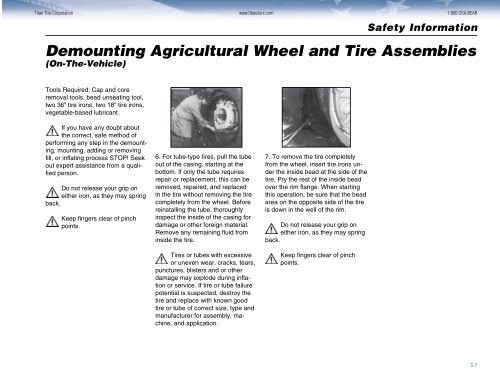
<strong>Titan</strong> Tire Corporation www.titanstore.com 1.800.USA.BEARSafety InformationDemounting Agricultural Wheel and Tire Assemblies(On-The-Vehicle)Tools Required: Cap and coreremoval tools, bead unseating tool,two 36” tire irons, two 18” tire irons,vegetable-based lubricant.If you have any doubt aboutthe correct, safe method ofperforming any step in the demounting,mounting, adding or removingfill, or inflating process STOP! Seekout expert assistance from a qualifiedperson.Do not release your grip oneither iron, as they may springback.Keep fingers clear of pinchpoints.6. For tube-type tires, pull the tubeout of the casing, starting at thebottom. If only the tube requiresrepair or replacement, this can beremoved, repaired, and replacedin the tire without removing the tirecompletely from the wheel. Beforereinstalling the tube, thoroughlyinspect the inside of the casing fordamage or other foreign material.Remove any remaining fluid frominside the tire.Tires or tubes with excessiveor uneven wear, cracks, tears,punctures, blisters and or otherdamage may explode during inflationor service. If tire or tube failurepotential is suspected, destroy thetire and replace with known goodtire or tube of correct size, type andmanufacturer for assembly, machine,and application.7. To remove the tire completelyfrom the wheel, insert tire irons underthe inside bead at the side of thetire. Pry the rest of the inside beadover the rim flange. When startingthis operation, be sure that the beadarea on the opposite side of the tireis down in the well of the rim.Do not release your grip oneither iron, as they may springback.Keep fingers clear of pinchpoints.S-7
1.800.USA.BEAR www.titanstore.com <strong>Titan</strong> Tire CorporationSafety InformationMounting Agricultural Wheel and Tire Assemblies(On-The-Vehicle)Tools Required: vegetable-basedlubricant, wire brush, two 36” tireirons, two 18” tire irons, rubbermallet, extension hose with in-linegauge and clip-on air chuck, air/water inflation gauge, restrainingdevice.directional bead tires are mountedfor correct rotation direction.If you have any doubt in thecorrect, safe method of performingany step in the demounting,mounting, adding or removing fill, orinflating process STOP! Seek outexpert assistance from a qualifiedperson.ALWAYS replace a tire on arim with another tire of exactlythe same rim diameter designation.Rims of different diametersand tapers CANNOT be interchanged.Remove water and foreign materialfrom tire. Tubes or tireswith excessive wear, cracks, tears,punctures, blisters, or other damagemay explode during inflation or service.If tube or tire failure potentialis suspected, render the tube or tireunusable and replace with knowngood tube or tire.1. Thoroughly lubricate the tire beadarea and rim flange with a vegetable-basedlubricant.Never use petroleum-basedlubricant. Only use vegetablebasedlubricant.2. With a wire brush, clean and inspectrim for fatigue cracks. Replaceany cracked, badly worn, damagedand severely rusted rims or wheels.Coat the rim with paint or a rustinhibitor if necessary.Follow procedures and safetyprecautions of the paint manufacturer.Do not, under any circumstances,attempt to rework,weld, heat, or braze any rim base orwheel components.3. Before placing tire on rim, be surethe rim’s valve hole is at the bottomof wheel. Also take care to ensure4. To put the tire on the wheel, placethe inner bead over the flange at thetop. Be sure the bead is not “hungup” on the bead seat, instead thebead is guided into the rim well,while the tire irons and/or rubbermallet are used to work the firstbead over the rim. With the firstbead on the rim, pull the tire towardthe outside of the rim as far as possibleto make room for the tube.Keep fingers clear of pinchpoints.Keep a firm grip on the tireiron(s), as they may springback.5. Tubeless-type tires, skip to stepseven. For tube-type tires, be surethe valve is at the bottom of thewheel. Align the stem with the valvehole and starting at the bottom,place the tube in the tire. Place thevalve in valve hole and screw therim nut in place. Be sure that thetube is well inside the rim beforeproceeding to the next step.S-8