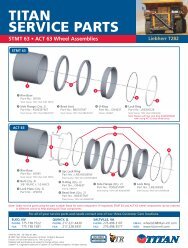
<strong>Titan</strong> Tire Corporation www.titanstore.com 1.800.USA.BEAROn-Vehicle Mounting of Tireson <strong>Titan</strong> 5-Piece Rim AssembliesDue to the variety of vehicle/equipment configurationsand the range of conditions andsituations under which on-vehicledemounting (wheel/tire assemblystill attached to vehicle or equipment)can occur, proper proceduresfor blocking, jacking, cribbing of thevehicle/equipment must be donein accordance with the manufacturersoperator’s manual, maintenancemanual or the information asprovided by the vehicle/equipmentmanufacturer.Tools Required: Lifting device orboom truck; jack, cribbing, blockingor other items as needed to jack andblock the vehicle/equipment per themanufacturer’s instructions.The task of servicing tiresand wheels can be extremelydangerous and should be performedby trained personnel only, using thecorrect tools and following specificprocedures. If you have any doubtabout the correct, safe method ofperforming any step in the demounting,mounting, or inflating processSTOP! Seek assistance from aqualified person.1. Before mounting, always cleanall rim components, removing rustand dirt, especially from the lockring groove and “O” ring groove toinsure proper seating and seal. Inspectparts for damage. Replace allcracked, badly worn, damaged andseverely rusted components; paintor coat all parts with a rust inhibitor.Double check to be sure correctparts are being assembled. Alsoinspect the tire for foreign matter.Follow procedures and safetyprecautions of the paint manufacturer.Tires with excessive or unevenwear, cracks, tears, punctures,blisters or other damage mayexplode during inflation or service.If tire failure potential is suspected,discard the tire and replace withgood tire of correct size, type andmanufacture for assembly, machineand application.Parts that are cracked, worn,pitted with corrosion, ordamaged must be discarded andreplaced with good parts.Do not attempt to rework,weld, heat, or braze any rimbase or wheel components.2. Place the inner flange on the rimbase, lubricate the tire beads with avegetable-base lubricant, and positionthe tire on the rim base using aboom truck or handler.Never use petroleum-basedlubricant; use vegetable basedlubricant only.Stand clear of lifting device.3. Position the outer flange on therim base with the help of the boom.Stand clear of lifting device.Keep fingers clear of pinchpoints.Safety Information4. Place the bead seat band on therim base with the help of the boom.Be sure driver pocket on bead seatband lines up with pocket on rimbase.Stand clear of lifting device.Keep fingers clear of pinchpoints.5. Using the boom to hold the rimcomponents back out of the way,insert a new, lubricated “O” ring intothe “O” ring groove area with anapproved vegetable-base lubricant.Snap “O” ring into place by placingin groove on one side stretching likea rubber band and seating on oppositeside.S-33
1.800.USA.BEAR www.titanstore.com <strong>Titan</strong> Tire CorporationSafety InformationOn-Vehicle Mounting of Tireson <strong>Titan</strong> 5-Piece Rim AssembliesThe task of servicing tiresand wheels can be extremelydangerous and should be performedby trained personnel only, using thecorrect tools and following specificprocedures. If you have any doubtabout the correct, safe method ofperforming any step in the demounting,mounting, or inflating processSTOP! Seek assistance from aqualified person.pressure gauge and enough air linehose to permit the person inflatingthe tire to stand clear of the potentialtrajectory danger zone. (Seep. S-5 & S-17) Stand to the sideof the tire during inflation. Inflateto approximately 3 psi and againcheck for proper engagement of allcomponents. If assembly is correct,continue to inflate to recommendedpressure.Stand clear of potential trajectorydanger zone (see p. S-5 &S-17 illustration).Never inflate beyond manufacturer’srecommended tirepressure.6. Work the lock ring into the lockring groove.Keep fingers clear of pinchpoints.7. Check components (lock rings,bead seat and flanges) to makesure that parts are correctly assembled.(NOTE: lock rings shouldbe fully seated in gutter around thecircumference. See page S-22.)Insert driver key as required, seepage S-23.Use a clip-on chuck with and in-lineIf assembly is incorrect, STOP-DEFLATE-CORRECT THEASSEMBLY-AND REPEAT PRO-CEDURE.Never attempt to inflate anassembly if components arenot properly aligned. Never attemptto seat rings or other componentsor correct components alignmentby hammering, welding, heating, orbrazing while tire is inflated, partiallyinflated or deflated.NOTE: A filter on the air inflationequipment to remove moisture fromthe air line prevents a lot of corrosion.Check the filter periodically tobe sure it’s functioning properly.34