LT-2016 MR-2605 Installation Manual Rev.3 - Secutron
LT-2016 MR-2605 Installation Manual Rev.3 - Secutron
LT-2016 MR-2605 Installation Manual Rev.3 - Secutron

Create successful ePaper yourself
Turn your PDF publications into a flip-book with our unique Google optimized e-Paper software.
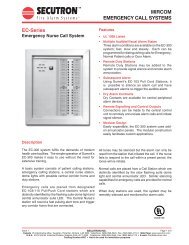
<strong>MR</strong>-<strong>2605</strong> <strong>Installation</strong> and Operator’s <strong>Manual</strong>List of FiguresFigure 1: <strong>MR</strong>-<strong>2605</strong> cabinet with door closed ....................................................................... 5Figure 2: <strong>MR</strong>-<strong>2605</strong> display and controls ............................................................................. 5Figure 3: <strong>MR</strong>-<strong>2605</strong> Cabinet Overview ................................................................................. 5Figure 4: Zone Label Insert ................................................................................................. 5Figure 5: Panel Assembly and Modules Locations ............................................................. 10Figure 6: Mounting Dimensions .......................................................................................... 11Figure 7: Knockout Locations .............................................................................................. 11Figure 8: <strong>MR</strong>-<strong>2605</strong> Terminal Descriptions .......................................................................... 12Figure 9: Connecting 2-Wire Alarm Initiating Devices ......................................................... 13Figure 10: Connecting 4-Wire Smoke Detectors ................................................................. 14Figure 11: Connecting NAC Devices (Class ‘B’) ................................................................. 14Figure 12: Connecting NAC Devices (Class ‘A’) ................................................................. 14Figure 13: Connecting Batteries .......................................................................................... 15Figure 14: Connecting AC Power ........................................................................................ 15Figure 15: Connecting the Alarm and Trouble Relays ........................................................ 16Figure 16: Connecting Optional Devices ............................................................................. 16Figure 17: Locating the Walk Test Switch ........................................................................... 24iii