Installation Guide - Thermostat Shop
Installation Guide - Thermostat Shop
Installation Guide - Thermostat Shop

Create successful ePaper yourself
Turn your PDF publications into a flip-book with our unique Google optimized e-Paper software.
Instruction ManualUS PAT:6,824,0696,786,421Models:CT03TS21CTO3TS32CTO3TS32Hwww.climatouch.comAED Electronics Inc.5758 Royalmount AvenueMontreal, Quebec,CanadaH4P 1K5Technical Support:1-866-90TOUCH(1-866-908-6824)514-737-4187
Dear Customer,Thank you for purchasing a Climatouch thermostat,the most innovative thermostat in the world.Did you know that your Climatouch thermostatcan also accurately display outdoor temperature?To enable this convenient feature you need anoptional outdoor UHF temperature transmitter.There is no need for any additional installation orset-up. Simply fit the the transmitter unit with batteriesand place it outdoors. Your Climatouchthermostat will start displaying accurate outdoortemperature immediately.Ask your installer for an optional outdoorUHF temperature transmitter today!UHF TEMPERATURE TRANSMITTER PART NUMBER: 217S31www.climatouch.com
Mounting Climatouch to the wall1. Make sure to turn off the power supply located at theelectrical service panel. All heating and cooling unitsshould be OFF.2. Remove the cover plate by pulling up the cover from theleft or right side only.3. Align the Climatouch unit to the wall.4. Mark the four locations for drilling the 3/16" holes requiredfor the plastic screw anchors.5. Remove the thermostat and drill the four 3/16" holesin these locations.6. Insert the plastic gyproc screw anchors and tighten themsecurely.7. Make the appropriate wire connections based on the specificationsof the household HVAC unit(s). Please refer to WiringTable to determine the appropriate wire connections.8. Securely mount the Climatouch unit to the wall withthe four supplied screws.9. Fit the cover plate back by clipping one side first (leftor right) and than push down on the opposite side.10. Turn on the electricity at the electrical service panel.CRY2O/B/WW2GY1Dh-HTerminalsPower Supply Common24VAC Power SupplySee Wiring Tableheat or cool reverse valve - the default is energizedin COOL mode.See Manufacturer's Technical Settings to reverse(if necessary) the logical orientation of contact Ob.FurnaceFanCompressorHumidity model only.24 VAC Class 2 MAX 4ANOTE (Humidity model only)HUMIDIFY feature controls the H relay in the HUMIDIFYmode when there is a demand for humidifying. DHrelay may control a variable speed fan in DEHUMIDIFYmode. DH relay is universally configurable in“Advanced Settings” - Page 6.
Wiring TableConfiguration Y1 Y2 W2 OB/W R C GCooling OnlyAir Conditioner Furn. Off AC x x x2Air Conditioner Furn. Off AC1 AC2 x x xHeating OnlyNo Compressor Electrical Furn. El.Furn El.Furn2* x x xNo Compressor Emg. El. Furn. Emg.El.Furn El.Furn El.Furn2* x x xNo Compressor Gas Gas Gas2* x x xNo Compressor Oil Oil Oil2* x x xNo Compressor 2 Stage Gas Gas1 Gas2 x x x* if there is another furnace, then connect it to OB/W relay.1 Stage Cooling, 1 Stage HeatingHeat Pump Furn. Off HP OB x x xAir Conditioner Electrical Furn. AC El.Furn x x xAir Conditioner Emg. El. Furn. AC Emg. El.Furn El.Furn x x xAir Conditioner Gas AC Gas x x xAir Conditioner Oil AC Oil x x x1 Stage Cooling, 2 Stage HeatingAir Conditioner 2 Stage Gas AC Gas1 Gas2 x x xAir Conditioner Electrical Furn. AC El.Furn1 El.Furn2 x x xAir Conditioner Emg. El. Furn. AC Emg. El.Furn El.Furn1 El.Furn2 x x xAir Conditioner Gas AC Gas1 Gas2 x x xAir Conditioner Oil AC Oil1 Oil2 x x xHeat Pump Electrical Furn. HP El.Furn OB x x xHeat Pump Gas HP Gas OB x x xHeat Pump Oil HP Oil OB x x x1 Stage Cooling, 3 Stage HeatingHeat Pump 2 Stage Gas HP Gas2 Gas1 OB x x x2 Stage Cooling, 1 Stage HeatingHP /AC Furn. Off HP AC OB x x x2Air Conditioner Electrical Furn. AC1 AC2 El.Furn x x x2Air Conditioner Gas AC1 AC2 Gas x x x2Air Conditioner Oil AC1 AC2 Oil x x x2 Stage Cooling, 2 Stage HeatingHP /AC Electrical Furn. HP AC El.Furn OB x x xHP /AC Gas HP AC Gas OB x x xHP /AC Oil HP AC Oil OB x x x2Heat Pump Furn. Off HP1 HP2 OB x x x2Air Conditioner Electrical Furn. AC1 AC2 El.Furn1 El.Furn2 x x x2Air Conditioner Gas AC1 AC2 Gas1 Gas2 x x x2Air Conditioner Oil AC1 AC2 Oil1 Oil2 x x x2Air Conditioner 2 stage Gas AC1 AC2 Gas1 Gas2 x x x2 stage Cooling, 3 stage heating2Heat Pump Gas HP1 HP2 Gas OB x x x2Heat Pump Oil HP1 HP2 Oil OB x x x2Heat Pump Electrical Furn. HP1 HP2 El. Furn OB x x x
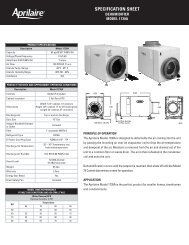
HOME PAGETo return to the Home Page, simply touchicon at any time!924356101287111131 Room Temperature; to change ºF/ºC, go to 35.2 Outdoor Temperature (ºF/ºC) 23 Relative Room Humidity (%) 1 ; to change set point, go to 17.4 <strong>Thermostat</strong> Control Mode; to change, go to 19.5 Temperature Control Mode; to change, go to 18.6 Fan Operation Mode; to change, go to 20.7 Fan Operation Indicator; to change, go to 20.8 Vacation Mode Indicator; to change, go to 28.9 Security On Indicator; to change, go to 36.10 Heating set point; to change, go to 16.11 Cooling set point; to change, go to 16.12 Date (Month/Day/Year); to change, go to 24.13 Time; to change, go to 24.
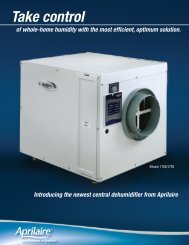
CONTROL PAGETo access the Control Page, simply touch the Home Page Screen…anywhere!211918202313* 1622151714 Current Room Temperature.15 Current Room Humidity 1 .16 Heat and Cool temperature set points; to change, raiseor lower set point as desired. In “Auto” mode touch* Heat/Cool button (Heat or Cool will flash once selected),then raise or lower set points as desired.17 Humidify/Dehumidify set point 1 ; to change, raise or loweras desired.18 Temperature Control Mode; select between Heat / Cool/ Auto / Emergency Heat.19 <strong>Thermostat</strong> Operation Mode: Select between “RunProgram” mode (for details, see 25 ) or “HoldTemperature” mode.20 Fan Operation Mode: select between Fan Automatic /Fan Continuously On / Fan Intermittently On.Note: to save energy, select Fan Intermittent (runs fanfor 10 minutes every 1/2 hour).21 Displays Installer Message; to enter a message, go to 3722 Return to Homepage.23 Access the Menu Page.
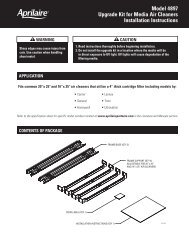
MENU PAGETo access the Menu Page, simply touch24252627from the Control Page.322829303124 Set Date and Time.25 Program automatic temperature changes and fan mode(“Run Program” mode) 4 events per day.26 Displays system energy consumption and cost of runningsystem; to enter system consumption parameters, go to34; otherwise, displays fan and compressor runtime.27 Freezes the screen for 15 sec to allow the user to wipethe screen with dampened cloth.28 Turn “Vacation Mode” OFF or ON and set: Departure Date,Arrival Date and temperature set point. (“Vacation Mode”will BEGIN at 11PM on your departure date and END atmidnight on your arrival date).29 Displays filter usage in days and resets filter timer.30 Select either “Humidify” or “Dehumidify” mode 1 ; to changeHumidify / Dehumidify set point, go to 17.31 Set Screen Options:Daylight Time (ON/OFF): activate only if you are locatedin a “Daylight Savings Time” zone.Reverse: Select between dark background (ON) or lightbackground (OFF)Night Reverse: Select between ON: Automatically reversesscreen background for comfortable viewing at night(from 9PM to 6AM) OFF: screen background determinedby “Reverse” function setting.Contrast: set screen contrast from 1-11.32 To access “Advanced Settings”, hold finger 5 seconds on icon.
ADVANCED SETTINGS: Page 1 ADVANCED SETTINGS: Page 238 4033 343539 4136 3733 Turn “Filter Monitor” ON or OFF; if ON enter the filterreplacement interval.34 Enter HVAC system consumption parameters roundedoff to kW; see 26 (Typically: Fan 1kW; Heat Pump1kW/ton; Furnace 5-30 kW, 7-9¢/kW)35 Change thermostat temperature display units (ºF or ºC).36 Turn “Security” ON or OFF (Default Security PIN = 1111)and select the security level:Partial Lock: User has can only change temperature setpoint(s) without a password.Full Lock: User must enter PIN to change any setting.37 Enter “Installer Message” (up to 42 characters) toappear at programmable intervals, see 21.Please note that inadvertently modifyingCompressor and Furnace settings, mayseriously degrade system performance.38 Select system heating and/or cooling equipment:Heat Pump, 2-stage Heat Pump, Air Conditioning, NoCompressor - see Wiring Table.39 Select the system Furnace Type:Furnace Off (No Furnace), Electric Furnace, EmergencyElectrical Furnace (additional electric furnace which willcome on in emergency mode in conjunction with electricfurnace), Gas Furnace, Oil Furnace, and 2-stage GasFurnace; see Wiring Table.40 Set maximum compressor cycles per hour.41 Set Minimum difference between auto mode heat andcool temperature set points. See 18.
ADVANCED SETTINGS: Page 3 ADVANCED SETTINGS: Page 44243 46444542 Set temperature difference between temperature set pointand actual temperature reading before 1st stage heatingor cooling is initiated.43 Set temperature difference between 1st stage initiation(42) and 2nd stage heating or cooling initiation.44 Set temperature difference between 2nd stage initiation(43) and 3rd stage heating or cooling initiation.NOTE: Number of stages depends on your system; see38 & 39.45 Reverses the Heat Pump OB Valve contact ; (manufacturerdependant)46 Specify X minutes for which stage 1 will function untilstage 2 is activated to help raise (or cool) temperature(if the temperature set point is not reached). This functionavoids excess compressor wear in the case where thenecessary temperature set point is not met (see 42, 43& 44). Set to “00” to disable.
4748ADVANCED SETTINGS: Page 5 ADVANCED SETTINGS: Page 6 149505147 HP “ON” when Furnace On: Heat Pump and Furnace canoperate together when 2nd stage furnace is required.HP “OFF” when Furnace On: turns off the Heat Pump whenthe furnace is On (required on some gas or oil furnaces).48 ON: fan runs when there is an independent demand tohumidify;OFF: fan only runs when there is a demand to humidifywhile heating or cooling.49 ON: fan runs when there is an independent demand todehumidify;OFF: fan only runs when there is a demand to dehumidifywhile cooling.50 ON, DH relay is normally closed when relative humidityis above DH set point.OFF, DH relay is normally open when relative humidityis above DH set point.51 ON: thermostat will turn off the air conditioning if eitherthe dehumidify set point or the temperature set point isreached, whichever comes first, both DH relay andcompressor will turn off.OFF: DH relay is independent of compressor activity (DHbecomes a spare and can be used for a variable speedfan or separate dehumidifier or air exchanger)
ADVANCED SETTINGS: Page 7525352 Humidity calibration offset - allows for fine-tuning of thehumidity sensor.53 Temperature calibration offset - allows for fine-tuningof the temperature sensor (use an accurate thermometerto calibrate if necessary).1Humidity model only.2Requires wireless temperature transmitter.
Simple <strong>Thermostat</strong> ModeClimatouch can also function as a non-programablethermostat after it has been configured.Simple Mode has the following basic features:Temperature Control Modes:Fan Operation Modes:To enable “Simple Mode”, press the reset button (take off thethermostat faceplate and press the reset button located in thebottom right-hand corner). The message “Touch for simplethermostat” will appear. Touch the screen, and Climatouchbecomes a simplified non-programmable thermostat.* Please note that when changing to Simple Mode, you will notlose any of the settings you have previously entered in the“Programmable Mode”.* To revert back to the Programmable Climatouch <strong>Thermostat</strong>,simply press the reset button and touch the screen when themessage “Touch for Programmable <strong>Thermostat</strong>” appears.
TroubleshootingTouch screen buttons do not function properly.Remove cover, press the reset button located in the bottomleft corner then accurately touch 3 target centers on thescreen when prompted.Air Conditioning does not turn on even when roomtemperature is higher then the temperature setpoint set point (Humidity models only).DHCONTROLCOMP is turned ON and dehumidify set pointhas been reached. This will cause air conditioning to turnoff. Lower dehumidify set point or turn off “DH ControlsCompressor” feature (see “Advanced Settings” Page 6).Air conditioning turns on in HEAT mode and heatingturns on in COOL mode.Reverse the OB valve (see “Advanced Settings” Page 3).<strong>Thermostat</strong> appears normal until the screenbecomes blank when the compressor or heatingsystem turn on.You need to connect the “C” wire. 4 wire system will notfunction unless the heat and compressor contactors cansupply enough current to power the thermostat with only4 wires, if you cannot hook up the “C” wire another possiblesolution is to connect two 100 ohm 10 watt resistors inthe HVAC room, one between Y and C, and the secondone between W2 and C.I forgot my PIN and cannot unlock the thermostat.Remove the cover plate, press the reset button located inthe bottom right corner, as soon as the message “touchto reset password” appears touch the screen, your PINwill be erased and the thermostat will unlock.PARTIAL LOCK and FULL LOCK do not function.You must not touch the screen for 1 minute forClimatouch to automatically lock
LIMITED WARRANTYHardwareAED Electronics Inc. (“AED”) warrants the original end user (“Customer”)that new Climatouch branded products will be free from defects in workmanshipand materials, under normal use, for two (2) years from the originalpurchase date.SoftwareAED warrants to Customer that the Climatouch thermostat software will performin substantial conformance to its program specifications for a period oftwo (2) years from the date of the original purchase.ExclusionsThis warranty excludes (1) physical damage to the surface of the product,including cracks or scratches on the touch-screen or outside casing; (2)damage caused by misuse, neglect, improper installation, unauthorizedattempts to open, repair, or modify the product, or any other cause beyondthe range of intended use; (3) damage caused by accident, fire, powerchanges, other hazard, or Acts of God; or (4) use of the product with anydevice if such device causes the problem.Exclusive RemediesShould a covered defect occur during the warranty period and Customernotifies AED, Customer’s sole and exclusive remedy will be, at AED’s soleoption and expense, to repair or replace the product. Replacement productsor parts may be new or reconditioned or a comparable version of the defectiveitem. AED warrants any replaced product or part for a period of ninety(90) days from shipment, or through the end of the original warranty,whichever is longer.Obtaining Warranty ServiceCustomer must contact and return product to a local AED product dealer orinstaller within the applicable warranty period to obtain warranty service.Dated proof of original purchase will be required. AED will not be responsiblefor Customer’s memory data contained in, stored on, or integrated withany products returned to AED for repair, whether under warranty or not.Warranty ExclusiveTHE FORGOING WARRANTIES AND REMEDIES ARE EXCLUSIVE AND IN LIEUOF ALL OTHER WARRANTIES, EXPRESS OR IMPLIED, INCLUDING WAR-RANTIES OF MERCHANTABILITY, FITNESS FOR A PARTICULAR PURPOSE,CORRESPONDENCE WITH DESCRIPTION, AND NON-INFRINGEMENT, ALL OFWHICH ARE EXPRESSLY DISCLAIMED BY AED AND ITS SUPPLIERS.DisclaimerNEITHER AED NOR ITS SUPPLIERS SHALL BE LIABLE FOR INCIDENTAL, CON-SEQUENTIAL, INDIRECT, SPECIAL, OR PUNITIVE DAMAGES OF ANY KIND, ORFINANCIAL LOSS ARISING OUT OF OR IN CONNECTION WITH THE SALE ORUSE OF THIS PRODUCT, WHETHER BASED IN CONTRACT, TORT (INCLUDINGNEGLIGENCE) OR ANY OTHER THEORY, EVEN IF AED HAS BEEN ADVISED OFTHE POSSIBILITY OF SUCH DAMAGES. AED’S ENTIRE LIABILITY SHALL BELIMITED TO REPLACEMENT OR REPAIR OF THE PRODUCT.FCC StatementTHIS DEVICE COMPLIES WITH PART 15 OF THE FCCRULES. OPERATION IS SUBJECT TO THE FOLLOWINGTWO CONDITIONS: (1) THIS DEVICE MAY NOT CAUSEHARMFUL INTERFERENCE, AND (2) THIS DEVICE MUSTACCEPT ANY INTERFERENCE RECEIVED, INCLUDINGINTERFERENCE THAT MAY CAUSE UNDESIRED OPERATION.
AED Electronics Inc.5758 Royalmount AvenueMontreal, Quebec, CanadaH4P 1K5Technical Support:1-866-90TOUCH (1-866-908-6824)514-737-4187www.climatouch.comPrinted in CanadaB4