RMAS- RMA install - Portsdean Technical
RMAS- RMA install - Portsdean Technical
RMAS- RMA install - Portsdean Technical
- No tags were found...

Create successful ePaper yourself
Turn your PDF publications into a flip-book with our unique Google optimized e-Paper software.
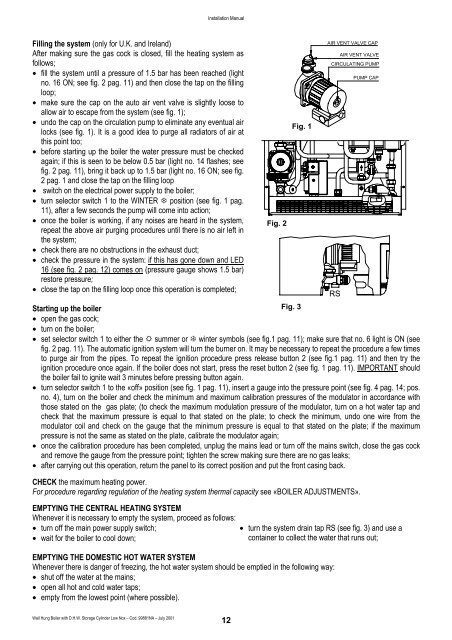
Installation ManualFilling the system (only for U.K. and Ireland)After making sure the gas cock is closed, fill the heating system asfollows;• fill the system until a pressure of 1.5 bar has been reached (lightno. 16 ON; see fig. 2 pag. 11) and then close the tap on the fillingloop;• make sure the cap on the auto air vent valve is slightly loose toallow air to escape from the system (see fig. 1);• undo the cap on the circulation pump to eliminate any eventual airlocks (see fig. 1). It is a good idea to purge all radiators of air atthis point too;• before starting up the boiler the water pressure must be checkedagain; if this is seen to be below 0.5 bar (light no. 14 flashes; seefig. 2 pag. 11), bring it back up to 1.5 bar (light no. 16 ON; see fig.2 pag. 1 and close the tap on the filling loop• switch on the electrical power supply to the boiler;• turn selector switch 1 to the WINTER ! position (see fig. 1 pag.11), after a few seconds the pump will come into action;• once the boiler is working, if any noises are heard in the system,repeat the above air purging procedures until there is no air left inthe system;• check there are no obstructions in the exhaust duct;• check the pressure in the system: if this has gone down and LED16 (see fig. 2 pag. 12) comes on (pressure gauge shows 1.5 bar)restore pressure;• close the tap on the filling loop once this operation is completed;Starting up the boilerFig. 3• open the gas cock;• turn on the boiler;• set selector switch 1 to either the " summer or ! winter symbols (see fig.1 pag. 11); make sure that no. 6 light is ON (seefig. 2 pag. 11). The automatic ignition system will turn the burner on. It may be necessary to repeat the procedure a few timesto purge air from the pipes. To repeat the ignition procedure press release button 2 (see fig.1 pag. 11) and then try theignition procedure once again. If the boiler does not start, press the reset button 2 (see fig. 1 pag. 11). IMPORTANT shouldthe boiler fail to ignite wait 3 minutes before pressing button again.• turn selector switch 1 to the «off» position (see fig. 1 pag. 11), insert a gauge into the pressure point (see fig. 4 pag. 14; pos.no. 4), turn on the boiler and check the minimum and maximum calibration pressures of the modulator in accordance withthose stated on the gas plate; (to check the maximum modulation pressure of the modulator, turn on a hot water tap andcheck that the maximum pressure is equal to that stated on the plate; to check the minimum, undo one wire from themodulator coil and check on the gauge that the minimum pressure is equal to that stated on the plate; if the maximumpressure is not the same as stated on the plate, calibrate the modulator again;• once the calibration procedure has been completed, unplug the mains lead or turn off the mains switch, close the gas cockand remove the gauge from the pressure point; tighten the screw making sure there are no gas leaks;• after carrying out this operation, return the panel to its correct position and put the front casing back.CHECK the maximum heating power.For procedure regarding regulation of the heating system thermal capacity see «BOILER ADJUSTMENTS».EMPTYING THE CENTRAL HEATING SYSTEMWhenever it is necessary to empty the system, proceed as follows:• turn off the main power supply switch;• wait for the boiler to cool down;Fig. 2Fig. 1• turn the system drain tap RS (see fig. 3) and use acontainer to collect the water that runs out;EMPTYING THE DOMESTIC HOT WATER SYSTEMWhenever there is danger of freezing, the hot water system should be emptied in the following way:• shut off the water at the mains;• open all hot and cold water taps;• empty from the lowest point (where possible).AIR VENT VALVE CAPAIR VENT VALVECIRCULATING PUMPRSPUMP CAPWall Hung Boiler with D.H.W. Storage Cylinder Low Nox – Cod. 99881NA – July 200112