RMAS- RMA install - Portsdean Technical
RMAS- RMA install - Portsdean Technical
RMAS- RMA install - Portsdean Technical
- No tags were found...

You also want an ePaper? Increase the reach of your titles
YUMPU automatically turns print PDFs into web optimized ePapers that Google loves.
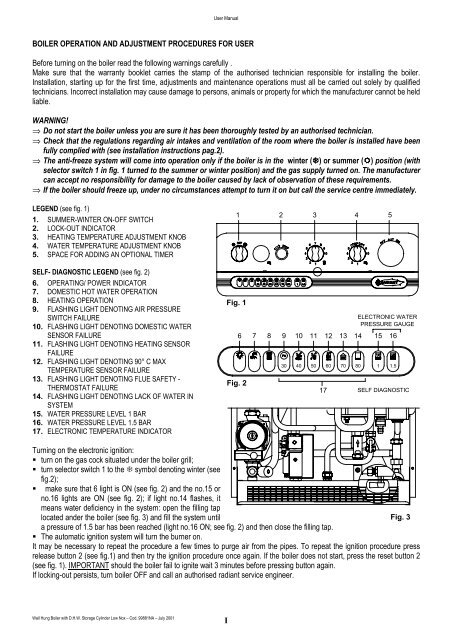
User ManualBOILER OPERATION AND ADJUSTMENT PROCEDURES FOR USERBefore turning on the boiler read the following warnings carefully .Make sure that the warranty booklet carries the stamp of the authorised technician responsible for <strong>install</strong>ing the boiler.Installation, starting up for the first time, adjustments and maintenance operations must all be carried out solely by qualifiedtechnicians. Incorrect <strong>install</strong>ation may cause damage to persons, animals or property for which the manufacturer cannot be heldliable.WARNING!⇒ Do not start the boiler unless you are sure it has been thoroughly tested by an authorised technician.⇒ Check that the regulations regarding air intakes and ventilation of the room where the boiler is <strong>install</strong>ed have beenfully complied with (see <strong>install</strong>ation instructions pag.2).⇒ The anti-freeze system will come into operation only if the boiler is in the winter (!) or summer (") position (withselector switch 1 in fig. 1 turned to the summer or winter position) and the gas supply turned on. The manufacturercan accept no responsibility for damage to the boiler caused by lack of observation of these requirements.⇒ If the boiler should freeze up, under no circumstances attempt to turn it on but call the service centre immediately.LEGEND (see fig. 1)1. SUMMER-WINTER ON-OFF SWITCH2. LOCK-OUT INDICATOR3. HEATING TEMPERATURE ADJUSTMENT KNOB4. WATER TEMPERATURE ADJUSTMENT KNOB5. SPACE FOR ADDING AN OPTIONAL TIMERSELF- DIAGNOSTIC LEGEND (see fig. 2)6. OPERATING/ POWER INDICATOR7. DOMESTIC HOT WATER OPERATION8. HEATING OPERATION9. FLASHING LIGHT DENOTING AIR PRESSURESWITCH FAILURE10. FLASHING LIGHT DENOTING DOMESTIC WATERSENSOR FAILURE11. FLASHING LIGHT DENOTING HEATING SENSORFAILURE12. FLASHING LIGHT DENOTING 90° C MAXTEMPERATURE SENSOR FAILURE13. FLASHING LIGHT DENOTING FLUE SAFETY -THERMOSTAT FAILURE14. FLASHING LIGHT DENOTING LACK OF WATER INSYSTEM15. WATER PRESSURE LEVEL 1 BAR16. WATER PRESSURE LEVEL 1.5 BAR17. ELECTRONIC TEMPERATURE INDICATOR1Fig. 16 7Fig. 22 3 4 58 9 10 11 12 13 14 15 1617ELECTRONIC WATERPRESSURE GAUGE30 40 50 60 70 80 1 1.5SELF DIAGNOSTICTurning on the electronic ignition:# turn on the gas cock situated under the boiler grill;# turn selector switch 1 to the ! symbol denoting winter (seefig.2);# make sure that 6 light is ON (see fig. 2) and the no.15 orno.16 lights are ON (see fig. 2); if light no.14 flashes, itmeans water deficiency in the system: open the filling taplocated ander the boiler (see fig. 3) and fill the system untilFig. 3a pressure of 1.5 bar has been reached (light no.16 ON; see fig. 2) and then close the filling tap.# The automatic ignition system will turn the burner on.It may be necessary to repeat the procedure a few times to purge air from the pipes. To repeat the ignition procedure pressrelease button 2 (see fig.1) and then try the ignition procedure once again. If the boiler does not start, press the reset button 2(see fig. 1). IMPORTANT should the boiler fail to ignite wait 3 minutes before pressing button again.If locking-out persists, turn boiler OFF and call an authorised radiant service engineer.Wall Hung Boiler with D.H.W. Storage Cylinder Low Nox – Cod. 99881NA – July 2001I