User Controls - Lampe-videoprojecteur.info
User Controls - Lampe-videoprojecteur.info
User Controls - Lampe-videoprojecteur.info
- No tags were found...

You also want an ePaper? Increase the reach of your titles
YUMPU automatically turns print PDFs into web optimized ePapers that Google loves.
Table of contentsTable of Contents ...................................................................................1Usage Notice ..........................................................................................2Safety Information .........................................................................................2Precautions ...................................................................................................3Eye Safety Warnings .....................................................................................5Introduction ............................................................................................6Product Features ...........................................................................................6Package Overview ........................................................................................7Product Overview ..........................................................................................8Main Unit ................................................................................................................ 8Control Panel ......................................................................................................... 9Connection Ports ................................................................................................. 10Remote Control .................................................................................................... 11Installation ............................................................................................12Connecting the Projector .............................................................................12Powering On/Off the Projector ....................................................................13Powering On the Projector ................................................................................... 13Powering Off the projector ................................................................................... 14Warning Indicator ................................................................................................. 14Adjusting the Projected Image ....................................................................15Adjusting the Projector’s Height ........................................................................... 15Adjusting the Projector’s Zoom / Focus ............................................................... 16Adjusting Projected Image Size ........................................................................... 16<strong>User</strong> <strong>Controls</strong> .......................................................................................17Control Panel & Remote Control .................................................................17On-screen Display Menus ...........................................................................20How to operate .................................................................................................... 20Menu Tree ............................................................................................................ 21Image ................................................................................................................... 22Display ................................................................................................................ 26Setup .................................................................................................................... 29System ................................................................................................................. 32Appendices ..........................................................................................36Troubleshooting ...........................................................................................36Image Problems .................................................................................................. 36Intermission Problems ........................................................................................ 38Projector Status Indication .................................................................................. 39Remote Control Problems ................................................................................... 40Replacing the Lamp ....................................................................................41Compatibility Modes ....................................................................................42RS232 Commands and Protocol Function List ...........................................43Ceiling Mount Installation ............................................................................46Optoma Global Offices ................................................................................47Regulation & Safety notices ........................................................................49EnglishTéléchargé depuis www.lampe-<strong>videoprojecteur</strong>.<strong>info</strong>1
Usage NoticeSafety InformationThe lightning flash with arrowheard within an equilateral triangle isintended to alert the user to the presence of uninsulated “dangerous voltage”within the product’s enclosure that may be of sufficient magnitude toconstitute a risk of electric shock to persons.The exclamation point within an equilateral triangle is intended to alertthe user to the presence of import operating and maintenance (servicing)instructions in the literature accompanying the appliance.2WARNING: TO REDUCE THE RISK OF FIRE OR ELECTRIC SHOCK, DO NOTEXPOSE THIS APPLIANCE TO RAIN OR MOISTURE. DANGEROUS HIGHVOLTAGES ARE PRESENT INSIDE THE ENCLOSURE. DO NOT OPEN THECABINET. REFER SERVICING TO QUALIFIED PERSONNEL ONLY.Class B emissions limitsThis Class B digital apparatus meets all requirements of the Canadian Interference-CausingEquipment Regulations.Important Safety Instruction1. Read these instructions –before using this projector.2. Keep these instructions –for future reference.3. Follow all instructions.4. Install in accordance with the manufacturer’s instructionsA. Do not block any ventilation openingsTo ensure reliable operation of the projector and to protect it from overheating,put the projector in a position and location that will not interferewith its proper ventilation. For example, do not place the projectoron a bed, sofa, carpet, or similar surface that may block the ventilationopenings. Do not put it in an enclosure, such as a bookcase or a cabinetthat may keep air from flowing through its ventilation openings.B. Do not use this projector near water or moisture. To reduce the riskof fire or electric shock, do not expose the projector to rain or moisture.C. Do not install near any heat sources, such as radiators, heaters,stoves or other apparatus (including amplifiers) that produce heat.5. Clean only with a dry cloth.6. Only use attachments/accessories specified by the manufacturer.7. Refer all servicing to qualified service personnel. Servicing is requiredwhen the projector has been damaged in any way:▀■ Such as power supply cord or plug is damaged.▀■ Liquid has been spilled or objects have fallen into the apparatus.▀■ The projector has been exposed to rain or moisture, does not operatenormally, or has been dropped.Do not attempt to service this projector yourself. Opening or removingcovers may expose you to dangerous voltages or other hazards. Pleasecall Optoma to be referred to an authorized service center near you.8. Do not let objects or liquids enter the projector –as they may touchdangerous voltage points or short-out parts that could result in a fire orelectric shock.9. See projector enclosure for safety related markings.10. The projector should not be adjusted or repaired by anyone exceptproperly qualified service personnel.
Usage NoticePrecautionsNoteWhen the lamp reachesthe end of its life, theprojector will notturn back on until thelamp module has beenreplaced. To replacethe lamp, follow theprocedures listed under“Replacing the Lamp”section on page 41.▀■ Warning-▀■ Warning-▀■ Warning-▀■ Warning-▀■ Warning-▀■ Warning-▀■ Warning-▀■ Warning-▀■ Warning-Please follow all warnings, precautions and maintenanceas recommended in this user’s guide.Do not look into the projector’s lens when thelamp is on. The bright light may hurt youreyes.To reduce the risk of fire or electric shock, donot expose this projector to rain or moisture.Please do not open or disassemble the projectoras this may cause electric shock.When replacing the lamp, please allow unit tocool down, and follow all replacement instructions.See page 41.This projector will detect the life of the lampitself. Please be sure to change the lamp whenit shows warning messages.Reset the “Lamp Reset” function from the onscreendisplay “System|Lamp Setting” menuafter replacing the lamp module (refer to page35).When switching the projector off, pleaseensure the cooling cycle has been completedbefore disconnecting power. Allow 90 secondsfor the projector to cool down.Do not use lens cap when projector is inoperation.When the lamp is approaching to the endof its life time, the message “Replacementsuggested” will show on the screen. Pleasecontact your local reseller or service center tochange the lamp as soon as possible.English3
IntroductionPackage OverviewThis projector comes with all the items shown below.Check to make sure your unit is complete. Contact yourdealer immediately if anything is missing.EnglishProjector with lens capPower Cord 1.8mRS232 Cable 1.8mRCA Component Cablefor YPbPr 2.0mIR Remote Controller2 x AA BatteriesAvailable in European version onlyNoteSCART RGB/S-VideoAdaptorDVI to VGA AdaptorVGA Cable 1.8mDue to the differencein applications for eachcountry, some regionsmay have different accessories.Documentation : <strong>User</strong>’s Manual Warranty Card Quick Start Card7
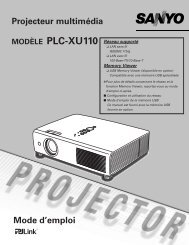
IntroductionProduct OverviewMain Unit172103 54 65715 911 8710101. Control Panel2. Zoom Lever3. Focus Ring4. Elevator Button (one on each side)5. Elevator Feet6. Zoom Lens7. IR Receivers8. Connection Ports9. Power Socket10. Tilt-Adjustment Feet11. Air exhaust vent8
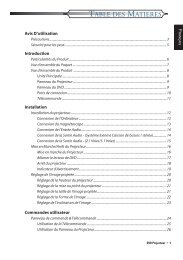
IntroductionConnection Ports1 2 3 4 5 6 789101. +12V Relay Connector2. Composite Video Input Connector3. RS232 Input Connector4. S-Video Input Connector5. DVI-I Input Connector (PC Digital and DVI-HDCP)6. HDMI 1 Connector7. HDMI 2 Connector8. Component Video Input Connector9. Power Socket10. Kensington Microsaver TM Lock Port10
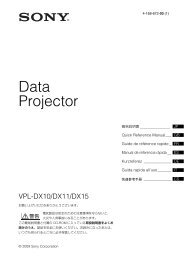
IntroductionRemote Control1English1. Power (On/Off)2. Contrast3. Gamma4. Brite Mode5. Image Shift6. Enter7. Four Directional SelectKeys8. Display Mode9. Edge Mask10. Brightness11. Image AI12. IRIS13. Menu14. Overscan15. 4:316. 16:917. HDMI1 Source18. YPbPr Source19. Letter-Box20. Native21. DVI Source22. Composite VideoSource23. HDMI2 Source24. S-Video10 21131245671368149151916201721182223 2411
InstallationConnecting the ProjectorSCART DVD Player7RGBDVI+12V Relay Output89321Video Output45610S-Video OutputDVD Player, Set-top Box,HDTV receiverNoteDue to the differencein applications for eachcountry, some regionsmay have different accessories.1. .............................................................................................................Power Cord2. ...................................................... DVI to VGA Adaptor (For European Only)3. ............................................................................................................ RS232 Cable4. ..................................................Composite Video Cable (Optional Accessory)5. ......................................................................RCA Component Cable for YPbPr6. ...................................................................S-Video Cable (Optional Accessory)7. ......................................SCART RGB/S-Video Adaptor (For European Only)8. ........................................................................ VGA Cable (For European Only)9. ......................................................................... DVI Cable (Optional Accessory)10. ................................................................... HDMI Cable (Optional Accessory)12
InstallationPowering On/Off the ProjectorPowering On the Projector1. Remove the lens cap. 2. Ensure that the power cord and signal cable are securelyconnected. The Power LED will turn red.3. Turn on the lamp by pressing “ ” button on the controlpanel. And the Power LED will turn blue.The startup screen will display in approximately 30 seconds.The first time you use the projector, you can select yourpreferred language from quick menu after the startup screendisplay.4. Turn on your source (computer, notebook, video player,etc.). The projector will detect your source automaticallywithin “Setup” menu, check that “Source Lock” has been setto “Off”.English▀■ If you connected multiple sources at the same time, press the“Source” button on the control panel or direct source key onthe remote control to switch between inputs.NoteTurn on the projectorfirst and then select thesignal sources.1213
InstallationPowering Off the Projector1. Press the “ ” button to turn off the projector lamp, you willsee a message displayed on the projector’s screen.Press the “ ” button again to confirm, otherwise the messagewill disappear after 5 seconds.2. The cooling fans continue to operate for about 60 seconds forcooling cycle and the Power LED will flash blue. When thelights solid red, the projector has entered standby mode.If you wish to turn the projector back on, you must waituntil the projector has completed the cooling cycle and hasentered standby mode. Once in standby mode, simply press“ ” button to restart the projector.3. Disconnect the power cord from the electrical outlet and theprojector.4. Do not turn on the projector immediately following a poweroff procedure.14Warning Indicator▀■ When the “LAMP” indicator lights solid red, the projectorwill automatically shut itself down. Please contact your localreseller or service centre. See page 47.▀■ When the “TEMP” indicator flashes red, it indicates the projectorhas overheated. The projector will automatically shutitself down.Under normal conditions, the projector can be switched onagain after it has cooled down. If the problem persists, youshould contact your local dealer or our service center. Seepage 47.▀■ When the “LAMP” indicator flashes red, it indicates the fanhas failed. Please contact your local dealer or our servicecentre. See page 47.
InstallationAdjusting the Projected ImageAdjusting the Projector’s HeightThe projector is equipped with elevator feet for adjusting theimage height.To raise the image:English1. Press the elevator button .2. Raise the image to the desired height angle , then releasethe button to lock the elevator feet into position.3. Use screw in feet to fine-tune the display angle.To lower the image:1. Press the elevator button.2. Lower the image, then release the button to lock the elevatorfeet into position.3. Use screw in feet to fine-tune the display angle.Elevator Button 12Elevator Feet3Tilt-Adjustment Feet15
InstallationAdjusting the Projector’s Zoom / FocusTurn the Zoom Lever to zoom in or zoom out. To focus theimage, turn the focus ring until you see a clear image. Theprojector will focus at distances from 4.9 to 39.4 feet (1.5 to12.0 meters) and the projection screen size from 0.775m~7.62m(30.5”~300”) at 16:9 mode with mechanical travel.Zoom LeverFocus RingAdjusting Projection Image SizeSide ViewFront ViewW1 (1440X1080)B(1920X1080)H(1920X1080)LAH'D(1920X1080)W0 (1920X1080)Throw Ratio (TR)=1.85 as Wide modeA=6.25°B(1920x1080)=22.47°W 0(1920x1080)=L/TRH'=L X tan(A) W 1(1440x1080)=W 0(1920x1080) X 0.75H (1920x1080)=W 0(1920x1080) X 0.56 H (1440x1080)=W 1(1440x1080) X 0.75Display Format A BL(cm)W(cm)H(cm)H’(cm)D(cm)16:9 (1920x1080) 6.25 22.47 245.73 132.83 74.72 26.90 152.40 60.004:3 (1440x1080) 6.25 22.47 245.73 99.62 74.72 26.90 124.53 49.03Projection Distance (M) 2.0 2.5 3.0 3.5 4.0 5.0 6.0Screen Size 16:9(inch)Screen Size 4:3(inch)D’(in)Max 48.8 61.0 73.3 85.5 97.7 122.1 146.5Min 40.7 50.9 61.0 71.2 81.4 101.7 122.1Max 39.9 49.9 59.9 69.8 79.8 99.8 119.7Min 33.3 41.6 49.9 58.2 66.5 83.1 99.816
<strong>User</strong> <strong>Controls</strong>Using the Remote ControlPowerBrightnessContrastImage AIGammaIRISBrite Mode/Image ShiftEdge MaskModeMenuFour DirectionalSelectKeysEnterOverscanRefer to the “Power On/Off the Projector”section on pages 13-14.Adjust the brightness of the image.Control the degree of difference betweenthe lightest and darkest parts of the picture.Switch the Image AI function ON/OFF.(refer to page 32-33)There are 10 preset gamma curves. Afterthe initial setup and fine tuning is completed,utilize the Gamma Adjustment steps tooptimize your image output.Refer to “IRIS” function on page 33 formore <strong>info</strong>rmation.Increase the brightness of the image. (referto page 35).Shifts the projected image position vertically.Choose “On” to mask off a few pixels oneach edge of the image to be displayed. UseEdge Mask “On” if image source happensto have encoding error near any edge of thedisplayable image.Select the display mode from Cinema,Bright, TV, sRGB and <strong>User</strong>.Press “Menu” to launch the on-screendisplay (OSD) menu. To exit OSD, Press”Menu” again.Use to select items or make adjustmentsto your selection.Confirm your item selection.Mask off a few pixels on each edge of theimage to be displayed. Use this functionto adjust if image source happens to havenoise near any edge of the display image.4:3 Scale the image at a 4:3 aspect ratio.18
<strong>User</strong> <strong>Controls</strong>16:9 Scale the image at a 16:9 aspect ratio.NativeLetter-BoxDVIHDMI1HDMI2YPbPrVideoS-VideoThe input source will be displayed withoutscaling.Enable the viewing of the letterboxed nonanamorphicallyenhanced movie at fullscreen width. Part of the original image willbe lost if the image aspect ratio is less than2.35:1.Press “DVI” to choose Analog and DigitalSignal source from DVI connector.Press “HDMI1” to choose source fromHDMI1 connector.Press “HDMI2” to choose source fromHDMI2 connector.Press “YPbPr” to choose Component videosource.Press “Video” to choose Composite videosource.Press “S-Video” to choose S-video source.English19
<strong>User</strong> <strong>Controls</strong>On-screen Display MenusThe Projector has multilingual On-screen Display menus thatallow you to make image adjustments and change a variety ofsettings. The projector will automatically detect the source.How to operate1. To open the OSD menu, press “Menu” on the Remote Control orControl Panel.2 When OSD is displayed, use keys to select any item in themain menu. While making a selection on a particular page, pressor “Enter” key to enter sub menu.3. Use keys to select the desired item and adjust the settingsbykey.4. Select the next item to be adjusted in the sub menu and adjust asdescribed above.5. Press “Enter” or “Menu” to confirm, and the screen will return tothe main menu.6. To exit, press “Menu” again. The OSD menu will close and theprojector will automatically save the new settings.Main MenuSub MenuSetting20
IMAGE|Advanced1 EnglishIMAGEDISPLAYIMAGE|Advanced1 EnglishSETUPIMAGE1 EnglishIMAGEIMAGE|AdvancedDISPLAYIMAGE|AdvancedSYSTEM SETUPDISPLAYDISPLAYSYSTEM|Lamp SettingSETUPSETUPSYSTEMSYSTEM|Lamp SettingSYSTEMSYSTEMAdvancedNoise ReductionGammaDegammaTrue VividEdge EnhanceB/W ExtensionColor TempMenu TreeModeContrastBrightnessColorFormat TintSharpnessOverscanEdge Advanced MaskH Image ShiftNoise V Image Reduction ShiftV Gamma KeystoneDegammaTrue Language VividEdge EnhanceB/W Mode ExtensionColor Contrast TempInput Brightness Mode SourceContrast ColorBrightness TintSource Sharpness Color LockHigh Advanced Tint AltitudeAuto Sharpness Power OffNoise Advanced FormatSignal ReductionOverscan GammaNoise Edge Degamma Reduction MaskH True Image Gamma Vivid ShiftEdge V Color DegammaImage Enhance Space ShiftB/W V True Keystone Reset Extension VividEdge Color Enhance TempB/W Menu Language Extension LocationLamp Color Setting TempProjectionImage AIInput IRIS SourceTest PatternBackgroundFormatSource 12V Overscan Trigger LockHigh Edge FormatAltitude MaskAuto H Lamp Image OverscanPower Hour Shift OffLamp V Edge Image Signal ReminderMask ShiftH V Brite Image Keystone Mode ShiftV Lamp Image Reset ShiftV Language Keystone ExitColor SpaceLanguage ResetMenu Input Location SourceLamp SettingInput Projection SourceSource Image Lock AIHigh IRIS AltitudeAuto Test Source Power Pattern Lock OffHigh BackgroundSignal AltitudeAuto 12V Power Trigger OffSignalLamp HourLamp Color Reminder SpaceBrite Reset ModeColor Lamp Space ResetMenu Reset Exit LocationLamp SettingMenu Projection LocationLamp Image Setting AIProjection IRISOff(0)/(1~5)<strong>User</strong> <strong>Controls</strong>Film/Video/Graphics/PCOff(0)/(1~2)On(1)/Off(0)WarmMidColdCinema/Bright/TV/sRGB/<strong>User</strong><strong>User</strong>:Red Gain/Green Gain/Blue Gain/Red Bias/Green Bias/Blue Bias16:9/4:3/LBX/NativeOff(0)/(1~5)Film/Video/Graphics/PCEnglish/Deutsch/Français/Italiano/Español/Português/Polski/Nederlands//Off(0)/(1~2)Suomi/Svenska/Norsk/Dansk//Cinema/Bright/TV/sRGB/<strong>User</strong>On(1)/Off(0)撫 繁 / 趣 雜 Warm / 勤 / Cinema/Bright/TV/sRGB/<strong>User</strong>MidHDMI 1/HDMI 2/DVI-Digital/DVI-Analog/ColdDVI-SCART/Component/S-Video/Video<strong>User</strong>:Red Gain/Green Gain/Blue Gain/Red Bias/On/OffGreen Bias/Blue BiasOn/OffPhase/Tracking/H16:9/4:3/LBX/NativeOff(0)/(1~5) Position/V PositionY Gain/Pb Gain/Pr Gain/Film/Video/Graphics/PCY Bias/Pb Off(0)/(1~5)Bias/Pr BiasWhite Level/Black Level/Saturation/TintFilm/Video/Graphics/PCOff(0)/(1~2)RGB/YCbCrOn(1)/Off(0)Current/AllOff(0)/(1~2)WarmEnglish/Deutsch/Français/Italiano/Español/On(1)/Off(0) MidPortuguês/Polski/Nederlands//Warm ColdSuomi/Svenska/Norsk/Dansk//Mid<strong>User</strong>:Red Gain/Green Gain/撫 繁 Blue / 趣 Gain/Red 雜 / 勤 / On/Off Cold Bias/Green Bias/Blue Bias<strong>User</strong>:Red On/(1~16)OffGain/Green Gain/HDMI 1/HDMI 2/DVI-Digital/DVI-Analog/Grid/WhiteBlue Gain/RedPattern/NoneBias/DVI-SCART/Component/S-Video/VideoGreen Bias/Blue BiasDark Blue/Black/Gray/Start 16:9/4:3/LBX/Native LogoSTD/LBX On/Off16:9/4:3/LBX/NativeOn/OffPhase/Tracking/H On/Off Position/V PositionY Gain/Pb On/Off Gain/Pr Gain/Y Bias/Pb Yes/No Bias/Pr BiasEnglish/Deutsch/Français/Italiano/Español/White Level/Black Level/Saturation/TintPortuguês/Polski/Nederlands//RGB/YCbCrEnglish/Deutsch/Français/Italiano/Español/Suomi/Svenska/Norsk/Dansk//Current/AllPortuguês/Polski/Nederlands//撫 繁 / 趣 雜 / 勤 / Suomi/Svenska/Norsk/Dansk//HDMI 1/HDMI 撫 繁 / 2/DVI-Digital/DVI-Analog/趣 雜 / 勤 / DVI-SCART/Component/S-Video/VideoHDMI 1/HDMI 2/DVI-Digital/DVI-Analog/DVI-SCART/Component/S-Video/VideoOn/OffOn/(1~16)OffOn/OffGrid/White On/Off Pattern/NonePhase/Tracking/H Dark Blue/Black/Gray/Start On/Off Position/V Position LogoY Gain/Pb STD/LBX Gain/Pr Gain/Phase/Tracking/H Y Bias/Pb Bias/Pr Position/V Bias PositionWhite Level/Black Y Gain/Pb Level/Saturation/Hue/IRELevel/Saturation/TintGain/Pr Gain/Y Bias/Pb RGB/YCbCrOn/Off Bias/Pr BiasWhite Level/Black Current/AllOn/Off Level/Saturation/TintRGB/YCbCrYes/NoCurrent/AllOn/OffOn/(1~16)Off21English
<strong>User</strong> <strong>Controls</strong>ImageNote“Image mode-->TV”will support automatically“Overscan” withstep “2” as default.22ModeThere are many factory presets optimized for various types of images. Cinema: For home theater. Bright: For the brightest possible image, Use if ambient light ispresent. TV: For watching analogue or digital TV images. sRGB: For standard color. <strong>User</strong>: Memorize user’s settings.ContrastThe contrast controls the degree of difference between the lightestand darkest parts of the picture. Adjusting the contrast changes theamount of black and white in the image. Press the Press theBrightnessto decrease the contrast.to increase the contrast.Adjust the brightness of the image. Press the Press theColorto darken image.to lighten the image.Adjusts a video image from black and white to fully saturated color. Press the Press theto decrease the amount of color in the image.to increase the amount of color in the image.
<strong>User</strong> <strong>Controls</strong>TintAdjusts the color balance of red and green. Press the Press theSharpnessto increase the amount of green in the image.to increase the amount of red in the image.Adjusts the sharpness of the image. Press the Press theto decrease the sharpness.to increase the sharpness.English23
<strong>User</strong> <strong>Controls</strong>Image | AdvanceNoise ReductionThe motion Adaptive Noise Reduction reduces the amount of visiblenoise interlaced signals. The range is from “0” to “10”. (0:Off)GammaThis unit comes with 10 preset gamma curves. After the initial setupand fine tuning is completed, utilize the Gamma Adjustment stepsto optimize your image output.DegammaThis allows you to choose a degamma table that has been fine-tunedto bring out the best image quality for the input.Note“B/W Extension” can’tsupport when source isHDMI, analog or digitalRGB via DVI port. Film: For home theater. Video: For video or TV source. Graphics: For image source. PC: For PC or computer source.True VividThis adjustable item utilizes a new color-processing algorithm andenhancements to enable the picture’s vividness to be significantlyincreased. The range is from “0” to “5”.Edge EnhanceThere are 3 pre-set modes and one user mode for advanced edgeenhancement filter. You can easily switch between the modes toachieve different effects. (0:Off)B/W ExtensionBlack and White Extension can stretch the black and white levels toautomatically increase the contrast of input image. This unit has 224
<strong>User</strong> <strong>Controls</strong>pre-set modes that allow the user to switch among the pre-sets toobtain different image effects. (0:Off/1:On)Color Temp.Adjust the color temperature. At cold temperature, the screenlooks colder; at warm temperature, the screen looks warmer.1) For <strong>User</strong> mode adjustment, put cursor on “<strong>User</strong>”, and press“Enter” to select this adjustment item.English2) Use “ ”, “ ” to highlight the desired adjustment items, thenpress “Enter” or “ ” to select it. The Menu disappears andonly an adjustment bar appears.3) Use “ ”, “ ” arrow keys to adjust image.25
<strong>User</strong> <strong>Controls</strong>DisplayFormatUse this function to choose your desired aspect ratio. 4:3: This format is for 4x3 input sources not enhanced for WidescreenTV. 16:9: This format is for 16x9 input sources, like HDTV and DVDenhanced for Widescreen TV. Native: This format displays the original image without any scaling.Input SignalDisplay areaPicture areaDisplay on Screen26
<strong>User</strong> <strong>Controls</strong>Note(*) Each I/O has differentsetting of “Overscan”.(*) “Image mode-->TV”will support automatically“Overscan” withstep “2” as default.(*) “Overscan” and“Edge mask” can’twork at same time.(*) “H Image shift” onlysupport in format “4:3”and “Native”. If sourceis 1080i/p, “H Imageshift” only support <strong>info</strong>rmat “4:3”. LBX: This format is for non-16x9, letterbox source and forusers who use external 16x9 lens to display 2.35:1 aspect ratiousing full resolution.Detail <strong>info</strong>rmations about LBX mode :1. Some Letter-Box DVDs are not enhanced for 16x9 TVs. Inthis situation, the image will not look right when displayedin 16:9 mode.In this situation, please try to using the 4:3 mode to viewthe DVD.But if the content itself is not 4:3, it will have black barsaround the image in a 16:9 display. For this kind of content,you can use LBX mode to fill the image in the 16x9display as much as possible.2. If you use an external 16x9 lens, this LBX mode also allowsyou to watch a 2.35:1 content (include Anamorphic DVDand HDTV film source) that support anamorphic wide isenhanced for 16x9 Display in a wide 2.35:1 image.In this case, there are no black bars, the full lamp powerand vertical resolution is fully utilized for maximum viewingeffects.Other than these two occasions, one should stay with 16:9and 4:3 modes for most viewing experiences.OverscanOverscan function removes the noise in a video image. Overscanthe image to remove video encoding noise on the edge of videosource.Edge Mask Press the Press theH Image Shiftto reduce the size of an image.to magnify an image on the projection screen.Shifts the projected image position horizontally.V Image ShiftShifts the projected image position vertically.English27
<strong>User</strong> <strong>Controls</strong>V KeystonePress the or to adjust image distortion vertically and makes asquarer image.28
<strong>User</strong> <strong>Controls</strong>SetupEnglishLanguageChoose the multilingual OSD menu. Press or into the submenu and then use the or key to select your preferred language.Press “Select (Enter)” to finalize the selection.Input SourceEnable input sources. Press or into the next menu as below andthen use or to select. Press “Select (Enter)” to finalize the selection.The projector will not search inputs that are de-selected.Source LockWhen this function is turned off, the projector will search for othersignals if the current input signal is lost. When this function isturned on, it will search for a specified connection port.29
<strong>User</strong> <strong>Controls</strong>High AltitudeChoose “On” to turn on High Altitude mode. Operates the fans atfull speed continuously to allow for proper high altitude cooling ofthe projector.Auto Power OffSets the interval of power-off of the system, if there is no signalinput. (In minutes)RGB/HDTV SourceVideo SourceNote“Signal” don’t supportwhen source is HDMIor DVI-D.Signal Phase: Changes the display data frequency to match the frequencyof your computer’s graphic card. When you experience avertical flickering bar, use this function to make an adjustment. Tracking : Synchronizes the signal timing of the display with thegraphics card. If you experience an unstable or flickering image,use this function to correct it. H Position: Adjusts the horizontal position. V Position: Adjusts the vertical position. White Level : Allow user adjust White Level when inputting S-Video or Video/CVBS signals. Black Level : Allow user adjust Black Level when inputting S-Video or Video/CVBS signals. Saturation : Adjusts a video image from black and white to fullysaturated color. Press the to decrease the amount of color inthe image. Press the to increase the amount of color in the image.30
<strong>User</strong> <strong>Controls</strong>Note“IRE” only supportunder NTSC signal. Hue : Adjusts the color balance of red and green. Press theto increase the amount of green in the image. Press the toincrease the amount of red in the image. IRE : Adjusts measurement of composite video signals.Color SpaceSelect an appropriate color matrix type from RGB or YCbCr.ResetReturn the adjustments and settings to factory default values. Current : Returns the current menu’s settings to factory default. All : Returns the settings for all menus to factory default values.English31
<strong>User</strong> <strong>Controls</strong>SystemMenu LocationChoose the menu location on the display screen.ProjectionFront-DesktopThe factory default setting. Rear-DesktopWhen you select this function, the projector reverses the imageso you can project behind a translucent screen. Front-CeilingWhen you select this function, the projector turns the imageupside down for ceiling-mounted projection.Rear-CeilingWhen you select this function, the projector reverses and turnsthe image upside down at same time. You can project from behinda translucent screen with ceiling mounted projection.Image AIImage AI improves the contrast of the picture by optimizing thebrightness of the lamp according to the picture content. On: The dynamic image performance manager is active in makingsure your greatest pleasure from seeing a movie dynamically32
<strong>User</strong> <strong>Controls</strong>with the most dark details revealed, vivid and bright imageperformed all the way.English Off: The dynamic image performance manager is on standby.IRISThe iris function adjusts the contrast optically by opening andclosing the lens aperture. The iris can be switched between Off(Close) and On (Open).When you press the IRIS button, the current setting appears. Whenpressing it again while the setting is being displayed, the setting canbe changed. It takes about 6 seconds for the iris to shift between Off(0) state and On (1-16) state. 1-16: When 1-16 steps is selected, black levels of the image arereproduced with more clarity though the brightness is lowered.There are 16 step for you adjust. 0: When 0 is selected, the image becomes brighter.Test PatternDisplays a test pattern. There are Grid, White pattern and None.BackgroundUse this feature to display a “Dark Blue”, “Black”, “Gray”or “StartLogo” screen when no signal is available.33
<strong>User</strong> <strong>Controls</strong>12V Trigger STD: When “STD” is selected, 12V Trigger will send 12V whenprojector turn on. LBX: When 12V trigger set as “LBX” --1. Format change to “LBX”,12V trigger port will send 12V.2. Format is “4:3”, “16:9”, or “Native”, 12V trigger port won’tsend 12V, it will be 0V.34
<strong>User</strong> <strong>Controls</strong>System| LampSettingEnglishLamp HourDisplays the cumulative lamp operating time.Lamp ReminderChoose this function to show or to hide the warning message whenthe changing lamp message is displayed. The message will appearup 30 hours before suggested replacement of lamp.Brite ModeChoose “On” to increase the brightness. Choose “Off” to returnnormal mode.Lamp ResetReset the lamp life hour after replacing the lamp.35
AppendicesNote(*) The resolution:HDMI’s 1920 x 1080 i/pand component’s 1920 x1080 i is recommendedfor this projector.TroubleshootingImage ProblemsNo image appears on-screen Ensure all the cables and power connections are correctly andsecurely connected as described in the “Installation” section. Ensure the pins of connectors are not crooked or broken. Check if the projection lamp has been securely installed. Pleaserefer to the “Replacing the lamp” section.If you experience a problem with your projector, pleaserefer to the following <strong>info</strong>rmation. If a problem persists,please contact your local reseller or service center. (Seepage 47 for details)Make sure you have removed the lens cap and the projector isswitched on.Partial, scrolling or incorrectly displayed image Press “Re-Sync” on the control panel. If you are using a PC:For Windows 95, 98, 2000, XP:1. From the “My Computer” icon, open the “Control Panel” folder,and double click the “Display” icon.2. Select the “Settings” tab.3. Verify that your display resolution setting is lower than UXGA(1600 x 1200). (*)4. Click on the “Advanced Properties” button.If the projector is still not projecting the whole image, you willalso need to change the monitor display you are using. Refer tothe following steps.5. Verify the resolution setting is lower than or equal to UXGA(1600 x 1200) resolution. (*)36
AppendicesNote(*) The resolution:6. Select the “Change” button under the “Monitor” tab.7. Click on “Show all devices.” Next, select “Standard monitortypes” under the SP box; choose the resolution mode you needunder the “Models” box.8. Verify that the resolution setting of the monitor display is lowerthan or equal to UXGA (1600 x 1200). (*)HDMI’s 1920 x 1080 i/p If you are using a Notebook:and component’s 1920 x1080 i is recommended 1. First, follow the steps above to adjust resolution of the computer.for this projector.2. Press the toggle output settings. Example: [Fn]+[F4]EnglishCompaq=>Dell =>Gateway=>IBM=>[Fn]+[F4][Fn]+[F8][Fn]+[F4][Fn]+[F7]HewlettPackard =>NEC=>Toshiba =>[Fn]+[F4][Fn]+[F3][Fn]+[F5]Mac Apple:System Preference-->Display-->Arrangement-->Mirrordisplay If you experience difficulty changing resolutions or your monitorfreezes, restart all equipment including the projector.The screen of the Notebook or PowerBook computer is notdisplaying your presentation If you are using a Notebook PC:Some Notebook PCs may deactivate their own screens when asecond display device is in use. Each has a different way to be reactivated.Refer to your computer’s manual for detailed <strong>info</strong>rmation.Unstable or flickering image Use “Tracking” to correct it. See page 30 for more <strong>info</strong>rmation. Change the monitor color setting on your computer.Image has vertical flickering bar Use “Phase” to make an adjustment. See page 30 for more <strong>info</strong>rmation.Check and reconfigure the display mode of your graphic card tomake it compatible with the projector.37
AppendicesImage is out of focus Make sure the Lens cap is removed. Adjusts the Focus Ring on the projector lens. Make sure the projection screen is between the required distance4.9 to 39.4 feet (1.5 to 12.0 meters) from the projector. Seepage 16.The image is stretched when displaying 16:9 DVD titleWhen you play anamorphic DVD or 16:9 DVD, the projector willshow the best image in 16: 9 format on projector side.If you play the LBX format DVD title, please change the format asLBX in projector OSD.If you play 4:3 format DVD title, please change the format as 4:3 inprojector OSD.If the image is still stretched, you will also need to adjust the aspectratio by referring to the following:Please setup the display format as 16:9 (wide) aspect ratio typeon your DVD player.Image is too small or too large Adjust the zoom lever on the top of the projector. Move the projector closer to or further from the screen. Press [ 4:3], [ 16:9], [ Letter-Box], [ Native] buttonon the remote control or [Menu] on the projector panel, go to“Display-->Format”. Try the different settings.Image has slanted sides: If possible, reposition the projector so that it is centered on thescreen and below the bottom of the screen.Use “Display-->V.Keystone” from the OSD to make an adjustment.Image is reversed Select “System-->Projection” from the OSD and adjust the projectiondirection.Intermission Problems38The projector stops responding to all controls If possible, turn off the projector, then unplug the power cordand wait at least 20 seconds before reconnecting power.
AppendicesLamp burns out or makes a popping soundWhen the lamp reaches its end of life, it will burn out and maymake a loud popping sound. If this happens, the projector will notturn on until the lamp module has been replaced. To replace thelamp, follow the procedures in the “Replacing the Lamp” sectionon page 41.EnglishProjector Status IndicationLED statesMessagePower LED(Red)Power LED(Blue)Temp-LEDLamp-LEDStandby State(Input power cord)Power on (Warming)FlashingPower on and LamplightingPower off (Cooling)FlashingNoteSteady light =>No light =>Error (Lamp fail)Error (Thermal fail)Error (Fan fail)Error (Over Temp.)FlashingFlashingMessage Reminders Fan failed:39
Appendices Over temperature: Replacing the lamp:Remote Control ProblemsIf the remote control does not work Check the operating angle for the remote control is approximately±22.5°.Make sure there are not any obstructions between the remote controland the projector. Move to within 6 m (20 ft) of the projector. Make sure batteries are inserted correctly. Make sure batteries are exhausted. If so, replace weak batteries inthe remote control.40
AppendicesReplacing the lampThe projector automatically detects the lamp life. When the lamplife is nearing the end of use, you will receive a warning message.EnglishWarning: Lamp compartmentis hot! Allow service center to change the lamp as soon as possible. Make sureWhen you see this message, please contact your local reseller orit to cool down beforethe projector has been cooled down for at least 30 minutes beforechanging lamp!changing the lamp.1324Warning: To reduce therisk of personal injury,do not drop the lampmodule or touch thelamp bulb. The bulbmay shatter and causeinjury if it is dropped.Lamp Replacing Procedure:1. Switch off the power to the projector by pressing the Powerbutton.2. Allow the projector to cool down at least 30 minutes.3. Disconnect the power cord.4. Use a screwdriver to remove the screw from the cover.5. Push up and remove the cover.6. Remove the 2 screws from the lamp module.7. Pull out the lamp module. To replace the lamp module, reverse the previous steps.8. Turn on the projector and do “Lamp Reset” after the lampmodule is replaced.Lamp Reset: (i)Press “Menu” -> (ii)Select “System” ->(iii)Select “Lamp setting” ->(iv)Select “Lamp reset” ->(v)Select “Yes”.41
AppendicesNoteCompatibility ModesModeResolutionV.Frequency(Hz)AAnalogDigitalVESA SVGA 800 x 600 60 VESA SVGA 800 x 600 72 VESA SVGA 800 x 600 75 VESA XGA 1024 x 768 60 VESA XGA 1024 x 768 70 VESA XGA 1024 x 768 75 VESA XGA 1024 x 768 85 VESA WXGA 1280 x 720 60 VESA WXGA 1280 x 768 60 VESA WXGA 1280 x 768 72 VESA WXGA 1280 x 768 85 HD 1280 x 720 60 HD 1280 x 720 72 VESA SXGA+ 1400 x 1200 60 VESA UXGA 1600 x 1200 60 * HD 1920 x 1080 24 * HD 1920 x 1080 60 * MAC 1152 x 870 75.06 MAC G4 640 x 480 60 MAC G4 1024 x 768 75 Remark : “ * ”compressedcomputerimage.42
AppendicesRS232 Commands and ProtocolFunction ListRS232 Pin AssignmentsEnglish5 3 19 6Pin no. Name I/O (From Projector Side1 NC __2 RXD IN3 TXD OUT4 NC __5 GND __6 NC __7 NC __8 NC __9 NC __43
RS232 Protocol Function ListInterface: 9 wires RS-232CBaud Rate: 115200Data Bit: 8Parity: noneStop Bits: 1Flow Control: noneDefault ACK:"*000
AppendicesComand HeaderBlank BlankAddress Code CommandBlank Terminator 1Header Terminator 2S ilence/ O SD Modes et/ g etT TH A CE ESEADDOMCORMRMILs/Viewed As D B R B H B M 1 2 N g Function Description ACK* 0 IR 035 * 0 IR 035 -- s Brightness Default ACK* 0 IR 036 * 0 IR 036 -- s Contrast Default ACK* 0 IR 037 * 0 IR 037 -- s Tint Default ACK* 0 IR 038 * 0 IR 038 -- s Color Default ACK* 0 IR 039 * 0 IR 039 -- s Image shift up Default ACK* 0 IR 040 * 0 IR 040 -- s Image shift down Default ACK* 0 IR 041 * 0 IR 041 -- s mode Default ACK* 0 IR 042 * 0 IR 042 -- s eage mask(overscan) Default ACK* 0 IR 043 * 0 IR 043 -- s overscan(zoom) Default ACK* 0 IR 046 * 0 IR 046 O s Keystone shift up Default ACK* 0 IR 047 * 0 IR 047 O s keystone shift down Default ACK* 0 IR 048 * 0 IR 048 O s Image shift left Default ACK* 0 IR 049 * 0 IR 049 O s Image shift right Default ACK* 0 IR 050 * 0 IR 050 -- s Source: HDMI 2 Default ACKEnglishComand HeaderBlank BlankAddress Code CommandBlankTerminatorHeaderTs et/ g etH A CEE D O C RsA D M O M/Viewed As D B R B H B M 1g Function Description Return Note* 0 IR 801 * 0 IR 801 -- g Get Lamp HourRange of xxxxx is*002 xxxxx 0 99999xx means00 : no source01 : DVI_Digital02 : HDMI 1* 0 IR 802 * 0 IR 802 -- g Get Video Source *003 xx03 : Composite Video04 : S-Video05 : DVI_Analog06 : Component Video07 : HDMI 208 : Testing* 0 IR 803 * 0 IR 803 -- g Get Lamp Status *004 xxxx means00 : Brite Mode Off01 : Brtire Mode* 0 IR 804 * 0 IR 804 -- g Get Projector status *005 xxxx means projector is in00 : Standby mode01 : Power On03: Cooling on or cooling off04: Lamp error05: Thermal error45
AppendicesCeiling Mount InstallationNotePlease note that damageresulting fromincorrect installationwill invalidate the warranty.1. To prevent damaging your projector, please use the ceilingmount package for installation.2. If you wish to use a third party ceiling mount kit, pleaseensure the screws used to attached a mount to the projectormet the following specifications: Screw type: M4 Maximum screw length: 10mm Minimum screw length: 8mm410.99mm(16.18")Warning:1. If you buy the ceilingmount from othercompany, pleaseensure that there is atleast 10cm distancebetween the bottomcover of the projectorand the ceiling.2. Avoid placingthe projector nearsources of heat suchair-conditioningunits and heatersotherwise it mayoverheat and shutdown automatically.3. Ceiling mountingshall be mounting onmetal or concrete.310.62mm(12.23")200.00mm(7.87")82.50mm(3.25")100.00mm(3.94")106.00mm(4.17")/ Max. 850.60mm(33.49")Min. 610.60mm(24.04")185.00mm(7.28")82.50mm(3.25")46
AppendicesOptoma Global OfficesFor service or support please contact your local office.USA715 Sycamore Drive Tel : 408-383-3700Milpitas, CA 95035, USA Fax: 408-383-3702www.optomausa.comCanada5630 Kennedy Road, Mississauga,Service : services@optoma.comON, L4Z 2A9, Canada Tel : 905-361-2582www.optoma.ca Fax: 905-361-2581Europe42 Caxton Way, The Watford Business ParkWatford, Hertfordshire,WD18 8QZ, UK Tel : +44 (0) 1923 691 800www.optoma.eu Fax: +44 (0) 1923 691 888Service Tel : +44 (0)1923 691865 Service : service@tsc-europe.comFranceBâtiment E Tel : +33 1 41 46 12 2081-83 avenue Edouard Vaillant Fax: +33 1 41 46 94 3592100 Boulogne Billancourt, France Service : savoptoma@optoma.frSpainPaseo de la Castellana Tel : +34 91 790 67 01135 7 Planta +34 91 790 67 02Madrid, Spain Fax: + 34 91 790 68 69DeutschlandWerftstrasse 25 Tel : +49 (0) 211 506 6670D40549 Düsseldorf, Fax: +49 (0) 211 506 66799GermanyService : <strong>info</strong>@optoma.deScandinaviaGrev Wedels Plass 2 Tel : +47 32 26 89 903015 Drammen Fax: +47 32 83 78 98NorwayService : <strong>info</strong>@optoma.deLatin America715 Sycamore Drive Tel : 408-383-3700Milpitas, CA 95035, USA Fax: 408-383-3702www.optoma.com.brwww.optoma.com.mxEnglish47
AppendicesTaiwan231, 台 北 縣 新 店 市 民 權 路 108 號 5 樓R.O.C. 傳 真 :+886-2-2218-2313電 話 :+886-2-2218-2360服 務 處 :services@optoma.com.twwww.optoma.com.twasia.optoma.comHong KongUnit A, 27/F Dragon Centre, 79 Wing Hong Street,Cheung Sha Wan Kowloon, Hong KongTel : +852-2396-8968 Fax: +852-2370-1222www.optoma.com.hkChina上 海 市 长 宁 区 凯 旋 路 1205 号 5 楼 电 话 :+86-21-62947376邮 编 : 200052 传 真 :+86-21-62947375www.optoma.com.cnJapan3-25-18E-Mail: <strong>info</strong>@osscreen.comKoreaWOOMI TECH.CO.,LTD.http://www.os-worldwide.com/4F, Minu Bldg.33-14, Nonhyun-Dong, Tel : +82+2+34430004Kangnam-Ku, seoul, 135-815, KOREA Fax: +82+2+3443000548
AppendicesRegulation & safety noticesThis appendix lists the general notices of your Projector.FCC noticeThis device has been tested and found to comply with the limitsfor a Class B digital device pursuant to Part 15 of the FCC rules.These limits are designed to provide reasonable protectionagainst harmful interference in a residential installation. Thisdevice generates, uses, and can radiate radio frequency energyand, if not installed and used in accordance with the instructions,may cause harmful interference to radio communications.EnglishHowever, there is no guarantee that interference will not occurin a particular installation. If this device does cause harmfulinterference to radio or television reception, which can be determinedby turning the device off and on, the user is encouragedto try to correct the interference by one or more of the followingmeasures:▀■ Reorient or relocate the receiving antenna.▀■ Increase the separation between the device and receiver.▀■ Connect the device into an outlet on a circuit differentfrom that to which the receiver is connected.▀■ Consult the dealer or an experienced radio/televisiontechnician for help.Notice: Shielded cablesAll connections to other computing devices must bemade using shielded cables to maintain compliance withFCC regulations.CautionChanges or modifications not expressly approved by themanufacturer could void the user’s authority, which isgranted by the Federal Communications Commission, tooperate this computer.49
AppendicesOperation conditionsThis device complies with Part 15 of the FCC Rules. Operationis subject to the following two conditions:1.this device may not cause harmful interference, and2.this device must accept any interference received, includinginterference that may cause undesired operation.Notice: Canadian usersThis Class B digital apparatus complies with CanadianICES-003.Remarque à l’intention des utilisateurs canadiensCet appareil numerique de la classe B est conforme a la normeNMB-003 du Canada.Declaration of Conformity for EU countries▀■ EMC Directive 89/336/EEC (including amendments)▀■ Low Voltage Directive 73/23/EEC (amended by 93/68/EEC)▀■ R & TTE Directive 1999/EC (if product has RF function)Disposal instructionsDo not throw this electronic device into thetrash when discarding. To minimize pollutionand ensure utmost protection of the globalenvironment, please recycle it.50