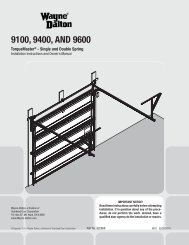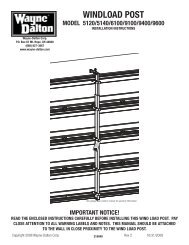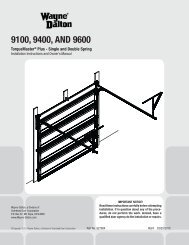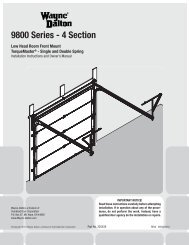
TorqueMaster Plus Standard Lift - Wayne Dalton
TorqueMaster Plus Standard Lift - Wayne Dalton
TorqueMaster Plus Standard Lift - Wayne Dalton
- No tags were found...

You also want an ePaper? Increase the reach of your titles
YUMPU automatically turns print PDFs into web optimized ePapers that Google loves.
MaintenanceCleaning Your Garage DoorImportant: Do not use a pressure washer on your garage door!While factory-applied finishes on garage doors are durable, it is desirable to clean them on aroutine basis. Some discoloration of the finish may occur when a door has been exposed todirt-laden atmosphere for a period of time. Slight chalking may also occur as a result of directexposure to sunlight.Cleaning the door will generally restore the appearance of the finish. To maintain an aestheticallypleasing finish of the garage door, a periodic washing of the garage door is recommended.The following cleaning solution is recommended:A mild detergent solution consisting of one cup detergent (with less than 0.5% phosphate) dissolvedinto five gallons of warm water will aid in the removal of most dirt.Note: The use of detergents containing greater than 0.5% phosphate is not recommended foruse in general cleaning of garage doors.Note: Be sure to clean behind weatherstrips on both sides and top of door.Caution: Never mix cleansers or detergents with bleach.Glass cleaning instructionsClean with a mild detergent solution (same as above) and a soft cloth. After cleaning, rinsethoroughly.Acrylic cleaning instructionsClean acrylic glazing with nonabrasive soap or detergent and plenty of water. Use your barehands to feel and dislodge any caked on particles. A soft, grit-free cloth, sponge or chamois maybe used to wipe the surface. Do not use hard or rough cloths that will scratch the acrylic glazing.Dry glazing with a clean damp chamois.Note: Do not use any window cleaning fluids, scouring compounds, gritty cloths or solventbasedcleaners of any kind.Painting Your Garage DoorPainting Instructions For Steel and Wood Doors.Steel (Surface Preparation for Painting)Wax on the surface must be removed or paint peeling/flaking will result. To remove this wax,it will be necessary to lightly scuff the surface with a fine steel wool pad, saturated with soapywater. A final wipe and rinse should be done with clean water only, to remove any loose particlesand any soapy film residue.Surface scratches, which have not exposed the metal substrate, can be lightly buffed or sandedwith 0000 steel wool or No. 400 sand paper to create a smoother surface. Care must be takento not expose the substrate under the paint. Once the substrate is exposed, the likelihood forrusting is greatly increased.If substrate is exposed, it must be treated to prevent rust from forming. Sand the exposed arealightly and paint with a high quality metal primer, specifically intended for galvanized surfaces,to protect the area from corrosion. Follow the drying time on primer can label before applyingtopcoat. The surface of the factory-applied finish, that is being painted, must not be too smooth,or the paint will not adhere to it. It is advisable to test in an inconspicuous area, to evaluateadhesion. If poor adhesion is observed, surface preparation for painting thefactory-applied finish,must be repeated until desired results are achieved. Again, care must be taken to not expose thesubstrate under the paint.Steel (Painting)After surface has been properly prepared, it must be allowed to dry thoroughly, then coatedimmediately with a premium quality latex house paint. Follow paint label directions explicitly. Oilbase or solvent base paints are not recommended. Please note that if substrate is exposed andnot properly primed, painting with latex paint may cause accelerated rusting of the steel in theexposed area.NOTES:1. Repainting of finish painted steel doors cannot be warranted, as this condition is totallybeyond the door manufacturer’s control.2. Consult a professional coatings contractor if in doubt about any of the above directions.3. Follow directions explicitly on the paint container labels for proper applications of coatings anddisposal of containers. Pay particular attention to acceptable weather and temperature conditionsin which to paint.Wood (Preparation and Painting)These instructions apply to all Wood Doors produced and sold by <strong>Wayne</strong>-<strong>Dalton</strong>. The exteriorsurfaces, as well as all edges must be properly painted and maintained if satisfactory performanceis to be achieved. The purpose for painting is to both protect and beautify the substrates.These requirements for finishing are intended to achieve both functions for reasonable servicelife of wood doors. Wood doors must be completely finished prior to installation, to ensure thatthe interior and exterior surfaces, as well as all edges of the doors are properly protected againstmoisture or other contaminants. Wood doors, in a non-finished condition, must not be transportedor stored where the wood surfaces can be exposed to moisture or other contaminants.Wood (Surface Preparation)Wood (Painting)Using painter’s tape, tape off all metal surfaces. A premium quality latex house based finishpaint is recommended for use over the factory latex based primerPainting the wood surfaces with at least 2 coats of finish paint over the primer. Follow paintmanufacture’s label directions completely for all coatings. Once finished, remove painter’s tapeand touch up where necessary.Wood (Maintenance and Refinishing)Yearly inspection of all the wood surfaces of the garage door(s) will reveal the extent of weatheringand the need for refinishing. When the finish becomes eroded or thin, clean and prime theareas of deterioration. Follow up with a complete refinishing of the door(s), according to theabove directions, as well as the manufacturer’s label directions. Protecting the door(s) fromprolonged exposure to moisture and sunlight is vital in extending the service life of your garagedoor(s).Operation and MaintenanceOPERATING YOUR GARAGE DOOR…Before you begin, read all warning labels affixed to the door and the installation instructions andowner’s manual. When correctly installed, your <strong>Wayne</strong>-<strong>Dalton</strong> door will operate smoothly. Alwaysoperate your door with controlled movements. Do not slam your door or throw your door into theopen position, this may cause damage to the door or its components. If your door has an electricopener, refer to the owner’s manual to disconnect the opener before performing manual dooroperation below.Manual door operation:For additional information on manual garage door operations go to www.dasma.com and referenceTDS 165.IMPORTANT: DO NOT PLACE FINGERS OR HANDS INTO SECTION JOINTS WHEN OPENINGAND/OR CLOSING A DOOR. ALWAYS USE LIFT HANDLES/ SUITABLE GRIPPING POINTS WHENOPERATING THE DOOR MANUALLY.Opening a Door: Make sure the lock(s) are in the unlocked position. <strong>Lift</strong> the door by using thelift handles/ suitable gripping points only. Door should open with little resistance.Closing a Door: From inside the garage, pull door downward using lift handles/ grippingpoint only or a high friction area only. If you are unable to reach the lift handles/ suitable grippingpoints only, use pull rope affixed to the side of door. Door should close completely with littleresistance.Using an electric opener:IMPORTANT: PULL ROPES MUST BE REMOVED AND LOCKS MUST BE REMOVED OR MADEINOPERATIVE IN THE UNLOCKED POSITION.When connecting a trolley type garage door opener to this door, an opener and/or trolley bracketmust be securely attached to the top section of the door, along with any u-bars provided withthe door. Always use the opener and/or trolley bracket supplied with the door. To avoid possibledamage to your door, <strong>Wayne</strong>-<strong>Dalton</strong> recommends reinforcing the top section on models 8000,8100, 8200 and 9100 doors with a u-bar (may or may not be supplied). The installation of theopener must be according to manufacturer’s instructions and force settings must be adjustedproperly. Refer to the owner’s manual supplied with your electric opener for complete details oninstallation, operation, maintenance and testing of the opener.MAINTAINING YOUR GARAGE DOOR…Before you begin, read all warning labels affixed to the door and the installation instructionsand owner’s manual. Perform routine maintenance steps once a month, and have the doorprofessionally inspected once a year. Review your Installation Instructions and Owner’s Manualfor the garage door. These instructions are available at no charge from <strong>Wayne</strong>-<strong>Dalton</strong>, A DivisionOf Overhead Door Corporation, P.O. Box 67, Mt. Hope, OH., 44660, or online at www.<strong>Wayne</strong>-<strong>Dalton</strong>.com. For additional information on garage door/opener maintenance go to www.dasma.com and reference TDS 151, 167 and 179.Monthly Inspections:1. Visual Inspection: Closely inspect jambs, header and mounting surface. Any wood found notto be structurally sound must be replaced. Inspect the springs, cables, rollers, pulleys, backhangs and other door hardware for signs of worn or broken parts. Tighten any loose screwsand/or bolts. Check exterior surface of the door sections for any minor cracks. Verify door hasnot shifted right and/or left in the opening. If you suspect problems, have a trained door systemtechnician make the repairs.WARNINGGARAGE DOOR SPRINGS, CABLES, BRACKETS, AND OTHER HARDWARE AT-TACHED TO THE SPRINGS ARE UNDER EXTREME TENSION, AND IF HANDLEDIMPROPERLY, CAN CAUSE SEVERE OR FATAL INJURY. ONLY A TRAINED DOORSYSTEMS TECHNICIAN SHOULD ADJUST THEM, BY CAREFULLY FOLLOWINGTHE MANUFACTURER’S INSTRUCTIONS.All surfaces must be clean, free of dust and dirt and any other contamination.17Please Do Not Return This Product To The Store. Contact your local <strong>Wayne</strong>-<strong>Dalton</strong> dealer. To find your local <strong>Wayne</strong>-<strong>Dalton</strong> dealer,refer to your local yellow pages business listings or go to the Find a Dealer section online at www.<strong>Wayne</strong>-<strong>Dalton</strong>.com