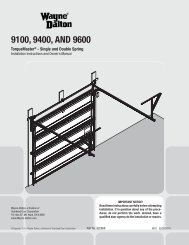
TorqueMaster Plus Standard Lift - Wayne Dalton
TorqueMaster Plus Standard Lift - Wayne Dalton
TorqueMaster Plus Standard Lift - Wayne Dalton
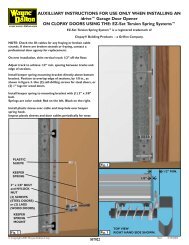
- No tags were found...

You also want an ePaper? Increase the reach of your titles
YUMPU automatically turns print PDFs into web optimized ePapers that Google loves.
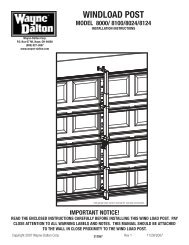
InstallationQuickInstalltabsHorizontal trackangleBefore installing your door, be certain that you have read and followed all of the instructionscovered in the pre-installation section of this manual. Failure to do so may result in animproperly installed door.NOTE: Reference TDS 160 for general garage door terminology at www.dasma.com.1Quick Install Flag AnglesTools: NoneNote: If you have Fully Adjustable flag angles, skip this step.NOTE: If you have riveted track, skip this step.Note: Flag angles are right and left handed.Place the lower Quick Install tab of the left hand flag angle in the Quick Install feature of theleft hand vertical track. Give the flag angle 1/4 turn to lock in place. Repeat for other side.Flag angle1/4 Turn4AlignmentholeKey slotsHorizontaltrackQuick Install Jamb BracketsTools: NoneQuick Install tabsin placeNote: If you have Fully Adjustable jamb brackets, skip this step.NOTE: If you have riveted track, skip this step.Measure the length of the vertical tracks. Using the jamb bracket schedule, determine theplacement of the jamb brackets for your door height and track length. To install the jambbrackets, align the Quick Install tab on the Quick Install jamb bracket with the Quick Installfeature in the vertical track and turn the bracket perpendicular to the track so the mountingflange is toward the back (flat) leg of the track. Repeat for other side.1st hole set2nd hole setVertical track3rd hole setTop of track2VerticaltrackLowerQuickInstall tabQuickInstallfeatureFully Adjustable Flag AnglesTools: NoneNote: If you have Quick Install flag angles, skip this step.NOTE: If you have riveted track, skip this step.Note: Flag angles are right and left handed.If you have Quick Install vertical tracks, hand tighten the left hand flag angle to the left handvertical track using (1) stud plate and (2) 1/4” – 20 flange hex nuts. Repeat for the other side.If you have Fully Adjustable vertical tracks, hand tighten the left hand flag angle to the lefthand vertical track using (2) 1/4”-20 x 9/16” track bolts and (2) 1/4”-20 flange hex nuts.Repeat for other side. Flange nuts will be secured after flag angle spacing is completed instep, Top Section.Flag angle1/4”-20Flange hex nutsQuick Installverticaltrack3StudplateFlag angle1/4”-20Flange hex nutsFully AdjustableverticaltrackHorizontal Track AnglesTools: Hammer1/4”- 20 x 9/16”Track boltsNOTE: For larger doors, a full length horizontal track angle may not already be spot welded tothe horizontal track. If the horizontal track angle is not welded, the horizontal track angle willbe installed, as shown.Position the left hand horizontal track angle, as shown. Place the Quick Install tabs of thehorizontal track angle in the key slot of the left hand horizontal track. Using a hammer, tapthe horizontal track angle towards the curved end of the track until the alignment hole in thetrack and angle are aligned. Repeat for other side. Set tracks aside.Bottom holeMiddle holeTop holeDOOR HEIGHT7’0”8’0” 4-SEC5Q.I. tabQ.I. jambbracketTRACKLENGTH76” (1930mm)88”(2235mm)JAMB BRACKET SCHEDULEJamb bracketin placeMounting flange1ST SET 2ND SET 3RD SET6 B 8 B NA7 M 8 B 10 TB= BOTTOM HOLE, M= MIDDLE HOLE, T= TOP HOLEFully Adjustable Jamb BracketsTools: NoneNote: If you have Quick Install jamb brackets, skip this step.NOTE: If you have riveted track, skip this step.Note: The bottom jamb bracket is always the shortest bracket, while the center jambbracket is the next tallest. If three jamb brackets per side are included with your door, you willhave received a top jamb bracket, which is the tallest.To attach the bottom jamb bracket, locate lower hole of the hole/ slot pattern of the 1st holeset on the vertical track. Align the slot in the jamb bracket with the lower hole of the hole/ slotpattern. Secure jamb bracket using (1) 1/4”-20 x 9/16” track bolt and (1) 1/4”-20 flange hexnut. Repeat for other side.Place the center jamb bracket over the lower hole of the hole/ slot pattern that is centeredbetween the bottom jamb bracket and flag angle of the 2nd hole set. Secure jamb bracketusing (1) 1/4”-20 x 9/16” track bolt and (1) 1/4”-20 flange hex nut. Repeat for other side.If a top jamb bracket was included, secure it to vertical track using the lower hole of the hole/slot pattern in the 3rd hole set and (1) 1/4”-20 x 9/16” track bolt and (1) 1/4”-20 flange hexnut. Repeat for other side.6Please Do Not Return This Product To The Store. Contact your local <strong>Wayne</strong>-<strong>Dalton</strong> dealer. To find your local <strong>Wayne</strong>-<strong>Dalton</strong> dealer,refer to your local yellow pages business listings or go to the Find a Dealer section online at www.<strong>Wayne</strong>-<strong>Dalton</strong>.com