MANUAL FOR - BMS and Labomed - high quality microscopes
MANUAL FOR - BMS and Labomed - high quality microscopes
MANUAL FOR - BMS and Labomed - high quality microscopes
- No tags were found...

Create successful ePaper yourself
Turn your PDF publications into a flip-book with our unique Google optimized e-Paper software.
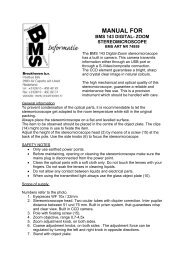
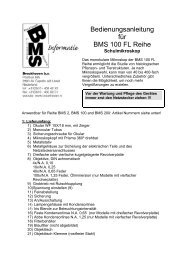
<strong>MANUAL</strong> <strong>FOR</strong>“11-140-143” SERIESOF STEREOMICROSCOPESThe stereo<strong>microscopes</strong> out of this series, are<strong>high</strong>ly suitable for beginning investigators <strong>and</strong>also for those who are more experienced.The <strong>high</strong> mechanical <strong>and</strong> optical <strong>quality</strong>,guarantee a reliable <strong>and</strong> maintenance free useof this stereomicroscope. This is a precisioninstrument which should be h<strong>and</strong>led with care.General informationTo prevent condensation of the optical parts, itis recommended to let the stereomicroscope get adapted to the room temperaturewhile still in the original packing.Always place the stereomicroscope on a flat <strong>and</strong> levelled surface.The item to be observed should be placed in the centre of the object plate. The clips(14) might come in use to fixate the item.Adjust the height of the stereomicroscope head (2) by means of a screw (15) at theback of the pole. Use the side knobs (6) to focus the stereomicroscope.SAFETY NOTES Only use earthed power points. Before maintaining, opening or cleaning the stereomicroscope make sure themains plug is disconnected from the power point. Clean the optical parts with a soft cloth only. Do not touch the lenses with yourfingers. Do not soak the lenses in cleaning liquids. Do not allow any contact between liquids <strong>and</strong> electrical parts. When using the transmitted light, always use the glass object plate (10).Scope of supply.Numbers refer to the photo.1. Eyepieces WF 10x / 22mm2. Stereomicroscope head. One ocular tube with diopter correction. Inter pupilardistance between 51 und 75 mm. Build in prism system, that guarantees crisp<strong>and</strong> clear view.3. Pole with fixating screw (15).4. Objective revolver: 2x-4x only for <strong>BMS</strong> 11 C-2LHObjective revolver: 1x-3x only for <strong>BMS</strong> 11 B-2LHZoom objective: 0,7-4,5x only for <strong>BMS</strong> 140 <strong>and</strong> <strong>BMS</strong> 1435. Zoom adjustment knob, on both sides, only for <strong>BMS</strong> 140 <strong>and</strong> <strong>BMS</strong> 1436. Coarse adjustment knobs, on both sides. The adjustment force can beregulated by turning the left <strong>and</strong> right knob in opposite directions.7. St<strong>and</strong> with object plate.
8. Incident light 12V / 15 Watt bulb, halogen.9. Knobs for intensity adjustment of illumination. (not visible on photo).10.Glass object plate (milk glass) or black & white object plate.11.Fuses on back of st<strong>and</strong> (7). (not visible on photo).12.Cable connection to power point13.Switch to guide light beam either through eyepieces or through third tube.14.Object clamps.15.Fixation screw for height adjustment of the stereomicroscope head.Storage <strong>and</strong> cleaningThe stereomicroscope should stay clean <strong>and</strong> kept away from dust. Keep eyepieces,objectives <strong>and</strong> objective pairs always in the stereomicroscope. Remove them onlywhen necessary.When not in use, protect the stereomicroscope against dust by means of thedustcover. Or store in a storage case (optional).Do not touch the optical system with bare h<strong>and</strong>s. Do not contaminate the opticalparts with fluids.Use lens paper or a soft cloth for cleaning lenses.In case the lenses are severally contaminated, clean by using a soft cloth sprinkledwith ethanol. The inner lens system can only be cleaned by using a soft hairedpencil.The rest of the stereomicroscope can best be cleaned with a soft cloth. Use of milddetergent is possible.Changing bulb <strong>and</strong> fuseNever touch the bulb with bare h<strong>and</strong>s, use cloth or gloves.Unplug the stereomicroscope <strong>and</strong> let the electrical parts cool down.When maintaining the stereomicroscope, make sure it is always disconnected fromthe power point.The light bulb is attached to the lamp holder by means of two clamps. Softly pull thetube shaped bulb. The transmitted light can be found by removing the object plate.The transmitted light bulb is connected in the same way as the incident light bulb.This goes for all series.The new light bulb should be pressed in its socket firmly but carefully.The fuse is placed in a fuse holder, which comes out by using a small screwdriver orcoin. Change fuse, be aware to replace the fuse with the same value as used before.Accessories<strong>BMS</strong> Art Nr Description74983 Eyepieces pair 15x74985 Eyepieces pair 20x74990 Auxiliary lens 0,5x74991 Auxiliary lens 1,5x74992 Auxiliary lens 2,0x74965 Dark field equipment
76340 Storage case, aluminium76029 Storage case, wood74986 Lamp, 12V-15W, Transmitted74987 Lamp, 12V-15W, Incident74995 Boom st<strong>and</strong>74997 Boom st<strong>and</strong> with tilted head
121353158641211971014