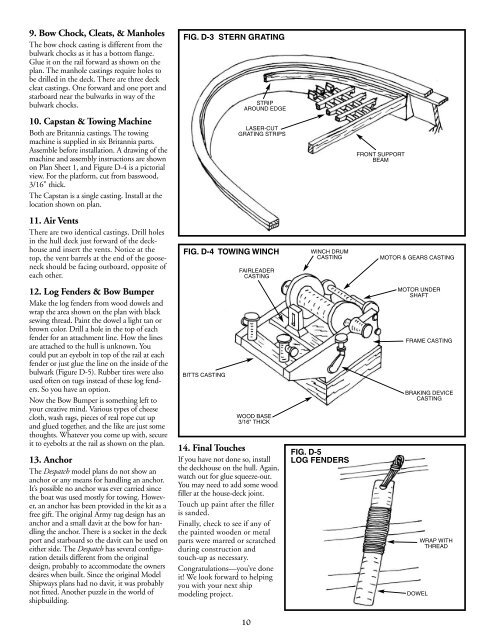
9. Bow Chock, Cleats, & ManholesThe bow chock casting is different from thebulwark chocks as it has a bottom flange.Glue it on the rail forward as shown on theplan. The manhole castings require holes tobe drilled in the deck. There are three deckcleat castings. One forward and one port andstarboard near the bulwarks in way of thebulwark chocks.10. Capstan & Towing MachineBoth are Britannia castings. The towingmachine is supplied in six Britannia parts.Assemble before installation. A drawing of themachine and assembly instructions are shownon Plan Sheet 1, and Figure D-4 is a pictorialview. For the platform, cut from basswood,3/16" thick.The Capstan is a single casting. Install at thelocation shown on plan.11. Air VentsThere are two identical castings. Drill holesin the hull deck just forward of the deckhouseand insert the vents. Notice at thetop, the vent barrels at the end of the gooseneckshould be facing outboard, opposite ofeach other.12. Log Fenders & Bow BumperMake the log fenders from wood dowels andwrap the area shown on the plan with blacksewing thread. Paint the dowel a light tan orbrown color. Drill a hole in the top of eachfender for an attachment line. How the linesare attached to the hull is unknown. Youcould put an eyebolt in top of the rail at eachfender or just glue the line on the inside of thebulwark (Figure D-5). Rubber tires were alsoused often on tugs instead of these log fenders.So you have an option.Now the Bow Bumper is something left toyour creative mind. Various types of cheesecloth, wash rags, pieces of real rope cut upand glued together, and the like are just somethoughts. Whatever you come up with, secureit to eyebolts at the rail as shown on the plan.13. AnchorThe Despatch model plans do not show ananchor or any means for handling an anchor.It’s possible no anchor was ever carried sincethe boat was used mostly for towing. However,an anchor has been provided in the kit as afree gift. The original Army tug design has ananchor and a small davit at the bow for handlingthe anchor. There is a socket in the deckport and starboard so the davit can be used oneither side. The Despatch has several configurationdetails different from the originaldesign, probably to accommodate the ownersdesires when built. Since the original ModelShipways plans had no davit, it was probablynot fitted. Another puzzle in the world ofshipbuilding.FIG. D-3 STERN GRATINGSTRIPAROUND EDGELASER-CUTGRATING STRIPSFIG. D-4 TOWING WINCHBITTS CASTINGFAIRLEADERCASTINGWOOD BASE3/16" THICK14. Final TouchesIf you have not done so, installthe deckhouse on the hull. Again,watch out for glue squeeze-out.You may need to add some woodfiller at the house-deck joint.Touch up paint after the filleris sanded.Finally, check to see if any ofthe painted wooden or metalparts were marred or scratchedduring construction andtouch-up as necessary.Congratulations—you’ve doneit! We look forward to helpingyou with your next shipmodeling project.WINCH DRUMCASTINGFIG. D-5LOG FENDERSFRONT SUPPORTBEAMMOTOR & GEARS CASTINGMOTOR UNDERSHAFTFRAME CASTINGBRAKING DEVICECASTINGDOWELWRAP WITHTHREAD10
1. Under Tow: A History of Tugs and Towingby Donal Baird. Vanwell Publishing 2004.BIBLIOGRAPHY2. Tugs: The World’s Hardest Working Boatsby Josh Leventhal. Black Dog & Leventhal, New York 1999. Nothing about Despatch but good look at tug boats in general.3. How to Built First-Rate Ship Models From Kitsby Ben Lankford. Model Expo 2002. Comprehensive reference covers construction methods for solid hull, plank-on-bulkhead, andplank-on-frame kits. The book is profusely illustrated and includes glossary of nautical terms.Note: Some books are available through Model Expo, Inc. www.modelexpo-online.com.Please check current catalog or website for availability.Fine Tools & <strong>Book</strong>s from Model ShipwaysREEVING & SPACING TOOLThis revolutionary new tool makes threading of deadeye assemblies or blocks and tackleseasier, and assures perfect spacing of deadeyes!Two built-in clamps hold deadeyes or blocks securely while you pass the lines through the holes for reeving. Thedifferent slots in the spacing bar let you create even distances between shroud deadeyes and chainplate or blocksof various sizes and shapes. One stationary and one removable spacing bar let you create uniform spacing from1/4" to 1-1/4" in 1/16" increments. Made of molded high-impact plastic, the tool is 7" long and 1-3/4" wide.No. MS107MAKE YOUR OWNSCALE ROPE!COMING SOON!See our websitefor availabilityFAIR-A-FRAME BUILDING SLIPAccommodates virtually any size keel. Makes plank-onbulkheadhull assembly fast and accurate. Adjustablealignment unit straddles base, ensuring that bulkheadsare square to the false keel. Set of ten metal screwsmakes unit fully adjustable in height as well as width. Kitincludes base, laser-cut wooden parts, necessary hardware& instructions. Base: 24" x 4-1/2".No. MS105HOW TO BUILDFIRST-RATESHIP MODELSFROM KITSBy Ben Lankford. Thiscomprehensive referencediscusses how to choose akit, foreign vs. US kits,materials, tools, hull construction,deck furniture,rigging and masting, finishingand display. Covershull construction methodsfor solid hull, plank-onbulkheadandplank-on-frame kits. Profusely illustrated, the bookincludes a glossary of nautical terms, tips on advancedresearch and a list of references for actual ships and shipmodel techniques. 96 pp, softcover.No. MS114LASER-CUT BASSWOOD ROPEWALKPut the master’s touch on your ship models with yourown rope. The Ropewalk from Model Shipways lets youturn ordinary thread into realistic 3-strand scale ropequickly and easily. No complicated mechanics, bobbins,rails or trucks. Our Ropewalk has only two main parts –the gear head and the tail end. It lays up (twists) anythread or cordage into high quality rope in all the necessarylengths and diameter to fully rig your model. TheRopewalk contains all materials needed for assembly:laser cut basswood parts, two diameters of brass tubing,two nylon gears, machine screws & eyes, spacers andretainers, plus clearly written, amply illustrated assemblyand operating instructions.No. MS110ELECTRIC PLANK BENDERBends wooden planking strips with ease. Place yourstrip on the wooden form and heat it by moving theplank bender over it several times. Set includessoldering iron handle with round metal head, plus awood pattern with two different curves.No. MS7205HULL PLANKING CLAMPSLaser cut plywood planking clamps eliminate unsightly holes inyour bulkheads, and hold your planks firmly in place while youglue, drill, measure and taper. Each clamp is 1" square, andincludes a metal screw with wing nut and two 1/16" diameterbrass support rods. Assembly required.No. MX103Set of 6, use with bulkheads less than 3/16" thick.No. MX104Set of 6, use with bulkheads 3/16" or thicker.DELUXE SHIPMODELER’STOOL SETHinged wooden chest contains all the essential knives andtools for building a perfect wooden ship model! Includesthree hobby knives (one each light, medium and heavy duty)with 15 assorted blades, aluminum miter box with saw blade,pointed nose tweezers, stainless steel springconstruction pliers with comfort cushion handles, aluminumawl, 4 assorted gouges, three mini-drills in differentdiameters, plus wooden sanding block and wedge.No. EX44291SAVE TIME & MONEY...ORDER DIRECTLY FROM OUR WEBSITE!www.modelexpo-online.com11


