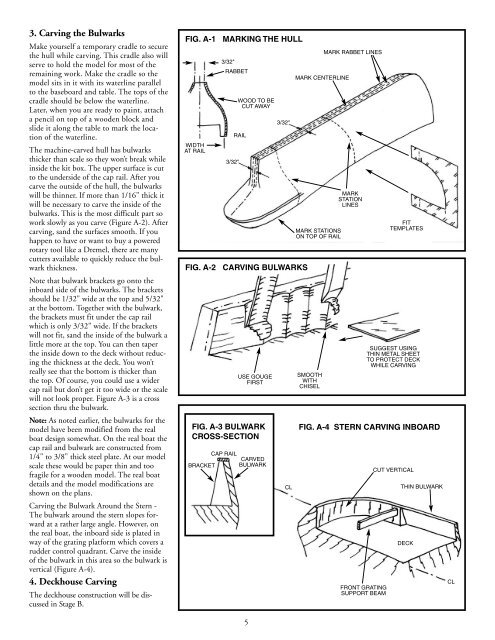
PaintingIt may seem strange to begin an instructionmanual with direction on applying thefinishes to the model. Not so! Much timeand effort can be saved and a more professionalresult can be obtained if the finishingprocess is carried out during construction.Proper timing in application of finishes andthe use of masking tape to define paintededges should eliminate unsightly glue marksand splotchy stained surfaces. In the end,following these general suggestions will beto your advantage.Paint Colors:The color scheme for Despatch No. 9 is asfollows:Hull Above the Waterline - Medium GrayHull Bottom Below Waterline - Dark GreenDecks - Light BrownDeck House, watertight doors, skylight,masts, life ring and air vents - AluminumHouse Border Trimmings (top mouldingon house, engine room skylight), searchlight, horn, grating at stern, inside bulwarks,and ladders) - RedBitts, chocks, cleats, capstan, and towingengine - BlackVentilator - Aluminum with inside ofcowl RedSmoke Stack - Black with White “S”Airport frames, Window frames. andpilot house doors - Dark BrownRunning lights - Light boxes, outside andtop of the light fixture - Red, Aluminuminside. Port light glass - Red, Starboardlight glass - GreenPaint:Use a flat-finish paint. Model Shipways lineof acrylic paints are available in the recommendedcolors. You may also purchase analready assembled Despatch paint kit fromModel Expo at www.modelexpo-online.com.Primer:Use a grey primer (one is provided with theModel Expo Despatch paint kit. The greycolor will highlight sanding scratches andother defects better than white primer. Primeall woodwork to be painted, and prime allmetal fittings. Lightly sand the primeditems. Use a spackling compound such asPic-n-Patch brand to fill any scratches anddefects, then re-prime.Brushes & Procedures:Use good quality soft sable or synthetic hairartist’s brushes. A small pointed brush isgood for details. For the main hull areas, usea 1/4" to 1/2" flat brush.Before painting, clean the model with a tackrag. Apply your paint in smooth and evenstrokes, overlapping them as you go. Thinthe paint enough to eliminate brush strokes,but not run. You will need three or fourcoats of the light colors to cover the greyprimer and maybe only two coats of thedark. Check your finish between coats andsand and add spackle as necessary to get ridof any blemishes.You will be told how to mark the waterlinelocation in Stage A. At this line, and anywhereelse two colors meet, use maskingtape. Electrician’s black plastic tape or any ofthe hobby tapes made of plastic film areideal. They leave a nice edge and are notoverly sticky. Do not use drafting tape unlessit is Chart-pak brand. The edges are somewhatwrinkled and paint may run underthem. A good trick; seal the edge of maskingtape with a clear flat finish and let dry thoroughly.This will really prevent paint fromrunning under the tape.Sanding alone will not shape the hullenough to precisely match the hull lines.Some carving is required, especially at therail, keel, bow, & stern areas.1. Using the TemplatesFor exact carving to hull lines, a template isrequired for the hull profile and each of the12 stations. You will find a template setprinted on heavy stock paper in the kit. Cutthe templates out carefully with a No. 11hobby knife. Do not use scissors! You willwant a nice smooth edge.Option-The profile template can be cut atStation 6 to make fitting easier. Just makesure you have the keel straight and don’tbuild in a knuckle. Likewise, the stationtemplates can be cut at the bulwark. If youdo this, mark the width of the hull at eachstation on top of the bulwark beforehandand carve to these marks.Note: The profile template shows a notchforward and one aft at the keel and stem.These notches are where the heavy stem pipeand the rudder skeg are glued. The notchescan be added as you carve the profile shape,but probably better if you wait and file thesenotches in when you are ready to install theSTAGE A: SHAPING THE PRE-CARVED HULLstem pipe and rudder skeg.2. Carving the HullCut a wooden block from scrap to about 3"x 1" x 3/4" thick. Screw the block to thedeck so the model can be held in a benchvise for carving. First, check the accuracy ofthe profile and correct it as necessary, using along sanding block.Next, mark the centerline, rabbet lines(where hull meets keel) and station lines onthe model (Figure A-1). Place the stationmarks on the center of the hull bottom andon top of the rails so the marks won’t becarved off as you work. Also, add thebreadth marks on the rail if you elected theoption noted above.Note: The width from the port to starboardkeel and stem rabbet is 3/32" wide from therail at the bow and all the way back to theend of the keel. You will be fitting a 3/32"wide keel strip to this flat area back to Station10. From Station 10 to the end of the keel iswhere the rudder skeg will be fitted. At thesternpost, carve this area down also to 3/32"wide where the stern post will be fitted.Start carving approximately at Station 6(maximum beam) and progress forward,4then aft, using chisels and gouges to cutaway excess wood. Avoid carving against thegrain by shifting forward or aft of Station 6until you find a spot where you are goingwith the grain. Basswood carves easily, soyou probably won’t have much problem withthe grain.Carve very slowly and take off a little woodat a time. Fit the templates as you go. Carveuntil the template fits reasonably well, thenuse sandpaper to obtain the final shape. Atfirst the templates will not fit very well. Youmust compare the template to the hull andvisually decide where to remove wood. Cut alittle off, then re-check the template.Finally, draw a few horizontal pencil lines(like waterlines) and the vertical station lineson the hull. Use these to visually check theshape of the hull. Hold the hull at variousangles, and look to see if the pencil lines arefair (even). If you have any unfairness, dipsor bump, they can usually be found with thisvisual check. You can also use a stiff stick ofwood, about 3/32" square, and lay it on thehull at various locations. Dips in the hullwill show up under the stick.
3. Carving the BulwarksMake yourself a temporary cradle to securethe hull while carving. This cradle also willserve to hold the model for most of theremaining work. Make the cradle so themodel sits in it with its waterline parallelto the baseboard and table. The tops of thecradle should be below the waterline.Later, when you are ready to paint, attacha pencil on top of a wooden block andslide it along the table to mark the locationof the waterline.The machine-carved hull has bulwarksthicker than scale so they won’t break whileinside the kit box. The upper surface is cutto the underside of the cap rail. After youcarve the outside of the hull, the bulwarkswill be thinner. If more than 1/16" thick itwill be necessary to carve the inside of thebulwarks. This is the most difficult part sowork slowly as you carve (Figure A-2). Aftercarving, sand the surfaces smooth. If youhappen to have or want to buy a poweredrotary tool like a Dremel, there are manycutters available to quickly reduce the bulwarkthickness.Note that bulwark brackets go onto theinboard side of the bulwarks. The bracketsshould be 1/32" wide at the top and 5/32"at the bottom. Together with the bulwark,the brackets must fit under the cap railwhich is only 3/32" wide. If the bracketswill not fit, sand the inside of the bulwark alittle more at the top. You can then taperthe inside down to the deck without reducingthe thickness at the deck. You won’treally see that the bottom is thicker thanthe top. Of course, you could use a widercap rail but don’t get it too wide or the scalewill not look proper. Figure A-3 is a crosssection thru the bulwark.Note: As noted earlier, the bulwarks for themodel have been modified from the realboat design somewhat. On the real boat thecap rail and bulwark are constructed from1/4" to 3/8" thick steel plate. At our modelscale these would be paper thin and toofragile for a wooden model. The real boatdetails and the model modifications areshown on the plans.Carving the Bulwark Around the Stern -The bulwark around the stern slopes forwardat a rather large angle. However, onthe real boat, the inboard side is plated inway of the grating platform which covers arudder control quadrant. Carve the insideof the bulwark in this area so the bulwark isvertical (Figure A-4).4. Deckhouse CarvingThe deckhouse construction will be discussedin Stage B.FIG. A-1 MARKING THE HULLWIDTHAT RAIL3/32"RABBET3/32"WOOD TO BECUT AWAYRAILFIG. A-2 CARVING BULWARKSUSE GOUGEFIRSTFIG. A-3 BULWARKCROSS-SECTIONCAP RAILCARVEDBULWARKBRACKET53/32"CLMARK CENTERLINEMARK STATIONSON TOP OF RAILSMOOTHWITHCHISELMARK RABBET LINESMARKSTATIONLINESFITTEMPLATESSUGGEST USINGTHIN METAL SHEETTO PROTECT DECKWHILE CARVINGFIG. A-4 STERN CARVING INBOARDFRONT GRATINGSUPPORT BEAMCUT VERTICALTHIN BULWARKDECKCL