Jabra 9470 user manual - Headset Plus.com
Jabra 9470 user manual - Headset Plus.com
Jabra 9470 user manual - Headset Plus.com
- No tags were found...

You also want an ePaper? Increase the reach of your titles
YUMPU automatically turns print PDFs into web optimized ePapers that Google loves.
Contents1. Introduction.......................................................................................62. Important Safety Information...............................................72.1 Read the Safety Booklet..........................................................................................................72.2 Protecting your Hearing with SafeTone............................................................72.3 Care and Maintenance..............................................................................................................82.4 Other Specifications....................................................................................................................83. Product Overview............................................................................93.1 Package Contents ..........................................................................................................................93.2 Optional Accessories..............................................................................................................103.3 <strong>Headset</strong> Diagrams.......................................................................................................................113.4 Base Diagram....................................................................................................................................134. System Setup and Connections........................................... 144.1 Setup Overview and Background...............................................................................144.2 The Quick-Start Setup Wizard.........................................................................................154.3 Preparing the base and and Assembling the <strong>Headset</strong>............................154.4 Connecting the Base to Your Desk Phone..........................................................174.5 Configuring the <strong>Jabra</strong> PRO Base for Your Desk Phone .........................194.6 Using a Handset Lifter or Electronic Hookswitch.................................214.7 Connecting the Base to Your Computer..............................................................224.8 Connecting <strong>Jabra</strong> PRO <strong>9470</strong> To a Mobile Phone.............................................234.9 Using a Remote Online Indicator.................................................................................23english<strong>Jabra</strong> PRO 9460, 9460-Duo and <strong>9470</strong> User <strong>manual</strong>www.HeadSet<strong>Plus</strong>.<strong>com</strong>2
5. Installing and Running the <strong>Jabra</strong> PC Suite................. 245.1 <strong>Jabra</strong> PC Suite Features ..........................................................................................................245.2 Installing the <strong>Jabra</strong> PC Suite............................................................................................245.3 <strong>Jabra</strong> PC Suite Documentation.......................................................................................245.4 Firmware Updates........................................................................................................................245.5 Central Administration and Mass Deployment...........................................246. Daily Use — Calling, Answering and Hanging Up...........256.1 <strong>Headset</strong> Controls and Indicators............................................................................256.2 The Target Phone Concept.................................................................................................256.3 How to make a call...................................................................................................................266.4 How to answer a call ............................................................................................................286.5 Hanging up.........................................................................................................................................296.6 Controlling the Speaker Volume and Microphone ................................306.7 Switching between Your Phone and <strong>Headset</strong>................................................306.8 Last Number Redial.....................................................................................................................316.9 Managing Call Collisions and Call Waiting..................................................316.10 Listening to Music.......................................................................................................................317. The <strong>Jabra</strong> PRO <strong>Headset</strong>................................................................ 327.1 How to Wear the <strong>Headset</strong>....................................................................................................327.2 Attaching or detaching a Wearing Style...........................................................337.3 <strong>Headset</strong> Controls and Signals.....................................................................................357.4 Battery Indicators, Recharge and Replacement.........................................407.5 Staying within Range................................................................................................................417.6 Noise Blackout Microphone (<strong>Jabra</strong> PRO <strong>9470</strong>).............................................417.7 Noise-Cancelling Microphone (<strong>Jabra</strong> PRO 9460 and 9460-Duo).............41english<strong>Jabra</strong> PRO 9460, 9460-Duo and <strong>9470</strong> User <strong>manual</strong>www.HeadSet<strong>Plus</strong>.<strong>com</strong>3
8. The <strong>Jabra</strong> PRO Touchscreen Base........................................ 428.1 Base Connections and Setup...........................................................................................428.2 Using the Touchscreen..........................................................................................................428.3 Standard Operation .................................................................................................................438.4 Pairing and Connecting the Base and <strong>Headset</strong>............................................438.5 Setting Active Call and Audio Preferences.....................................................448.6 Managing Call Collision.....................................................................................................458.7 Managing Call Waiting..........................................................................................................468.8 Setting General User Preferences.............................................................................488.9 Re-running the Setup Wizards........................................................................................498.10 Base Audio Indicators.............................................................................................................498.11 Narrowband vs. Wideband Audio...............................................................................498.12 Conference Calling..................................................................................................................508.13 <strong>Headset</strong> Docking-Operation.............................................................................................508.14 Theft Protection..........................................................................................................................508.15 Dealing with Density Issues..............................................................................................519. Using <strong>Jabra</strong> PRO <strong>9470</strong> with a Mobile Phone.................. 529.1 <strong>Jabra</strong> PRO Bluetooth Support.........................................................................................529.2 Pairing and Connecting with Other Bluetooth Devices.....................539.3 Forcing reconnection/Disconnection via the touchscreen................5410. Recording Your Calls................................................................. 5611. FAQs and Troubleshooting.................................................... 5712. Getting Assistance ...................................................................... 6012.1 Europe......................................................................................................................................................6012.2 USA and Canada............................................................................................................................6012.3 Asia/Pacific..........................................................................................................................................60english<strong>Jabra</strong> PRO 9460, 9460-Duo and <strong>9470</strong> User <strong>manual</strong>www.HeadSet<strong>Plus</strong>.<strong>com</strong>4
13. Technical Specifications.......................................................... 6113.1 All <strong>Jabra</strong> PRO <strong>Headset</strong>s..........................................................................................................6113.2 <strong>Jabra</strong> PRO Midi <strong>Headset</strong>...........................................................................................................6113.3 <strong>Jabra</strong> PRO Flex <strong>Headset</strong>..........................................................................................................6213.4 <strong>Jabra</strong> PRO 9460-Duo <strong>Headset</strong>.............................................................................................6213.5 <strong>Headset</strong> Hearing Protection...........................................................................................6213.6 <strong>Headset</strong> Battery.............................................................................................................................6213.7 Materials and Allergies........................................................................................................6313.8 Touchscreen Base........................................................................................................................6313.9 <strong>Jabra</strong> PRO <strong>9470</strong> Base Bluetooth Support...............................................................6413.10 Product Disposal........................................................................................................................6413.11 Certifications and Safety Approvals.....................................................................6414. GlOSSARY............................................................................................... 65english<strong>Jabra</strong> PRO 9460, 9460-Duo and <strong>9470</strong> User <strong>manual</strong>www.HeadSet<strong>Plus</strong>.<strong>com</strong>5
1.IntroductionThank you for selecting a <strong>Jabra</strong> PRO headset. We are sure that you will enjoy its wide range of featuresand find it <strong>com</strong>fortable to wear and easy to use.<strong>Jabra</strong> PRO headsets are available in a wide range of configurations, including several different headset designs,wearing styles, connectivity options and control features. All of the models in the <strong>Jabra</strong> PRO family feature aDECT-based wireless headset and base station. They all share hands-free working efficiency, wireless mobility,and many customization and accessory options.All <strong>Jabra</strong> PRO headsets feature a dual Noise Blackout or single noise-cancelling microphone, one or twospeakers, easy-to-use controls and wireless <strong>com</strong>munication. The headset is very lightweight and sits next toyour ear, with the microphone extended towards your mouth by a short boom arm. Several wearing styles areavailable, including ear hook, headband, neckband and/or dual-mono; the options available to you will dependon which model you have purchased.The <strong>Jabra</strong> PRO Touchscreen Base connects to your desk telephone and PC and manages the wireless link to yourheadset; it also recharges the headset battery while you are not using it. The touchscreen makes it easy to viewinformation, connect to your various phones, configure the solution and more. The <strong>Jabra</strong> PRO <strong>9470</strong> Base alsofeatures Bluetooth, so it can connect to your mobile phone too.This <strong>manual</strong> describes the <strong>Jabra</strong> PRO 9460, 9460-Duo and <strong>9470</strong> headset solutions. Model differences, where theyexist, are noted in this document.<strong>Jabra</strong> PRO <strong>Headset</strong> FeaturesAll <strong>Jabra</strong> PRO headsets described in the <strong>manual</strong> provide the following:- Range from base to headset up to 150m- Wideband audio for extra audio quality (when also supported by the connected phone)- Touch-panel volume and mute control- Intuitive headset control via adaptive multifunction button for answer/end call, call-waiting control and otherfunctions- Status LED and audio feedback- Advanced hearing protection with SafeTone noise-exposure controlsThe <strong>Jabra</strong> PRO 9460 headset also features the following:- <strong>Jabra</strong> PRO Flex boom design- Single noise-cancelling microphone- Choice of ear-hook or headband wearing style (neckband also available as an accessory)The <strong>Jabra</strong> PRO 9460-Duo also features the following:- <strong>Jabra</strong> PRO Flex boom design- Single noise-cancelling microphone- Headband wearing style with a speaker for each ear (dual mono, which means that the same signal <strong>com</strong>es outof both speakers)The <strong>Jabra</strong> PRO <strong>9470</strong> headset also features the following:- <strong>Jabra</strong> PRO Midi boom design- Dual Noise Blackout microphones- Choice of ear-hook, headband or neckband wearing style<strong>Jabra</strong> PRO Touchscreen Base Features:- 2.4” color touchscreen- Touchscreen-guided set up of desk phone, mobile phone and PC connections- Touchscreen control of calls and connections to all connected phones (including desk phone, mobile phoneand/or soft phone)- Desk phone support, with optional electronic-hookswitch support for selected phones (for remote deskphone operation using the headset)- Bluetooth support (<strong>Jabra</strong> PRO <strong>9470</strong> only) links the base to your mobile phone. Supports both the standardheadset Bluetooth profile and the more advanced hands-free profile to provide voice-activated dialing(depending on mobile phone model)- Advanced softphone support and control- On-screen caller ID (mobile phones and soft phones only)- Wideband audio for extra audio quality (when also supported by the connected phone)- <strong>Headset</strong> recharge cradle- Call-waiting control (for managing multiple calls to your softphone or mobile phone)- Call-collision control (for managing multiple calls to different phones, such as desk and soft phones)- Mass-deployment features enable IT managers to load identical settings onto any number of bases via theUSB connectionenglish<strong>Jabra</strong> PRO 9460, 9460-Duo and <strong>9470</strong> User <strong>manual</strong>www.HeadSet<strong>Plus</strong>.<strong>com</strong>6
2.3Care and MaintenanceProtect your base and headset just as you would any other type of sensitive electronic equipment. If your <strong>Jabra</strong>devices require cleaning, then consider the following advice:- If necessary, clean the touchscreen with a standard <strong>com</strong>puter-screen cleaning solution, such as dry wipes,anti-static screen cleaner and/or prepackaged towelettes.- The headset, headband neckband and ear hook can be wiped clean with a dry cloth if needed.- The cords and base unit can be dry-dusted as required.- The leatherette ear cushion(s) can be cleaned or replaced. When cleaning, remove them and wipe witha damp cloth.- Avoid getting moisture or liquids into any button ports, receptors or other openings.- Avoid exposing the product to rain.2.4Other SpecificationsFor <strong>com</strong>plete technical specifications, see Chapter 13: Technical Specifications.english<strong>Jabra</strong> PRO 9460, 9460-Duo and <strong>9470</strong> User <strong>manual</strong>www.HeadSet<strong>Plus</strong>.<strong>com</strong>8
3.3.11 BaseProduct OverviewPackage Contents2 <strong>Headset</strong> cradle3 <strong>Headset</strong> appropriate for your <strong>Jabra</strong> PRO model4 Ear hook with earbud mounted (not included with <strong>Jabra</strong> PRO 9460-Duo) and two alternative earbuds5 Headband (not included with <strong>Jabra</strong> PRO 9460-Duo)6 Power adapter7 Telephone cable8 USB cable9 Installation CD with <strong>Jabra</strong> PC Suite Software, <strong>user</strong>’s guide and other tools10 Warning & Declaration guide and quick-start guide11 Neckband (included as standard for <strong>Jabra</strong> PRO <strong>9470</strong> only)12 Startup posterenglish323.a 3.b3.c14685 10127119Figure 1: Components included with <strong>Jabra</strong> PRO models that feature a touchscreen baseProduct variants contain:<strong>Jabra</strong> PRO 9460<strong>Jabra</strong> PRO 9460 Duo1 Base 1 Base2 <strong>Headset</strong> cradle 2 <strong>Headset</strong> cradle3b <strong>Headset</strong>3c <strong>Headset</strong>4 Ear hook 6 Power adapter5 Headband 7 Telephone cable6 Power adapter 8 USB cable7 Telephone cable 9 Installation CD with <strong>Jabra</strong> PC Suite Software8 USB cable 10 Warning & Declaration guide and quick-start guide9 Installation CD with <strong>Jabra</strong> PC Suite Software 12 Startup poster10 Warning & Declaration guide and quick-start guide12 Startup poster<strong>Jabra</strong> PRO <strong>9470</strong>1 Base2 <strong>Headset</strong> cradle3a <strong>Headset</strong>4 Ear hook5 Headband6 Power adapter7 Telephone cable8 USB cable9 Installation CD with <strong>Jabra</strong> PC Suite Software10 Warning & Declaration guide and quick-start guide11 Neckband12 Startup poster<strong>Jabra</strong> PRO 9460, 9460-Duo and <strong>9470</strong> User <strong>manual</strong>www.HeadSet<strong>Plus</strong>.<strong>com</strong>9
3.2Optional AccessoriesThe following accessories for <strong>Jabra</strong> PRO are available separately and are occasionally mentioned in the otherchapters of this <strong>manual</strong>. You may have ordered one or more of these together with your headset.1 Remote Handset lifter GN1000 RHL2 Electronic-hookswitch adapter for your desk-phone model3 Neckband (not <strong>com</strong>patible with <strong>Jabra</strong> PRO 9460-Duo)4 Replacement headband (not <strong>com</strong>patible with <strong>Jabra</strong> PRO 9460-Duo)5 Replacement ear hook (not <strong>com</strong>patible with <strong>Jabra</strong> PRO 9460-Duo)6 Replacement ear cushionenglish132456Figure 2: <strong>Jabra</strong> PRO accessories (available separately)Accessory variants contain:<strong>Jabra</strong> PRO 9460<strong>Jabra</strong> PRO 9460 Duo1 01-0369 Remote Handset lifter GN1000 rhl 1 01-0369 Remote Handset lifter GN1000 RHL2 * Electronic-hookswitch adapter 2 * Electronic-hookswitch adapter3 14121-24 neckband 6 14101-19 Replacement ear cushions4 14121-25 Replacement headband5 14121-26 Replacement ear hook6 14101-19 Replacement ear cushions<strong>Jabra</strong> PRO <strong>9470</strong>1 01-0369 Remote Handset lifter GN1000 RHL2 * Electronic-hookswitch adapter*3 14121-24 neckband4 14121-25 replacement headband5 14121-26 replacement ear hook6 14101-19 Replacement ear cushions* <strong>Jabra</strong> LINK 14201-09 MSH Cord, 14201-10 DHSG Cord, 14201-17 (Poly<strong>com</strong>), 14201-19 (Avaya), 14201-20 (Avaya & Alcatel),and 14201-22 (Cisco)<strong>Jabra</strong> PRO 9460, 9460-Duo and <strong>9470</strong> User <strong>manual</strong>www.HeadSet<strong>Plus</strong>.<strong>com</strong>10
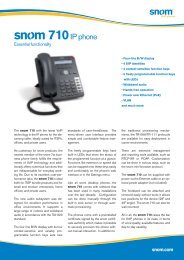
3.3<strong>Headset</strong> Diagrams<strong>Jabra</strong> PRO models are available with several headset options, each of which is illustrated below. The following keyapplies to all three headset illustrations:1 Multifunction button (answer/end call, among other functions)2 Touch panel for volume and mute control3 Activity and status indicator (multicolor LED)4 Noise-cancelling port or Noise Blackout microphone5 Voice microphone6 Boom arm (flex or midi)7 Recharge contact8 Mount for wearing-style attachments9 Speakerenglish1237948Figure 3: <strong>Jabra</strong> PRO Midi headset (included with <strong>Jabra</strong> PRO <strong>9470</strong>) as seen from the outer and inner sides, respectively5617923684Figure 4: <strong>Jabra</strong> PRO Flex headset (included with <strong>Jabra</strong> PRO 9460) as seen from the outer and inner sides, respectively5<strong>Jabra</strong> PRO 9460, 9460-Duo and <strong>9470</strong> User <strong>manual</strong>www.HeadSet<strong>Plus</strong>.<strong>com</strong>11
english1923756Figure 5: <strong>Jabra</strong> PRO 9460-Duo headset4Note: most of the other illustrations in this <strong>manual</strong> show the <strong>Jabra</strong> PRO Midi headset; all other headsetmodels feature similar controls at similar locations, as illustrated in the figures above.<strong>Jabra</strong> PRO 9460, 9460-Duo and <strong>9470</strong> User <strong>manual</strong>www.HeadSet<strong>Plus</strong>.<strong>com</strong>12
3.41 <strong>Headset</strong> cradleBase Diagram2 Recharge contact3 Touchscreen4 Desk-phone clear dial-tone switchNote: Not included on the <strong>Jabra</strong> PRO <strong>9470</strong> base, where this is software controlled (set up automatically)5 Cover for desk-phone controlNote: There is no clear dial-tone switch underneath on the <strong>Jabra</strong> PRO <strong>9470</strong> base6 Telephone port7 Handset port8 AUX port9 USB port10 Power adapter port11 Remote online-indicator port12 Security slot13 Speaker for ring tones and touchscreen audio feedbackenglish2131245678910 1113Figure 6: <strong>Jabra</strong> PRO Touchscreen Base, seen from the front and back, respectively789 10 11 12<strong>Jabra</strong> PRO 9460, 9460-Duo and <strong>9470</strong> User <strong>manual</strong>www.HeadSet<strong>Plus</strong>.<strong>com</strong>13
4.System Setup and ConnectionsThis chapter explains how to assemble your <strong>Jabra</strong> PRO solution and connect it to your other office equipment.4.1Connection Diagram (for no headset port)Setup Overview and BackgroundenglishFigure 7: <strong>Jabra</strong> PRO base connections (Bluetooth available with <strong>Jabra</strong> PRO <strong>9470</strong> only)Using a <strong>Headset</strong> with a Desk PhoneTo ac<strong>com</strong>modate the full range of desk phones in use, <strong>Jabra</strong> PRO is able to adapt itself to your phone by offeringthe following settings:- Termination standardThough all desk phones use the same type of cable to connect the handset to the phone body, the internalwiring standard for this cable varies according to desk-phone model. <strong>Jabra</strong> PRO supports all of the possible<strong>com</strong>binations — you will adjust the clear dial-tone switch on the <strong>Jabra</strong> PRO base until you find the right one.Note that there is no clear dial-tone switch on the <strong>Jabra</strong> PRO <strong>9470</strong> base — here the right <strong>com</strong>bination is foundautomatically.- Microphone levelThe sound volume sent from your <strong>Jabra</strong> PRO base must be adjusted to ensure that it is neither too quietnor too loud for your desk-phone model (as it must be neither too quiet nor too loud for the person you aretalking to).- Electronic-hookswitch or handset lifterAn electronic hookswitch adapter or handset lifter will enable you to answer the phone or hang up using onlythe button on your headset or its docking operations. These are available as optional accessories for <strong>Jabra</strong>PRO; the best choice for you will depend on your desk-phone model.The <strong>Jabra</strong> PRO setup wizard will help you to make each of the above settings.Using a <strong>Headset</strong> with a SoftphoneTo use <strong>Jabra</strong> PRO with a softphone, you must connect the <strong>Jabra</strong> PRO base to your PC via a USB cable and installthe <strong>Jabra</strong> PC Suite collection of software and softphone drivers on your PC. The <strong>Jabra</strong> PRO setup wizard willremind you to do this.Using a <strong>Jabra</strong> PRO <strong>9470</strong> <strong>Headset</strong> with a Mobile Phone<strong>Jabra</strong> PRO <strong>9470</strong> Base can connect to a mobile phone using Bluetooth (the headset itself does not use Bluetooth).To enable Bluetooth <strong>com</strong>munication, you must pair the two units. The <strong>Jabra</strong> PRO setup wizard will help you to dothis.<strong>Jabra</strong> PRO 9460, 9460-Duo and <strong>9470</strong> User <strong>manual</strong>www.HeadSet<strong>Plus</strong>.<strong>com</strong>14
4.2The Quick-Start Setup WizardTo get started, just power the base and then follow the set-up-wizard instructions on the touchscreen.To run the setup wizard:1. Review the information outlined in Section 4.1: Setup Overview and Background. It will help you understand thetypes of tasks that the setup wizard will ask you to do.2. Assemble the base and apply power to it. (See also Section 4.3: Preparing the base and and Assembling the<strong>Headset</strong>).3. The base automatically launches the setup wizard the first time you turn it on. On each page of the wizard,follow the instructions shown and then touch the “next” icon (see also Section 8.2: Using the Touchscreen).- Note: When the wizard is helping you set up your desk phone, it will ask you to call the <strong>Jabra</strong> test server.This enables the base to test its clear dial-tone switch and mic.-level settings by exchanging signals withthe test server. See your <strong>Jabra</strong> PRO Quick Start Guide for a list of <strong>Jabra</strong> test-server phone numbers (alsoavailable on our web site). If, for some reason, the connection to the test server fails, you are prompted toretry; you can retry the automatic setup or try a <strong>manual</strong> setup. You can also choose to retry the cable setup.4. Continue until the wizard tells you that you are finished. At this point, all of your phones should be connectedand your headset will be fully configured to work with each of them.The remainder of this chapter provides extra information about each step of the setup process. Refer to thischapter if you have trouble while working through the on-screen setup wizard.englishTip: You can re-start the setup wizard <strong>manual</strong>ly at any time, thereby re-initializing some or all base andheadset settings. See Section 8.9: Re-running the Setup Wizards for details.4.3 Preparing the base and and Assembling the <strong>Headset</strong>Adjusting the <strong>Headset</strong> CradleThe headset cradle is already attached to the <strong>Jabra</strong> PRO base when it is delivered but you might want to adjust itsangle in order to optimize for left- or right-handed docking. To do this, simply rotate the cradle until it sits at yourpreferred docking angle. As you rotate the cradle, you will feel it fit into a number of distinct positions on thebase. The figure below shows the angular range; -90 to +45 degrees.45-90Figure 8: Adjusting the headset cradle angle on the baseIf, at a later stage, you need to remove the cradle (for example to replace it with another), simply rotate the cradleclockwise as far as possible, then carefully pull it out from the base.To attach / re-attach a headset cradle on the base, hold the cradle against the base so that the large and smallpins on either side of the cradle post align with the matching slots on either side of the hole on the base. Thensimply push it into the base.<strong>Jabra</strong> PRO 9460, 9460-Duo and <strong>9470</strong> User <strong>manual</strong>www.HeadSet<strong>Plus</strong>.<strong>com</strong>15
Applying Power to the BaseConnect the mains power adapter to the port markedpower socket, as shown in the figure below.on the base, and then plug the adapter into a mainsenglishFigure 9: Powering the baseAssembling the <strong>Headset</strong><strong>Jabra</strong> PRO headsets — other than the <strong>Jabra</strong> PRO 9460-Duo — can be worn in any of several wearing styles,including headband, ear hook and neckband.Ear hook and headband wearing-style attachments are included in the standard packages. The neckband isincluded as standard for <strong>Jabra</strong> PRO <strong>9470</strong> but must be ordered separately for <strong>Jabra</strong> PRO 9460. <strong>Jabra</strong> PRO 9460-Duois always worn as a headband and does not require any assembly.Figure 10: Assembling and wearing the <strong>Jabra</strong> PRO headset in various stylesChoose a style and assemble the headset so that it will fit to your preferred ear. See Section 7.2: Attaching ordetaching a Wearing Style for detailed instructions.Important: Regardless of which wearing style you choose, always be sure to adjust the headset so thatthe microphone is positioned as close to your mouth as possible. This will maximize the noise-cancellingeffect of the microphone and make sure that you voice <strong>com</strong>es through loud and clear.<strong>Jabra</strong> PRO 9460, 9460-Duo and <strong>9470</strong> User <strong>manual</strong>www.HeadSet<strong>Plus</strong>.<strong>com</strong>16
Placing the <strong>Headset</strong> in its CradleWhenever you are not using your headset, you should keep it in its recharge cradle as shown in the figure below.It is held firmly in place by a magnet. Note that placing it in its cradle is sometimes called docking the headset.When the headset is docked correctly in the cradle, an extra icon is displayed in the touchscreen’s status bar. Seethe section “Using the Touchscreen”.englishFigure 11: Inserting the headset into the cradle for storage and charging4.4 Connecting the Base to Your Desk PhoneIdentifying Your Desk Phone FeaturesThe way you connect and configure the <strong>Jabra</strong> Pro base will vary according to the type of desk phone you areusing. Check your phone (by looking at its connectors and/or documentation) to see which of the followingfeatures it has, then see the appropriate section below to learn how to connect your <strong>Jabra</strong> PRO base to thephone:- Standard desk phoneThis type of phone does not include any built-in support for adding a headset. You will therefore connectthe <strong>Jabra</strong> PRO base between your desk phone’s handset and body, enabling you to use either the handset orheadset. All desk phones can be connected in this way.- Desk phone with headset portThis type of phone provides a dedicated headset port (usually at the back of the phone). These phonestypically also have a button on the front panel for switching between the headset and handset.- Desk phone with electronic hookswitchThis type of phone is able to place or answer a call automatically when you press the multifunction buttonon your headset. This requires a desk phone that includes an electronic hookswitch feature and also requiresan extra adapter cable from <strong>Jabra</strong>. Please see our web site and/or refer to your telephone’s <strong>user</strong> <strong>manual</strong> fordetails about electronic hookswitch <strong>com</strong>patibility.- Desk phone with GN1000 Remote Handset LifterA handset lifter physically lifts your handset from your desk phone when needed, thereby creating a solutionthat works similarly to an electronic hookswitch. The GN1000 Remote Handset Lifter is available separately;please speak to your <strong>Jabra</strong> dealer for details.<strong>Jabra</strong> PRO 9460, 9460-Duo and <strong>9470</strong> User <strong>manual</strong>www.HeadSet<strong>Plus</strong>.<strong>com</strong>17
Connecting to a Desk Phone without a <strong>Headset</strong> PortIf your desk phone does not include any built-in support for adding a headset, then connect the <strong>Jabra</strong> PRO basebetween the handset and the desk-phone body as described below.englishFigure 12: Connecting to a desk phone without a headset port1. On your desk phone, unplug the handset cable from the phone body at the phone-body side.2. Plug the loose end of your handset cord to the port marked on the base.3. Connect the telephone cord included with your headset from the port marked on the <strong>Jabra</strong> PRO base tothe handset port on your desk phone body.4. Your base and desk phone are now connected. Note, however, that you must still configure the base for yourspecific desk-phone model. The setup wizard usually helps you to do this, but you can also make this settingat any time using the touchscreen (see Section 8.9: Re-running the Setup Wizards).Connecting to a Standard <strong>Headset</strong> PortIf your desk phone includes a dedicated headset port, then take advantage of this feature by connecting the<strong>Jabra</strong> PRO base as follows:Figure 13: Connecting to a desk phone with a headset port<strong>Jabra</strong> PRO 9460, 9460-Duo and <strong>9470</strong> User <strong>manual</strong>www.HeadSet<strong>Plus</strong>.<strong>com</strong>18
1. Connect the telephone cord included with your headset (marked with a blue band) from the port markedon the <strong>Jabra</strong> PRO base to the headset port on your desk-phone body. See your desk-phone documentationif you are not sure where this port is. If the supplied cord does not fit the port of your desk phone, then see“Connecting to a Proprietary <strong>Headset</strong> Port,” below.2. Your base and desk phone are now connected. Note, however, that you must still configure the base for yourspecific desk phone model. The setup wizard usually helps you to do this, but you can also make this settingat any time using the touchscreen (see Section 8.9: Re-running the Setup Wizards).Note: Do not connect the base to a dedicated headset port if you want to use a GN1000; connect itin line with the handset instead (see also “Connecting to a Desk Phone without a <strong>Headset</strong> Support,”above). One reason to use the GN1000 instead of the headset port is that the GN1000 has a ring detector,thereby enabling the base and headset to target the desk phone automatically when it rings (manyelectronic-hookswitch solutions also provide ring detection).englishConnecting to a Proprietary <strong>Headset</strong> PortSome types of desk phones provide a non-standard headset port. This is usually part of an advanced solutionthat also provides an electronic hookswitch. These types of phones normally also include the standard handsetports described above, but you should consider taking advantage of the proprietary connection if possible.To use this type of connection, you must purchase a special adapter designed to match the requirements of yourdesk phone and headset. The adapter <strong>com</strong>es with instructions for how to connect it. See also Section 4.6: Usinga Handset Lifter or Electronic Hookswitch for more information about this type of solution.4.5Configuring the <strong>Jabra</strong> PRO Base for Your Desk PhoneWhen the touchscreen wizard is helping you set up your desk phone, it will ask you to call a <strong>Jabra</strong> test server. Thisenables the <strong>Jabra</strong> PRO base to test its clear dial-tone switch and microphone level settings by exchanging signalswith the test server.Important: Your headset will not work correctly with your desk phone until you have set both the cleardial-tone switch and microphone level as described in this section. You must repeat these procedures ifyou move the headset to a new type of desk phone.Setting the Clear Dial-tone Switch to find a Clear Dial-toneFollow the procedure below to find the best position for the clear dial-tone switch on the <strong>Jabra</strong> PRO base; thecorrect position varies by desk phone model.Figure 14: Setting the clear dial-tone switchFor <strong>Jabra</strong> PRO 9460:1. Open the panel on the front-right of the <strong>Jabra</strong> PRO base by slipping your fingernail under the bottom edge ofthe panel and pulling forward and up. This reveals the clear dial-tone switch. It is labelled with the letters A to G.2. The touchscreen wizard prompts you to call the <strong>Jabra</strong> test server. Follow the on-screen instructions.If the base cannot contact the test server, you can re-try or you can try to set the switch <strong>manual</strong>ly — see theprocedure below.3. The wizard prompts you to select a position (A – G) <strong>manual</strong>ly on the base’s clear dial-tone switch. The baseitself will determine which of these is the best.<strong>Jabra</strong> PRO 9460, 9460-Duo and <strong>9470</strong> User <strong>manual</strong>www.HeadSet<strong>Plus</strong>.<strong>com</strong>19
If the <strong>Jabra</strong> PRO 9460 base cannot contact the <strong>Jabra</strong> test server:In this case, you can choose to set the switch <strong>manual</strong>ly:1. Open the panel on the front-right of the <strong>Jabra</strong> PRO base by slipping your fingernail under the bottom edge ofthe panel and pulling forward and up. This reveals the clear dial-tone switch. It is labelled with the letters A to G.2. Put on the headset.3. Tap the multifunction button at the back of the headset to activate the audio link to your desk phone.4. Press the headset button on your desk phone (or lift the handset from your desk phone and set it aside).This connects your desk phone to the phone network.5. Step slowly through each position (A – G) of the clear dial-tone switch, listening for a dial tone in your headsetat each one. Find the setting where the dial tone is strong, clear and undistorted.If positions A and G both sound best, then choose position A; if another pair of positions sound best, thenpick one and remember the other one — you will find which of these settings is best when you are testing themicrophone level (see below).6. Press the headset button on your desk phone (or hang up the handset) to disconnect from the phonenetwork. Then tap the multifunction button at the back of the headset to de-activate the audio link to yourdesk phone.7. Set the microphone level, as described in the section below.For <strong>Jabra</strong> PRO <strong>9470</strong>:There is no clear dial-tone switch accessible to the <strong>user</strong> on the base — stepping through positions A – G tofind the best one occurs automatically. You simply need to call the <strong>Jabra</strong> test server and follow the on-screeninstructions.If the <strong>Jabra</strong> PRO <strong>9470</strong> base cannot contact the <strong>Jabra</strong> test server:In this case, you can choose to set the switch <strong>manual</strong>ly. Follow the same procedure as given above for <strong>Jabra</strong> PRO9460 except that you must step through the switch positions using the touchscreen (no switch is accessible to the<strong>user</strong> on the base). The desk phone part of the setup wizard guides you through.Setting the Microphone Level:Follow the procedure below to find the best microphone level for your desk phone. The correct setting varies bydesk phone model.englishFigure 15: Setting the microphone level <strong>manual</strong>ly1. If you have not already done so, then set the clear dial-tone switch as described above.2. The touchscreen wizard prompts you to call the <strong>Jabra</strong> test server. Follow the on-screen instructions. The basewill determine the optimal microphone level automatically.If the base cannot contact the test server, you can re-try or you can try to set the mic.-level <strong>manual</strong>ly — seethe procedure below.If the <strong>Jabra</strong> PRO base cannot contact the <strong>Jabra</strong> test server:In this case, you can choose to set the mic.-level <strong>manual</strong>ly:1. If you have not already done so, then set the clear dial-tone switch as described above.2. Make arrangements to call a friend who is not sitting nearby. Tell your friend that you will be testing yourheadset and ask him or her not to adjust his or her own telephone volume during the test.3. Call your friend by doing the following:- Wear the headset and position its microphone close to your mouth.- Tap the multifunction button at the back of the headset to activate the audio link to your desk phone.- Press the headset button on your desk phone (or lift the handset) to connect to the phone network.- Dial your friend’s number using your desk-phone buttons.<strong>Jabra</strong> PRO 9460, 9460-Duo and <strong>9470</strong> User <strong>manual</strong>www.HeadSet<strong>Plus</strong>.<strong>com</strong>20
4. As you speak with your friend, adjust the mic.-level control on the <strong>Jabra</strong> PRO touchscreen (Desk phone setupwizard, <strong>manual</strong> setup) until your friend tells you that your voice sounds clear (loud enough) but not distorted(too loud). The desk phone part of the setup wizard guides you through. Remind your friend not to adjust hisor her own volume during the test.If your best mic.-level setting turns out to be the loudest possible and you found more than one best positionfor the clear dial-tone switch, then move the clear dial-tone switch to the alternative setting and try again tofind the best mic.-level together with your friend. If this time the mic.-level is not set to the maximum, thenkeep this new <strong>com</strong>bination of settings.5. Press the headset button on your desk phone (or replace the handset) to hang up. Then dock the headset(the audio link from the headset to your desk phone closes automatically when you dock the headset).Your headset is now ready for use.english4.6Using a Handset Lifter or Electronic HookswitchWith traditional desk phones, you must lift the handset (or press a desk phone headset button, if present)whenever you want to place or receive a call. However, you can automate this connection by adding one of thefollowing:- GN1000 Remote Handset Lifter, which will work with nearly any phone.- An electronic hookswitch connection, which requires a supported desk phone and a phone-specific adapterfrom <strong>Jabra</strong>.Electronic solutions such as these enable you to answer an in<strong>com</strong>ing call when away from your desk simply bypressing a button on the headset. They also tell the base when your desk phone is ringing, thereby setting thedesk phone as the current target phone automatically. The GN1000 and most electronic hookswitch solutionssupport ring detection.Connecting to the GN1000 Remote Handset LifterA remote handset lifter gives you remote call control with a <strong>Jabra</strong> PRO headset up to 150 m away from your desk.It lets you answer calls, end calls and transfer ring tones to the headset.The GN1000 Remote Handset Lifter is an accessory available from <strong>Jabra</strong>. It is a motorized device that physicallylifts the handset when you use controls of your headset or base. You can use the handset lifter with nearly anytype of desk phone — including phones that also happen to have electronic hookswitch support.Figure 16: Connecting to a GN1000 Remote Handset LifterTo connect the <strong>Jabra</strong> PRO base to a GN1000 RHL handset lifter:1. Connect the <strong>Jabra</strong> PRO base to your desk phone using the standard in-line setup as described in Section 4.4:Connecting the Base to Your Desk Phone. Do not use your desk phone’s headset port if it has one.2. Assemble the GN1000 RHL handset lifter and attach it to your desk phone as described in the lifter’sdocumentation.3. Connect the control cord attached to the GN1000 to the port marked on the <strong>Jabra</strong> PRO base. Press it inuntil you hear or feel the soft click of the connector tab popping into place.4. The base and handset lifter are now connected.<strong>Jabra</strong> PRO 9460, 9460-Duo and <strong>9470</strong> User <strong>manual</strong>www.HeadSet<strong>Plus</strong>.<strong>com</strong>21
Using an Electronic-Hookswitch ConnectionIf your desk phone includes an electronic hookswitch, then you can take advantage of this feature by purchasingand installing the appropriate type of electronic hookswitch adapter for your phone. Adapter requirements canbe very different between desk phone models. Please see our web site and/or refer to your telephone’s <strong>user</strong><strong>manual</strong> for details about electronic hookswitch <strong>com</strong>patibility. You can configure the connection using either thetouchscreen wizard or the <strong>Jabra</strong> PC Suite.englishFigure 16.1: Connecting using an electronic-hookswitch adapter (<strong>Jabra</strong> LINK series)To connect the <strong>Jabra</strong> PRO base to an electronic hookswitch port:1. Make sure that you have purchased the correct electronic hookswitch adapter for your desk phone modelfrom <strong>Jabra</strong>.2. Connect the electronic hookswitch adapter as described in the cabling guide included with the adapter.3. Configure the <strong>Jabra</strong> PRO base to <strong>com</strong>municate correctly with your model of desk phone. The requiredstandard is clearly printed on a label attached to the hookswitch cable. The touchscreen setup wizard willautomatically ask for this during initial setup; see also Section 8.9: Re-running the Setup Wizards for instructionsabout how to make this setting at any time after the initial setup.4. Check the documentation for your desk phone to see which (if any) steps are required to configure your deskphone to use the electronic hookswitch.4.7Connecting the Base to Your ComputerConnect the touchscreen base to your <strong>com</strong>puter if you would like to use your headset together with a softphonerunning on the PC. You can also use this connection to configure your headset and base and to update theirfirmware.Figure 17: Connecting to a <strong>com</strong>puterTo connect the <strong>Jabra</strong> PRO base to your <strong>com</strong>puter:1. Connect the small connector of the supplied USB cable to the port marked on the <strong>Jabra</strong> PRO base.2. Connect the other end of the USB cable to any free USB port on your <strong>com</strong>puter.3. Install the <strong>Jabra</strong> PC Suite software on your <strong>com</strong>puter (see Chapter 5: Installing and Running the <strong>Jabra</strong> PC Suite).<strong>Jabra</strong> PRO 9460, 9460-Duo and <strong>9470</strong> User <strong>manual</strong>www.HeadSet<strong>Plus</strong>.<strong>com</strong>22
4.8Connecting <strong>Jabra</strong> PRO <strong>9470</strong> To a Mobile PhoneThe <strong>Jabra</strong> PRO <strong>9470</strong> Touchscreen Base features Bluetooth and can therefore be used with any mobile phone thatalso supports Bluetooth. You must set up the wireless <strong>com</strong>munication between the two devices by pairing them.The setup wizard helps you to do this during initial setup and can repeat the procedure at any time later.See Chapter 9: Using <strong>Jabra</strong> PRO <strong>9470</strong> with a Mobile Phone for details.4.9Using a Remote Online IndicatorA remote online indicator (OLI) connects to your base via a cable and lights up to show colleagues when you areon the phone.To connect an OLI to your base:1. Unpack and assemble your OLI device as described in its documentation.2. Connect the cable from your OLI device to the port marked on the <strong>Jabra</strong> PRO base.See also the documentation that came with your OLI for more information about that product.english<strong>Jabra</strong> PRO 9460, 9460-Duo and <strong>9470</strong> User <strong>manual</strong>www.HeadSet<strong>Plus</strong>.<strong>com</strong>23
5.5.1Installing and Running the <strong>Jabra</strong> PC Suite<strong>Jabra</strong> PC Suite FeaturesThe <strong>Jabra</strong> PC Suite is a collection of programs that support and expand your headset’s features. It enables you to:- Control several types of softphone programs from your headset- Configure the base and headset from your PC- Update the firmware for your base and headset- Save and recall headset configuration to/from your PC- Upload language packs for touchscreen menus5.2Installing the <strong>Jabra</strong> PC SuiteInstallation instructions and a setup program for <strong>Jabra</strong> PC Suite are included on the CD ROM that came with your<strong>Jabra</strong> PRO headset. You can also download the latest version of the package from the <strong>Jabra</strong> web site. Please seethe documentation included on the CD or in the download package for instructions and system requirements.5.3<strong>Jabra</strong> PC Suite DocumentationAll programs of the <strong>Jabra</strong> PC Suite include <strong>com</strong>plete online help. Where appropriate, this <strong>manual</strong> refers tosettings and features provided by the <strong>Jabra</strong> PC Suite, but please see the online help for <strong>com</strong>plete details about allsoftware features.5.4Firmware UpdatesFirmware is software that runs inside many types of electronic devices, including your <strong>Jabra</strong> base and headset.Occasionally, <strong>Jabra</strong> may release updates that can improve performance and/or add new functionality to yourbase and headset.Obtaining Firmware UpdatesVisit the <strong>Jabra</strong> web site to find out if firmware updates are available for any of your <strong>Jabra</strong> PRO products. You willbe able to download the updates from there as they be<strong>com</strong>e available.Applying Firmware UpdatesTo apply a firmware update, connect your <strong>Jabra</strong> PRO Base to your <strong>com</strong>puter and run the firmware-updateapplication of the <strong>Jabra</strong> PC Suite. See the <strong>Jabra</strong> PC Suite online help for <strong>com</strong>plete details.5.5Central Administration and Mass DeploymentIf you are an IT manager of an organization that is rolling out a large number of <strong>Jabra</strong> PRO solutions, then youmight wish to use the <strong>Jabra</strong> Control Center, which is part of the <strong>Jabra</strong> PC Suite.For advanced <strong>Jabra</strong> products with many configuration parameters, the <strong>Jabra</strong> Control Center lets you savea device’s <strong>com</strong>plete configuration to a file on disk and load it into the same, or a similar device at a later pointin time. This feature enables you to make a snapshot or backup of your device’s current configuration.A configuration file can be used to restore your device’s configuration at a later time if you wish to revert toa previous snapshot, or if you need to clone your settings to a new device.For mass deployment, you can save a copy of configuration settings from one <strong>Jabra</strong> PRO device on PC andquickly apply this configuration to new <strong>Jabra</strong> PRO devices when you connect them to the administrator PC.The ability to clone the configuration of one device to other similar devices is useful for mass deployment ofmany devices in an organization. This means that an administrator only needs to <strong>manual</strong>ly go through the setupof a single device and save its configuration to a file. This master configuration file can then be loaded into alldevices that are deployed in the organization.Access to a device from <strong>Jabra</strong> Control Center can be password protected, ensuring that only authorized <strong>user</strong>s canchange settings.english<strong>Jabra</strong> PRO 9460, 9460-Duo and <strong>9470</strong> User <strong>manual</strong>www.HeadSet<strong>Plus</strong>.<strong>com</strong>24
6.Daily Use — Calling, Answering andHanging Up6.1 <strong>Headset</strong> Controls and IndicatorsThe Multifunction ButtonThis button is located near the back of the headset. Through a <strong>com</strong>bination of taps, double-taps and presses,you will be able to execute all of the most-needed functions, including answering a call, hanging up, switchingbetween held calls, and more.See Section 7.3: <strong>Headset</strong> Controls and Signals for <strong>com</strong>plete details of all headset <strong>com</strong>mands.<strong>Headset</strong> Visual and Audio IndicatorsThe headset provides status messages using both lights and audio signals. For example, the LED lights variouscolors to indicate battery level, in<strong>com</strong>ing calls, on/off operations, etc. Audio signals tell you when you havepressed a button, selected a new target phone or changed the volume; in-ear ring tones are also provided.See Section 7.3: <strong>Headset</strong> Controls and Signals for <strong>com</strong>plete details.6.2The Target Phone ConceptThe target phone is the phone to which the audio link for your (outgoing) call is activated when you tap themultifunction button (MFB) on the headset or touch the green handset icon on the touchscreen. You can select adifferent target phone by touching a phone icon or pressing the headset MFB.The large foreground phone icon indicates the current target phone.21. Current target phone: this large icon indicates the phone to whichyou will open a connection if you tap the headset multifunctionbutton or touch the green handset icon at the bottom of the screen.Double-tap the headset multifunction button to redial on thisphone (selected mobile and softphones only).englishDouble-tap the headset multifunction button to redial on this phone(selected mobile and softphones only).12. Other phones: touch the appropriate icon here to change thecurrent target phone — or press the headset multifunction buttonwhen no call is active.Figure 18: The current target phone is indicated by the large icon on the touchscreen; change the target by touching onone of the other iconsThe effect of activating the audio link to an idle target phone varies depending on the gesture you use on theMFB, on your set-up and on the features supported by your phone — for mobile phones you can activate voiceactivateddialing or redial, for desk phones with a hook lifter you lift the handset off-hook, for softphones you canopen the audio link and for some softphones redial.If you initiate an outgoing call from a mobile- or softphone, the audio link opens automatically when the phonegoes off-hook. This phone-initiated outgoing call does not affect your choice of target phone.For in<strong>com</strong>ing calls on phones with ring detection — as is the case with mobile phones, most softphones anddesk phones with a hook lifter or electronic hookswitch (EHS) — the ringing phone is indicated by a large ringingicon and activating MFB/green handset icon accepts the call. When the in<strong>com</strong>ing call ends, the target phonereturns to the selected target phone before the in<strong>com</strong>ing call.For phones where ring detection is not possible, you have to change the target phone <strong>manual</strong>ly before you canaccept the call. In this case, when the call ends the target phone is the phone for which you accepted the call.For maximum convenience, set the target phone to the phone which you are most likely to use for outgoing calls.<strong>Jabra</strong> PRO 9460, 9460-Duo and <strong>9470</strong> User <strong>manual</strong>www.HeadSet<strong>Plus</strong>.<strong>com</strong>25
Note: if the target phone is shown greyed out on the touchscreen, it means that the phone has be<strong>com</strong>edisconnected. This can only occur with mobile- or softphones. You need to either re-connect the phoneor touch another phone on-screen to select a different target. See the figure below.englishFigure 19: A disconnected target phone is shown greyed out on the touchscreen6.3Calling through a Desk PhoneHow to make a callFigure 20: Placing a call with your headset and desk phoneTo place a call through your desk phone:1. If necessary, set the desk phone as the current target for your headset (see also Section 6.2: The Target PhoneConcept.)2. Do one of the following to get a dial tone:- If you are using a handset lifter or electronic-hookswitch:Open the audio link to the headset by doing one of the following: tap the headset’s multifunction button ortouch the call icon on the base touchscreen. You should now hear a dial tone.- If you do not have a handset lifter or electronic-hookswitch:Open the audio link to the headset by doing one of the following: tap the headset’s multifunction button;touch the call icon on the base touchscreen; or lift the headset from the base (if enabled, see Section 8.13:<strong>Headset</strong> Docking-Operation). Then lift your desk phone handset from the receiver and set it aside — or pressthe headset button, if your desk phone has one — to get a dial tone.3. Dial the number using your desk phone’s buttons.<strong>Jabra</strong> PRO 9460, 9460-Duo and <strong>9470</strong> User <strong>manual</strong>www.HeadSet<strong>Plus</strong>.<strong>com</strong>26
Calling through a SoftphoneenglishFigure 21: To make a call on your softphone, simply dial as usual while wearing the headsetTo place a call through your softphone, dial the number or choose a contact using your softphone program. Theaudio connection to your headset will open automatically as soon as your recipient’s phone begins ringing.Notes:- If you are using an unsupported softphone, you might need to use <strong>Jabra</strong> Control Center to open the audiolink from your softphone to your headset before dialing. See the PC Suite online help for details. See alsoChapter 5: Installing and Running the <strong>Jabra</strong> PC Suite.- <strong>Jabra</strong> PRO includes call handling (e.g. ringtone detection, accept call, hang up) for supported softphonesonly. Unsupported softphones see the headset as a standard sound card.Standard Mobile Phone Dialing (<strong>Jabra</strong> PRO <strong>9470</strong> Only)To place a call through your mobile phone, dial the number as usual and then press the call button on themobile. On most phones, the audio link from the mobile phone to your headset opens automatically.Figure 22: To make a call on your mobile phone, simply dial as usual while wearing the headsetNote: some mobile phones might work differently and/or require you to configure them to work asdescribed above. Please see your mobile phone documentation for <strong>com</strong>plete details about how to use itwith a Bluetooth headset.<strong>Jabra</strong> PRO 9460, 9460-Duo and <strong>9470</strong> User <strong>manual</strong>www.HeadSet<strong>Plus</strong>.<strong>com</strong>27
Voice-Activated Mobile Phone Dialing (<strong>Jabra</strong> PRO <strong>9470</strong> Only)This feature requires that your mobile phone supports the hands-free Bluetooth profile. See your mobile phone’sdocumentation for details about how to set up voice-activated dialing and whether this feature is supported overBluetooth.englishFigure 23: To use voice-activated dialing, tap the multifunction button and speak the appropriate voice tagTo use voice-activated dialing with a mobile phone that supports it:1. If necessary, set the mobile phone as the current target for your headset (see also Section 6.2: The Target PhoneConcept).2. Tap the headset’s multifunction button or touch the open-connection icon on the touchscreen. You will thenhear the voice-dialing prompt generated by your mobile phone. Speak the trigger for the number you wantand allow the phone to dial.Tip: Your voice tags may work better if you record them using the headset rather than your phone’s built-inmicrophone. This will make sure that the sound the phone “hears” <strong>com</strong>ing from the headset when dialingwill be the closest possible match to the recorded voice tag.6.4How to answer a callFigure 24: Answering a callTo answer a call from any connected phone:1. You will hear a ring tone from the target phone, <strong>Jabra</strong> PRO base and/or headset. Usually, the touchscreenindicates which phone is ringing and (if possible) shows the in<strong>com</strong>ing phone number. The ringtone played inthe headset normally also indicates which phone is ringing (see also Section 7.3: <strong>Headset</strong> Controls and Signals).Do one of the following:<strong>Jabra</strong> PRO 9460, 9460-Duo and <strong>9470</strong> User <strong>manual</strong>www.HeadSet<strong>Plus</strong>.<strong>com</strong>28
6.6Controlling the Speaker Volume and MicrophoneThe headset features a touch panel that is similar to the touch pad included with many laptop <strong>com</strong>puters. Use itto adjust the volume you hear in your headset and to mute/enable the microphone.- Slide your finger up the touch panel (away from your mouth) to increase the volume.- Slide your finger down the touch panel to decrease the volume.- Double-tap on the touch panel to mute or unmute the microphone.englishFigure 26: Use the headset’s touch panel to control listening volume and microphone muteYou can also control the volume and mute functions using the touchscreen; see Section 8.5: Setting Active-Call andAudio Preferences for details.Note: A tone will sound to indicate each new volume setting; a double tone indicates that you havereached maximum or minimum volume. You will also hear a soft tone in the headset to remind you whenmicrophone muting is active; this signal will repeat occasionally until you reactivate the microphone.If you hang up while the microphone is muted, it will automatically be re-enabled the next time youplace or answer a call.6.7Switching between Your Phone and <strong>Headset</strong>It is possible to enable or disable the headset without interrupting your current call.Desk PhonesTo go from desk-phone handset to your headset:1. If necessary, set the desk phone as the current target for your headset (see also Section 6.2: The Target PhoneConcept.)2. Open the audio link to the headset by doing one of the following: tap the headset’s multifunction button;touch the call icon on the base touchscreen; or lift the headset from the base (if enabled, see Section 8.13:<strong>Headset</strong> Docking-Operation).3. Listen to hear if you are now connected through the headset. If you are not connected, then you may need topress the desk-phone headset button. See also your desk-phone documentation.4. Place the handset on your desk, but do not hang up, because this will terminate your call.To go from headset to desk-phone handset:1. Lift the handset to your ear.2. Do one of the following:- If you are using a traditional phone without a headset button or electronic hookswitch, then close the audioconnection to your headset by tapping the headset multifunction button, docking the headset in its cradleon the <strong>Jabra</strong> PRO base or touching the close-connection icon on the base touchscreen. (This applies also ifyou are using a GN1000 handset lifter.)- If your desk phone has a dedicated headset port and/or electronic hookswitch, then please see your desk-phonedocumentation for details. In some cases, you must press a button on your desk phone, while in others it willbe automatic. Also, some solutions may terminate the connection if you close the audio link to the headset(e.g., by tapping its multifunction button or docking it in its charge cradle), while others may require you todo this before you can speak on the handset. Experiment to find out what works best for you.<strong>Jabra</strong> PRO 9460, 9460-Duo and <strong>9470</strong> User <strong>manual</strong>www.HeadSet<strong>Plus</strong>.<strong>com</strong>30
SoftphonesFor softphones, your headset is likely to be your only option, but if other audio devices are connected to yourPC, you may be able to switch to them by changing the audio preferences for Windows and/or your softphoneprogram.Mobile PhonesFor mobile phones (<strong>Jabra</strong> PRO <strong>9470</strong> only), the procedure varies by phone model. Please see your mobile phonedocumentation for details.6.8Last Number Redial<strong>Jabra</strong> PRO is able to send a redial <strong>com</strong>mand to the current target phone. This feature requires that the targetphone supports the redial <strong>com</strong>mand; check your phones’ documentation for details.To use last-number redial with a phone that supports it:1. If necessary, set the appropriate phone as the current target for your headset (see also Section 6.2: The TargetPhone Concept.)2. Double-tap the headset’s multifunction button. <strong>Jabra</strong> PRO sends the redial <strong>com</strong>mand to the selected targetphone and opens the audio link.6.9Managing Call Collisions and Call WaitingCall collision and call waiting both refer to situations in which you are already on the phone when another call<strong>com</strong>es in.- Call CollisionOccurs when you are talking on one phone and a call <strong>com</strong>es in on a different phone that is also connected toyour headset. The headset informs you that the collision occurred by playing the ringtone associated with thein<strong>com</strong>ing phone and updating the touchscreen, but it is not able to place calls on hold. You must thereforechoose to answer the new call (thus terminating your current call) or to ignore the new call. See Section 8.6:Managing Call Collision for <strong>com</strong>plete details.- Call waitingEnables you to place a current call on hold to answer another call <strong>com</strong>ing in (or on hold) on the same phone.This feature is available only for selected softphones and mobile phones. For mobile phones this featuredepends on your network operator and subscription type. See Section 8.7: Managing Call Waiting for <strong>com</strong>pletedetails about how to manage call waiting.6.10Listening to MusicTo listen to music from your PC, use the <strong>Jabra</strong> Control Center and/or its icon in the Windows notification area toopen the audio link from the PC to the <strong>Jabra</strong> PRO base. Provided no other phone lines are active, your headsetwill then begin to play all of the sounds generated by your PC, including music from your media player. See alsothe <strong>Jabra</strong> PC Suite online help for details.To listen to music from a mobile phone, use the controls provided by your phone as described in its <strong>user</strong> <strong>manual</strong>.Note also the following:- Music sounds best when you use wideband audio when possible. See Section 8.11: Narrowband vs. WidebandAudio.- If you are using a supported media player and softphone on your PC, then the <strong>Jabra</strong> softphone driver willautomatically pause the music when a call <strong>com</strong>es in. You must <strong>manual</strong>ly restart the music, however.english<strong>Jabra</strong> PRO 9460, 9460-Duo and <strong>9470</strong> User <strong>manual</strong>www.HeadSet<strong>Plus</strong>.<strong>com</strong>31
7.2Attaching or detaching a Wearing StyleNote: <strong>Jabra</strong> PRO 9460-Duo headset is always worn as a headband.Attaching the headband1. Align the mounting surface of the headset with matching socket on the headband attachment.2. Press the headset assembly firmly onto the outer side of the headband attachment until it clicks into place(snap-to-click). If you have trouble pressing them together, try to rotate the boom arm about 300 and tryagain. Refer to the figure in the section 4.3: “Assemble the <strong>Headset</strong>” earlier in this <strong>manual</strong>.3. Rotate the headset boom arm for left- or right-ear use as needed. Always position the microphone so that itsits as close to the corner of your mouth as possible when you wear the headset.4. Adjust the length of the headband to fit snugly around your head.See also Section 7.1: How to Wear the <strong>Headset</strong> for illustrations.Detaching the headband1. Hold the assembly firmly in both hands, with the headset in one hand and the ear-cushion assembly of thewearing-style attachment in the other.2. Gently pull the headset away from the headband attachment until it <strong>com</strong>es free. If you have trouble pullingthem apart, try to rotate the boom arm about 300 and try again.englishFigure 28: Detaching a wearing-style attachment from the headsetAttaching the ear hookNote: The ear hook is delivered pre-assembled for wearing on your right ear with the medium sizedearbud mounted.1. Decide whether you want to wear the ear hook on the left or right ear — you might need to pull out the hookitself from its attachment, rotate it 180 degrees and then push it back in to change left/right orientation. Leftand right assemblies are shown on the previous page in the figure “Assembling and wearing the <strong>Jabra</strong> PROheadset in various styles”:The point at which the hook is attached — marked with the text “<strong>Jabra</strong>” — must always be in front of the hookitself.2. Try placing the ear hook with an earbud mounted in your ear. If it does not fit snugly in your ear, pull theearbud off the attachment and put on another size (small, medium and large earbuds are delivered asstandard.)<strong>Jabra</strong> PRO 9460, 9460-Duo and <strong>9470</strong> User <strong>manual</strong>www.HeadSet<strong>Plus</strong>.<strong>com</strong>33
2. Align the mounting surface of the headset with the matching socket on the ear-cushion attachment. Pressthe headset assembly firmly onto the outer side of the attachment until it clicks into place (snap-to-click).Refer to the figure in the section 4.3: “Assemble the <strong>Headset</strong>” earlier in this <strong>manual</strong>. If you have trouble pressingthem together, try to rotate the boom arm about 300 and try again.3. Turn the headset in the socket to ensure that it is mounted correctly.4. Put on the neckband and headset assembly.5. Turn the headset boom arm so that the microphone is right in front of the corner of your mouth.See also Section 7.1: How to Wear the <strong>Headset</strong> for illustrations.Detaching the neckband1. Hold the assembly firmly in both hands, with the headset in one hand and the ear-cushion assembly of theneckband attachment in the other.2. Pull the headset away from the ear-cushion assembly of the neckband attachment until it <strong>com</strong>es free. If youhave trouble pulling them apart, try to rotate the boom arm about 300 and try again.7.3<strong>Headset</strong> Controls and SignalsAll <strong>Jabra</strong> PRO headsets feature a collection of controls and indicators that enable you to manage and monitoryour calls. These are:1. Multifunction buttonThis button is located near the back of the headset. Through a <strong>com</strong>bination of taps, double-taps, short pressesand long presses, you will be able to execute all of the most-needed functions, including answering a call,hanging up, switching between held calls, and more.2. Touch panelThis touch-sensitive panel is similar to the touch pad included with many laptop <strong>com</strong>puters. It enables you toadjust the speaker volume and mute/unmute the microphone.3. <strong>Headset</strong> visual indicatorA multicolor LED lets others see when you are on the phone and also gives feedback for certain types ofevents, such as low battery, in<strong>com</strong>ing call, etc.4. Audio signal tonesThe headset generates several types of soft signal tones to let you know when you have an in<strong>com</strong>ingcall, muted call, call on hold, low battery, or other type of event. It also responds each time you use themultifunction button.14english23Figure 31: <strong>Jabra</strong> PRO headset controls and indicatorsThe Multifunction ButtonThe table below summarizes the various gestures recognized by the multifunction button. The terms listed in thetable are often used in this <strong>manual</strong> when describing how to use the headset.Gesture nameTapDouble tapPressHow to make itTap and release instantly (not longer than 0.8 seconds).Two quick taps (less than half a second between them).Press and hold the button for 1 - 3 seconds.Table 3: Gestures for using the headset multifunction button; the terms here are used throughout this <strong>manual</strong>Note: You can hear whether you have tapped / double-tapped / pressed the button as each gesture isidentified by a unique tone / series of tones played in the headset. See the table “<strong>Headset</strong> signal tonesand their meanings” for more.<strong>Jabra</strong> PRO 9460, 9460-Duo and <strong>9470</strong> User <strong>manual</strong>www.HeadSet<strong>Plus</strong>.<strong>com</strong>35
The precise effect of each type of gesture depends on what you are currently doing (e.g., if you are already on acall, which phone is the current target, etc.). The table below summarizes all of the control possibilities presentedby the multifunction button.Function Tap Double-TapAnswer in<strong>com</strong>ing callOpen a connection on current target phone(e.g., go to dial tone; voice-activated dialing)Enable voice-activated dialing (when target is a cell phonethat supports this)End current call (and activate held or in<strong>com</strong>ing call, if any)Call the last number dialed on current target phone(supported softphones and mobile phones only)Reject in<strong>com</strong>ing call (when already on a call)Switch target phone (when no call is active)Reject in<strong>com</strong>ing call (when no call is active)Hold current call and switch to held or in<strong>com</strong>ing call(supported softphones and mobile phones only)Press(hold 1-3 sec)englishPower off / power on(hold 5 secs)Table 4: All multifunction button <strong>com</strong>mandsThe Touch PanelThe headset features a touch panel that is similar to the touch pad included with many laptop <strong>com</strong>puters. Use itto adjust the volume you hear in your headset and to mute/enable the microphone.- Slide your finger up the touch panel (away from your mouth) to increase the volume.- Slide your finger down the touch panel to decrease the volume.- Double-tap on the touch panel to mute or unmute the microphone.See also Section 6.6: Controlling the Speaker Volume and Microphone.<strong>Jabra</strong> PRO 9460, 9460-Duo and <strong>9470</strong> User <strong>manual</strong>www.HeadSet<strong>Plus</strong>.<strong>com</strong>36
<strong>Headset</strong> Signal TonesThe headset uses a variety of soft tones to alert you to events such as an in<strong>com</strong>ing call, multifunction buttonpresses, volume changes, and more. These enable you to keep track of what is going on while you are wearingthe headset.State or eventButton tapTone descriptionA quick medium toneSample(click to play)englishButton double-tapButton pressTurn volume upMaximum volume reachedTurn volume downMinimum volume reachedMuteIn<strong>com</strong>ing desk phone callIn<strong>com</strong>ing softphone callIn<strong>com</strong>ing mobile phone callTarget changed to desk phoneTarget changed to softphoneTarget changed to mobile phoneCall endedBattery lowCalls on hold via call waitingPairing succeededError (such as pairing failed)Two button-tap tonesThe button-tap tone followed by a longer toneA short, high tone that indicates the new volumeTwo short, high notesA short, low tone that indicates the new volumeTwo short, low notesA quick medium tone, rest and quick low tone;repeats occasionallyA very fast, high-pitch melodyA very fast, medium-pitch melodyA very fast, low-pitch melodyA slow, high melody; or a human voice announcing“desk phone” in EnglishA slow, medium melody; or a human voiceannouncing “softphone” in EnglishA slow, deep melody; or a human voice announcing“mobile phone” in EnglishA quick melody ending on a low noteTwo very quick, low tones; repeats occasionallyTwo slow medium-pitch notes, a long rest, andthen two more; repeats occasionallyThree slow tones ending on a medium-high noteThree quick tones followed by a lower long toneTable 5: <strong>Headset</strong> signal tones and their meanings<strong>Jabra</strong> PRO 9460, 9460-Duo and <strong>9470</strong> User <strong>manual</strong>www.HeadSet<strong>Plus</strong>.<strong>com</strong>37
Choosing Voice or Tones for Target indicatorsThe headset is capable of playing either a tone or a human voice when you change the target phone, thus tellingyou what the new target is. The human voice is always in English, regardless of your other language settings.By default, the human voice will be played. However, if you do not like hearing the English voice, you can switchto using the tones.To change this setting, use the <strong>Jabra</strong> Control Center program of the <strong>Jabra</strong> PC Suite running on your PC. See theonline help for <strong>com</strong>plete details.<strong>Headset</strong> Visual Indicators (LED)The headset includes a multicolor LED which indicates the state of the headset, as outlined in the table below.During charging, the headset state LED indication is shown interspersed with a constant yellow light (whichshows the headset is charging). Once fully charged, only the state LED indication is shown (no charging lightwhile fully charged).english<strong>Headset</strong> state LED when battery level is good LED when battery level is lowIdleBlue 200msOff 4800msRepeats for 60 secondsRed 100msOff 4900msRepeats indefinitelyNot connectedGreen 300msOff 300msGreen 300msOff 300msGreen 300msOff 1500msRepeats for 60 secondsRed 100msOff 500msRed 100msOff 500msRed 100msOff 1700msRepeats indefinitelyCall activeBlue 100msOff 300msBlue 100msOff 2000msRepeats indefinitelyRed 100msOff 300msRed 100msOff 2000msRepeats indefinitelyRingingBlue 100msOff 300msBlue 100msOff 1000msRepeats indefinitelyRed 100msOff 300msRed 100msOff 1000msRepeats indefinitely<strong>Jabra</strong> PRO 9460, 9460-Duo and <strong>9470</strong> User <strong>manual</strong>www.HeadSet<strong>Plus</strong>.<strong>com</strong>38
<strong>Headset</strong> state LED when battery level is good LED when battery level is lowPower turned onGreen 100msOff 100msRepeats to a total of 4 timesGreen 100msOff 100msRepeats to a total of 4 timesenglishPower turned offRed 100msOff 100msRepeats to a total of 4 timesRed 100msOff 100msRepeats to a total of 4 timesPairingConstant blueConstant redPairing succeededBlue 100msOff 100msRepeats to a total of 5 timesRed 100msOff 100msRepeats to a total of 5 timesChargingConstant yellowFully charged in cradle no light N/ATable 6: <strong>Headset</strong> visual signals and their meanings<strong>Jabra</strong> PRO 9460, 9460-Duo and <strong>9470</strong> User <strong>manual</strong>www.HeadSet<strong>Plus</strong>.<strong>com</strong>39
7.4 Battery Indicators, Recharge and ReplacementBattery indicatorsThe headset and touchscreen base indicate the current headset battery level as follows:- Whenever the battery is low, the headset multicolor LED will display red for all of its usual signals.- While the battery is low, you will hear an audio signal (two quick, low tones) every minute or so in theheadset.- When the headset is paired with a touchscreen base, you can read the current battery level on thetouchscreen.Recharging the <strong>Headset</strong>To recharge your headset battery, place the headset in its cradle on the base. See also Section 4.3: Preparing thebase and Assembling the <strong>Headset</strong>.How to replace the batteryIf you begin to notice that you get significantly less talk time between battery charges, it might be time to replacethe battery.To replace the headset battery:1. Order a <strong>Jabra</strong> PRO battery-replacement kit from <strong>Jabra</strong> (contact your <strong>Jabra</strong> representative or see our web sitefor details).2. Remove the wearing-style attachment from your headset (see also Section 7.2: Attaching or detaching aWearing Style).3. Place the headset down on a table with the speaker facing up.4. Use the screwdriver supplied with the battery-replacement kit to remove the three screws indicated in thefigure below.english5. Carefully tilt the speaker plate up, allowing it to rotate around the edge where the boom arm sticks out.6. The battery is the rectangular <strong>com</strong>ponent now visible in the center of the headset body. Gently pry the batteryup and out of the headset. The battery will remain attached to the headset by a pair of very thin wires.7. Grab the two wires that connect the old battery to the headset and gently pull them straight away from thesocket inside the headset until they are free.<strong>Jabra</strong> PRO 9460, 9460-Duo and <strong>9470</strong> User <strong>manual</strong>www.HeadSet<strong>Plus</strong>.<strong>com</strong>40
8. Align the wired connector for your new battery with the socket inside the headset and press it all the way in.If you have trouble, you might have the connector upside down — try the other way.9. Fold the wires beside the new battery in the wire groove and press the battery down into place in theheadset. Ensure that the battery label faces upwards for the correct orientation.10. Replace the speaker plate and insert and tighten each of the three screws you removed at the start of thisprocedure.7.5Staying within Range<strong>Jabra</strong> PRO supports a maximum range of up to 150m. In practice, you will probably find the range to besomewhat shorter due to physical obstructions and electromagnetic interference.The sound in your headset will slowly deteriorate as you move farther from the base; move back into range torestore sound quality. If you move all the way out of range while talking, all sound will stop but your call will beheld open at the base for 60 seconds, giving you a chance to move back in range; after this time the current callwill be terminated.If you remain out of range for a long time, you may need to re-establish the DECT connection <strong>manual</strong>ly when youreturn (e.g., by docking the headset to the base).7.6Noise Blackout Microphone (<strong>Jabra</strong> PRO <strong>9470</strong>)The <strong>Jabra</strong> PRO midi headset features an advanced, two-microphone Noise Blackout system that will help ensurethat your voice will be clear and easy to understand — even when you are sitting in a crowded office or othernoisy environment. It works by using a pair of directional microphones: one facing towards your mouth and onefacing away. These two signals are <strong>com</strong>bined inside the headset, which subtracts the room-noise signal from thevoice signal, leaving only your voice behind.This system works best when the headset’s voice microphone is placed as close as possible to your mouth andwhen the out-facing microphone is <strong>com</strong>pletely unblocked. Avoid covering the out-facing microphone with yourhand or any other substance. (Some <strong>user</strong>s assume that blocking the out-facing microphone will reduce noise, butthe opposite is true!)7.7Noise-Cancelling Microphone (<strong>Jabra</strong> PRO 9460 and 9460-Duo)The <strong>Jabra</strong> PRO 9460 and 9460-Duo feature electronic noise cancelling, which will help reduce the noisetransmitted by your headset, making your voice easier to hear and understand. For best results, always make sureto place the microphone as close to your moth as possible.english<strong>Jabra</strong> PRO 9460, 9460-Duo and <strong>9470</strong> User <strong>manual</strong>www.HeadSet<strong>Plus</strong>.<strong>com</strong>41
8.The <strong>Jabra</strong> PRO Touchscreen BaseThis chapter describes how to work with the features of the <strong>Jabra</strong> PRO Touchscreen Base. See also Chapter 3:Product Overview for detailed diagrams.8.1Base Connections and SetupFor details about how to set up the base and connect it to your various phones, please see Chapter 4: SystemSetup and Connections.8.2Using the Touchscreen<strong>Jabra</strong> PRO Touchscreen Base features a color touchscreen that enables you to configure the solution, setpreferences and manage everyday calls. Its display changes to adapt to the task at hand. Touch the screen withyour finger to activate icons, scroll down a page, select a target device and execute other tasks.211. Status bar:- heasdet battery level indicator- full HD (High Definition) audio. The base is set to transmit widebandaudio to the headset. See “Setting General User Preferences”- tape icon; call recording is enabled. See “Recording your Calls”- two headsets icon; conference calling is enabled as both a primaryand secondary headset are paired with the base. See “Pairing andConnecting the Base and <strong>Headset</strong>” and “Conference Calling”- speaker icon; opens the settings menu. See “Setting Active Call andAudio Preferences”english2. Activity window: the contents of this area will change dependingon what you are doing. Usually it indicates your current call statusby displaying icons that show which type of phone you are using(desk, soft or mobile) and whether you have any calls on hold.A number of button icons may also appear here. These will ofteninclude target-phone options or forward/back icons when you areworking through a series of settings. Touch the screen to “press” anyof the button icons here.Figure 32: Touchscreen elementsThe entire area of the touchscreen is fully dynamic, both in terms of what it shows and where you can touch.The touchscreen turns around its bottom-front edge axis so you can adjust it to your preferred viewing angle.<strong>Jabra</strong> PRO 9460, 9460-Duo and <strong>9470</strong> User <strong>manual</strong>www.HeadSet<strong>Plus</strong>.<strong>com</strong>42
8.3Standard OperationDuring normal operation, the touchscreen shows status information about your headset, displays the currenttarget phone and indicates its status. From here you can answer an in<strong>com</strong>ing call, end the current call, accessyour base settings, choose a target phone and open an audio link to the current target phone.1. Settings icon: touch here to go to the settings menu for your base1and headset.2432. Battery indicator: indicates the current charge level of your headset.3. Current target phone: shows the current target phone andindicates its status (ringing, online, etc.). This is the phone to whichyou will connect if you tap the headset multifunction button ortouch the activate-audio-link icon.4. Other phones: touch the appropriate icon here to change thecurrent target phone — or press the headset multifunction buttonwhen no call is active to cycle through available phones.english55. Activate audio link: touch here to answer an in<strong>com</strong>ing call oractivate the audio link to the current target phone — or tap theheadset multifunction button when no call is active.Figure 33: Touchscreen controls for standard operation8.4Pairing and Connecting the Base and <strong>Headset</strong>To enable secure wireless <strong>com</strong>munication between the <strong>Jabra</strong> PRO headset and its base, you must pair the twounits. Once paired, they will find, connect and <strong>com</strong>municate with each other as needed whenever they are inrange and turned on, but they will ignore all other DECT devices in the area.Pairing the DECT Base and <strong>Headset</strong>The headset can only be paired with one base at a time, while the base is able to pair with one primaryheadset and an optional and temporary secondary headset. The secondary pairing enables you to share yourconversation with another headset <strong>user</strong> to support conference calling (see Section 8.12: Conference Calling). Youcannot pair the <strong>Jabra</strong> PRO base or headset with other types of DECT products.To pair your base and headset:1. Dock the headset to the charging cradle of the target base.2. If the headset is not already paired with that base, then the touchscreen will ask you if you would like to doone of the following:- Pair as primary: touch this icon to make the current headset the new primary device for the current base.This will remove any previous primary headset.- Pair as secondary: touch this icon to make a temporary connection to the current headset. This connectionwill only last until the end of the next (or current) call. The current primary headset will be kept and all audiowill be shared with both headsets.- Do not pair: touch this icon to charge the current headset without pairing with it.3. Touch the icon of your choice and you are done.Note: A similar pairing mechanism is also used by Bluetooth devices. <strong>Jabra</strong> PRO <strong>9470</strong> supports Bluetoothfor the purpose of adding a mobile phone to your headset solution. However, the Bluetooth pairing is<strong>com</strong>pletely independent of the DECT pairing mechanism described above. See Section 9.2: Pairing andConnecting with Other Bluetooth Devices for details.<strong>Jabra</strong> PRO 9460, 9460-Duo and <strong>9470</strong> User <strong>manual</strong>www.HeadSet<strong>Plus</strong>.<strong>com</strong>43
Managing the DECT ConnectionOnce you have paired the base and headset, the base manages the connection automatically even as you takethe headset out of range and/or turn off the devices from time to time. The connection will usually activate itselfagain automatically the next time the <strong>Jabra</strong> PRO Base and headset are turned on and in range. However,<strong>Jabra</strong> PRO also provides controls for managing the connection <strong>manual</strong>ly if necessary.If you would like to drop the connection from the base to your headset, use the base touchscreen menus asdescribed in Section 8.8: Setting General User Preferences.To connect a base and headset <strong>manual</strong>ly, do one of the following:- Place the headset into its recharge cradle on the base.- Use the base touchscreen menus. See Section 8.8: Setting General User Preferences for instructions.english8.5 Setting Active Call and Audio PreferencesWhen you are on a call you can access your call options and audio preferences by touching on theupper right-hand corner, as shown below. This opens the Call Options menu.icon in theCALL OPTIONSSpeakerVolume1 Mute: enables youto mute/unmute themicrophone on yourheadset. You can also dothis by double-tappingthe touch-panel on theside of your headset.Hold1EnablerecordingFigure 34: Finding your active-call and audio preferencesTo view/edit the settings available here, touch one of the following icons from the Call Options menu:- Speaker volume: enables you to adjust the level of the sound you hear. You can also do this using thetouch-panel on the side of your headset.- Hold: enables you to put your current call on hold. Once you put a call on hold, this call option is removed.- Enable Recording: enables you to manage the recording of your conversation to a file on your PC. See alsoChapter 10: Recording Your Calls for <strong>com</strong>plete details about this feature.- Tone setting: enables you to select one of three pre-sets for the sound you hear in your headset: Treble,Normal and Bass.<strong>Jabra</strong> PRO 9460, 9460-Duo and <strong>9470</strong> User <strong>manual</strong>www.HeadSet<strong>Plus</strong>.<strong>com</strong>44
8.6Managing Call CollisionWhen you have more than one phone connected to your base, it be<strong>com</strong>es possible that more than one call willbe<strong>com</strong>e active simultaneously. This might occur under the following circumstances:- You are talking on one phone (e.g., your desk phone) when a call <strong>com</strong>es in on one of your other phones(e.g., your mobile phone).- You press the connect button on your mobile-phone keypad or softphone graphic interface (thereby openinga connection) while you are talking on one of your other phones.Events such as these are called call collision, because here we have two or more different phones <strong>com</strong>peting foraccess to your single headset. When a collision occurs, you can choose to answer the in<strong>com</strong>ing call or reject it,but you are not able to place either call on hold.In the event of a call collision, the following occur:- The headset plays the ringtone associated with the in<strong>com</strong>ing phone.- The touchscreen displays the in<strong>com</strong>ing number (if possible).- The touchscreen shows which other phone is ringing and provides controls for handling the call, as shown inthe figure below.- Call-collision controls for the headset multifunction button be<strong>com</strong>e active, as listed in the figure below.english423151. Current phone: the phone on which you are talking.2. Caller ID: the in<strong>com</strong>ing call number is shown here, if available.3. Ringing phone: the phone on which the in<strong>com</strong>ing call is arriving.4. Accept new: touch here — or tap the headset multifunction button —to terminate your current call and answer the in<strong>com</strong>ing call.5. Reject new: touch here — or double-tap the headset multifunctionbutton — to remain on your current call and terminate the in<strong>com</strong>ingcall.Figure 35: Touchscreen information and options for handling call collisionNote: call collision is not the same as call waiting, which is sometimes available when you are talkingon one phone and a call <strong>com</strong>es in on that same phone. See Section 8.7: Managing Call Waiting for detailsabout how this is handled.<strong>Jabra</strong> PRO 9460, 9460-Duo and <strong>9470</strong> User <strong>manual</strong>www.HeadSet<strong>Plus</strong>.<strong>com</strong>45
8.7Managing Call WaitingCall waiting refers to the ability to place a current call temporarily on hold to answer another call <strong>com</strong>ing in onthe same phone. It is a feature that is provided by your phone <strong>com</strong>pany or softphone program, which meansthat it is largely external to the base or headset. However, you are able to manage call waiting using your headsetmultifunction button and/or touchscreen for the following types of phones:- Mobile phones with call-waiting features and full support for the hands-free Bluetooth profile- Softphones with call-waiting features that are also specifically supported by a <strong>Jabra</strong> driverIt is not possible to manage call waiting on a desk phone from the base or headset; in this case, you must usethe physical controls of your desk phone if it supports call waiting. Similarly, if you are using an unsupportedsoftphone, then you must use your softphone’s native interface to manage its call-waiting features.When call waiting is triggered by a new in<strong>com</strong>ing call, the following occur:- The standard call-waiting tone will sound in your headset.- The touchscreen displays the in<strong>com</strong>ing number (if available) and provides controls for handling the new call,as shown in the figure below.- Call-waiting control is enabled for the headset multifunction button. The <strong>com</strong>mands for this are alsomentioned in the figure below.1. Current phone: the phone on which you are talking.english2312. Caller ID: the in<strong>com</strong>ing call number is shown here, if available.3. Ringing phone: the phone on which the in<strong>com</strong>ing call is arriving.4. Accept new: touch here — or press the headset multifunctionbutton — to put your current call on hold and answer the in<strong>com</strong>ingcall.5. Reject new: touch here — or double-tap the headset multifunctionbutton — to remain on your current call and reject the in<strong>com</strong>ing call.4 5Figure 36: Touchscreen controls for managing call waiting when a new call arrivesWhile call waiting is active (i.e. you have calls on hold), the following occurs:- The touchscreen displays the call-on-hold icon and provides controls for switching between active and heldcalls as shown in the figure below.- Call-waiting control is enabled for the headset multifunction button. The <strong>com</strong>mands for this are also outlinedin the figure.1. Held-call icon: this icon represents the first held call in the queue.122. Hold and switch: touch here — or press the headset multifunctionbutton — to put your current call on hold (at the back of the queue)and activate the first held call in the queue.3. Active-call icon: this icon represents the currently active call, showingthe phone type.5344. End and switch: touch here — or tap the headset multifunction button— to terminate your current call and activate the next held call.5. Mute: enables you to mute/unmute the microphone on your headset.You can also do this by double-tapping the touch-panel on the side ofyour headset.Figure 37: Touchscreen controls for managing call waiting while one or more calls are on hold<strong>Jabra</strong> PRO 9460, 9460-Duo and <strong>9470</strong> User <strong>manual</strong>www.HeadSet<strong>Plus</strong>.<strong>com</strong>46
If you have an active call, with no calls waiting, and you then put the active call on hold, the red (end call) buttonis removed from display. This means that you must re-activate the held call before you can end it (press the greenarrow). See the figure below:englishFigure 38: The current (active) call is put on hold; no other calls are waitingNote: call waiting is not the same as call collision, which is what happens when you are talking on onephone (e.g., your desk phone) and a new call <strong>com</strong>es in on another phone (e.g., your mobile phone). SeeSection 8.6: Managing Call Collision for details about how this is handled.Note: if call waiting is active when a call collision occurs, then the touchscreen will indicate the collisionand enable you either to ignore the in<strong>com</strong>ing call or to answer it, thus dropping all of the active and heldcalls being managed by call waiting. The headset, however, does not provide a tone to inform you of a callcollision if you have held calls; it essentially ignores the colliding call until there are no more calls on hold.<strong>Jabra</strong> PRO 9460, 9460-Duo and <strong>9470</strong> User <strong>manual</strong>www.HeadSet<strong>Plus</strong>.<strong>com</strong>47
8.8Setting General User PreferencesWhen you are not using the headset, you are able to access the general <strong>user</strong> preferences on the base. Use thisfunction to adjust your hearing-protection settings, switch to wideband or narrowband audio, control callrecording, set the screen language, disconnect the headset or re-start some or all of the setup wizard.SETTINGSenglishPersonal SetupInntellitoneWidebandFigure 39: Finding the general <strong>user</strong> preferences1. Wait until you have no active calls and will not need the phone for a few minutes.2. Touch the icon in the upper-right corner of the touchscreen (available only when all connected phonesare idle).3. The Settings menu opens. Select one of the following:- Personal Setup: touch here to adjust display brightness, dimming timeout, set base-speaker volume for yourdesk-, mobile-, and softphone ringtones, adjust touch click-volume and to select tone or voice tags.- IntelliTone: touch here to go to the settings for protecting your hearing. See also Section 2.2: Protecting yourHearing with SafeTone for <strong>com</strong>plete details about this feature.- Wideband: touch here to set the base to transmit wideband or narrowband audio to the headset. See alsoSection 8.11: Narrowband vs. Wideband Audio for details about this feature.- Language: touch here to change the language displayed for the touchscreen text.- Disconnect HS: touch here to break the wireless connection from the headset to the base. You might do thisif you want to use a different headset.- Enable / Disable Recording: Determines whether audio from your desk phone and mobile phone calls arecopied to the PC for recording. The equivalent setting is available in the Audio tab for your <strong>Jabra</strong> device in<strong>Jabra</strong> Control Center. Note that the recording feature is disabled by default. See also Chapter 10: RecordingYour Calls for more on this feature.- Disable / Enable audio detection: Determines whether the audio link opens automatically when sound isdetected on the USB interface. The equivalent setting is available in the Audio tab for your <strong>Jabra</strong> device in<strong>Jabra</strong> Control Center. Audio detection is enabled by default.- Software Update: Provides information on where to find the latest firmware versions for downloading toyour <strong>Jabra</strong> headset and base.- Advanced: touch here to run some or all of the setup wizard for configuring the connection from the base toyour desk phone, mobile phone and/or <strong>com</strong>puter. See also Section 8.9: Re-running the Setup Wizards.- About: touch here to view a few technical details about the base, such as firmware revision, copyright details, etc.4. Follow the instructions on your screen for the option you selected.<strong>Jabra</strong> PRO 9460, 9460-Duo and <strong>9470</strong> User <strong>manual</strong>www.HeadSet<strong>Plus</strong>.<strong>com</strong>48
8.9Re-running the Setup WizardsThe very first time you turn on the base, a setup wizard launches automatically, helping you to configure theconnection to your desk phone, mobile phone and/or <strong>com</strong>puter. Thereafter, the base starts normally each timeyour turn it on. However, if you would like to revisit your desk-phone, <strong>com</strong>puter and/or mobile-phone setup, youcan do so at any time. In each case, an on-screen wizard will help you make the relevant settings.SETTINGSADVANCED SETTINGSenglishDisable AudiodetectionSetup WizardAdvancedResetConfigurationAboutDesk PhoneFigure 40: Finding the setup wizardsTo run some or all of the setup wizard:1. Wait until you have no active calls and will not need the phone for a few minutes.2. Touch the icon in the upper-right corner of the touchscreen (available only when all lines are idle).3. The Settings menu opens. Touch the Advanced icon here.4. The Advanced Settings menu opens. Select one of the following:- Setup Wizard: runs the whole setup wizard.- Reset Configuration: touch here to clear all base settings (only) and launch the <strong>com</strong>plete setup wizard.- Setup Desk Phone: touch here to reset your desk phone configuration (including all clear dial-tone switch,electronic hookswitch and microphone-level settings). The desk phone part of the setup wizard thenlaunches. All other settings will be kept.- Setup Soft Phone: touch here to reset your softphone configuration and re-launch the softphone part of thesetup wizard. All other settings will be kept.- Setup Mobile Phone: touch here to reset your mobile phone configuration. The mobile phone part of thesetup wizard then launches. All other settings will be kept.5. Follow the instructions on your screen for the wizard you selected. See also Section 4.1: Setup Overview andBackground and Section 4.2 The Quick-Start Setup Wizard for background information that may help as youwork through the setup wizard.8.10Base Audio IndicatorsThe base includes a small speaker, which enables it to supply one or both of the following:- A ringing sound to indicate an in<strong>com</strong>ing call (can be especially useful when you are using a softphone or havethe ringer disabled on your desk or mobile phone).- A soft clicking sound to provide feedback when you use the touchscreen. This can help make using thetouchscreen feel more like working with a physical control panel.You can choose to enable/disable one or both of the above audio features by adjusting your personal settings.See Section 8.5: Setting Active-Call and Audio Preferences for details about how to do this.8.11Narrowband vs. Wideband AudioThe <strong>Jabra</strong> PRO headset supports both wideband and narrowband audio, but uses narrowband by default.You should consider using wideband if you listen to music from your PC and/or if your voice-<strong>com</strong>municationchannels also support it. Note, however, that wideband audio reduces battery talktime.You are able to configure narrowband/wideband operation individually for each phone type.See Section 8.8: Setting General User Preferences for details about how to find these settings.<strong>Jabra</strong> PRO 9460, 9460-Duo and <strong>9470</strong> User <strong>manual</strong>www.HeadSet<strong>Plus</strong>.<strong>com</strong>49
8.12Conference CallingThe <strong>Jabra</strong> PRO Touchscreen Base enables you to connect a secondary <strong>Jabra</strong> PRO headset to the base, therebyadding another person to the conversation.To begin a conference call, dock the secondary headset with the base that will host the call. You can do this eitherjust before the call or at any time during the call. The touchscreen will ask you to confirm the new connection(see Section 8.4: Pairing and Connecting the Base and <strong>Headset</strong> for a detailed description). Thereafter, all audio willbe shared by both connected headsets until one of the following occurs:- The primary headset <strong>user</strong> hangs up.- The secondary headset <strong>user</strong> taps the multifunction button on his or her headset.- The secondary headset <strong>user</strong> docks his or her headset to its own base.On disconnect, the secondary headset is permanently removed from the host base. You must repeat the fullsecondary-pairing procedure each time you want to have a conference call.8.13<strong>Headset</strong> Docking-OperationWhenever the headset is docked correctly in the base’s cradle, the successful electrical connection to the base isindicated by an icon in the touchscreen’s status bar as shown below:englishFigure 41: The touchscreen indicates that the headset is docked successfullyDocking operations (lifting and replacing the headset to/from the recharge cradle) simulate the pick-up andhang-up operations of a traditional phone as follows:- Whenever you dock the headset to the base, all current calls will be terminated.- If the base is able to detect that a connected phone is ringing, then lifting the headset will answer thatline and open an audio connection to the ringing phone. However, not all types of phone support ringdetection.8.14Theft ProtectionThe base includes a slot for attaching a security cable, which can help prevent the base from “accidentally”being removed from your desk while you are not paying attention. The slot meets the Kensington Security Slotstandard, which is <strong>com</strong>monly found on laptops and laptop docking stations.To secure the base to your desk, purchase any safety cable intended for use with the Kensington Security Slotstandard and follow the instructions included with the cable.<strong>Jabra</strong> PRO 9460, 9460-Duo and <strong>9470</strong> User <strong>manual</strong>www.HeadSet<strong>Plus</strong>.<strong>com</strong>50
8.15Dealing with Density IssuesDECT technology uses low-power radio technology for wireless transmission. Because DECT uses a dedicatedradio-frequency band, it is relatively immune to interference from other products using radio technologies<strong>com</strong>monly used in offices such as wireless routers or wireless networks. Likewise, DECT will not interfere with WiFinetworks.You might, however, experience some performance degradation if you install many <strong>Jabra</strong> PRO headsets inone area – the limits are explained below. DECT has a built-in automatic channel-allocation which attempts toallocate channels in a way which minimizes the likelihood of interference. The number of channels is alwayslimited, which may have some implications for large scale deployment.Performance issues manifest themselves as audible clicks and pops. In the most severe cases, they manifestthemselves as the inability for some headsets to establish the wireless link.The basic limit you should be aware of is the number of headsets in one area before DECT channels are re-used:- 80 headsets for EU DECT (normal audio), or 40 headsets for EU DECT (wideband audio)- 45 headsets for US DECT (normal audio), or 22 headsets for US DECT (wideband audio)The use of wideband audio gives an additional constraint as wideband audio reduces the number of headsets bya factor of 2.If the number of headsets in any one area is below the limit indicated above, there should be no performanceissues. Even in those lower density situations, you are advised to separate bases from each other by at least 2 - 4m.If you exceed the density limits, you should configure the products to operate in low-power mode. You must planusing the following conservative average areas per headset and base-to-base distances:- 25m 2 – 49m 2 for EU DECT (i.e 5 – 7m between bases).- 49m 2 – 100m 2 for US DECT (i.e. 7 – 10m between bases).Be aware of the fact that large metal objects or large glass windows, especially those covered with a metalliclayer, create many radio reflections. This forces you to plan even more conservatively. The average areas are validfor an average headset-to-base distance of < 5m — otherwise more conservative planning is needed.The area referred to above depends on the building layout. It could be an open space office, or a set of collocatedoffices separated by lightweight walls. Offices far apart, say >100m apart, or shielded by heavy concrete wallsshould not be considered one area. The above planning figures are valid if most <strong>user</strong>s are near their bases(< 3m distance). If most <strong>user</strong>s are > 5m away from their bases, you should roughly double the re<strong>com</strong>mended area.english<strong>Jabra</strong> PRO 9460, 9460-Duo and <strong>9470</strong> User <strong>manual</strong>www.HeadSet<strong>Plus</strong>.<strong>com</strong>51
9.Using <strong>Jabra</strong> PRO <strong>9470</strong> with a Mobile Phone9.1Note: this chapter applies only to <strong>Jabra</strong> PRO <strong>9470</strong>.<strong>Jabra</strong> PRO Bluetooth SupportThe <strong>Jabra</strong> PRO <strong>9470</strong> Base features Bluetooth support, which means that you can place and receive calls throughyour Bluetooth-enabled mobile phone using your headset. The headset, however, is based on DECT wirelesstechnology, which means that you cannot pair it directly with your mobile phone.englishFigure 42: <strong>Jabra</strong> PRO <strong>9470</strong> Base connections with BluetoothFrom the mobile phone’s point of view, the <strong>Jabra</strong> PRO <strong>9470</strong> Base looks just like a standard Bluetooth headset withhands-free, headset and phone-book access profile support. The features available to you will depend on whichof these are also supported by your mobile phone.When using your headset with your mobile phone, you should keep the mobile phone on your desk somewhereclose to the base. Most mobiles use Bluetooth Class 2, which supports a range of up to 10m. The <strong>Jabra</strong> PRO <strong>9470</strong>Base also supports Bluetooth Class 2.See Chapter 6: Daily Use — Calling, Answering and Hanging Up for <strong>com</strong>plete details about how to use your headsettogether with your mobile phone and other types of phones for day-to-day calling.<strong>Jabra</strong> PRO 9460, 9460-Duo and <strong>9470</strong> User <strong>manual</strong>www.HeadSet<strong>Plus</strong>.<strong>com</strong>52
9.2 Pairing and Connecting with Other Bluetooth DevicesPairing the Base with a Mobile PhoneTo use Bluetooth, you must set up the wireless <strong>com</strong>munication between the <strong>Jabra</strong> PRO <strong>9470</strong> Base and yourmobile phone by pairing them. The setup wizard helps you to do this during the initial setup but you can run thewizard at any later time.1. Launch the mobile-phone part of the setup wizard on the <strong>Jabra</strong> PRO base as described in Section 8.9: Re-runningthe Setup Wizards. This puts the base into pairing mode, which causes it to advertise itself as available forpairing.2. Make sure that Bluetooth is active on your mobile phone and put your phone into Bluetooth pairing mode.The exact procedure for doing this varies by mobile phone manufacturer and model — see your mobilephone <strong>manual</strong> for details.english3. Your phone now looks to see if any nearby Bluetooth devices are advertising themselves for pairing. Useyour phone’s controls to identify and select the “<strong>Jabra</strong> PRO <strong>9470</strong>” device. Your phone might also ask for theheadset’s pass code. The pass code for all <strong>Jabra</strong> devices is 0000 (four zeros).JABRA PRO4. Your phone attempts to connect to the base and then shows you the result of the attempt. If the attemptfails, please try again. If you are still having trouble, please check your mobile phone documentation and/orcontact technical support for <strong>Jabra</strong> and/or your mobile phone.Note: All <strong>com</strong>munications between your <strong>Jabra</strong> PRO <strong>9470</strong> Base and your mobile phone are encrypted, soothers will not be able to intercept and understand your conversation. Establishing this encryption is animportant part of the pairing process.Managing Bluetooth ConnectionsJust because two devices are paired, does not necessarily mean they are connected, which means that the linkbetween them is active. Usually, the base manages its Bluetooth connection automatically even as you takethe mobile phone out of range and/or turn off the devices from time to time. However <strong>Jabra</strong> PRO does providecontrols for managing the connection <strong>manual</strong>ly if necessary, as described below.To drop the connection from the base to your mobile phone (for example, because you would like to connectyour mobile phone to another device), do one of the following:- Use the base touchscreen menus as described in Section 8.8: Setting General User Preferences.- Use the menu system on your mobile phone as described in your phone’s documentation.If two paired devices are turned on and in range but fail to connect automatically, you can connect <strong>manual</strong>lyusing the base and/or mobile phone menu <strong>com</strong>mands.<strong>Jabra</strong> PRO 9460, 9460-Duo and <strong>9470</strong> User <strong>manual</strong>www.HeadSet<strong>Plus</strong>.<strong>com</strong>53
9.3Forcing reconnection/Disconnection via the touchscreenIf the base — and therefore also the headset — loses the connection to the mobile phone (e.g. if you take itout of range) it periodically attempts to reconnect — every 15 secs for the first 3 hours and then every 40 secsindefinitely. You can instead force the headset to reconnect with it via the touchscreen base. The headset must bewithin range of the base for this to happen.Consider the figure below:englishFigure 43: Mobile phone connection is lostThe mobile phone icon is greyed out, indicating that the connection is lost. To reconnect <strong>manual</strong>ly, do thefollowing:1. Touch the greyed out mobile phone icon to make it the target. See the figure below:Figure 44: Mobile phone is the target2. Touch the Bluetooth button on the mobile phone icon. This causes the base to start reconnecting to themobile phone, indicated by the flashing Bluetooth icon. See the figure below:Figure 45: Mobile phone is the target<strong>Jabra</strong> PRO 9460, 9460-Duo and <strong>9470</strong> User <strong>manual</strong>www.HeadSet<strong>Plus</strong>.<strong>com</strong>54
3. When the mobile and base are reconnected — which means that the connection to the headset is alsorestored via the base — the mobile phone target icon is no longer greyed out, as shown in the figure below:englishFigure 46: Mobile phone and base are reconnectedConversely, if you want to force the headset to disconnect the mobile phone, do the following:1. Touch the mobile phone target icon to view the Mobile Phone menu. See the figure below:MOBILE PHONEDisconnectFigure 47: Mobile Phone menu2. Touch Disconnect. This causes the base (and also the headset) to disconnect the mobile phone, indicated bygreyed out target icon with the Bluetooth button. See figure 44 above.3. Touch a different phone icon to select a different (connected) target. Suppose you select the desk phone asthe new target; the touchscreen is as shown in figure 43 above.<strong>Jabra</strong> PRO 9460, 9460-Duo and <strong>9470</strong> User <strong>manual</strong>www.HeadSet<strong>Plus</strong>.<strong>com</strong>55
10.Recording Your CallsThe <strong>Jabra</strong> PRO touchscreen base enables you to record your conversations using third-party software on your PC.Controls for working with this feature are included in the touchscreen menus.IMPORTANT: Never record conversations with people without first informing them that you are doing soand getting their permission. Recording people surreptitiously may be against the law and can also leadto law suits.englishCALL OPTIONSSpeakerVolumeThere are settings to enable recording both in the Call Options menu (seesection “Setting Active Call and Audio Preferences) and the Settings menu(see section “Setting General User Preferences”). Refer to the menus shownhere on this page.HoldEnablerecordingSETTINGSLanguageEnable RecordingThe setting in the Settings menu is the default value (recording enabledor recording disabled) that applies to any call. The equivalent setting isavailable in the Audio tab for your <strong>Jabra</strong> device in <strong>Jabra</strong> Control Center.For an active call it is then possible to “override” this default by accessingthe Call Options menu and either enable or disable recording. Note thatthe setting in Call Options only applies to the current active call.Disable audiodetection<strong>Jabra</strong> PRO 9460, 9460-Duo and <strong>9470</strong> User <strong>manual</strong>www.HeadSet<strong>Plus</strong>.<strong>com</strong>56
11.FAQs and TroubleshootingQ How can I use my headset with my mobile phone? (<strong>Jabra</strong> PRO <strong>9470</strong> only).A To be able to do this, you need to pair the <strong>Jabra</strong> PRO <strong>9470</strong> base with your mobile phone (your headset is basedon DECT and cannot be paired directly with your mobile phone). Do the following:- Refer to the section “Re-running the Setup Wizards” which explains how to launch the mobile phone partof the setup wizard. This puts the headset’s base into pairing mode, which causes it to advertise itself as‘available for pairing’.- Make sure that Bluetooth® is active on your mobile phone and put it into Bluetooth® pairing mode. The exactprocedure for doing this varies according to brand and model. See your <strong>user</strong> <strong>manual</strong> for details.- Remember that the headset identifies itself as “<strong>Jabra</strong> PRO <strong>9470</strong>” — you need to find and select this on yourphone. You might also be prompted to enter the pass code “0000” (four zeros) to accept pairing. If you needmore on this, see the section called “Using <strong>Jabra</strong> PRO <strong>9470</strong> with a mobile phone” in the <strong>user</strong> <strong>manual</strong>.englishQ How many Bluetooth® devices can I have connected to the <strong>Jabra</strong> PRO <strong>9470</strong> base?A Only one. The <strong>Jabra</strong> PRO <strong>9470</strong> base supports Bluetooth® so that you can use your mobile phone with yourheadset.Q How do I pair my headset with the <strong>Jabra</strong> PRO 9400 base?A If you dock a <strong>Jabra</strong> PRO 9400 base and headset that are not paired, the touch screen asks if you would liketo pair the headset — either as a primary or secondary device. If you choose to pair it as secondary, theconnection is temporary, lasting only until the end of the next (or current call). This feature is meant tofacilitate conference calling.Touch the ‘confirm’ icon to pair them; touch the ‘cancel’ icon to prevent pairing (while still charging the headset).If you dock a headset to a <strong>Jabra</strong> PRO 9400 base with which it is already paired, no pairing notification appears.For more information, see the section called “Pairing and Connecting the Base and <strong>Headset</strong>” in the <strong>user</strong> <strong>manual</strong>.Q Can I pair my headset directly with a third-party DECT phone?A No, you can only pair the headset with a <strong>Jabra</strong> PRO 9400 base (it is not Generic Access Profile (GAP) <strong>com</strong>pliant).This is because <strong>Jabra</strong> PRO 9400 uses an enhanced version of the DECT standard, thereby enabling many of itsadvanced call-handling features. These enhancements are not supported by third-party manufacturers.Q Why doesn’t my <strong>com</strong>puter detect the <strong>Jabra</strong> PRO 9400 base?A Try connecting the base to another USB port on the PC. Also, please note that it is re<strong>com</strong>mended to havea direct connection - i.e. with no USB hub in between.Q Why doesn’t my headset work with my desk phone / softphone / mobile phone(<strong>Jabra</strong> PRO <strong>9470</strong> only)?A Please check the following:- Make sure the headset is charged. The LED lights a constant yellow color while charging, then shows no lightat all (only state indication) when fully charged.- Make sure the headset is within range of the base (up to 150m) and that the mobile is within range of thebase (up to 10m).- The base / mobile phone and the headset may no longer be paired. Refer to the questions about pairingthese devices, above.Q Nothing happens when I try to use my desk phone.A Check the following:- Make sure the <strong>Jabra</strong> PRO 9400 base is powered on (check that the touch screen is on).- Make sure the desk phone is the current target. See the section called “The Target Phone Concept” for more.- Make sure the audio link to the desk phone is active (e.g., by tapping the headset multifunction button ortouching the activate-audio-link icon on the touch screen)- Make sure that the telephone has an active connection to the phone network (i.e. its handset is off the hookor its headset button is pressed).- Re-run the desk phone set-up wizard.<strong>Jabra</strong> PRO 9460, 9460-Duo and <strong>9470</strong> User <strong>manual</strong>www.HeadSet<strong>Plus</strong>.<strong>com</strong>57
Q I cannot hear anything in my headset when using my mobile phone. (<strong>Jabra</strong> PRO <strong>9470</strong> only)A Try the following:- Make sure the two devices are paired and connected. See the section “Using <strong>Jabra</strong> PRO <strong>9470</strong> with a mobilephone” in the <strong>user</strong> <strong>manual</strong> for more information.- Increase the speaker volume on the headset by sliding your finger up the touch-sensitive panel on the sideof the headset.Q I hear a low noise in the headset when there is silence at the other end?A Your headset is probably using one of the highest volume settings. Decrease the speaker volume on theheadset by sliding your finger down the touch-sensitive panel on the side of the headset.englishQ I hear myself when I talk using my desk phone. What can I do?A This probably means your transmission volume is too high. Set the transmission volume on your desk phone toa lower level.Q The sound in the headset is poor quality or the person at the other end cannot hearme when I talk using my desk phoneA The clear dial-tone switch and/or microphone-level setting in the <strong>Jabra</strong> PRO 9400 base may be set incorrectly.Correct by re-running the desk phone setup wizard. See the section called “Re-running the Setup Wizards”in the <strong>user</strong> <strong>manual</strong> for more information.Q I am getting a buzzing sound in my headset.A If the device has been set up correctly, your telephone may not be fully immune to the radio signals the headsetuses. To over<strong>com</strong>e this problem, move the headset base at least 30 cm away from the telephone. Alternatively,you can reduce the range of your unit by adjusting the settings on the touch screen.Q I can’t hear sound or listen to music from my PC in my headset.A Please check the following:- Make sure that the <strong>Jabra</strong> PRO 9400 base is selected as the current audio device both in the Windows soundcontrol panel and in the application you are using.- Make sure the audio link to the PC is open (e.g., by right-clicking on the <strong>Jabra</strong> Device Service icon in theWindows notification area on your PC).- Make sure softphone is enabled in <strong>Jabra</strong> PC Suite.Q I have moved to a new desk at work. Is it possible to put my headset on another<strong>Jabra</strong> PRO 9400 base?A Yes. Just place your headset in the cradle on the new <strong>Jabra</strong> PRO 9400 base. The two devices will pair andconnect automatically.Q When I try to make a call on my desk phone, the GN1000 RHL lifts, but the call is notconnected.A The GN1000 cannot be used in conjunction with a headset port. Make sure that the <strong>Jabra</strong> PRO 9400 base isconnected to your desk phone’s handset port and not its headset port (if it has one).Q Is it possible to automate calling and answering on my desk phone without usinga handset lifter?A Yes, if your desk phone has an electronic hook switch feature. Check with your supplier for <strong>com</strong>patibility withyour phone, and/or consult the support area at www.jabra.<strong>com</strong>.Q My telephone includes an electronic hook switch feature that should work with myheadset, but I can’t make it function.A Please check your desk phone documentation to see if any special configuration settings or software updatesare required. See also the <strong>Jabra</strong> website for more information, including <strong>com</strong>patibility and the correct, cleardial tone switch setting – www.jabra.<strong>com</strong>/PRO9400Q Does Wi-Fi interfere with <strong>Jabra</strong> PRO 9400 if you have them in the same place?A No, the <strong>Jabra</strong> PRO <strong>9470</strong> Bluetooth® port uses adaptive frequency hopping, thereby avoiding channels that areblocked by Wi-Fi. To ensure good sound quality, only the free channels are used.Q Is it possible to listen in on calls with the <strong>Jabra</strong> PRO 9400 solution?A The risk of unauthorized access to <strong>com</strong>munication via a <strong>Jabra</strong> PRO 9400 headset is very limited as 64-bitencryption is used for the data stream.<strong>Jabra</strong> PRO 9460, 9460-Duo and <strong>9470</strong> User <strong>manual</strong>www.HeadSet<strong>Plus</strong>.<strong>com</strong>58
Q What is the range on the <strong>Jabra</strong> PRO 9400 solution?A <strong>Jabra</strong> PRO 9400 supports a maximum range of up to 150m* (base to headset). In practice, you may find therange to be somewhat shorter due to physical obstructions and electromagnetic interference.The sound in your headset will slowly deteriorate as you move farther from the base. Move back into rangeand sound quality is restored. If you move all the way out of range while talking, you will lose all sound,but your call will be held open at the base for 60 seconds. This gives you the chance to move back in range.However, after 60 seconds the current call will be terminated. If you remain out of range for a longer time, youmay need to re-establish the DECT connection <strong>manual</strong>ly when you return (i.e. dock the headset to the base).englishQ What about conference calls?A The <strong>Jabra</strong> PRO 9400 base is able to pair with one primary headset plus an optional and temporary secondaryheadset. This allows you to share your conversation with another headset <strong>user</strong> for conference calling.Q Can I turn the headset off to save power when I’m away from the base?A Yes. Press and hold down the headset’s multifunction button down for 5 seconds. To turn the headset back onagain, simply dock it in its cradle or press the multifunction button. Please note that this power cycle is theequivalent of resetting the headset.Q What is the talk time for a <strong>Jabra</strong> PRO 9400 headset?A About 8h for wideband talk mode and up to 10h for narrowband talk mode.Q My headband / earhook / neckband is broken. How do I get another one?A Simply contact your local <strong>Jabra</strong> supplier and place an order. You can find the part numbers in the sectioncalled “Optional Accessories” in the <strong>user</strong> <strong>manual</strong>.Q I can’t contact the dial-in server. What should I do?A Let the touch screen wizard guide you — you can retry the automatic setup or try a <strong>manual</strong> setup of your deskphone. You can also choose to retry the cable setup. See the section called “Configuring the <strong>Jabra</strong> PRO 9400base for your desk phone” in the <strong>user</strong> <strong>manual</strong> for more information.* Range varies according to the environment in which the headset is used<strong>Jabra</strong> PRO 9460, 9460-Duo and <strong>9470</strong> User <strong>manual</strong>www.HeadSet<strong>Plus</strong>.<strong>com</strong>59
12.Getting AssistanceIf you are having problems with your headset solution that are not addressed by the information in this <strong>manual</strong>,then please feel free to contact <strong>Jabra</strong> technical support at any the locations listed below.12.1EuropeWeb (for the latest support info and online User Manuals):www.jabra.<strong>com</strong>Phone:E-mail:Belgique/Belgium + 49 (0)8031 2651 72 techsupport@gn.<strong>com</strong>Czech Republic 800 522 722 support.cz@gn.<strong>com</strong>Danmark + 45 45 75 99 99 support.dk@gn.<strong>com</strong>Deutschland + 49 (0)8031 2651 72 techsupport@gn.<strong>com</strong>España + 34 916 398 064 info@gnnet<strong>com</strong>.esFrance + 33 (0) 130 589 075 techsupport@gnnet<strong>com</strong>.frItalia + 39 02 5832 8253 tecnico@gn.<strong>com</strong>Luxembourg + 49 (0)8031 2651 72 techsupport@gn.<strong>com</strong>Nederland + 49 (0)8031 2651 72 techsupport@gn.<strong>com</strong>Norge + 47 32 22 74 70 support.no@gn.<strong>com</strong>Österreich + 49 (0)8031 2651 72 techsupport@gn.<strong>com</strong>Poland + 48 12 254 40 150 801 800 550 support.pl@jabra.<strong>com</strong>Russiasorlov@gn.<strong>com</strong>darkhipov@gn.<strong>com</strong>Suomi + 358 9 396 811 support.fi@gn.<strong>com</strong>Sverige + 46 (0)8 693 09 00 info@jabra.seUnited Kingdom + 44 (0)1784 220 172 info_uk@jabra.<strong>com</strong>12.2USA and CanadaWeb (for the latest support info and online User Manuals):www.jabra.<strong>com</strong>E-mail Technical support: techsupp@jabra.<strong>com</strong>E-mail Information: info@jabra.<strong>com</strong>Phone (toll-free in USA and Canada):Canada 1-800-489-4199usa 1-800-826-465612.3Asia/PacificWeb (for the latest support info and online User Manuals):www.jabra.<strong>com</strong>E-mail Information: support.apac@jabra.<strong>com</strong>Phone:Australia1-800-083-140 (GN Customer service)1-800-636-086 (local distributor)China + 86-21-5836 5067Hong Kong 800-968-265 (Toll free)Indonesia 001-803-852-7664Japan + 81-3-3242-8572Malaysia1800-812-160 (Tollfree)New Zealand 0800-447-982 (Toll free)Singapore800-860-0019 (Toll free)Taiwan0080-186-3013 (Toll free)India000-800-852-1185(Tollfree)Philippine + 63-2-2424806english<strong>Jabra</strong> PRO 9460, 9460-Duo and <strong>9470</strong> User <strong>manual</strong>www.HeadSet<strong>Plus</strong>.<strong>com</strong>60
13.Technical Specifications13.1 All <strong>Jabra</strong> PRO <strong>Headset</strong>sOperating environment:-10˚C to +55˚C (0˚C to +40˚C when charging); up to 98% humidityCall control:multifunction button supporting answer call, end call, voice-activated dialing, reject call, redial, swap held calls;docking operations can also answer and end callsVolume control and microphone mute:controlled via touch-panel on headsetVisual indicator:multi-color LED indicates call status, battery level, pairing status and other eventsAudio indicators:Tones to indicate in<strong>com</strong>ing calls, low battery, volume level, microphone muting and other events; target phonecan be indicated by English voice tag or target-specific melodySound quality:DSP noise reduction; echo cancellation; tone control; narrowband and wideband audio (selectable per phone type)Firmware update:Downloadable from PCRecharge:While docked in the <strong>Jabra</strong> PRO basePC-based configuration:All settings can be stored and loaded from a PC for backup and mass deploymentWireless standard:DECT and DECT 6.0 (CAT - iq)DECT range:up to 150m from <strong>Jabra</strong> PRO base to headsetDECT Frequencies:US DECT: 1.88 - 1.90EU DECT: 1.92 - 1.93Wearing styles:Ear hook or headband (neckband is available as an accessory)Boom style:MidiMicrophone:Single noise-cancelling microphone13.2<strong>Jabra</strong> PRO Midi <strong>Headset</strong>The <strong>Jabra</strong> PRO Midi <strong>Headset</strong> is included with <strong>Jabra</strong> PRO <strong>9470</strong>. In addition to the specifications listed above, thisheadset provides the following:Wearing styles:Ear hook, headband, neckband (either included or available as accessories, depending on model)Speakers:1Boom style:MidiMicrophone:Dual Noise Blackout microphonesenglish<strong>Jabra</strong> PRO 9460, 9460-Duo and <strong>9470</strong> User <strong>manual</strong>www.HeadSet<strong>Plus</strong>.<strong>com</strong>61
13.3 <strong>Jabra</strong> PRO Flex <strong>Headset</strong>Wearing styles:Ear hook, headband, neckband (either included or available as accessories, depending on model)Speakers:1Boom style:FlexMicrophone:Single noise-cancelling microphone13.4Wearing style:headbandSpeakers:2 (dual mono)Boom style:flexMicrophone:single noise-cancelling microphone13.5<strong>Jabra</strong> PRO 9460-Duo <strong>Headset</strong><strong>Headset</strong> Hearing ProtectionAll <strong>Jabra</strong> PRO 9460 and <strong>9470</strong> headsets can be configured to provide any of several levels of protection,depending on how long you use the headset each day. A specific setting may be required in some jurisdictions.See also Section 2.2: Protecting your Hearing with SafeTone.All four IntelliTone levels above zero meet and exceed de facto global protection levels, and are <strong>com</strong>pliant withNIOSH standards and EU health and safety codes of 85 dB(A). The are also <strong>com</strong>pliant with Directive 2003/10/EC ofthe European Parliament and Council of 6 February 2003.The TT4 protection level is <strong>com</strong>pliant with pertinent Australian re<strong>com</strong>mendation.13.6<strong>Headset</strong> BatteryAll <strong>Jabra</strong> PRO headsets use the same type of battery, which has the following specifications:Battery type:Lithium IonBattery capacity:315 mA/h, typicalBattery talk time:Up to 8hBattery lifetime:Minimum 500 charge cycles (over 3 years when used for 8 hours a day)Battery standby time:At least 100hOperating temperature range:at -10˚C to +60˚CNote: The headset features an temperature-dependant charging algorithm that prevents the battery from beingcharged during extreme temperatures (about 0 to 45 deg. C)Battery charge time:2 hoursShelf life:Holds a charge for at least 6 months in the off state before recharge is requiredReplacement:Battery lifetime is usually about 3 years with regular use. Contact your <strong>Jabra</strong> dealer for details about how to ordera battery-replacement kit for your headsetenglish<strong>Jabra</strong> PRO 9460, 9460-Duo and <strong>9470</strong> User <strong>manual</strong>www.HeadSet<strong>Plus</strong>.<strong>com</strong>62
13.7Materials and AllergiesThe headband attachment is made of stainless steel and does not have a nickel-coated surface. Nickel releasefrom the headband is 0.02 μg/cm 2 /week, which is well below the 0.50 μg/cm 2 /week limit established by EUDirective 94/27/EF. The stainless steel alloy was tested for nickel release in accordance with the Europeanstandard EN 1811:1998.Other wearing-style attachments are made of plastic and contain no known allergens.The leatherette ear cushions do not contain vinyl.The products contain no nickel, chrome or natural rubber that can <strong>com</strong>e into contact with <strong>user</strong>s’ skin.13.8Touchscreen BaseAll <strong>Jabra</strong> PRO bases described in this <strong>manual</strong> meet the following specifications (model differences are notedwhere relevant). The <strong>9470</strong> base also supports Bluetooth, which is specified in the next section.Dimensions:160mm x 94mm x 82mmWireless standard:DECT and DECT 6.0 (CAT - iq)DECT range:Up to 150m from base to headsetOperating environment:-10˚C to +55˚C (0˚C to +40˚C when charging); up to 98% humidityTouchscreen:2.4” touch-sensitive TFT; Q-VGA resolutionTouchscreen functions:Detailed call handling, system configuration and setup wizard; can fetch and redial from mobile-phone callhistory (in<strong>com</strong>ing, outgoing and missed calls)Recharge cradle:Fits supplied <strong>Jabra</strong> PRO headset; features magnetic coupling; easily replaced to ac<strong>com</strong>modate future headsetupgradesAudio:Built-in speaker can provide ring tones and/or audio feedback for touchscreen operationAudio bandwidth:Narrowband or widebandDesk phone connections:RJ-11 for handset, RJ-11 for phone body (or headset port), RJ-45 for AUX (for electronic hookswitch or GN1000handset lifter)Clear dial-tone switch and microphone calibration:Software controlled and adjusted automatically by calling your local <strong>Jabra</strong> test serverElectronic-hookswitch standards:GN1000, Cisco, DHSG, MSH, (each requires additional cabling and/or equipment available separately; more maybe<strong>com</strong>e available in future and added via firmware upgrade)Online indicator:2,5 mm jack connector (available as an accessory)PC connector:Mini USBFirmware update:Downloadable from PC; also can include language packs for touchscreen displayPC-based configuration:All settings can be stored and loaded from a PC for backup and mass deploymentSoftphone support:Full call handling for Skype, Microsoft Office Communicator and Cisco IP Communicator; other softphones seeheadset as a standard sound card; support for additional softphones may be added via driver updates for the PC.For the latest updates, see jabra.<strong>com</strong>/pcsuite on the webTheft protection:Kensington Security Slot standardenglishThis product contains font software programs which generate human readable typeface designs (“Font Software”)on base display. The Font Software family is Frutiger® Next licensed to GN Net<strong>com</strong> by Linotype®.<strong>Jabra</strong> PRO 9460, 9460-Duo and <strong>9470</strong> User <strong>manual</strong>www.HeadSet<strong>Plus</strong>.<strong>com</strong>63
13.9<strong>Jabra</strong> PRO <strong>9470</strong> Base Bluetooth SupportIn addition to the <strong>com</strong>mon specifications listed above, the <strong>Jabra</strong> PRO <strong>9470</strong> Base also includes Bluetooth supportwith the following specifications:Bluetooth version:BT 2.0 Class 2Bluetooth range:Up to 10m (Class 2)Bluetooth profiles:<strong>Headset</strong> profile (HSP 1.1), hands-free profile (HFP 1.5), device-identification profile (DIP 1.3), phone-book accessprofile (PBAP 1.0)Bluetooth paring table:1 trusted device (headset)Simultaneous Bluetooth connections:1 (headset)13.10 Product DisposalPlease dispose of the headset according to local regulations and recycle when possible. Do not dispose ashousehold waste. Do not dispose of the headset in a fire as the battery may explode. Batteries may also explodeif damaged.13.11 Certifications and Safety ApprovalsCEThis product is CE marked according to the provisions of the R & TTE Directive (99/5/EC). Hereby, GN declares thatthis product is in <strong>com</strong>pliance with the essential requirements and other relevant provisions of Directive 1999/5/EC.For further information, please consult http://www.jabra.<strong>com</strong>.Within the EU, this device is intended for use in Austria, Belgium, Cyprus, Czech Republic, Denmark, Estonia,Finland, France, Germany, Greece, Hungary, Ireland, Italy, Latvia, Lithuania, Luxembourg, Malta, Poland, Portugal,Slovakia, Slovenia, Spain, Sweden, The Netherlands, United Kingdom, and within EFTA in Iceland, Norway andSwitzerland.FCCThis device <strong>com</strong>plies with part 15 of the FCC Rules. Operation is subject to the following two conditions: (1) Thisdevice may not cause harmful interference, and (2) this device must accept any interference received, includinginterference that may cause undesired operation.Users are not permitted to make changes or modify the device in any way. Changes or modifications notexpressly approved by <strong>Jabra</strong> will void the <strong>user</strong>’s authority to operate the equipment.This equipment has been tested and found to <strong>com</strong>ply with the limits for a Class B digital device, pursuant to part15 of the FCC Rules. These limits are designed to provide reasonable protection against harmful interferencein a residential installation. This equipment generates, uses and can radiate radio frequency energy and, if notinstalled and used in accordance with the instructions, may cause harmful interference to radio <strong>com</strong>munications.However, there is no guarantee that interference will not occur in a particular installation. If this equipment doescause harmful interference to radio or television reception, which can be determined by turning the equipmentoff and on, the <strong>user</strong> is encouraged to try to correct the interference by one or more of the following measures:- Reorient or relocate the receiving antenna.- Increase the separation between the equipment and receiver.- Connect the equipment into an outlet on a circuit different from that to which the receiver is connected.- Consult the dealer or an experienced radio/TV technician for help.The <strong>user</strong> must place the base 8” (20 cm) or more from any personnel in order to <strong>com</strong>ply with FCC RF exposurerequirements.Industry CanadaOperation is subject to the following two conditions: (1) This device may not cause interference and (2) Thisdevice must accept any interference, including interference that may cause undesired operation of the device.The term “IC:” before the certification/registration number only signifies that registration was performed basedon a Declaration of Conformity indicating that Industry Canada technical specifications were met. It does notimply that Industry Canada approved the equipment.englishPatents and design registration pending international<strong>Jabra</strong> PRO 9460, 9460-Duo and <strong>9470</strong> User <strong>manual</strong>www.HeadSet<strong>Plus</strong>.<strong>com</strong>64
14.GlOSSARYBluetoothAn open wireless protocol for exchanging data over short distances from fixed and mobile devices, such asmobile phones and headsets. It is primarily designed for low power consumption, with a short range (powerclass-dependent:1 meter, 10 meters, 100 meters) based on low-cost transceiver microchips in each device.Bluetooth makes it possible for these devices to <strong>com</strong>municate with each other when they are in range. Becausethe devices use a radio (broadcast) <strong>com</strong>munications system, they do not have to be in line of sight of each other.DECT(Digital Enhanced Cordless Tele<strong>com</strong>munications). DECT is an ETSI standard for digital portable phones (cordlesshome telephones), <strong>com</strong>monly used for domestic or corporate purposes. DECT can also be used for wirelessbroadband data transfers.DongleA small piece of hardware that connects to a <strong>com</strong>puter, typically portable like a USB Pen. Although earlier useof dongles was to authenticate a piece of software, the word dongle is now widely used to refer to a broadbandwireless adapter. In connection with <strong>Jabra</strong>® products, dongle is another term for USB Bluetooth adapter(see below).Dual microphonesDual microphones increase the amount of captured sound data, enabling the device to more intelligently filterthe background noise. DSP technology then uses the microphones to determine the direction of the sound ornoise based on the sound delay between the two microphones, making it possible to filter out unwanted noise.The DSP also uses the dual microphone system to significantly reduce stationary noise. To eliminate the “tinny”effect, sound emanating from the mouth is enhanced and transmitted while all other sound is classified as noiseand is filtered out.DSPDigital Signal Processing.FirmwareThe software that is embedded in a hardware device, for example any <strong>Jabra</strong> headset or base.HookswitchThe control mechanism that answers and hangs up a call on a telephone. When you place the handset in thetelephone cradle, it depresses the switch hook’s button and hangs up (puts the phone “on hook”).<strong>Jabra</strong>® PC SuiteA collection of PC programs that enable you to configure your <strong>Jabra</strong> device, update its firmware and controlsupported softphones using the buttons on your headset. The <strong>Jabra</strong> PC Suite also includes drivers for varioussoftphones on the market.Narrowband audioNarrowband refers to a situation in radio <strong>com</strong>munications where the bandwidth of the message does notsignificantly exceed the channel’s coherence bandwidth. It is a <strong>com</strong>mon misconception that narrowband refersto a channel which occupies only a “small” amount of space on the radio spectrum. Narrowband can also beused with the audio spectrum to describe sounds which occupy a narrow range of frequencies. In telephony,narrowband is usually considered to cover frequencies 300–3400 Hz.Noise BlackoutDeveloped by GN Net<strong>com</strong> engineers, Noise Blackout applies a directional principle to noise cancellation,reducing only surrounding noise and not distorting the <strong>user</strong>’s voice. The technology uses dual microphonesto capture sound, intelligently filtering background noise only. Other noise cancellation headsets cancel noiseby cutting away audio frequency and reducing sound quality. Used together with advanced DSP technologyand Peakstop (audio shock protection) that monitors in<strong>com</strong>ing audio volume, sound is balanced to filter outbackground noise, leaving both sides of the call with a natural sounding voice quality.PairingCreates a unique and encrypted link between two Bluetooth devices and enables them to <strong>com</strong>municate witheach other. Bluetooth devices will not <strong>com</strong>municate if they have not been paired.SoftphoneA piece of software for making telephone calls over the Internet using a general purpose <strong>com</strong>puter, rather thanusing dedicated hardware. Often a softphone is designed to behave like a traditional telephone, sometimesappearing as an image of a phone, with a display panel and buttons with which the <strong>user</strong> can interact.A softphone is usually used with a headset connected to the sound card of the PC, or with a USB phone.english<strong>Jabra</strong> PRO 9460, 9460-Duo and <strong>9470</strong> User <strong>manual</strong>www.HeadSet<strong>Plus</strong>.<strong>com</strong>65
Softphone driverEstablishes a control link between a softphone and your <strong>Jabra</strong> headset, so you can answer and end, mute andun-mute, and hold and resume calls using the buttons on your headset. The actual call control functions availablefrom your headset depend on the capabilities of the softphone and the <strong>Jabra</strong> headset model.USB Bluetooth adapterSometimes also called a dongle (see above). A PC must have a Bluetooth adapter in order to <strong>com</strong>municate withother Bluetooth devices. While some desktop <strong>com</strong>puters and most recent laptops <strong>com</strong>e with a built-in Bluetoothadapter, others require an external one. Bluetooth allows multiple devices to <strong>com</strong>municate with a <strong>com</strong>puter overa single adapter.Wideband audioSometimes also called HD Audio, this is an audio technology used in telephony. It extends the frequency rangeof sound travelling over telephone lines, resulting in higher quality voice transmission. The range of the humanvoice extends from 80 hertz to 14,000 hertz. Traditional, or narrowband telephone calls, limit audio frequencies tothe range of 300 to 3400 hertz. Wideband audio eliminates the majority of bandwidth limitations and transmitsin the range of 30 hertz to 7000 hertz or higher.englishDispose of the product according to localstandards and regulations.www.jabra.<strong>com</strong>/weee<strong>Jabra</strong> PRO 9460, 9460-Duo and <strong>9470</strong> User <strong>manual</strong>www.HeadSet<strong>Plus</strong>.<strong>com</strong>66