instructions - Mamas & Papas
instructions - Mamas & Papas
instructions - Mamas & Papas
- No tags were found...

Create successful ePaper yourself
Turn your PDF publications into a flip-book with our unique Google optimized e-Paper software.
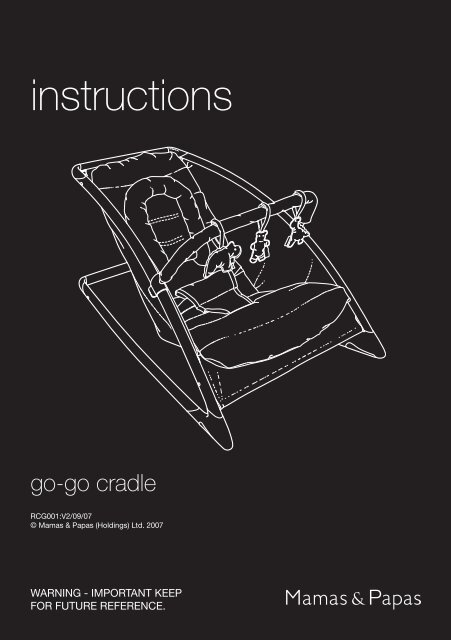
<strong>instructions</strong>go-go cradleRCG001:V2/09/07© <strong>Mamas</strong> & <strong>Papas</strong> (Holdings) Ltd. 2007WARNING - Important keepfor future reference.
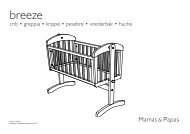
go-go cradleThese <strong>instructions</strong> are important. Please read carefullyand retain for future reference.The correct use and maintenance of your cradle will ensure it gives a longand trouble free use. When somebody else is using your cradle, ensure theyalso know how to use and adjust it and all necessary safety precautions.The safety of your child is your responsibility.After sales Service: If you need assistance, spare parts or you are unhappy with any aspect ofthe goods please contact Customer Care on: +44 (0)845 268 2000, or e-mail us at: customer.care@mamasandpapas.com. Visit our website at www.mamasandpapas.com for the latestproduct information.component list7526314Item Description Qty1 Seat 12 Legs 13 Leg joints Item Description Qty5 Toy bar 16 Hanging toys 37 Head hugger 14 Seat pad 1- -
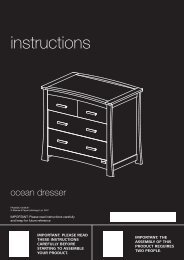
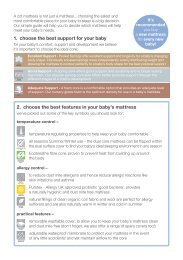
Assembling the cradle3Select the seat (1),legs (2) and legconnectors (3).Slot the legconnectors into openended tubes of theseats frame as shownin the diagram A.You will need to pushthe studs on the legconnectors in to fullyinsert them.2BACheck that the studson the leg connectorsare protrudingthrough the holes inthe legs tubing, seediagram B.1Slot the other endsof the leg connectorsinto the open ends ofthe legs, see diagramC.CCheck that the studson the leg connectorsare protrudingthrough the holes inthe leg tubing, seediagram B.- -
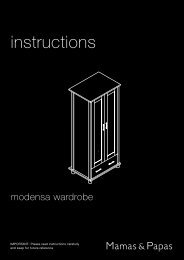
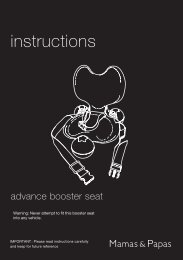
Fitting the seat padUnfasten the harnessif it is fastened, seepage 6.Place the seat pad onthe seat.Pull the crotch strapthrough the hole inthe seat pad, seediagram A.Slot the straps on thetop of the seat padthrough the holes inthe top of the seat,see diagram B.Unfasten the twopress studs on therear of the seatsbackrest, see diagramC.Fasten the press studson the strap to thepress stud attached tothe back of the seat,see diagram D.Fasten the press studson the straps attachedto the cover to thepress stud on theseat pads straps, seediagram E.BDCEA- -
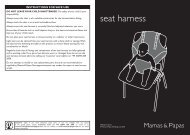
Fitting the toy barAPush the clips on thesides of the toy barover the frame of theseat, see diagram A.So that your child canplay with the toys thetoy bar can be pushedup or down the seatsframe.Pass the straps of thethree toys around thetoy bar. Fasten thevelcro pads on theends on the strapstogether, see diagramB.To remove the toy bar,pull the tabs on theclips outwards, seediagram C.BC- -
Stabilising feetThe cradle is equippedwith stabilising feet.These can be pulledout from the legconnectors to preventthe cradle fromrocking.Head huggerThe cradle is suppliedwith a head hugger.This can be placebehind the heads ofyoung babies to giveadded support andgreater comfort.- -
Instructions for safe use• WARNING: Never leave your child unattended in the cradle.• Not recommended for children who can sit up by themselves(6 months approximately: until 9 kgs).• WARNING: It is dangerous to put this rocking cradle on anelevated surface.• Never carry the cradle with the child in the seat and neverattempt to lift the cradle using the toy bar.• Always use the safety harness, see page 6.• Assemble and adjust the activity cradle with care.• Occasionally clean the metal and plastic parts with aproprietary polish. Do not use abrasives or bleach.• The fabric may be sponged clean on the frame.• Prolonged and direct exposure to the bright sunlight canchange the fabrics colours. Try to limit if possible.After sales Service: If you need assistance, spare parts or you are unhappy with any aspect ofthe goods please contact Customer Care on: +44 (0)845 268 2000, or e-mail us at: customer.care@mamasandpapas.com. Visit our website at www.mamasandpapas.com for the latestproduct information.- -