03 Sport Instructions - Mamas & Papas
03 Sport Instructions - Mamas & Papas
03 Sport Instructions - Mamas & Papas
- No tags were found...

Create successful ePaper yourself
Turn your PDF publications into a flip-book with our unique Google optimized e-Paper software.
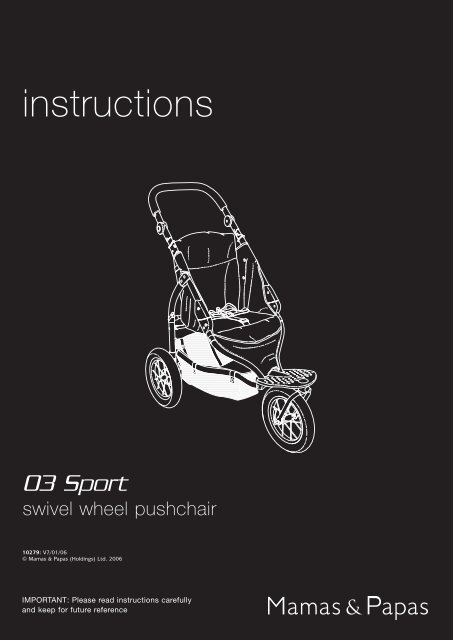
instructions<strong>03</strong> <strong>Sport</strong>swivel wheel pushchair10279: V7/01/06© <strong>Mamas</strong> & <strong>Papas</strong> (Holdings) Ltd. 2006IMPORTANT: Please read instructions carefullyand keep for future reference
<strong>03</strong> PUSHCHAIR RANGEDear Customer,Thank you for choosing one of the <strong>Mamas</strong> & <strong>Papas</strong> <strong>03</strong> range of pushchairs.The <strong>03</strong> range of pushchairs combine the rugged features of a three-wheeled pushchair with thedesign, comfort and style expected of <strong>Mamas</strong> & <strong>Papas</strong>.These pushchairs are at home in city high streets or on countryside lanes and tracks.Ideal for those who expect a little more from their pushchair and appreciate the design and feel ofa high quality piece of engineering.The <strong>Mamas</strong> & <strong>Papas</strong> Primo Viaggio Car Seat can also be attached to the pushchair using the Surefix‘right first time’ attachment system.CONTENTSProduct Information...................................................................................................................................2Accessories.........................................................................................................................2<strong>Instructions</strong> For Safe Use...................................................................................................3Pushchair Features.............................................................................................................4General OperationFitting the wheels............................................................................................................5Opening the pushchair for the first time ..........................................................................6Selecting swivel or fixed wheel mode...............................................................................7Fitting the hood ..............................................................................................................8Operating the brakes .......................................................................................................9Adjusting the legrest .......................................................................................................10Adjusting the backrest .....................................................................................................11Using and adjusting the safety harness ............................................................................12Fitting the footmuff and babycosy...................................................................................13Folding the pushchair ......................................................................................................14Removing the wheels.......................................................................................................15Opening the pushchair.....................................................................................................16Attaching the Primo Viaggio car seat ..............................................................................16Removing the Primo Viaggio car seat ..............................................................................17Opening the pushchair.....................................................................................................18Care and MaintenanceRemoving the basket .......................................................................................................19Removing the fabric cover ...............................................................................................20Fitting and using the hand pump .....................................................................................21Fitting the raincover ........................................................................................................21Care and maintenance of the tyres...................................................................................21Care and maintenance......................................................................................................221
PRODUCT INFORMATIONThis pushchair has been designed and tested to comply with the latest British safety standards.• This pushchair is designed for children from birth up to 15kgs (3 years of age approx).• The pushchair comes equipped with a five-point safety harness. Always use the harness whenyour child is in the pushchair.• Pneumatic tyres for increased comfort and improved grip.• Supplied with a hand pump, hood and PVC raincover.• The angle of the backrest can be adjusted for the added comfort of your child.• A shower resistant removable fabric hood.• A fitted basket.• Easy to remove front and rear wheels for a more compact storage solution.• The Primo Viaggio Car Seat can be attached to the pushchair.• Easy to remove, hard wearing fabric cover that is machine washable.BabycosyACCESSORIES<strong>03</strong> Accessory PackFootmuff to keepyour baby warm incolder weather.Rucksack and Travel bagsSeveral different bag styles are availableaccording to your preference and the fabriccolour of your pushchair.Head-huggerGives extra support toyour child and a morecomfortable ride.FootmuffTo keep your childwarm in colderweather.Primo Viaggio Car SeatSun canopyThe Primo Viaggio Car Seat is suitable frombirth to 13 kgs (12-15 months approximately).Coordinating sun canopy to help protect yourchild from the sun.2
INSTRUCTIONS FOR SAFE USE• WARNING: A CHILD’S SAFETY IS YOUR RESPONSIBILITY.• NEVER LEAVE YOUR CHILD UNATTENDED AT ANY TIME.• Always ensure that your pushchair is fully erect and all locking clips are engaged. (Take particularcare if the PVC Raincover is fitted. Check that it is not entangled or preventing the lockingmechanism from functioning correctly).• Your pushchair is supplied with a five-point safety harness. We recommend that the harness isworn by your child at all times. Ensure that the harness is correctly adjusted, providing a snug fitaround your child. Adjustments can be made using the buckles on the shoulder, waist and crotchstraps. Please refer to “Using and Adjusting the Safety Harness” on page 12. The pushchair issupplied with ‘D’ ring harness attachment points. These are located on either side at the base ofthe backrest and are for fitting a separate harness conforming to BS 6684 if required.• Always ensure the brakes are correctly engaged whenever the pushchair is left for any reason,even if only for a short time on a flat surface. Check the brakes are engaged by rocking thepushchair backwards and forwards.• Care should be taken when using any PVC raincover. Regularly check that your baby iscomfortable and not over heating. There are ventilation holes in the sides of the raincover. Theseare essential to aid the flow of cool air around your baby. When it is not raining or the pushchairis indoors always remove the raincover.• Always ensure your child is clear of moving parts before adjusting the position of the backrest,hood or sun canopy.• When you change the angle of the backrest, always ensure that the harness is correctly adjusted.• Always manoeuvre your pushchair up and down kerbs and steps gently. Do not let your pushchairdrop. Carry it up stairs whenever possible.• Never allow additional children to ride on the pushchair at any time.• Never overload your pushchair with additional goods.• Do not hang shopping from the handlebars.• Do not use any replacement parts or accessories e.g. child seats, raincovers, stand-on platformsetc, except those recommended or supplied by <strong>Mamas</strong> & <strong>Papas</strong>. The use of non-approvedreplacement parts or accessories may damage your pushchair or make it unsafe.• Never force your pushchair. Adjustments and locks should be free and easy to operate.• Do not store your pushchair in a damp place. Always allow the fabric to dry naturally away fromdirect heat.• The basket supplied with your pushchair is designed to hold a maximum of 3kgs. Excessiveweight could damage the basket or impede the safe operation of the pushchair.• We recommend that you fit a <strong>Mamas</strong> & <strong>Papas</strong> Sun Canopy to shade your child from directsunlight. We recommend that this is used in conjunction with the appropriate sun protectioncream and clothing.• The tyres of the pushchair should be regularly checked and inflated if necessary using the handpump supplied, or a suitable foot pump. Do not use high pressure air lines or mechanical pumpsas used in garages to inflate the tyres.IMPORTANT: Never inflate the tyres above - 28 P.S.I.3
<strong>03</strong> SPORT SWIVEL WHEEL PUSHCHAIRBackrestHoodThe hood comes with a detachablepocket as well as a removable backsection to allow increased ventilationfor your child.Safety harnessLegrestFootrestBasketSwivelknobRaincoverFully waterproof PVC raincover toprevent your child and the pushchairfrom getting wet.AdjustablehandlebarsBackrestadjustment strapFrame lockHandpumpHand pumpUse the hand pump to keep yourpushchair tyres correctly inflated.Brake pedal4
FITTING THE WHEELSFitting the front wheel:Place the folded pushchairon a flat work surface withthe forks facing up.Align the holes in the plastichubs with the ends of theforks and slot themtogether. Ensure thesuspension mechanism ispositioned at the back ofthe forks.Push down on the wheeluntil the two locking pins inthe forks spring into thecorresponding holes in theplastic hubs.Suspension mechanismForksRear wheelhousingsFitting the rear wheels:Slot the pin on the rearwheel into the hole in theend of the rear wheelhousing.Test the wheel is correctlyfitted by pulling it.Repeat the procedure toattach the second wheel.5
OPENING THE PUSHCHAIR FOR THE FIRST TIMELocate the frame lock onthe right hand side of thepushchair frame anddisengage it from the stud.Frame lockGrip the front wheel andpull it up to unfold thepushchair.When the pushchair isalmost fully open, pull thewheel up sharply to lockthe frame open.Adjusting the handlebars:Locate the two handlebaradjustment buttons oneither side of thehandlebars and push themin. With the buttons heldin, unfold the handlebarsand rotate them to thedesired position. Releasethe buttons to lock thehandlebars in position.Important: Check that thelocks are fully engaged byattempting to push thehandlebars forwards as ifyou were folding thepushchair.6
SELECTING SWIVEL OR FIXED WHEEL MODEThe pushchair can beoperated in swivel wheelmode or fixed wheel mode.Turn the swivel knob at thefront of the footrest toswitch between thesemodes.Ensure that the brakes areapplied. Turn the swivelknob clockwise or anticlockwise90 degrees froma vertical position tounlock the front wheel andengage swivel wheel mode.ATurn the swivel knob toposition A for fixed wheelmode and position B forswivel wheel mode.Important: If you aregoing to be jogging withthe pushchair, only everuse the wheel in the fixedwheel mode.BAB7
FITTING THE HOODSlot the back of the hoodthrough the handlebarsand position the hoodpivots against the frame.Hood pivotPush the tabs on the endof the hood pivots ontothe frame.Fasten the press studs onthe side flaps of the hoodA to the studs on the sidesof the backrest.Fasten the two press studson the back of the hood Bto the studs on thepushchairs backrest.ABAPush the tensioning barson the hood down.To remove the back sectionof the hood, unfasten thezip in the middle of thehood.Removing the hood is thereverse of fitting.Important: Always releasethe tensioning bars andfold the hood back beforefolding the pushchair.Zip8
OPERATING THE BRAKESApplying the brakes:Press the brake pedaldown as far as it will go.Do not use excessive forcewhen applying the brakes.Important: Always checkthat the brakes have fullyengaged by rocking thepushchair backwards andforwards.Releasing the brakes:Lift the brake pedal up asfar as it will go.Do not use excessive forcewhen releasing the brakes.9
ADJUSTING THE LEGRESTRaising the legrest:Lift the legrest up into thehorizontal position.2Lowering the legrest:1 Lift the two catcheseither side of the legrest.2 Lower the legrest.1110
ADJUSTING THE BACKRESTVelcro stripLowering the backrest:Feed the backrestadjustment strap throughbuckle and lower thebackrest to the desiredposition.Fasten the end of theadjustment strap onto thevelcro strip on thebackrest.Important: Do not adjustthe backrest when yourchild is pressed against it.Raising the backrest:Push the backrest up untilit is in the desired position.Pull the backrestadjustment strap until allof the slack is removed andthe backrest is held firmlyin position.Fasten the end of theadjustment strap onto thevelcro strip on thebackrest.Important: Do not adjustthe backrest when yourchild is pressed against it.11
USING AND ADJUSTING THE SAFETY HARNESSIMPORTANT: Every time you place your child in the pushchair or whenever you alter theposition of the backrest always check that the harness is correctly fitted and adjustedusing the shoulder and waist strap buckles. Tighten the harness until it fits snugly aroundyour child.Locking the harness:Push the tongues on theends of the waist strapsinto the buckle on thecrotch strap 1.The harness willautomatically lock whenthe tongues have beenfully inserted.Unlocking the harness:Squeeze the ends of thetongues together 2 andthen slide them out of thebuckle 3.Your child can now beremoved from thepushchair.12
FITTING THE FOOTMUFF AND BABYCOSYNote: The footmuff andbabycosy are available asaccessories. For moreinformation please consultyour retailer.ShoulderstrapsBefore fitting the footmuffor babycosy, unfasten theharness. Disconnect theshoulder straps from thewaist straps by squeezingthe ends of the tonguestogether and then slidethem out of the buckle.TonguesBuckleSlot the crotch strapthrough hole 1 in the backpad of the footmuff orbabycosy.Back padSlot the shoulder strapsthrough the hole 2 in theback pad.Slot the waist strapsthrough the side holes 3 inthe sides of the back pad.Clip the shoulder strapsback onto the waist straps.Important: Ensure that theharness webbing has notbecome twisted.3 321The front of the footmuffcan be removed from theseat pad by unfasteningthe zip.Reattach the top cover ofthe footmuff to the seatpad by zipping the twosections together.13
FOLDING THE PUSHCHAIRImportant: Before foldingthe pushchair ensure thatthe brakes are applied, thehood is folded and thebackrest is in the uprightposition. Also ensure thatthe front wheel is in fixedwheel mode, see page 7.Release the locking catchon the left hand side of thepushchair and slide thelock on the handlebars up.LockingcatchLockRelease the locking catchon the right hand side ofthe pushchair and slide thelock on the handlebars up.While holding the locksopen, push the handlebarsforward and down untilthe pushchair starts tofold.Release both of the locksand continue to push downuntil the pushchair isfolded flat.Gently push down on thehandlbars and fasten theframe lock over the stud tolock the pushchair in thefolded position.Finally, fold the handlebarsflat, see page 7.Important: Never fold andlock the pushchair when inswivel wheel mode.14
REMOVING THE WHEELSLockingpinRemoving the frontwheel:Lay the pushchair on itsside or back. Push the twolocking pins on the forksthrough the holes in theplastic hubs. Then pull thefront wheel and the hubsfrom the pushchair.Removing the rearwheels:Locate the two rear wheelrelease levers on eitherside of the rear axle.Lift one of the rear wheelrelease levers to unlock thewheel and pull it from therear wheel housing.Repeat for the second rearwheel.Releaselever15
ATTACHING THE PRIMO VIAGGIO CAR SEATApply the brakes on thepushchair then lower thebackrest to its lowestposition, see page 11.Raise the legrest to theupper position, see page10.Disconnect the crotch strapand fold the harness flaton the seat. Fold back thefabric flap on the bottomof the seat to reveal thetwo attachment brackets.Fold the fabric flap in halfover the legrest and usethe velcro pads to hold itin place.VelcropadsAttachmentbracketsRaise the attachmentbrackets to the verticalposition.1 Slide the attachmentbrackets sidewaystowards the centre of theseat.2 Rotate them up until theyare vertical.3 The attachment bracketswill lock in the verticalposition.Align the centre lockingclips in the car seat withthe attachment brackets.Push the car seat downonto the attachmentbrackets until it clicks intoplace. Check the car seatis firmly in place byattempting to lift it off.With the car seat in positionpull the backrestadjustment strap until allof the slack is removed andthe backrest is positionedfirmly against the front ofthe car seat.16
REMOVING THE PRIMO VIAGGIO CAR SEATApply the brakes on thepushchair before removingthe car seat.Pull the release handle onthe back of the car seat upand hold it in position.ReleasehandleLift the car seat from thepushchair.Lower the attachmentbrackets.1 Slide the attachmentbrackets sidewaystowards the centre of theseat.2 Rotate them down untilthey are flat.Unfold the fabric flap onthe legrest and cover thebottom section of the seatto conceal the attachmentbrackets.Fix the fabric cover inposition using the velcropads.17
OPENING THE PUSHCHAIRLocate the frame lock onthe right hand side of thepushchaIr frame anddisengage it from the stud.Grip the handlebars and liftthem up until the frame isfully open and the lockingcatches on the frame haveengaged.Adjust the handlbars asrequired, see page 6.Important: Check that thelocks are fully engaged byattempting to push thehandlebars forwards as ifyou were folding thepushchair.18
REMOVING THE BASKETThe basket is attached tothe basket frame by eightpress stud ties. Unfastenthem and remove thebasket from the frame.Remove the hand pumpand pouch from the rear ofthe basket frame to accessthe two rear basket ties.The basket can now becleaned according to theinstructions on thewashcare label attached tothe pushchair.19
REMOVING THE FABRIC COVERAdjust the backrest as farforward as it will go.Unfasten the two pressstuds A that attach thefabric cover to the frame.Unfasten the four pressstuds B just below thelocking catches.Undo the two velcro padsC.Push the buckles on theends of the crotch strapand D-rings C through theslots in the seat base.CBADetach the two clips thatsecure the backrest to theback legs.Unfasten the four pressstuds that attach the coverto the underside of the seat.The cover can now beremoved from the legrest.The waist and shoulderstraps can be threadedthrough the D-rings, seediagram, but the crotchstrap is stitched to the cover.D-ringBefore cleaning, undo thezip at the top of thebackrest and pull out theboard from the pocket.Clean the cover according tothe instructions on thewashcare label attached.20
FITTING AND USING THE HAND PUMPThe hand pump is stored ina removable pouchattached by two velcrostraps to the rear of thebasket frame.Remove the pump fromthe pouch and screw in thenarrow end of the adaptor(stored in the top of thepump) into the hole inbottom of the pump.Remove the dust cap fromthe wheel valve and attachthe large end of theadaptor to it, then pumpup the tyre.Important: Never inflatethe tyres above 28 P.S.I.Always replace the dustcap to prevent damage tothe valve.Hand pumpandadaptorHand pumppouchFITTING THE RAINCOVER11 Slot the centre section ofthe hood cover betweenthe handlebars. Thenfasten the four velcropads together.2 Fasten the velcro strapsunder the footrest.2CARE AND MAINTENANCE OF THE TYRESRegularly check that the tyres are correctly inflated. When pushing your pushchair always check thatno sharp objects are in your path as these may puncture the pneumatic tyres.Puncture repair: In the event of a puncture you will need to purchase a set of tyre levers and apuncture repair kit from a reputable bicycle shop. Always follow the instructions given in thepuncture repair kit.21
CARE & MAINTENANCEYour pushchair is a valuable piece of equipment and deserves careful handling.• Regularly check that the safety harness is correctly fitted and that the webbing straps have notbecome frayed or damaged. If the harness is damaged, we recommend that a new one is fitted. Formore information contact our Customer Services Helpline on: 0870 8307700.• Clean the plastic parts of the pushchair with a damp cloth. Do not use abrasives or bleach.• Clean and lubricate the wheels, locks (where appropriate) and sliding parts using a light oil or siliconspray. Do not use heavy oil as this will attract dust and grit which tend to clog and damage movingparts. If in any doubt contact our Customer Services Helpline.• We strongly recommend that you have your pushchair serviced regularly, particularly after the first sixmonths. To do this contact either your retailer or call our Customer Services Helpline.• Do not over fill the pocket on the hood, (maximum weight 0.5 kgs).Fabric care• All the <strong>Mamas</strong> & <strong>Papas</strong> pushchair fabrics are shower resistant. Should your pushchair become wet, donot fold the hood or the pushchair when you take it inside. Always allow the fabrics to dry naturallyaway from strong heat sources such as fires, radiators and out of direct sunlight.• Whilst fabrics are carefully selected and tested, washing, wear and normal exposure to brightsunlight may cause their colour to change.• The exposed edges of fabric covers are often the first to wear and fray, remember this when storingor transporting your pushchair and accessories.• Light soiling to the pushchair can be removed with a damp sponge and a mild detergent.Washing instructions• Remove the fabrics following the information given in these instructions. Clean the fabrics accordingto the instructions on the washcare labels. Do not use abrasives or bleach to clean the fabric.• Should a fault arise with your pushchair please contact either your retailer or phone our CustomerServices Helpline.AFTER SALES SERVICE: If you need assistance, spare parts or you are unhappy with any of thegoods please contact Customer Services on: 0870 8307700,or e-mail us at: customer.services@mamasandpapas.comVisit our website at www.mamasandpapas.com for the latest product information.ALL OUR PRODUCTS ARE MADE FROM THE FINEST QUALITY MATERIALSAND ARE MANUFACTURED UNDER THE STRICTEST QUALITY CONTROLSWe guarantee all our products or part thereof, for a period of six months from the date of delivery to the consumer against faultymanufacture. This guarantee is not effective against damage caused as a result of incorrect usage of the product or accidental damage.This in no way affects your statutory rights.GUARANTEETo validate this guarantee, fill in this coupon and return to: <strong>Mamas</strong> & <strong>Papas</strong>, Colne Bridge Rd, Huddersfield, HD5 0RHAlternatively, call our Guarantee Registration Line on: 0870 8307700 or visit our website: www.mamasandpapas.comTitle (Mr/Mrs/Miss/Ms) .............. First name ....................................................................... Surname............................................................Address................................................................................................................................................................................................................................................................................................................................................... Postcode............................................................Daytime Tel. No. ................................................................ Email..................................................................................................................Baby’s due date/date of birth........................................................................................................................................................................Product purchased <strong>03</strong> <strong>Sport</strong> Swivel Wheel Pushchair ...... Purchase date................................ Price............................................................If you would like to receive further information regarding new products, promotions and special offers from <strong>Mamas</strong> & <strong>Papas</strong> please tick the boxes indicatingyour preferred method(s) of contact. Post ; Email .If you would like to receive information from carefully selected 3rd parties please tick the boxes indicating your preferred method(s) of contact.Post ; Email .22
www.mamasandpapas.com<strong>Mamas</strong> & <strong>Papas</strong>Colne Bridge RoadHuddersfield, HD5 0RHcustomer services helpline: 0870 8307700customer services email: customer.services@mamasandpapas.com