Student Handout - VEX Robotics
Student Handout - VEX Robotics
Student Handout - VEX Robotics

You also want an ePaper? Increase the reach of your titles
YUMPU automatically turns print PDFs into web optimized ePapers that Google loves.
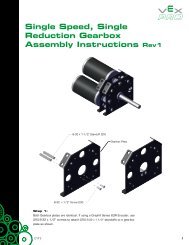
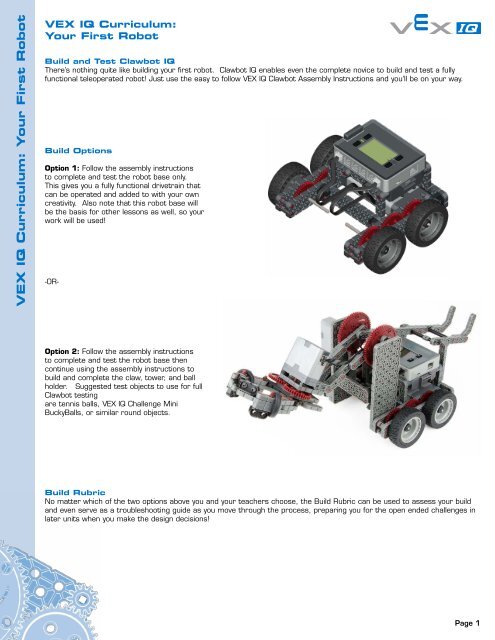
<strong>VEX</strong> IQ Curriculum: Your First Robot<strong>VEX</strong> IQ Curriculum:Your First RobotBuild and Test Clawbot IQThere’s nothing quite like building your first robot. Clawbot IQ enables even the complete novice to build and test a fullyfunctional teleoperated robot! Just use the easy to follow <strong>VEX</strong> IQ Clawbot Assembly Instructions and you’ll be on your way.Build OptionsOption 1: Follow the assembly instructionsto complete and test the robot base only.This gives you a fully functional drivetrain thatcan be operated and added to with your owncreativity. Also note that this robot base willbe the basis for other lessons as well, so yourwork will be used!- OR-Option 2: Follow the assembly instructionsto complete and test the robot base thencontinue using the assembly instructions tobuild and complete the claw, tower, and ballholder. Suggested test objects to use for fullClawbot testingare tennis balls, <strong>VEX</strong> IQ Challenge MiniBuckyBalls, or similar round objects.Build RubricNo matter which of the two options above you and your teachers choose, the Build Rubric can be used to assess your buildand even serve as a troubleshooting guide as you move through the process, preparing you for the open ended challenges inlater units when you make the design decisions!Page 1
<strong>VEX</strong> IQ Curriculum: Your First RobotUnit Idea Book Pages: Learning Design ProcessThe Your First Robot unit also comes with Idea Book pages that help guide you through your first robot build and help you tolearn about design process.Engineering was defined in the It’s Your Future unit as using practical & scientific knowledge to create solutions foridentified problems. In that unit we also learned that engineers often use an engineering notebook to help them think aboutand solve problems. What does an engineer write and draw in that notebook if questions and instructions aren’t already onthe page, like are in some of your Idea Book pages?Well, engineers use a design process that is a series of steps that can be followed to help solve a problem and designa solution for something. This is similar to the “Scientific Method” that is taught to young scientists. There is no singleuniversally accepted design process. Most engineers have their own twist for how the process works. The process is a cyclethat generally starts with a problem and ends with a solution, but steps can vary.Simplified, the design process can be seen as a three- step loop:Step 1: Think about a problem or generate an idea and write it down and/or draw it. Sometimes the problem or idea is givento you and sometimes you come up with the problem or idea on your own.Step 2: This is where you take action and you “do” something to solve the problem or try toprove your idea. In our lessons, this is where you will build your potential solution.Step 3: Test what you did in Step 2.Is your problem fully solved? In testing, if you conclude the problem is not fully solved, then you have something more to thinkabout, so you write down or draw your next problem (that you see in testing) and you repeat the cycle until your problem isfully solved. Always know, problems ARE NOT failures. They are an expected part of the design process!In this unit you will use one Idea Book page for each “Think- Do- Test loop” you need to solve your given problem of followingdirections to build your first functional robot. The prompts and questions in the Idea Book pages will lead you through the robotbuild preparing you for full engineering notebook use when you make all of the design decisions in the future.Page 2