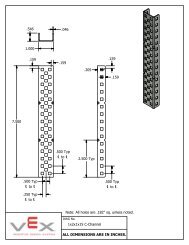
Single Speed, Single Reduction Gearbox Assembly ... - VEX Robotics
Single Speed, Single Reduction Gearbox Assembly ... - VEX Robotics
Single Speed, Single Reduction Gearbox Assembly ... - VEX Robotics

You also want an ePaper? Increase the reach of your titles
YUMPU automatically turns print PDFs into web optimized ePapers that Google loves.
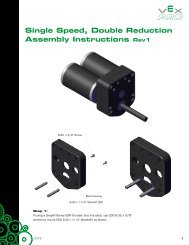
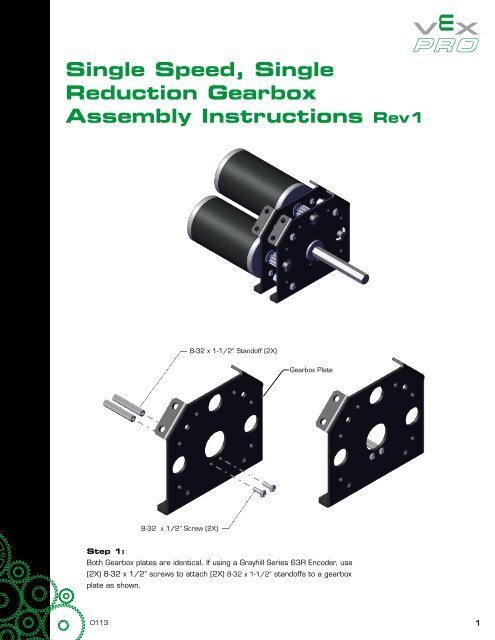
<strong>Single</strong> <strong>Speed</strong>, <strong>Single</strong><strong>Reduction</strong> <strong>Gearbox</strong><strong>Assembly</strong> Instructions Rev18-32 x 1-1/2” Standoff (2X)<strong>Gearbox</strong> Plate8-32 x 1/2” Screw (2X)Step 1:Both <strong>Gearbox</strong> plates are identical. If using a Grayhill Series 63R Encoder, use(2X) 8-32 x 1/2” screws to attach (2X) 8-32 x 1-1/2” standoffs to a gearboxplate as shown.01131
<strong>Single</strong> <strong>Speed</strong>, <strong>Single</strong> <strong>Reduction</strong> <strong>Gearbox</strong> <strong>Assembly</strong> Instructions Rev11/4-20 x 1/2”<strong>Gearbox</strong> Plate1/4-20 x 1” Standoff (4X)1/2 Round BearingStep 2:Use (4X) 1/4-20 screws to attach (4X) 1/4-20 x 1” Standoffs to the gearbox plate and insert a1/2” round bearing as shown.1/2” Hex Shaft CollarIncluded GearOutput ShaftStep 3:Insert the output shaft in the bearing. Then, slide on a 1/2” hex shaft collar and the includedgear. Do not tighten the shaft collar.2
<strong>Single</strong> <strong>Speed</strong>, <strong>Single</strong> <strong>Reduction</strong> <strong>Gearbox</strong> <strong>Assembly</strong> Instructions Rev11/2” Hex Bearing<strong>Gearbox</strong> Plate1/4-20 x 1/2” Screw (4X)Step 4:Slide a 1/2” Hex Bearing on the Output Shaft and use (4X) 1/4-20 x 1/2” screws to mount asecond gearbox plate as shown.Gap1/2” HEX Shaft CollarStep 5:Slide the gear and shaft collar all the way forward as shown, and tighten the shaft collar.3
<strong>Single</strong> <strong>Speed</strong>, <strong>Single</strong> <strong>Reduction</strong> <strong>Gearbox</strong> <strong>Assembly</strong> Instructions Rev1Grayhill Series 63R EncoderGrayhill Encoder MountLock WasherEncoder NutStep 6:If using a Grayhill Series 63R encoder (not included), remove the nut and lock washer that comeinstalled on the encoder. Re-install the nut and lock washer with the Grayhill encoder mount asshown above.Step 68-32 x 1/2” Screw (2X)Step 7:If using a Grayhill Series 63R Encoder, use (2X) 8-32 x 1/2” screws to mount the encoder assemblyfrom Step 6 as shown. A coupler for the encoder is NOT provided. A 1/4”-1/4” shaft coupler will needto be provided by the user (McMaster part number 61005K311 or 6208K441).4
<strong>Single</strong> <strong>Speed</strong>, <strong>Single</strong> <strong>Reduction</strong> <strong>Gearbox</strong> <strong>Assembly</strong> Instructions Rev12mm KeyCIM Motor12 Tooth PinionStep 8:Use a socket to press a retainer ring onto the shaft of a CIM motor. Push the ring to the back of thekeyway, but DO NOT allow it to contact the housing of the CIM motor. The “teeth“ of the retaining ringshould point away from the motor. Insert a 2mm key into the keyway of the CIM motor and slide the 12tooth pinion gear on. Retain the pinion gear with a second retaining ring as shown. Repeat for up to (3X)motor assemblies.Step 8Retaining Ring(2X)10-32 x 1/2” Screw (2X)Step 9:Install up to (3X) motor assemblies using (2X) 10-32 x 1/2” screw per motor as shown.Gap5