Robot Inspection Guidelines - VEX Robotics
Robot Inspection Guidelines - VEX Robotics
Robot Inspection Guidelines - VEX Robotics
- No tags were found...
You also want an ePaper? Increase the reach of your titles
YUMPU automatically turns print PDFs into web optimized ePapers that Google loves.
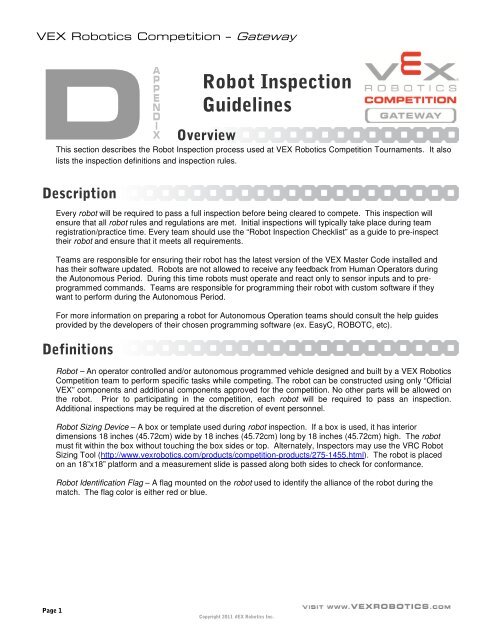
<strong>VEX</strong> <strong>Robot</strong>ics Competition – GatewayD OverviewAPPENDIX<strong>Robot</strong> <strong>Inspection</strong><strong>Guidelines</strong>This section describes the <strong>Robot</strong> <strong>Inspection</strong> process used at <strong>VEX</strong> <strong>Robot</strong>ics Competition Tournaments. It alsolists the inspection definitions and inspection rules.DescriptionEvery robot will be required to pass a full inspection before being cleared to compete. This inspection willensure that all robot rules and regulations are met. Initial inspections will typically take place during teamregistration/practice time. Every team should use the “<strong>Robot</strong> <strong>Inspection</strong> Checklist” as a guide to pre-inspecttheir robot and ensure that it meets all requirements.Teams are responsible for ensuring their robot has the latest version of the <strong>VEX</strong> Master Code installed andhas their software updated. <strong>Robot</strong>s are not allowed to receive any feedback from Human Operators duringthe Autonomous Period. During this time robots must operate and react only to sensor inputs and to preprogrammedcommands. Teams are responsible for programming their robot with custom software if theywant to perform during the Autonomous Period.For more information on preparing a robot for Autonomous Operation teams should consult the help guidesprovided by the developers of their chosen programming software (ex. EasyC, ROBOTC, etc).Definitions<strong>Robot</strong> – An operator controlled and/or autonomous programmed vehicle designed and built by a <strong>VEX</strong> <strong>Robot</strong>icsCompetition team to perform specific tasks while competing. The robot can be constructed using only “Official<strong>VEX</strong>” components and additional components approved for the competition. No other parts will be allowed onthe robot. Prior to participating in the competition, each robot will be required to pass an inspection.Additional inspections may be required at the discretion of event personnel.<strong>Robot</strong> Sizing Device – A box or template used during robot inspection. If a box is used, it has interiordimensions 18 inches (45.72cm) wide by 18 inches (45.72cm) long by 18 inches (45.72cm) high. The robotmust fit within the box without touching the box sides or top. Alternately, Inspectors may use the VRC <strong>Robot</strong>Sizing Tool (http://www.vexrobotics.com/products/competition-products/275-1455.html). The robot is placedon an 18”x18” platform and a measurement slide is passed along both sides to check for conformance.<strong>Robot</strong> Identification Flag – A flag mounted on the robot used to identify the alliance of the robot during thematch. The flag color is either red or blue.Page 1Copyright 2011 <strong>VEX</strong> <strong>Robot</strong>ics Inc.
<strong>VEX</strong> <strong>Robot</strong>ics Competition – Gateway<strong>Inspection</strong> Rules The team’s robot must pass inspection before being allowed to compete in Qualification Rounds.Noncompliance with any robot design or construction rule may result in disqualification of the robot at anevent. Each robot must display the appropriate identification features as mandated by the tournament. <strong>Robot</strong> construction is constrained by the number of Official <strong>VEX</strong> Components a team may use asdefined in the <strong>Robot</strong> section of the manual. The maximum size of the robot for starting a Qualifying or Elimination Match is 18 inches (45.72cm)wide by 18 inches (45.72cm) long by 18 inches (45.72cm) high. The robot must fit within a <strong>Robot</strong> SizingDevice without touching the sides or top of the <strong>Robot</strong> Sizing Device. The robot must be self-supporting whilein the <strong>Robot</strong> Sizing Device.a. If a <strong>Robot</strong> Sizing Device is not available, some other measuring device may be used. Measuringdevices or templates need to be capable of verifying that the robot does not exceed the startingsize limitation. The starting configuration of the robot at the beginning of a match must be the same as a robotconfiguration inspected for compliance, and within the maximum allowed size.a. Teams using more than one robot configuration at the beginning of matches must tell theinspector(s) and have the robot inspected in its largest configuration(s).b. A team may NOT have their robot inspected in one configuration and then place it at the start of amatch in an uninspected configuration. When a team makes a modification to improve performance or reliability of their robot, the team mayrequest a re-inspection of their robot by an Inspector. Inspectors evaluate robots to insure that each robot has been designed to operate and function safely.The robot must be designed for safe operation and handling. Specific safety rules and limitations apply to thedesign and construction of a robot. A robot is deemed successfully inspected when all items listed on the “<strong>Robot</strong> <strong>Inspection</strong> Checklist” havebeen recorded as “passed” by an Inspector. Each robot must include a mounting device to securely hold the <strong>Robot</strong> Identification Flag throughout anentire match. Specific regulations can be found in the <strong>Robot</strong> section of the manual.a. The <strong>Robot</strong> Identification Flag mounting device may NOT extend outside the <strong>Robot</strong> Sizing Box.b. The <strong>Robot</strong> Identification Flag may NOT extend outside the <strong>Robot</strong> Sizing Device at the start of amatch.c. It is permissible for the <strong>Robot</strong> Identification Flag orientation to change during the match.d. The Mounting device shall provide for easy removal and replacement of the flag betweenmatches.Page 2Copyright 2011 <strong>VEX</strong> <strong>Robot</strong>ics Inc.
<strong>VEX</strong> <strong>Robot</strong>ics Competition – GatewayField Control CheckDuring the <strong>Inspection</strong> Process each robot will be tested to ensure the <strong>Robot</strong> will properly function with thecompetition field controls.There are two methods, one for robots that use <strong>VEX</strong>net and one for robots that use 75MHz crystals.I. <strong>VEX</strong>net: The procedure for robots using <strong>VEX</strong>net is as follows:1. Set the <strong>VEX</strong>net Competition Switch to “DISABLE” and “AUTONOMOUS”.2. Connect the team’s Handheld Controller to the <strong>VEX</strong>net Competition Switch using an Ethernet Cable.3. Turn ON the <strong>Robot</strong> and the Handheld Controller.4. Wait for the <strong>VEX</strong>net LED on the Handheld Controller to turn Green.5. Verify the ROBOT LED on the Handheld Controller is not Red.a. A Red robot LED indicates that a 9V Backup Battery is not installed, not connected, or dead.i. Properly install and connect a charged 9V Backup Battery.6. Verify the GAME LED on the Handheld Controller is Yellow.a. Verify that the team has NO control of their robot.7. Set the <strong>VEX</strong>net Competition Switch to “ENABLE” and “AUTONOMOUS”.a. Verify the GAME LED on the Handheld Controller is Fast Green Blink.b. The robot may begin to move if the team has Autonomous Code. Movement is not required.c. Verify that the team has NO control of their robot.8. Set the <strong>VEX</strong>net Competition Switch to “DISABLE” and “AUTONOMOUS”.9. Set the <strong>VEX</strong>net Competition Switch to “DISABLE” and “DRIVER”.10. Set the <strong>VEX</strong>net Competition Switch to “ENABLE” and “DRIVER”.a. Verify the GAME LED on the Handheld Controller is Slow Green Blink.b. Verify that the team has FULL control of their robot.11. Test Complete!Page 3Copyright 2011 <strong>VEX</strong> <strong>Robot</strong>ics Inc.


