VersaPlanetary Quick Start Guide - VEX Robotics
VersaPlanetary Quick Start Guide - VEX Robotics
VersaPlanetary Quick Start Guide - VEX Robotics

You also want an ePaper? Increase the reach of your titles
YUMPU automatically turns print PDFs into web optimized ePapers that Google loves.
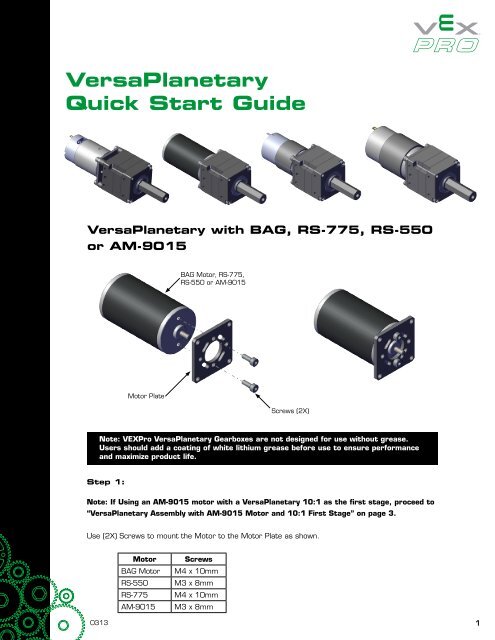
<strong>VersaPlanetary</strong><strong>Quick</strong> <strong>Start</strong> <strong>Guide</strong><strong>VersaPlanetary</strong> with BAG, RS-775, RS-550or AM-9015BAG Motor, RS-775,RS-550 or AM-9015Motor PlateScrews (2X)Note: <strong>VEX</strong>Pro <strong>VersaPlanetary</strong> Gearboxes are not designed for use without grease.Users should add a coating of white lithium grease before use to ensure performanceand maximize product life.Step 1:Note: If Using an AM-9015 motor with a <strong>VersaPlanetary</strong> 10:1 as the first stage, proceed to“<strong>VersaPlanetary</strong> Assembly with AM-9015 Motor and 10:1 First Stage” on page 3.Use (2X) Screws to mount the Motor to the Motor Plate as shown.MotorBAG MotorRS-550RS-775AM-9015ScrewsM4 x 10mmM3 x 8mmM4 x 10mmM3 x 8mm03131
<strong>VersaPlanetary</strong> <strong>Quick</strong> <strong>Start</strong> <strong>Guide</strong>InputCouplerBAG CollarRS-550 CollarRS-775 CollarAM-9015 CollarCollarClearanceHoleNote: The RS-550 Collar andAM-9015 Collar are verysimilar. Check to seewhich fits best on yourmotor shaft. Use thetightest one that still fits.Set ScrewSplit andNotchAlignmentStep 2:Insert the appropriate Collar into the Input Coupler as shown. Take note of the orientation of the Collar(highlighted Red) and the Set Screw (highlighted green). The “split” in the Collar should align with the notchin the Input Coupler as shown. The Set Screw should align with the Clearance Hole on side of the InputHousing as illustrated by the blue line. DO NOT TIGHTEN THE SET SCREW.Step 2Step 18-32 x 1/2” screws (4X)Step 3:To ensure Motor concentricity it is critical that the following processes are done in order.1. Insert the Motor Output Shaft into the Collar. Take care not to rotate the Collar or the Input Coupler.2. Mount the Step 1 Assembly with (4X) 8-32 x 1/2” Screws.3. Use a 3/32” Hex Key to tighten the Set Screw.4. Loosen the (4X) 8-32 x 1/2” Mounting Screws by about 1/4 turn.5. Re-tighten the (4X) 8-32 x 1/2” Mounting Screws.2
<strong>VersaPlanetary</strong> <strong>Quick</strong> <strong>Start</strong> <strong>Guide</strong><strong>VersaPlanetary</strong> Assembly with AM-9015 Motorand 10:1 First StageStep 1:Use (2X) M3 x 8mm screws to mount an AM-9015 Motor to the Motor Plate as shown.Split andNotchAlignmentInputCouplerCollarSet ScrewStep 2:Insert the AM-9015 Collar into the Input Coupler as shown. Take note of the orientation of the Collar andthe Set Screw (highlighted green). The “split” in the Collar should align with the notch in the Input Coupler asshown. The Set Screw should align with the Clearance Hole on side of the Input Housing as illustrated by theblue line. DO NOT TIGHTEN THE SET SCREW.3
<strong>VersaPlanetary</strong> <strong>Quick</strong> <strong>Start</strong> <strong>Guide</strong>Step 2Step 11/4” Spacer(Used only if 1ststage is 10:1)8-32 x 3/4” screws (4X)Step 3:To ensure Motor concentricity it is critical that the following processes are done in order.1. Insert the Motor Output Shaft into the Collar. Take care not to rotate the Collar or the Input Coupler.2. Mount the Step 1 Assembly with (4X) 8-32 x 3/4” Screws and (4X) 1/4” Spacers as shown.3. Use a 3/32” Hex Key to tighten the Set Screw.4. Loosen the (4X) 8-32 x 3/4” Mounting Screws by about 1/4 turn.5. Re-tighten the (4X) 8-32 x 3/4” Mounting Screws.4