How to upgrade the firmware of Edimax Access point/Range ...
How to upgrade the firmware of Edimax Access point/Range ...
How to upgrade the firmware of Edimax Access point/Range ...

Create successful ePaper yourself
Turn your PDF publications into a flip-book with our unique Google optimized e-Paper software.
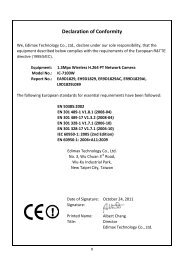
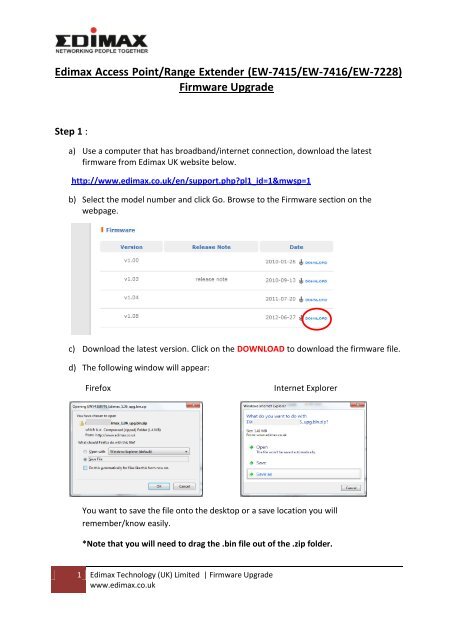
<strong>Edimax</strong> <strong>Access</strong> Point/<strong>Range</strong> Extender (EW-7415/EW-7416/EW-7228)Firmware UpgradeStep 1 :a) Use a computer that has broadband/internet connection, download <strong>the</strong> latest<strong>firmware</strong> from <strong>Edimax</strong> UK website below.http://www.edimax.co.uk/en/support.php?pl1_id=1&mwsp=1b) Select <strong>the</strong> model number and click Go. Browse <strong>to</strong> <strong>the</strong> Firmware section on <strong>the</strong>webpage.c) Download <strong>the</strong> latest version. Click on <strong>the</strong> DOWNLOAD <strong>to</strong> download <strong>the</strong> <strong>firmware</strong> file.d) The following window will appear:FirefoxInternet ExplorerYou want <strong>to</strong> save <strong>the</strong> file on<strong>to</strong> <strong>the</strong> desk<strong>to</strong>p or a save location you willremember/know easily.*Note that you will need <strong>to</strong> drag <strong>the</strong> .bin file out <strong>of</strong> <strong>the</strong> .zip folder.1 <strong>Edimax</strong> Technology (UK) Limited | Firmware Upgradewww.edimax.co.uk
Step 2 :a) Do a hard reset on your <strong>Edimax</strong> <strong>Access</strong> Point/<strong>Range</strong> Extender. To reset, power it on,press and hold <strong>the</strong> reset but<strong>to</strong>n for 20 seconds. Then, power it <strong>of</strong>f and on.b) Disconnect your computer from your broadband/router. Connect your computer <strong>to</strong><strong>the</strong> LAN port <strong>of</strong> <strong>the</strong> <strong>Edimax</strong> <strong>Access</strong> Point/<strong>Range</strong> Extender using an E<strong>the</strong>rnet cable.c) In <strong>the</strong> computer, setup a fix IP address.For XP, click on Control Panel, Network Connection, Right-click on Local Area Connection,go <strong>to</strong> it's Properties. Select Internet Pro<strong>to</strong>col (TCP/IP), click on Properties. Select Use <strong>the</strong>Following IP Address, enter IP address = 192.168.2.2 and subnet mask = 255.255.255.0,Default Gateway leaves it blank. Click OK/Apply <strong>to</strong> save <strong>the</strong> setting.For Vista, click on Control Panel, Network and Internet>Network and sharingcenter>Click on Manage Network Connection> Right-click on Local Area Connection, go<strong>to</strong> it's Properties. Select Internet Pro<strong>to</strong>col Version 4, click on Properties. Select Use <strong>the</strong>Following IP Address, enter IP address = 192.168.2.2 and subnet mask = 255.255.255.0,Default Gateway leaves it blank. Click OK <strong>to</strong> save <strong>the</strong> setting.For Windows 7, click on Control Panel, Network and Internet>Network and sharingcenter>Click on Change Adapter Setting> Right-click on Local Area Connection, go <strong>to</strong> it'sProperties. Select Internet Pro<strong>to</strong>col Version 4, click on Properties. Select Use <strong>the</strong>Following IP Address, enter IP address = 192.168.2.2 and subnet mask = 255.255.255.0,Default Gateway leaves it blank. Click OK <strong>to</strong> save <strong>the</strong> setting.For Mac, go <strong>to</strong> System Preferences>Network>select “Built-in E<strong>the</strong>rnet”>clickConfigure>Select “TCP/IP”>select Manually for IP address>enter IP address =192.168.2.2, subnet mask =255.255.255.0, router = leave it blank. Click Apply Now <strong>to</strong>save <strong>the</strong> setting.d) Open Internet Explorer/Safari, at <strong>the</strong> address bar, type 192.168.2.1 and press Enter.It will prompt you <strong>to</strong> login. Login with default username is “admin”; password is“1234”.2 <strong>Edimax</strong> Technology (UK) Limited | Firmware Upgradewww.edimax.co.uk
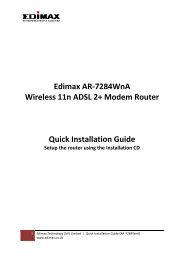
e) Once login, click “Upgrade” and “Browse”.f) Browse <strong>to</strong> <strong>the</strong> <strong>firmware</strong> bin file saved in <strong>the</strong> computer. Select it and click Open.g) Click “Apply” but<strong>to</strong>n.3 <strong>Edimax</strong> Technology (UK) Limited | Firmware Upgradewww.edimax.co.uk
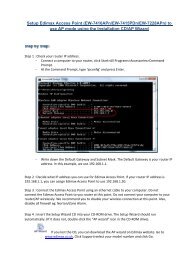
h) Click “OK” but<strong>to</strong>n for writing <strong>the</strong> latest <strong>firmware</strong> <strong>to</strong> <strong>the</strong> access <strong>point</strong>.i) Click “OK” but<strong>to</strong>n.Please do not power <strong>of</strong>f or disconnect <strong>the</strong> AP when <strong>the</strong> <strong>firmware</strong><strong>upgrade</strong> is in progress.j) When <strong>the</strong> <strong>upgrade</strong> is done, in <strong>the</strong> computer, change <strong>the</strong> TCP/IP setting back <strong>to</strong>Obtain IP address au<strong>to</strong>matically.For XP, click on Control Panel, Network Connection, Right-click on Local Area Connection,go <strong>to</strong> it's Properties. Select Internet Pro<strong>to</strong>col (TCP/IP), click on Properties. Select ObtainIP Address Au<strong>to</strong>matically. Click OK/Apply <strong>to</strong> save <strong>the</strong> setting.For Vista, click on Control Panel, Network and Internet>Network and sharingcenter>Click on Manage Network Connection> Right-click on Local Area Connection, go<strong>to</strong> it's Properties. Select Internet Pro<strong>to</strong>col Version 4, click on Properties. Select Obtain IPAddress Au<strong>to</strong>matically. Click OK <strong>to</strong> save <strong>the</strong> setting.4 <strong>Edimax</strong> Technology (UK) Limited | Firmware Upgradewww.edimax.co.uk
For Windows 7, click on Control Panel, Network and Internet>Network and sharingcenter>Click on Change Adapter Setting> Right-click on Local Area Connection, go <strong>to</strong> it'sProperties. Select Internet Pro<strong>to</strong>col Version 4, click on Properties. Select Obtain IPAddress Au<strong>to</strong>matically. Click OK <strong>to</strong> save <strong>the</strong> setting.For Mac, System Preferences>Network>select “Built-in E<strong>the</strong>rnet”>click Configure>Select“TCP/IP”>select Using DHCP. Click Apply Now <strong>to</strong> save <strong>the</strong> setting.k) Lastly, do a hard reset on <strong>the</strong> <strong>Edimax</strong> <strong>Access</strong> Point/<strong>Range</strong> Extender <strong>to</strong> allow new<strong>firmware</strong> <strong>to</strong> take effect. To reset, power it on, press and hold <strong>the</strong> reset but<strong>to</strong>n for20 seconds. Then, power <strong>of</strong>f and on. Firmware <strong>upgrade</strong> is now complete. You cannow set up <strong>the</strong> <strong>Edimax</strong> <strong>Access</strong> Point/<strong>Range</strong> Extender <strong>to</strong> your network.5 <strong>Edimax</strong> Technology (UK) Limited | Firmware Upgradewww.edimax.co.uk