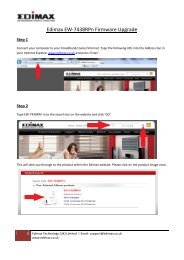
Manual - Edimax
Manual - Edimax
Manual - Edimax
- No tags were found...

Create successful ePaper yourself
Turn your PDF publications into a flip-book with our unique Google optimized e-Paper software.
COPYRIGHTCopyright ©2005/2006 by this company. All rights reserved. No part of thispublication may be reproduced, transmitted, transcribed, stored in a retrievalsystem, or translated into any language or computer language, in any form orby any means, electronic, mechanical, magnetic, optical, chemical, manual orotherwise, without the prior written permission of this companyThis company makes no representations or warranties, either expressed orimplied, with respect to the contents hereof and specifically disclaims anywarranties, merchantability or fitness for any particular purpose. Any softwaredescribed in this manual is sold or licensed "as is". Should the programs provedefective following their purchase, the buyer (and not this company, itsdistributor, or its dealer) assumes the entire cost of all necessary servicing,repair, and any incidental or consequential damages resulting from any defectin the software. Further, this company reserves the right to revise thispublication and to make changes from time to time in the contents thereofwithout obligation to notify any person of such revision or changes.
EnglishCopyright© by <strong>Edimax</strong> Technology Co, LTD. all rights reserved. No part ofthis publication may be reproduced, transmitted, transcribed, stored in aretrieval system, or translated into any language or computer language, in anyform or by any means, electronic, mechanical, magnetic, optical, chemical,manual or otherwise, without the prior written permission of this Company .This company makes no representations or warranties, either expressed orimplied, with respect to the contents hereof and specifically disclaims anywarranties, merchantability or fitness for any particular purpose. Anysoftware described in this manual is sold or licensed "as is". Should theprograms prove defective following their purchase, the buyer (and not thiscompany, its distributor, or its dealer) assumes the entire cost of all necessaryservicing, repair, and any incidental or consequential damages resulting fromany defect in the software. Further, this company reserves the right to revisethis publication and to make changes from time to time in the contents hereofwithout obligation to notify any person of such revision or changes.The product you have purchased and the setup screen may appear slightlydifferent from those shown in this QIG. For more detailed information about thisproduct, please refer to the User <strong>Manual</strong> on the CD-ROM. The software andspecifications are subject to change without notice. Please visit our web sitewww.edimax.com for the update. All rights reserved including all brand andproduct names mentioned in this manual are trademarks and/or registeredtrademarks of their respective holders .Linux Open Source CodeCertain <strong>Edimax</strong> products include software code developed by thirdparties, software code is subject to the GNU General Public License("GPL") or GNU Lesser General Public License ("LGPL"). Please seethe GNU (www.gnu.org) and LPGL(www.gnu.org) Websites to view theterms of each license.The GPL Code and LGPL Code used in <strong>Edimax</strong> products are distributedwithout any warranty and are subject to the copyrights of their authors.For details, see the GPL Code and LGPL Code licenses. You candownload the firmware-files at http://www.edimax.com under"Download" page.
C A T A L O G1-1 Introduction and safety information ................................................................61-2 Safety Information...........................................................................................81-3 System Requirements ......................................................................................91-4 Package Contents...........................................................................................101-5 Familiar with your new wireless broadband router.......................................11Chapter II: System and Network Setup........................................................................132-1 Establish network connection........................................................................132-2 Setup client computers to obtain IP address automatically ...........................152-2-1 Windows 95/98/Me IP address setup: ................................................162-2-2 Windows 2000 IP address setup:........................................................182-2-3 Windows XP IP address setup:...........................................................202-2-4 Windows Vista IP address setup:........................................................222-3 Connect to broadband router by web browser...............................................242-4 Using ‘Quick Setup’ ......................................................................................282-4-1 Using ‘Cable Modem’ as broadband connection type........................322-4-2 Using ‘Fixed-IP xDSL’ as broadband connection type ......................342-4-3 Using ‘PPPoE xDSL’ as broadband connection type.........................362-4-4 Using ‘PPTP xDSL’ as broadband connection type ...........................382-4-5 Using 'L2TP xDSL' as broadband connection type............................412-4-6 Using 'Telstra Big Pond' as broadband connection type ....................44Chapter III: General Setup ..........................................................................................463-1 System ...........................................................................................................483-1-1 Time Zone ..........................................................................................483-1-3 Remote Management..........................................................................513-2 WAN ..............................................................................................................533-2-2 Static IP ..............................................................................................563-2-3 PPPoE.................................................................................................583-2-4 PPTP...................................................................................................603-2-5 L2TP...................................................................................................633-2-5 L2TP...................................................................................................633-2-6 Telstra Big Pond .................................................................................663-3 LAN (Wired) .................................................................................................683-3-1 Before you start ..................................................................................68Suggestions for deciding an IP address to be used with this broadband router............................................................................................................68
3-3-2 LAN IP ...............................................................................................693-3-2 LAN IP ...............................................................................................703-3-3 DHCP Server......................................................................................713-3-4 Static DHCP Leases ...........................................................................723-4 Wireless .........................................................................................................743-4-1 Basic Settings .....................................................................................753-4-1-1 AP mode..................................................................................763-4-1-2 Station-Infrastructure ..............................................................793-4-1-3 AP Bridge-Point to Point.........................................................823-4-1-4 AP Bridge-Point to Multi-Point ..............................................853-4-1-5 AP Bridge-WDS......................................................................873-4-1-6 Universal Repeater..................................................................903-4-1-7 Set Security .............................................................................943-4-2 Security Settings.................................................................................983-4-4 WPS..................................................................................................1053-5 Advance Settings* .......................................................................................1073-5-1 QoS...................................................................................................1083-5-1-1 Basic QoS Settings................................................................1083-5-1-2 Add a new QoS entry ............................................................1103-5-2 NAT ..................................................................................................1123-5-2-1 Virtual Server ........................................................................1123-5-2-2 Special Applications..............................................................1153-5-2-3 Firewall .................................................................................1183-5-2-3-1 Access Control...........................................................1183-5-2-3-2 URL Blocking............................................................1243-5-2-3-3 DoS ............................................................................1273-5-2-4 DDNS....................................................................................1303-5-2-5 Port Forwarding ....................................................................1333-5-2-6 DMZ......................................................................................136Chapter V : Status ..............................................................................................1475-1 Internet Connection .............................................................................1495-2 Device Status .......................................................................................1505-3 System Log..........................................................................................1515-4 Security Log ........................................................................................1525-5 Active DHCP Client ............................................................................153Chapter VI : Tools..............................................................................................1556-1 Configuration Tools .............................................................................1576-2 Firmware Upgrade...............................................................................1586-3 Restart..................................................................................................159Chapter VII : Language .....................................................................................160
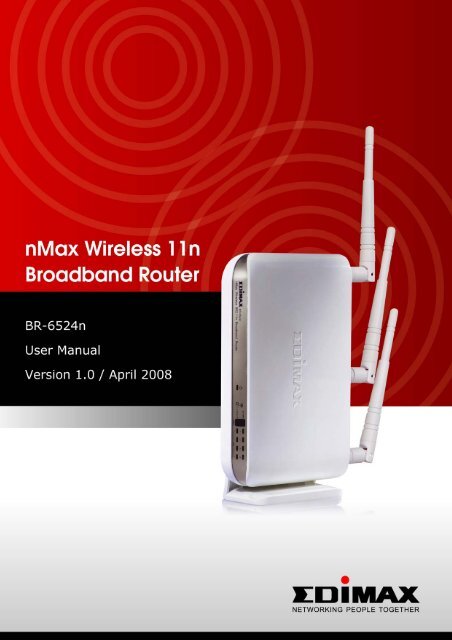
Chapter I: Product Information1-1 Introduction and safety informationThank you for purchasing <strong>Edimax</strong> BR-6524n wireless 11n broadbandrouter! This high cost-efficiency router is the best choice for Small office/ Home office users, all computers and network devices can share a singlexDSL / cable modem internet connection at high speed. Easy installprocedures allows any computer users to setup a network environment invery short time - within minutes, even inexperienced. When the numberof your computers and network-enabled devices grow, you can alsoexpand the number of network slot by simple attach a hub or switch, toextend the scope of your network!With built-in IEEE 802.11b/g/Draft-N wireless network capability, allcomputers and wireless-enabled network devices (including PDA,cellular phone, game console, and more!) can connect to this broadbandrouter without additional cabling. New Draft-N wireless capability alsogives you the highest speed of wireless experience ever! With acompatible wireless card installed in your PC, you can transfer file forup to 300 Mbps! The radio coverage is also doubled, so don’t worry ifyour office or house is really big!Other features of this router including:• High Internet Access throughput (140M)• Allow multiple users to share a single Internet connection• Supports up to 253 LAN users sharing a single Cable or xDSL internetconnection• Four wired LAN ports (10/100M) and one WAN port (10/100M)• Provides IEEE 802.11b/g/n wireless LAN capability• Support DHCP (Server/Client) for easy client IP-address setup• Advanced network and security features like: Special Applications, DMZ,Virtual Servers, Access Control, Firewall.• Allow you to monitor the router’s status like: DHCP Client Log, SystemLog, Security Log and Device/Connection Status
• Easy to use Web-based GUI for network configuration andmanagement purposes• Remote management function allows configuration and upgrades froma remote computer (over the Internet)• Auto MDI / MDI-X function for all wired Ethernet ports.
1-2 Safety InformationIn order to keep the safety of users and your properties, please follow thefollowing safety instructions:1. This router is designed for indoor use only; DO NOT place this routeroutdoor.2. DO NOT put this router at or near hot or humid places, like kitchen orbathroom. Also, do not left this router in the car in summer.3. DO NOT pull any connected cable with force; disconnect it from therouter first.4. If you want to place this router at high places or hang on the wall,please make sure the router is firmly secured. Falling from high placeswould damage the router and its accessories, and warranty will be void.5. Accessories of this router, like antenna and power supply, are danger tosmall children under 3 years old. They may put the small parts in theirnose or month and it could cause serious damage to them. KEEP THISROUTER OUT THE REACH OF CHILDREN!6. The router will become hot when being used for long time (This isnormal and is not a malfunction), DO NOT put this router on paper,cloth, or other flammable materials.7. There’s no user-serviceable part inside the router. If you found that therouter is not working properly, please contact your dealer of purchase andask for help. DO NOT disassemble the router, warranty will be void.8. If the router falls into water when it’s powered, DO NOT use yourhand to pick it up. Switch the electrical power off before you do anything,or contact an experienced technician for help.9. If you smell something strange, or even see some smoke coming outfrom the router or power supply, remove the power supply or switch theelectrical power off immediately, and call dealer of purchase for help.
1-3 System Requirements• Internet connection, provided by xDSL or cable modem with a RJ-45Ethernet port.• Computer or network devices with wired or wireless network interfacecard.• Web browser (Microsoft Internet Explorer 4.0 or above, NetscapeNavigator 4.7 or above, Opera web browser, or Safari web browser).• An available power socket
1-4 Package ContentsBefore you starting to use this router, please check if there’s anythingmissing in the package, and contact your dealer of purchase to claim formissing items:□ Broadband router (main body, 1 pcs)…………………………… 1□ Quick installation guide (1 pcs) ………………………………… 2□ CDROM (with multi-languages setup wizard, multi-languages Quickinstallation guide and User manual )(1 pcs) …………………….. 3□ 12V 1A power adapter (1 pcs)…………………………………..... 4□ Holding Base …………………………………….…………..... 5□ Ethernet Cable (1 pcs)………………………………………..... 6□ Antennas (3 pcs)……………………………………………..... 7□ Accessaries (1 pcs)……………………………………………..... 8You can configure the router by running the Setup Wizard in theCD-ROM provided in the package. The wizard provides quick setupfor the Internet connection, SSID, wireless security, firmwareupgrade and changing router’s password. When you start theSetup Wizard, you will get the following Welcome screen. Pleasechoose the language to start with and follow the easy steps in theWizard. No instruction for the Setup Wizard is given here.If you lost the CD-ROM or you prefer the traditional web setup,please follow the procedures in this <strong>Manual</strong> ( or Quick InstallationGuide ) to configure the router
1-5 Familiar with your new wireless broadband routerFront PanelLED Name Light Status DescriptionPWR ON Router is switched on and correctly poweredOn Wireless network is switched onWLAN Off Wireless network is switched offFlashing Wireless LAN activity (transferring data) orWPS mode is on. (LED will on and off every1 second)On WAN port (Internet) is running at 100MbpsWAN Off WAN port (Internet) is running at10Mbps10/100M Flashing WAN activity (transferring data)WANOnWAN port is connectedOff WAN port is not connectedLNK/ACT Flashing WAN activity (transferring data)LAN On LAN port is running at 100Mbps10/100M Off LAN port is running at 10MbpsLANOnLAN port is connectedOff LAN port is not connectedLNK/ACT Flashing LAN activity (transferring data)
Back PanelAntenna A Antenna B Antenna CBR-6524nItem NameAntennasPowerReset / WPSDescriptionAntenna A, B, and CPower connector, connects to power adapterReset the router to factory default settings (clear allsettings) or start WPS function. Press this button andhold for 20 seconds to clear all settings, and press thisbutton for less than 5 seconds to start WPS function.1 - 4 Local Area Network (LAN) ports 1 to 4WAN Wide Area Network (WAN / Internet) port
Chapter II: System and Network Setup2-1 Establish network connectionPlease follow the following instruction to build the network connectionbetween your new Broadband router and your computers, networkdevices:1. Connect your xDSL / cable modem to the WAN port of router byEthernet cable.2. Connect all your computers, network devices (network-enabledconsumer devices other than computers, like game console, or switch /hub) to the LAN port of the router.3. Connect the power adapter to the wall socket, and then connect it tothe ‘Power’ socket of the router.
4. Please check all LEDs on the front panel. ‘PWR’ LED should besteadily on, WAN and LAN LEDs should be on if the computer /network device connected to the respective port of the router ispowered on and correctly connected. If PWD LED is not on, or anyLED you expected is not on, please recheck the cabling, or jump to‘4-2 Troubleshooting’ for possible reasons and solution.5. To improve wireless signal reception, please arrange the antennas asthe picture shown below (horizontal or vertical installation), and placethe wireless access point in open space. Please keep the distancebetween antennas, if the antennas are too close to each other, wirelesssignal reception will be affected.The access point shown in the following picture is 3-antenna model. Ifyou’re using 2-antenna model, please also follow the instructionslisted above.or
2-2 Setup client computers to obtain IP address automaticallyAfter the network connection is established, the next step you shoulddo is setup the router with proper network parameters, so it can workproperly in your network environment.Before you can connect to the router and start configurationprocedures, your computer must be able to get an IP addressautomatically (use dynamic IP address). If it’s set to use static IP address,or you’re unsure, please follow the following instructions to configureyour computer to use dynamic IP address:If the operating system of your computer is….Windows 95/98/Me - please go to section 2-2-1Windows 2000 - please go to section 2-2-2Windows XP - please go to section 2-2-3Windows NT - please go to section 2-2-4
2-2-1 Windows 95/98/Me IP address setup:1. Click ‘Start’ button (it should be located at lower-left corner of yourcomputer), then click control panel. Double-click Network icon, andNetwork window will appear. Select ‘TCP/IP’, then click ‘Properties’.
2. Select ‘Obtain an IP address from a DHCP server’, then click ‘OK’.
2-2-2 Windows 2000 IP address setup:1. Click ‘Start’ button (it should be located at lower-left corner of yourcomputer), then click control panel. Double-click Network and Dial-upConnections icon, double click Local Area Connection, and Local AreaConnection Properties window will appear. Select ‘Internet Protocol(TCP/IP)’, then click ‘Properties’
2. Select ‘Obtain an IP address automatically’ and ‘Obtain DNS serveraddress automatically’, then click ‘OK’.
2-2-3 Windows XP IP address setup:1. Click ‘Start’ button (it should be located at lower-left corner of yourcomputer), then click control panel. Double-click Network and InternetConnections icon, click Network Connections, then double-click LocalArea Connection, Local Area Connection Status window will appear,and then click ‘Properties’
2. Select ‘Obtain an IP address automatically’ and ‘Obtain DNS serveraddress automatically’, then click ‘OK’.
2-2-4 Windows Vista IP address setup:1. Click ‘Start’ button (it should be located at lower-left corner of yourcomputer), then click control panel. Click View Network Status andTasks, then click Manage Network Connections..Right-click Local AreaNetwrok, then select ‘Properties’. Local Area Connection Propertieswindow will appear, select ‘Internet Protocol Version 4 (TCP / IPv4), andthen click ‘Properties’
2. Select ‘Obtain an IP address automatically’ and ‘Obtain DNS serveraddress automatically’, then click ‘OK’.
2-3 Connect to broadband router by web browserDefault IP address of this broadband router is ‘192.168.2.1’, and you canconnect to broadband router’s web-based configuration interface by anyconnected computer with web browser (Internet Explorer 5.x or above,Firefox, or Netscape).Please input ‘192.168.2.1’ in web browser’s address bar and press ‘Enter’key to establish connection:You should see the following authentication window:
Please input ‘admin’ in ‘User name’ field, and ‘1234’ in ‘Password’ field,and click ‘OK’ button to enter web configuration interface.TIPS: If you can’t establish connection with broadband router with webbrowser (got ‘The page cannot be displayed’ or similar error message),the IP address you inputted may be wrong. If you’ve changed the IPaddress of this broadband router previously, please input correct IPaddress instead of the default IP address ’192.168.2.1’.If the DHCP server function of this broadband router is enabled, pleasefollow the following instructions to find out the IP address of thisbroadband router:
Please click ‘start’ -> ‘run’ at the bottom-lower corner of your desktop:Input ‘cmd’, then click ‘OK’
Input ‘ipconfig’, then press ‘Enter’ key. Please check the IP addressfollowed by ‘Default Gateway’ (In this example, the IP address of routeris 192.168.2.1, please note that this value may be different.)NOTE: If the IP address of Gateway is not displayed, or the address followedby ‘IP Address’ begins with ‘169’, please recheck network connectionbetween your computer and router, and / or go to the beginning of thischapter, to recheck every step of network setup procedure.If you tried the instructions listed above and still can not find the IPaddress of this broadband router / you forget the password, please jump tochapter xx-xx to reset the broadband router.
2-4 Using ‘Quick Setup’This broadband router provides a ‘Quick Setup’ menu, and you can setupbasic parameters of this broadband router.Please follow the following instructions to use ‘Quick Setup’ menu:1. Click ‘Quick Setup’ after logged in.
2. In the first step of quick setup, you can setup automatic timesynchronization settings.The descriptions of every setting items are listed as follow:Item NameTime ZoneTime Server AddressDaylight SavingsDescriptionPlease select a time zone of the country orregion of your residence here. If you can’t findthe country / region of your residence here,please select a city / region which time zone isthe same with the country / region of yourresidence.This load-balance router supports NTP(Network Time Protocol). NTP server willprovide correct time for this router to setup thedate and time of the router automatically.Please input the host name or IP address ofNTP server here. If you don’t know the hostname or IP address of time server, please asknetwork administrator or use ‘pool.ntp.org’ astime server.If the country / region of your residence usedaylight saving time, please check ‘EnableFunction’ box, and select the beginning andending date of daylight time saving.
After you finish with time zone settings, please click ‘Next’ to proceed tonext step of quick setup - broadband type:Please choose the broadband (Internet connection) type you’re using inthis page. There are six types of Internet connection, they are:Cable Modem - Please go to section 2-4-1Fixed-IP xDSL - Please go to section 2-4-2PPPoE xDSL - Please go to section 2-4-3PPTP xDSL - Please go to section 2-4-4L2TP xDSL - Please go to section 2-4-5Telstra Big Pond - Please go to section 2-4-6If you’re not sure, please contact your Internet service provider. A wrongInternet connection type will cause connection problem, and you will notbe able to connect to internet.
If you want to go back to previous step, please press ‘Back’ button on thebottom of this page.NOTE: Some service providers use ‘DHCP’ (Dynamic HostConfiguration Protocol) to assign IP address to you. In this case, youcan choose ‘Cable Modem’ as Internet connection type, even you’reusing another connection type, like xDSL. Also, some cable modem3. uses PPPoE, so you can choose ‘PPPoE xDSL’ for such cable modemconnection, even you’re using a cable modem.
2-4-1 Using ‘Cable Modem’ as broadband connection typeIf your Internet service provider uses cable modem to provide Internetservice to you, you can select this connection type. You can also selectthis connection type if your ISP tells you that they will assign you the IPaddress by ’DHCP’ (Dynamic Host Configuration Protocol).Here are descriptions of every setup items:Item NameHost NameMAC addressTTLDescriptionPlease input the host name of your computer,this is optional, and only required if yourservice provider asks you to do so.Please input MAC address of your computerhere, if your service provider only permitscomputer with certain MAC address to accessinternet. If you’re using the computer whichused to connect to Internet via cable modem,you can simply press ‘Clone Mac address’button to fill the MAC address field with theMAC address of your computer.Time-to-live (TTL) is a value in an InternetProtocol packet that tells a network routerwhether or not the packet has been in thenetwork too long and should be discarded.
If you wish to select another connection type as broadband connectiontype, click ‘Back’; or you can click ‘OK’ to finish with quick setup.You’ll see the following messages:Please click ‘Apply’ to save changes you made and restart the broadbandrouter, this requires about 30 seconds and the broadband router will stopresponding (this is normal and is not malfunction). You can reconnect tothis broadband router and continue on other settings later.
2-4-2 Using ‘Fixed-IP xDSL’ as broadband connection typeIf your ISP requires you to set a fixed IP address to establish connection,you can use this connection type to input the IP address informationassigned by your ISP.Please note that not only xDSL connections (like ADSL, HDSL, VDSL)can use this connection type, you can select this connection type for allconnections that requires you to input a fixed IP address. Also, if your ISPis assigning a fixed IP address to you by DHCP or PPPoE, do not selectthis connection type. Please contact your ISP’s service hotline to makesure you really need to use static IP as connection type.Here are descriptions of every setup items:Item NameIP address assigned byyour by your serviceproviderSubnet MaskDNS addressService ProviderGateway AddressTTLDescriptionPlease input IP address assigned by yourservice provider.Please input subnet mask assigned by yourservice provider.Please input the IP address of DNS serverprovided by your service provider.Please input the IP address of DNS serverprovided by your service provider.Time-to-live (TTL) is a value in an InternetProtocol packet that tells a network routerwhether or not the packet has been in thenetwork too long and should be discarded.
You must use the addresses provided by your Internet serviceprovider, wrong setting value will cause connection problem.If you wish to select another connection type as broadband connectiontype, click ‘Back’; or you can click ‘OK’ to finish with quick setup.You’ll see the following messages:Please click ‘Apply’ to save changes you made and restart the broadbandrouter, this requires about 30 seconds and the broadband router will stopresponding (this is normal and is not malfunction). You can reconnect tothis broadband router and continue on other settings later.
2-4-3 Using ‘PPPoE xDSL’ as broadband connection typeIf your ISP requires you to establish Internet connection by PPPoE(Point-to-Point Protocol over Ethernet), you can use this connection typeto establish Internet connection.Here are descriptions of every setup items:Item NameUser NamePasswordService NameMTUConnection TypeDescriptionPlease input user name assigned by yourInternet service provider here.Please input the password assigned by yourInternet service provider here.Please give a name to this Internet service, thisis optional.Please input the MTU value of your networkconnection here. If you don’t know, you can usedefault value.Please select the connection type of Internetconnection you wish to use. There are 3options:‘Continuous’ - keep internet connection alive,do not disconnect.’Connect on Demand’ - only connects to
Internet when there’s a connect attempt,Idle Time OutTTL<strong>Manual</strong> - only connects to Internet when‘Connect’ button on this page is pressed, anddisconnects when ‘Disconnect button ispressed.Please specify the time to shutdown internetconnect after no internet activity is detected inminute(s). This option is only available whenconnection type is ‘Connect on Demand’.Time-to-live (TTL) is a value in an InternetProtocol packet that tells a network routerwhether or not the packet has been in thenetwork too long and should be discarded.If you wish to select another connection type as broadband connectiontype, click ‘Back’; or you can click ‘OK’ to finish with quick setup.You’ll see the following messages:Please click ‘Apply’ to save changes you made and restart the broadbandrouter, this requires about 30 seconds and the broadband router will stopresponding (this is normal and is not malfunction). You can reconnect tothis broadband router and continue on other settings later.
2-4-4 Using ‘PPTP xDSL’ as broadband connection typeIf your ISP requires you to use PPTP (Point-to-Point Tunneling Protocol)to establish connection, you can select this connection type to establishInternet connection.PPTP xDSL requires two kinds of setting: WAN interface setting (setupIP address) and PPTP setting (PPTP user name and password). Here westart from WAN interface setting first:Select the type of how you obtain IP address from your service providerhere. You can choose ‘Obtain an IP address automatically’ (equal toDHCP, please refer to ‘Cable Modem’ section above), or ‘Use thefollowing IP address’ (i.e. static IP address).WAN interface settings must be correctly set, or the Internet connectionwill fail even those settings of PPTP settings are correct. Please contactyour Internet service provider if you don’t know what you should fill inthese fields.
Now please go to PPTP settings section:Here are descriptions of every setup items:Item NameUser IDPasswordPPTP GatewayConnection IDMTUBEZEQ-ISRAELConnection TypeDescriptionPlease input user ID (user name) assigned byyour Internet service provider here.Please input the password assigned by yourInternet service provider here.Please input the IP address of PPTP gatewayassigned by your Internet service providerhere.Please input the connection ID here, this isoptional and you can leave it blank.Please input the MTU value of your networkconnection here. If you don’t know, you can usedefault value.Check ‘Enable’ box if you’re using BEZEQnetwork service in Israel. Do not check thisbox if you’re using other Internet serviceprovider.Please select the connection type of Internetconnection you wish to use. There are 3options:
‘Continuous’ - keep internet connection alive,do not disconnect.’Connect on Demand’ - only connects toInternet when there’s a connect attempt,Idle Time Out<strong>Manual</strong> - only connects to Internet when‘Connect’ button on this page is pressed, anddisconnects when ‘Disconnect button ispressed.Please specify the time to shutdown internetconnect after no internet activity is detected inminute(s). This option is only available whenconnection type is ‘Connect on Demand’.If you wish to select another connection type as broadband connectiontype, click ‘Back’; or you can click ‘OK’ to finish with quick setup.You’ll see the following messages:Please click ‘Apply’ to save changes you made and restart the broadbandrouter, this requires about 30 seconds and the broadband router will stopresponding (this is normal and is not malfunction). You can reconnect tothis broadband router and continue on other settings later.
2-4-5 Using 'L2TP xDSL' as broadband connection typeIf your ISP requires you to use L2TP (Layer-2 Tunneling Protocol) toestablish connection, you can select this connection type to establishInternet connection. L2TP is another popular connection method forxDSL and other Internet connection types, and all required setting itemsare the same with PPTP connection.Like PPTP, there are two kinds of required setting, we’ll start from ‘WANInterface Settings’:Please select the type of how you obtain IP address from your serviceprovider here. You can choose ‘Obtain an IP address automatically’ (equalto DHCP, please refer to ‘Cable Modem’ section above), or ‘Use thefollowing IP address’ (equal to static IP address, please refer to ‘PPPoExDSL’ section above).WAN interface settings must be correctly set, or the Internet connectionwill fail even those settings of PPTP settings are correct. Please contactyour Internet service provider if you don’t know what you should fill inthese fields.Now please go to PPTP settings section:
Here are descriptions of every setup items:Item NameUser IDPasswordL2TP GatewayMTUConnection TypeDescriptionPlease input user ID (user name) assigned byyour Internet service provider here.Please input the password assigned by yourInternet service provider here.Please input the IP address of PPTP gatewayassigned by your Internet service providerhere.Please input the MTU value of your networkconnection here. If you don’t know, you can usedefault value.Please select the connection type of Internetconnection you wish to use. There are 3options:‘Continuous’ - keep internet connection alive,do not disconnect.’Connect on Demand’ - only connects toInternet when there’s a connect attempt,<strong>Manual</strong> - only connects to Internet when‘Connect’ button on this page is pressed, and
Idle Time Outdisconnects when ‘Disconnect button ispressed.Please specify the time to shutdown internetconnect after no internet activity is detected inminute(s). This option is only available whenconnection type is ‘Connect on Demand’.If you wish to select another connection type as broadband connectiontype, click ‘Back’; or you can click ‘OK’ to finish with quick setup.You’ll see the following messages:Please click ‘Apply’ to save changes you made and restart the broadbandrouter, this requires about 30 seconds and the broadband router will stopresponding (this is normal and is not malfunction). You can reconnect tothis broadband router and continue on other settings later.
2-4-6 Using 'Telstra Big Pond' as broadband connection typeThis connection type only works for Telstra big pond network service inAustralia. DO NOT select this connection type if you’re not using Telstrabig pond network service.Here are descriptions of every setup items:Item NameUser NamePasswordUser device loginserver manuallyLogin ServerDescriptionPlease input the user name assigned by Telstra.Please input the password assigned by Telstra.Check this box to choose login server byyourself.Please input the IP address of login serverhere.If you wish to select another connection type as broadband connectiontype, click ‘Back’; or you can click ‘OK’ to finish with quick setup.You’ll see the following messages:
Please click ‘Apply’ to save changes you made and restart the broadbandrouter, this requires about 30 seconds and the broadband router will stopresponding (this is normal and is not malfunction). You can reconnect tothis broadband router and continue on other settings later.
Chapter III: General SetupThis broadband router provides a ‘Quick Setup’ menu, and you can setupbasic parameters of this broadband router.Please follow the following instructions to use ‘Quick Setup’ menu:1. Click ‘General Setup’ after logged in.
2. Five submenus will appear:System - Basic system settings (please go to chapter 3-1)WAN - Setup WAN port manually (please go to chapter 3-2)LAN - Setup LAN port manually (please go to chapter 3-3)Wireless - Setup wireless interface manually (please go to chapter 3-4)Advance Settings - Setup advanced settings of this broadband router(Please go to chapter 3-5)
3-1 SystemYou can setup basic system settings of this broadband router in ‘System’menu:Please select the setting item you wish to set, then click ‘Apply’ button toproceed. You can also click ‘Previous’ button to back to ‘System’ menu.3-1-1 Time ZoneYou can change the time zone settings of this broadband router. It’simportant to have correct date and time setting if you need to read systemlog and use build-in firewall functions.
The descriptions of every setting item are listed as follow:Item NameTime ZoneTime Server AddressDaylight SavingsDescriptionPlease select a time zone of the country orregion of your residence here. If you can’t findthe country / region of your residence here,please select a city / region which time zone isthe same with the country / region of yourresidence.This load-balance router supports NTP(Network Time Protocol). NTP server willprovide correct time for this router to setup thedate and time of the router automatically.Please input the host name or IP address ofNTP server here. If you don’t know the hostname or IP address of time server, please asknetwork administrator or use ‘pool.ntp.org’ astime server.If the country / region of your residence usedaylight saving time, please check ‘EnableFunction’ box, and select the beginning andending date of daylight time saving.
3-1-2 Password SettingsYou can change the web login password of this broadband router. If youkeep using the default password ‘1234’, other people may access theconfiguration interface without your permission. Please change thepassword as soon as possible.The descriptions of every setting item are listed as follow:Item NameCurrent PasswordNew PasswordConfirmed PasswordDescriptionPlease input current password here.Please input new password here.Please input new password here again forconfirmation.After you inputted current and new password, click ‘Apply’ to savechanges, or you can click ‘Cancel’ to keep current password untouched.
3-1-3 Remote ManagementIf you need to manage this broadband router outside of your LAN (i.e.from Internet), you can use this function to assign a remote IP addresswhich is permitted to connect to this broadband router’s web managementinterface from Internet.If it’s not required for you to manage this broadband router from Internet,you can disable this function to improve security.The descriptions of every setting item are listed as follow:Item NameHost addressPortEnabledDescriptionInput the IP address of the remote host youwish to initiate a management access.You can define the port number this routershould expect an incoming connection request.If you’re providing a web service (default portnumber is 80), you should try to use other portnumber. You can use the default port setting‘8080’, or something like ‘32245’ or ‘1429’.(Any integer between 1 and 65534)Check this box to enable remote managementfunction. When this box is unchecked, no onecan access this broadband router’smanagement interface from Internet.
Please click ‘Apply’ to save changes in this page, or you can click‘Cancel’ to discard all settings in this page. After you click ‘Apply’ button,you’ll see the following message:Please click ‘Apply’ to save changes you made and restart the broadbandrouter, this requires about 30 seconds and the broadband router will stopresponding (this is normal and is not malfunction). You can reconnect tothis broadband router and continue on other settings later.
3-2 WANYou can setup WAN (Wide Area Network, i.e. Internet) connections ofthis broadband router in ‘WAN’ menu:Please select the WAN connection type you wish to use, then click‘Apply’ to continue. You can also click ‘Previous’ to back to previouspage.If you’re not sure which connection type you should use, please call yourISP’s service hotline and ask for help. You’ll not be able to connect toInternet with wrong connection type.
3-2-1 Dynamic IPDynamic IP means your ISP will assign an IP address to youautomatically by ‘DHCP’ (Dynamic Host Configuration Protocol).Dynamic IP is often used by cable modem Internet connection.Here are descriptions of every setup items:Item NameHost NameMAC addressTTLDescriptionPlease input the host name of your computer,this is optional, and only required if yourservice provider asks you to do so.Please input MAC address of your computerhere, if your service provider only permitscomputer with certain MAC address to accessinternet. If you’re using the computer whichused to connect to Internet via cable modem,you can simply press ‘Clone Mac address’button to fill the MAC address field with theMAC address of your computer.Time-to-live (TTL) is a value in an InternetProtocol packet that tells a network routerwhether or not the packet has been in thenetwork too long and should be discarded.
If you wish to select another connection type as broadband connectiontype, click ‘Back’; or you can click ‘OK’ to finish with quick setup.You’ll see the following messages:Please click ‘Apply’ to save changes you made and restart the broadbandrouter, this requires about 30 seconds and the broadband router will stopresponding (this is normal and is not malfunction). You can reconnect tothis broadband router and continue on other settings later.
3-2-2 Static IPSome ISP will give you a fixed IP address, and ask you to use this IPaddress to establish Internet connection. In this case, you have to selectthis connection type to establish connection with your ISP.Please note that if your ISP is assigning a fixed IP address to you byDHCP or PPPoE, do not select this connection type. Please contact yourISP’s service hotline to make sure you really need to use static IP asconnection type.Here are descriptions of every setup items:Item NameIP address assigned byyour by your serviceproviderSubnet MaskDNS addressService ProviderGateway AddressTTLDescriptionPlease input IP address assigned by yourservice provider.Please input subnet mask assigned by yourservice provider.Please input the IP address of DNS serverprovided by your service provider.Please input the IP address of DNS serverprovided by your service provider.Time-to-live (TTL) is a value in an InternetProtocol packet that tells a network routerwhether or not the packet has been in thenetwork too long and should be discarded.
You must use the addresses provided by your Internet serviceprovider, wrong setting value will cause connection problem.If you wish to select another connection type as broadband connectiontype, click ‘Back’; or you can click ‘OK’ to finish with quick setup.You’ll see the following messages:Please click ‘Apply’ to save changes you made and restart the broadbandrouter, this requires about 30 seconds and the broadband router will stopresponding (this is normal and is not malfunction). You can reconnect tothis broadband router and continue on other settings later.
3-2-3 PPPoEIf your ISP requires you to establish Internet connection by PPPoE(Point-to-Point Protocol over Ethernet), you can use this connection typeto establish Internet connection.Here are descriptions of every setup items:Item NameUser NamePasswordService NameMTUConnection TypeDescriptionPlease input user name assigned by yourInternet service provider here.Please input the password assigned by yourInternet service provider here.Please give a name to this Internet service, thisis optional.Please input the MTU value of your networkconnection here. If you don’t know, you can usedefault value.Please select the connection type of Internetconnection you wish to use. There are 3options:‘Continuous’ - keep internet connection alive,do not disconnect.’Connect on Demand’ - only connects to
Internet when there’s a connect attempt,Idle Time OutTTL<strong>Manual</strong> - only connects to Internet when‘Connect’ button on this page is pressed, anddisconnects when ‘Disconnect button ispressed.Please specify the time to shutdown internetconnect after no internet activity is detected inminute(s). This option is only available whenconnection type is ‘Connect on Demand’.Time-to-live (TTL) is a value in an InternetProtocol packet that tells a network routerwhether or not the packet has been in thenetwork too long and should be discarded.If you wish to select another connection type as broadband connectiontype, click ‘Back’; or you can click ‘OK’ to finish with quick setup.You’ll see the following messages:Please click ‘Apply’ to save changes you made and restart the broadbandrouter, this requires about 30 seconds and the broadband router will stopresponding (this is normal and is not malfunction). You can reconnect tothis broadband router and continue on other settings later.
3-2-4 PPTPIf your ISP requires you to use PPTP (Point-to-Point Tunneling Protocol)to establish connection, you can select this connection type to establishInternet connection.PPTP requires two kinds of setting: WAN interface setting (setup IPaddress) and PPTP setting (PPTP user name and password). Here we startfrom WAN interface setting first:Select the type of how you obtain IP address from your service providerhere. You can choose ‘Obtain an IP address automatically’ (equal toDHCP, please refer to ‘Cable Modem’ section above), or ‘Use thefollowing IP address’ (i.e. static IP address).WAN interface settings must be correctly set, or the Internet connectionwill fail even those settings of PPTP settings are correct. Please contactyour Internet service provider if you don’t know what you should fill inthese fields.
Now please go to PPTP settings section:Here are descriptions of every setup items:Item NameUser IDPasswordPPTP GatewayConnection IDMTUBEZEQ-ISRAELConnection TypeDescriptionPlease input user ID (user name) assigned byyour Internet service provider here.Please input the password assigned by yourInternet service provider here.Please input the IP address of PPTP gatewayassigned by your Internet service providerhere.Please input the connection ID here, this isoptional and you can leave it blank.Please input the MTU value of your networkconnection here. If you don’t know, you can usedefault value.Check ‘Enable’ box if you’re using BEZEQnetwork service in Israel. Do not check thisbox if you’re using other Internet serviceprovider.Please select the connection type of Internetconnection you wish to use. There are 3options:
‘Continuous’ - keep internet connection alive,do not disconnect.’Connect on Demand’ - only connects toInternet when there’s a connect attempt,Idle Time Out<strong>Manual</strong> - only connects to Internet when‘Connect’ button on this page is pressed, anddisconnects when ‘Disconnect button ispressed.Please specify the time to shutdown internetconnect after no internet activity is detected inminute(s). This option is only available whenconnection type is ‘Connect on Demand’.If you wish to select another connection type as broadband connectiontype, click ‘Back’; or you can click ‘OK’ to finish with quick setup.You’ll see the following messages:Please click ‘Apply’ to save changes you made and restart the broadbandrouter, this requires about 30 seconds and the broadband router will stopresponding (this is normal and is not malfunction). You can reconnect tothis broadband router and continue on other settings later.
3-2-5 L2TPIf your ISP requires you to use L2TP (Layer-2 Tunneling Protocol) toestablish connection, you can select this connection type to establishInternet connection. L2TP is another popular connection method forxDSL and other Internet connection types, and all required setting itemsare the same with PPTP connection.Like PPTP, there are two kinds of required setting, we’ll start from ‘WANInterface Settings’:Please select the type of how you obtain IP address from your serviceprovider here. You can choose ‘Obtain an IP address automatically’ (equalto DHCP, please refer to ‘Cable Modem’ section above), or ‘Use thefollowing IP address’ (equal to static IP address, please refer to ‘PPPoExDSL’ section above).WAN interface settings must be correctly set, or the Internet connectionwill fail even those settings of PPTP settings are correct. Please contactyour Internet service provider if you don’t know what you should fill inthese fields.Now please go to PPTP settings section:
Here are descriptions of every setup items:Item NameUser IDPasswordL2TP GatewayMTUConnection TypeDescriptionPlease input user ID (user name) assigned byyour Internet service provider here.Please input the password assigned by yourInternet service provider here.Please input the IP address of PPTP gatewayassigned by your Internet service providerhere.Please input the MTU value of your networkconnection here. If you don’t know, you can usedefault value.Please select the connection type of Internetconnection you wish to use. There are 3options:‘Continuous’ - keep internet connection alive,do not disconnect.’Connect on Demand’ - only connects toInternet when there’s a connect attempt,<strong>Manual</strong> - only connects to Internet when‘Connect’ button on this page is pressed, and
Idle Time Outdisconnects when ‘Disconnect button ispressed.Please specify the time to shutdown internetconnect after no internet activity is detected inminute(s). This option is only available whenconnection type is ‘Connect on Demand’.If you wish to select another connection type as broadband connectiontype, click ‘Back’; or you can click ‘OK’ to finish with quick setup.You’ll see the following messages:Please click ‘Apply’ to save changes you made and restart the broadbandrouter, this requires about 30 seconds and the broadband router will stopresponding (this is normal and is not malfunction). You can reconnect tothis broadband router and continue on other settings later.
3-2-6 Telstra Big PondThis connection type only works for Telstra big pond network service inAustralia. DO NOT select this connection type if you’re not using Telstrabig pond network service.Here are descriptions of every setup items:Item NameUser NamePasswordUser device loginserver manuallyLogin ServerDescriptionPlease input the user name assigned by Telstra.Please input the password assigned by Telstra.Check this box to choose login server byyourself.Please input the IP address of login serverhere.If you wish to select another connection type as broadband connectiontype, click ‘Back’; or you can click ‘OK’ to finish with quick setup.You’ll see the following messages:
Please click ‘Apply’ to save changes you made and restart the broadbandrouter, this requires about 30 seconds and the broadband router will stopresponding (this is normal and is not malfunction). You can reconnect tothis broadband router and continue on other settings later.
3-3 LAN (Wired)You can setup Wired LAN (Local Area Network) connections of thisbroadband router in ‘LAN’ menu. This broadband router has 4 LAN portsand they’ll all use the same LAN IP address settings. Please also note thatboth wired and wireless LAN uses the same LAN IP address settings, too.LAN settings split into 3 sections: LAN IP, DHCP Server, and StaticDHCP leases. Please refer to corresponding sections below for detailedsetup instructions.3-3-1 Before you startSuggestions for deciding an IP address to be used with this broadbandrouterBefore all computers using wired Ethernet connection (i.e. thosecomputers connect to this router’s LAN port 1 to 4 by Ethernet cable) orwireless connection can communicate with each other and access internet,they must have a valid IP address.There are two ways to assign IP addresses to computers: static IP address(set the IP address for every computer manually), and dynamic IP address(IP address of computers will be assigned by router automatically. It’srecommended for most of computers to use dynamic IP address, it willsave a lot of time on setting IP addresses for every computer, especiallywhen there are a lot of computers in your network; for servers andnetwork devices which will provide services to other computer and usersthat come from Internet, static IP address should be used, so othercomputes can locate the server.This broadband router has a built-in DHCP (Dynamic Host ConfigurationProtocol) server, and can help you to assign IP addresses to your clientcomputers. Almost all network computers / devices manufactured afteryear 1995 are compatible with DHCP, and you can let this broadbandrouter to assign the IP address to client computers / devices for you.
Suggestions on IP address numbering plan:If you have no idea on how to define an IP address plan for yournetwork, here are some suggestions.1. A valid IP address has 4 fields: a.b.c.d, for most of home andcompany users, it’s suggested to use 192.168.c.d, where c isan integer between 0 and 254, and d is an integer between 1and 254. This router is capable to work with up to 253 clients,so you can set ‘d’ field of IP address of router as 1 or 254 (orany number between 1 and 254), and pick a number between 0and 254 for field ‘c’.2. In most cases, you should use ‘255.255.255.0’ as subnet mask,which allows up to 253 clients (this also meets router’scapability of working with up to 253 clients).3. For all servers and network devices which will provideservices to other people (like Internet service, print service,and file service), they should use static IP address. Give eachof them a unique number between 1 and 253, and maintain alist, so everyone can locate those servers easily.4. For computers which are not dedicated to provide specificservice to others, they should use dynamic IP address.If you don’t really understand the descriptions listed above, don’tworry! We will provide recommended setup values below.
3-3-2 LAN IPYou can use this setting to assign an IP address to the LAN interface ofthis broadband router.Here are descriptions of every setup items:Item NameDescriptionIP addressPlease input the IP address of this broadbandrouter’s LAN interface.Subnet Mask Please input subnet mask for this network.802.1d Spanning Tree If you wish to activate 802.1d spanning treefunction, select ‘Enabled’ for setup item‘802.1d Spanning Tree’, or set it to ‘Disabled’.DHCP Server If you want to activate DHCP server functionof this router, select ‘Enabled’, or set it to‘Disabled’.Lease TimePlease select the lease time for every DHCPleases here. You can select the time period fromthe dropdown list, and the DHCP client will beforced to obtain a new IP address from thisbroadband router after this period of time.You can select ‘Forever’ if you’re using thisbroadband router with only few computers(less than 30 computers)Recommended Value if you don’t know what to fill:IP Address: 192.168.1.254Subnet Mask: 255.255.255.0802.1d Spanning Tree: DisabledDHCP Server: Enabled
3-3-3 DHCP ServerYou can use this setting to decide the range of IP address leases.Here are descriptions of every setup items:Item NameStart IPEnd IPDomain NameDescriptionPlease input the start IP address of the IPleases range.Please input the end IP address of the IP leasesrange.If you wish, you can also input the domainname for your network. This is optional.Recommended Value if you don’t know what to fill:Lease Time: Two Weeks (or ‘Forever’, if you have less than 20 computers)Start IP: 192.168.1.1End IP: 192.168.1.200Domain Name: (leave it blank)NOTE:1. The number of the last field (mentioned ‘d’ field) of ‘End IP’ must begreater than ‘Start IP’, and can not the same with router’s IP address.2. The former three fields of IP address of ‘Start IP’, ‘End IP’, and ‘IPAddress of ‘LAN IP’ section (mentioned ‘a’, ‘b’, and ‘c’ field) should bethe same.3. These settings will affect wireless clients, too.
3-3-4 Static DHCP LeasesIf you wish to assign a fixed IP address to certain computers / devices byDHCP, you can use this function to establish a MAC-to-IP address tablehere, so you can assign a specific IP address to a specific computer /network device by its MAC address.Here are descriptions of every setup items:Item NameEnable StaticDHCP LeasesMAC AddressIP addressAddClearDescriptionCheck this box to enable this function,otherwise uncheck it to disable this function.Input the MAC address of the computer ornetwork device (total 12 characters, withcharacter from 0 to 9, and from a to f, like‘001122aabbcc’).Input the IP address you want to assign tothis computer or network device.After you inputted MAC address and IPaddress pair, click this button to add the pairto static DHCP leases table.Click this button to remove texts in MACaddress and IP address field.
All MAC-to-IP address entries will be listed in this page, and thisbroadband router supports up 16 static DHCP leases:To delete one or more entries listed here, please check the box of themapping entry (under ‘Select’), and click ‘Delete Selected’ button.If you wish to delete all mapping entries, click ‘Delete All’ button. Todeselect all checked boxes, click ‘Reset’ button.When you finished with the settings in this page, you can click ‘Apply’button to save changes you made in this page, or you can click ‘Cancel’to discard changes. After you click ‘Apply’ button, you’ll see thefollowing messages:Please click ‘Apply’ to save changes you made and restart the broadbandrouter, this requires about 30 seconds and the broadband router will stopresponding (this is normal and is not malfunction). You can reconnect tothis broadband router and continue on other settings later.
3-4 WirelessYou can setup Wireless LAN connection parameters of this broadbandrouter in ‘Wireless’ menu:Please select one setting in this menu, then click ‘Apply’ to proceed. Ifyou wish to go back to previous page, click ‘Previous’.
3-4-1 Basic SettingsYou can set basic settings of wireless LAN here.Please select the working mode of this broadband router from ‘Mode’dropdown list first:a. AP: Standard wireless AP (access point).b. Station-Infrastructure: This broadband router acts as both wirelesscommunication client and server - connects to another wireless accesspoint as client, and serves other wireless clients as server.c. AP Bridge-Point to Point: Connect this router with another broadbandrouter, to expand the scope of network.d. AP Bridge-Point to Multi-Point: Connect this router with up to fourother broadband routers, to expand the scope of network.e. AP Bridge-WDS: Connect this router with up to four WDS-capablebroadband routers, to expand the scope of network.f. Universal Repeater: This broadband router will repeat other wirelessaccess point’s signal to extend its wireless signal coverage, and also actsas a wireless access point to serve other wireless clients.
3-4-1-1 AP modeIn AP mode, the following settings will appear:Here are descriptions of every setup items:Item NameBandDescriptionPlease select the radio band from one offollowing options:2.4 GHz (B): 2.4GHz band, only allows802.11b wireless network client to connect thisrouter (maximum transfer rate 11Mbps).2.4 GHz (N): 2.4GHz band, only allows802.11n wireless network client to connect thisrouter (maximum transfer rate 300Mbps).2.4 GHz (B+G): 2.4GHz band, only allows802.11b and 802.11g wireless network client toconnect this router (maximum transfer rate11Mbps for 802.11b clients, and maximum54Mbps for 802.11g clients).2.4 GHz (G): 2.4GHz band, only allows802.11g wireless network client to connect thisrouter (maximum transfer rate 54Mbps).
ESSIDChannel NumberAssociated Clients2.4 GHz (B+G+N): 2.4GHz Band, Allows802.11b, 802.11g, and 802.11N wireless clients.It’s recommends to select this band to maximizecompatibility.This is the name of broadband router. You cantype any alphanumerical characters here,maximum 32 characters. ESSID is used toidentify your own broadband router fromothers when there are other broadband routersin the same area. Default SSID is ‘default’, it’srecommended to change default ESSID valueto the one which is meaningful to you, likemyhome, office_room1, etc.Please select a channel from the dropdown listof ‘Channel Number’, available channelnumbers are 1 to 13. You can choose anychannel number you want to use, and almostall wireless clients can locate the channelyou’re using automatically without anyproblem. However, it’s still useful to rememberthe channel number you use, some wirelessclient supports manual channel number select,and this would help in certain scenario whenthere is some radio communication problem.Click ‘Show Active Clients’ button to showthe list of all connected wireless clients. Youcan click ‘Refresh’ in new window to getlatest list again, or click ‘Close’ to close thewindow.Please note that if you have pop-up blockerinstalled, you may have to disable it or tellyour pop-up blocker to allow the popupwindow, or you will not be able to see thewireless client list window.
TIPS: You can try to change channel number to another one if youthink the data transfer rate is too slow, or keep having problem whiletransferring the file over wireless network. There could be some otherbroadband routers using the same channel, which will disturb theradio communication between wireless client and the broadbandWhen you finished with the settings in this page, you can click ‘Apply’button to save changes you made in this page, or you can click ‘Cancel’to discard changes. After you click ‘Apply’ button, you’ll see thefollowing messages:Please click ‘Apply’ to save changes you made and restart the broadbandrouter, this requires about 30 seconds and the broadband router will stopresponding (this is normal and is not malfunction). You can reconnect tothis broadband router and continue on other settings later.You can click ‘Continue’ to continue on other settings without restart thebroadband router, however, the changes you made will not take effectbefore you restart the broadband router.
3-4-1-2 Station-InfrastructureIn Station-Infrastructure mode, you can select a wireless access point tobecome its wireless client, and also acts as wireless access point to serveother wireless clients. If you have the access privilege of other wirelessaccess point nearby, and you wish to use that access point to accessInternet, you can use this connection type:Here are descriptions of every setup items:Item NameBandDescriptionPlease select the radio band from one offollowing options (must be the same with thewireless access point you wish to connect):2.4 GHz (B): 2.4GHz band, only allows802.11b wireless network client to connect thisrouter (maximum transfer rate 11Mbps).2.4 GHz (N): 2.4GHz band, only allows802.11n wireless network client to connect thisrouter (maximum transfer rate 300Mbps).2.4 GHz (B+G): 2.4GHz band, only allows802.11b and 802.11g wireless network client toconnect this router (maximum transfer rate11Mbps for 802.11b clients, and maximum
54Mbps for 802.11g clients).2.4 GHz (G): 2.4GHz band, only allows802.11g wireless network client to connect thisrouter (maximum transfer rate 54Mbps).ESSIDSite SurveyWLAN MAC2.4 GHz (B+G+N): 2.4GHz Band, Allows802.11b, 802.11g, and 802.11N wireless clients.It’s recommends to select this band to maximizecompatibility.This is the name of broadband router. You cantype any alphanumerical characters here,maximum 32 characters. ESSID is used toidentify your own broadband router fromothers when there are other broadband routersin the same area. Default SSID is ‘default’, it’srecommended to change default ESSID valueto the one which is meaningful to you, likemyhome, office_room1, etc.Click ‘Select Site Survey’ and a popup windowwill appear. All reachable wireless accesspoints will be shown in the window. Select thewireless access point you wish to connect fromthe list, and click ‘Done’. If the wireless accesspoint you wish to connect is not listed, you canclick ‘Refresh’ to rescan.If you still can’t find the wireless access pointyou wish to connect, please move thebroadband router to the place nearer to theaccess point you wish to connect.Some wireless access points will only allowclients with certain MAC address toestablish connection. In this case, you caninput the MAC address that will be acceptedby the wireless access point you wish toconnect here. You can also click ‘CloneMAC’ button to use the MAC address of your
Auto MAC Clonecomputer (the one you used to connect to theweb management interface currently).If you wish to use the MAC address of wiredLAN interface of this broadband router,select ‘Enable’, or select ‘Disable’ to not touse the MAC address of the wired LANinterface of this broadband router.When you finished with the settings in this page, you can click ‘Apply’button to save changes you made in this page, or you can click ‘Cancel’to discard changes. After you click ‘Apply’ button, you’ll see thefollowing messages:Please click ‘Apply’ to save changes you made and restart the broadbandrouter, this requires about 30 seconds and the broadband router will stopresponding (this is normal and is not malfunction). You can reconnect tothis broadband router and continue on other settings later.You can click ‘Continue’ to continue on other settings without restart thebroadband router, however, the changes you made will not take effectbefore you restart the broadband router.
3-4-1-3 AP Bridge-Point to PointIn this mode, you can use this broadband router as a wireless networkbridge and let all computers connected to the LAN ports of both wirelessaccess points to communicate with each other. This mode supports onlyone wireless access point peer.Please note that when you select this mode, this broadband router will actas wireless bridge only, and will not accept other wireless clients.Also, you can connect to the wireless access point with the samefunctionality only. If you wish to connect to the wireless access pointsmade by other manufacturer, please select ‘AP Bridge-WDS’ mode if thewireless access point you wish to connect supports WDS.Here are descriptions of every setup items:Item NameBandDescriptionPlease select the radio band from one offollowing options (must be the same with thewireless access point you wish to connect):2.4 GHz (B): 2.4GHz band, only allows802.11b wireless network client to connect thisrouter (maximum transfer rate 11Mbps).2.4 GHz (N): 2.4GHz band, only allows802.11n wireless network client to connect this
outer (maximum transfer rate 300Mbps).2.4 GHz (B+G): 2.4GHz band, only allows802.11b and 802.11g wireless network client toconnect this router (maximum transfer rate11Mbps for 802.11b clients, and maximum54Mbps for 802.11g clients).2.4 GHz (G): 2.4GHz band, only allows802.11g wireless network client to connect thisrouter (maximum transfer rate 54Mbps).Channel NumberMAC address 1Set Security2.4 GHz (B+G+N): 2.4GHz Band, Allows802.11b, 802.11g, and 802.11N wireless clients.It’s recommends to select this band to maximizecompatibility.Select the channel number you wish to use;both access points must use the same channel.Input the MAC address of another wirelessaccess point (the one you wish to connect).Click ‘Set Security’ button to set securityfunctions of this wireless connection toimprove security. Please refer to chapter3-2-1-7 for detailed instructions.When you finished with the settings in this page, you can click ‘Apply’button to save changes you made in this page, or you can click ‘Cancel’to discard changes. After you click ‘Apply’ button, you’ll see thefollowing messages:
Please click ‘Apply’ to save changes you made and restart the broadbandrouter, this requires about 30 seconds and the broadband router will stopresponding (this is normal and is not malfunction). You can reconnect tothis broadband router and continue on other settings later.You can click ‘Continue’ to continue on other settings without restart thebroadband router, however, the changes you made will not take effectbefore you restart the broadband router.
3-4-1-4 AP Bridge-Point to Multi-PointIn this mode, you can use this broadband router as a wireless networkbridge and let all computers connected to the LAN ports of all wirelessaccess points to communicate with each other. This mode supports up tofour wireless access point peers.Please note that when you select this mode, this broadband router will actas wireless bridge only, and will not accept other wireless clients.Also, you can connect to the wireless access point with the samefunctionality only. If you wish to connect to the wireless access pointsmade by other manufacturer, please select ‘AP Bridge-WDS’ mode if thewireless access point you wish to connect supports WDS.Here are descriptions of every setup items:Item NameBandDescriptionPlease select the radio band from one offollowing options (must be the same with thewireless access point you wish to connect):2.4 GHz (B): 2.4GHz band, only allows802.11b wireless network client to connect thisrouter (maximum transfer rate 11Mbps).2.4 GHz (N): 2.4GHz band, only allows802.11n wireless network client to connect thisrouter (maximum transfer rate 300Mbps).2.4 GHz (B+G): 2.4GHz band, only allows802.11b and 802.11g wireless network client toconnect this router (maximum transfer rate11Mbps for 802.11b clients, and maximum54Mbps for 802.11g clients).2.4 GHz (G): 2.4GHz band, only allows802.11g wireless network client to connect this
outer (maximum transfer rate 54Mbps).Channel NumberMAC address 1 to 4Set Security2.4 GHz (B+G+N): 2.4GHz Band, Allows802.11b, 802.11g, and 802.11N wireless clients.It’s recommends to select this band to maximizecompatibility.Select the channel number you wish to use; allaccess points must use the same channel.Input the MAC address of other wireless accesspoints (the access points you wish to connect).Click ‘Set Security’ button to set securityfunctions of this wireless connection toimprove security. Please refer to chapter3-2-1-7 for detailed instructions.When you finished with the settings in this page, you can click ‘Apply’button to save changes you made in this page, or you can click ‘Cancel’to discard changes. After you click ‘Apply’ button, you’ll see thefollowing messages:Please click ‘Apply’ to save changes you made and restart the broadbandrouter, this requires about 30 seconds and the broadband router will stopresponding (this is normal and is not malfunction). You can reconnect tothis broadband router and continue on other settings later.You can click ‘Continue’ to continue on other settings without restart thebroadband router, however, the changes you made will not take effectbefore you restart the broadband router.
3-4-1-5 AP Bridge-WDSIn this mode, this broadband router acts as both wireless communicationbridge and wireless access point. This broadband router can establishcommunication with up to four WDS-compatible wireless access points,and let all computers connected to the LAN ports of every wireless accesspoints communicate with each other. The broadband router is able toserve other wireless clients and acts as a wireless access point at the sametime.Here are descriptions of every setup items:Item NameBandDescriptionPlease select the radio band from one offollowing options (must be the same with thewireless access point you wish to connect):2.4 GHz (B): 2.4GHz band, only allows802.11b wireless network client to connect thisrouter (maximum transfer rate 11Mbps).2.4 GHz (N): 2.4GHz band, only allows
802.11n wireless network client to connect thisrouter (maximum transfer rate 300Mbps).2.4 GHz (B+G): 2.4GHz band, only allows802.11b and 802.11g wireless network client toconnect this router (maximum transfer rate11Mbps for 802.11b clients, and maximum54Mbps for 802.11g clients).2.4 GHz (G): 2.4GHz band, only allows802.11g wireless network client to connect thisrouter (maximum transfer rate 54Mbps).ESSIDChannel NumberAssociated Clients2.4 GHz (B+G+N): 2.4GHz Band, Allows802.11b, 802.11g, and 802.11N wireless clients.It’s recommends to select this band to maximizecompatibility.This is the name of broadband router. You cantype any alphanumerical characters here,maximum 32 characters. ESSID is used toidentify your own broadband router fromothers when there are other broadband routersin the same area. Default SSID is ‘default’, it’srecommended to change default ESSID valueto the one which is meaningful to you, likemyhome, office_room1, etc.Select the channel number you wish to use; allaccess points must use the same channel.Click ‘Show Active Clients’ button to showthe list of all connected wireless clients. Youcan click ‘Refresh’ in new window to getlatest list again, or click ‘Close’ to close thewindow.Please note that if you have pop-up blockerinstalled, you may have to disable it or tellyour pop-up blocker to allow the popupwindow, or you will not be able to see the
MAC address 1 to 4Set Securitywireless client list window.Input the MAC address of other wireless accesspoints (the access points you wish to connect).Click ‘Set Security’ button to set securityfunctions of this wireless connection toimprove security. Please refer to chapter3-2-1-7 for detailed instructions.When you finished with the settings in this page, you can click ‘Apply’button to save changes you made in this page, or you can click ‘Cancel’to discard changes. After you click ‘Apply’ button, you’ll see thefollowing messages:Please click ‘Apply’ to save changes you made and restart the broadbandrouter, this requires about 30 seconds and the broadband router will stopresponding (this is normal and is not malfunction). You can reconnect tothis broadband router and continue on other settings later.You can click ‘Continue’ to continue on other settings without restart thebroadband router, however, the changes you made will not take effectbefore you restart the broadband router.
3-4-1-6 Universal RepeaterIn this mode, this broadband router acts as a wireless repeater. It willrepeat the signal of the wireless access point you specified, to extend itswireless coverage. The broadband router will still accept wireless clientswhen in this mode.ModemBR-6574nBR-6574nUniversal Repeater
Here are descriptions of every setup items:Item NameBandDescriptionPlease select the radio band from one offollowing options (must be the same with thewireless access point you wish to connect):2.4 GHz (B): 2.4GHz band, only allows802.11b wireless network client to connect thisrouter (maximum transfer rate 11Mbps).2.4 GHz (N): 2.4GHz band, only allows802.11n wireless network client to connect thisrouter (maximum transfer rate 300Mbps).2.4 GHz (B+G): 2.4GHz band, only allows802.11b and 802.11g wireless network client toconnect this router (maximum transfer rate11Mbps for 802.11b clients, and maximum54Mbps for 802.11g clients).2.4 GHz (G): 2.4GHz band, only allows802.11g wireless network client to connect thisrouter (maximum transfer rate 54Mbps).ESSID2.4 GHz (B+G+N): 2.4GHz Band, Allows802.11b, 802.11g, and 802.11N wireless clients.It’s recommends to select this band to maximizecompatibility.This is the name of broadband router. You cantype any alphanumerical characters here,maximum 32 characters. ESSID is used toidentify your own broadband router fromothers when there are other broadband routersin the same area. Default SSID is ‘default’, it’srecommended to change default ESSID valueto the one which is meaningful to you, likemyhome, office_room1, etc.
Channel NumberAssociated ClientsRoot AP SSIDSite SurveySelect the channel number you wish to use; allaccess points must use the same channel.Click ‘Show Active Clients’ button to showthe list of all connected wireless clients. Youcan click ‘Refresh’ in new window to getlatest list again, or click ‘Close’ to close thewindow.Please note that if you have pop-up blockerinstalled, you may have to disable it or tellyour pop-up blocker to allow the popupwindow, or you will not be able to see thewireless client list window.Please input the SSID of the wireless accesspoint you wish to extend signal coverage.Click ‘Select Site Survey’ and a popup windowwill appear. All reachable wireless accesspoints will be shown in the window. Select thewireless access point you wish to connect fromthe list, and click ‘Done’. If the wireless accesspoint you wish to connect is not listed, you canclick ‘Refresh’ to rescan.If you still can’t find the wireless access pointyou wish to connect, please move thebroadband router to the place nearer to theaccess point you wish to connect.When you finished with the settings in this page, you can click ‘Apply’button to save changes you made in this page, or you can click ‘Cancel’to discard changes. After you click ‘Apply’ button, you’ll see thefollowing messages:
Please click ‘Apply’ to save changes you made and restart the broadbandrouter, this requires about 30 seconds and the broadband router will stopresponding (this is normal and is not malfunction). You can reconnect tothis broadband router and continue on other settings later.You can click ‘Continue’ to continue on other settings without restart thebroadband router, however, the changes you made will not take effectbefore you restart the broadband router.
3-4-1-7 Set SecurityIn certain AP working modes, you can enable encryption to improvesecurity level.When you click ‘Set Security’ button, the following window will appear:Please select an encryption method from ‘Encryption’ dropdown menu,and corresponding setting will appear:DisabledEncryption is disabled. It’s not recommended to disable encryptionbecause other people may use certain wireless scanner to copy the datatransferred over air.
WEPSelect WEP to enable WEP (Wired Equivalent Privacy) encryption:Here are descriptions of every setup items:Item NameKey LengthKey FormatDefault Tx KeyEncryption Key 1 to 4DescriptionThere are two types of WEP key length: 64-bitand 128-bit. Using ‘128-bit’ is saferthan ’64-bit’, but will reduce some datatransfer performance.There are two types of key format: ASCII andHex. When you select a key format, the numberof characters of key will be displayed. Forexample, if you select ’64-bit’ as key length,and ‘Hex’ as key format, you’ll see the messageat the right of ‘Key Format’ is ‘Hex (10characters), which means the length of WEPkey is 10 characters.You can set up to four sets of WEP key, and youcan decide which key is being used by defaulthere. If you don’t know which one you shoulduse, select ‘Key 1’.Input WEP key characters here, the number ofcharacters must be the same as the number
displayed at ‘Key Format’ field. You can useany alphanumerical characters (0-9, a-z, andA-Z) if you select ‘ASCII’ key format, and ifyou select ‘Hex’ as key format, you can usecharacters 0-9, a-f, and A-F. You must enter atleast one encryption key here, and if youentered multiple WEP keys, they should not besame with each other.Please click ‘Apply’ to save changes, or click ‘Reset’ to clear the texts inall fields. If you click ‘Apply’, the following messages will appear:You can click ‘Continue’ to back to previous page and continue setting, orclick ‘Apply’ to restart the broadband router so the changes will takeeffect.WPA pre-shared keyWPA (Wi-Fi Protected Access) is also an encryption method and is saferthan WEP. It’s recommended to use WPA instead of WEP when you needto use encryption to protect your data security.
Here are descriptions of every setup items:Item NameWPA Unicast CipherSuitePre-shared KeyFormatPre-shared KeyDescriptionPlease select a type of WPA cipher suite.Available options are: WPA (TKIP), WPA2(AES), and WPA2 Mixed. You can select one ofthem, but you have to make sure your wirelessclient support the cipher you selected.Select the type of pre-shared key, youcan select Passphrase (8 or morealphanumerical characters, up to 63), or Hex(64 characters of 0-9, and a-f).Please input the WPA passphrase here.It’s not recommended to use a word that canbe found in a dictionary due to securityreason.Please click ‘Apply’ to save changes, or click ‘Reset’ to clear the texts inall fields. If you click ‘Apply’, the following messages will appear:You can click ‘Continue’ to back to previous page and continue setting, orclick ‘Apply’ to restart the broadband router so the changes will takeeffect.
3-4-2 Security SettingsThis wireless router supports two types of encryption: WEP (WiredEquivalent Privacy) and WPA (Wi-Fi Protected Access):Please select an encryption method from ‘Encryption’ dropdown menu,and corresponding setting will appear:DisabledEncryption is disabled. It’s not recommended to disable encryptionbecause other people may use certain wireless scanner to copy the datatransferred over air.
WEPSelect WEP to enable WEP (Wired Equivalent Privacy) encryption:Here are descriptions of every setup items:Item NameKey LengthKey FormatDefault Tx KeyEncryption Key 1 to 4DescriptionThere are two types of WEP key length: 64-bitand 128-bit. Using ‘128-bit’ is saferthan ’64-bit’, but will reduce some datatransfer performance.There are two types of key format: ASCII andHex. When you select a key format, the numberof characters of key will be displayed. Forexample, if you select ’64-bit’ as key length,and ‘Hex’ as key format, you’ll see the messageat the right of ‘Key Format’ is ‘Hex (10characters), which means the length of WEPkey is 10 characters.You can set up to four sets of WEP key, and youcan decide which key is being used by defaulthere. If you don’t know which one you shoulduse, select ‘Key 1’.Input WEP key characters here, the number ofcharacters must be the same as the number
displayed at ‘Key Format’ field. You can useany alphanumerical characters (0-9, a-z, andA-Z) if you select ‘ASCII’ key format, and ifyou select ‘Hex’ as key format, you can usecharacters 0-9, a-f, and A-F. You must enter atleast one encryption key here, and if youentered multiple WEP keys, they should not besame with each other.Please click ‘Apply’ to save changes, or click ‘Reset’ to clear the texts inall fields. If you click ‘Apply’, the following messages will appear:You can click ‘Continue’ to back to previous page and continue setting, orclick ‘Apply’ to restart the broadband router so the changes will takeeffect.WPA pre-shared keyWPA (Wi-Fi Protected Access) is also an encryption method and is saferthan WEP. It’s recommended to use WPA instead of WEP when you needto use encryption to protect your data security.
Here are descriptions of every setup items:Item NameWPA Unicast CipherSuitePre-shared KeyFormatPre-shared KeyDescriptionPlease select a type of WPA cipher suite.Available options are: WPA (TKIP), WPA2(AES), and WPA2 Mixed. You can select one ofthem, but you have to make sure your wirelessclient support the cipher you selected.Select the type of pre-shared key, youcan select Passphrase (8 or morealphanumerical characters, up to 63), or Hex(64 characters of 0-9, and a-f).Please input the WPA passphrase here.It’s not recommended to use a word that canbe found in a dictionary due to securityreason.Please click ‘Apply’ to save changes, or click ‘Reset’ to clear the texts inall fields. If you click ‘Apply’, the following messages will appear:You can click ‘Continue’ to back to previous page and continue setting, orclick ‘Apply’ to restart the broadband router so the changes will takeeffect.WPA RADIUSIf you have RADIUS authentication server on your local network, youcan authenticate the wireless clients by RADIUS server’s user database.Only authenticated clients can establish wireless connection with thisbroadband router.
Here are descriptions of every setup items:Item NameWPA Unicast CipherSuiteRADIUS Server IPaddressRADIUS Server PortRADIUS ServerPasswordDescriptionPlease select a type of WPA cipher suite.Available options are: WPA (TKIP), WPA2(AES), and WPA2 Mixed. You can select one ofthem, but you have to make sure your wirelessclient support the cipher you selected.Input the IP address of RADIUS authenticationserver here.Input the port number of RADIUSauthentication server here. Most of RADIUSserver will use port number 1812 and you cankeep using default value.Input the password of RADIUS authenticationserver here.Please click ‘Apply’ to save changes, or click ‘Reset’ to clear the texts inall fields. If you click ‘Apply’, the following messages will appear:You can click ‘Continue’ to back to previous page and continue setting, orclick ‘Apply’ to restart the broadband router so the changes will takeeffect.
3-4-3 MAC Address FilteringThis function will help you to prevent unauthorized users fromconnecting to your wireless router; only those wireless devices who havethe MAC address you assigned here can gain access to your wirelessrouter. You can use this function with other security measures describedin previous section, to create a safer wireless environment. Up to 20MAC addresses can be assigned.To enable MAC address filtering, please check ‘Enable Wireless AccessControl’ box in this page, the descriptions of other setting items are listedas follow:Item NameMAC addressCommentAddClearDescriptionInput the MAC address you wish to add to theMAC address to the table.You can input any text here as the comment ofthis MAC address, like ‘ROOM 2A Computer’or anything. You can input up to 16alphanumerical characters here. This isoptional and you can leave it blank, however,it’s recommended to use this field to write acomment for every MAC addresses as amemory aid.Click ‘Add’ button to add the MAC address andassociated comment to the MAC addressfiltering table.Click ‘Clear’ to remove the value you inputtedin MAC address and comment field.
All MAC address entries will be listed in this page:To delete one or more entries listed here, please check the box of themapping entry (under ‘Select’), and click ‘Delete Selected’ button.If you wish to delete all mapping entries, click ‘Delete All’ button. Todeselect all checked boxes, click ‘Reset’ button.When you finished with the settings in this page, you can click ‘Apply’button to save changes you made in this page, or you can click ‘Cancel’to discard changes. After you click ‘Apply’ button, you’ll see thefollowing messages:Please click ‘Apply’ to save changes you made and restart the broadbandrouter, this requires about 30 seconds and the broadband router will stopresponding (this is normal and is not malfunction). You can reconnect tothis broadband router and continue on other settings later.
3-4-4 WPSWPS (Wi-Fi Protected Setup) provides a convenient way to establish theconnection between this broadband router and wireless clients. AnyWPS-compatible wireless clients can establish secure connection withthis broadband router with simple push-button type configuration orPinCode type configuration.Here are descriptions of every setup items:Item NameEnable WPSWPS StatusSelf PIN codeSSIDDescriptionCheck this box to enable WPS function,uncheck it to disable WPS.If the wireless security (encryption) function ofthis wireless router is properly set, you’ll see‘Configured’ message here. If wireless securityfunction has not been set, you’ll see‘unConfigured’.This is the WPS PIN code of this wirelessrouter. This code is useful when you need tobuild wireless connection by WPS with otherWPS-enabled wireless devices.The SSID of this wireless router will be
Authentication ModePassphrase KeyConfig Modedisplayed here.The wireless security authentication mode ofthis wireless router will be displayed here.The WPA passphrase will be displayed asasterisk here.Select the WPS configuration role of thisbroadband router.Registrar: This broadband router will act asWPS registrar and wait for wireless clients tosend WPS configuration request.Configure via PushButtonConfigure via ClientPinCodeEnrollee: This broadband router will act asWPS enrollee and send WPS configurationrequest to other WPS registrar.Click ‘Start PBC’ to start Push-Button typeWPS configuration (PBC). Please push theWPS push-button on other WPS-compatiblenetwork devices to begin WPS configuration.You can also push the ‘WPS / Reset’ buttonlocated at the back of this broadband router tostart PBC without using web configurationinterface.Please input the PinCode displayed at theconfiguration software of WPS-enabledwireless client, and click ‘Start PIN’ toestablish connection with the wireless client.
3-5 Advance Settings*This router provides various network functionalities like QoS and NAT,and you can configure these functions in ‘Advanced Settings’ menu.Please select the function you wish to set, then click ‘Apply’ button. Ifyou wish to go back to previous page, click ‘Previous’ button.
3-5-1 QoSQuality of service provides an efficient way for computers on the networkto share the internet bandwidth with a promised quality of internet service.Without QoS, all computers and devices on the network will competewith each other to get internet bandwidth, and some applications whichrequire guaranteed bandwidth (like video streaming and networktelephone) will be affected, therefore an unpleasing result will occur, likethe interruption of video / audio transfer.With this function, you can limit the maximum bandwidth or give aguaranteed bandwidth for a specific computer, to avoid said unpleasingresult from happening.3-5-1-1 Basic QoS SettingsHere are descriptions of every setup items:Item NameEnable QoSTotal DownloadBandwidthTotal UploadBandwidthAddDescriptionCheck this box to enable QoS function,uncheck it to disable QoS.You can set the limit of total downloadbandwidth in kbits. To disable downloadbandwidth limitation, input ‘0’ here.You can set the limit of total upload bandwidthin kbits. To disable upload bandwidthlimitation, input ‘0’ here.Click ‘add’ button to add a new QoS rule(detailed instructions will be given below).
EditDelete SelectedDelete AllMove UpMove DownResetIf you want to modify the content of a specificrule, please check the ‘select’ box of the ruleyou want to edit, then click ‘Edit’ button. Onlyone rule should be selected a time! If youdidn’t select a rule before clicking ‘Edit’button, you’ll be prompted to add a new rule.You can delete selected rules by clicking thisbutton. You can select one or more rules todelete by check the ‘select’ the box of therule(s) you want to delete a time. If the QoStable is empty, this button will be grayed outand can not be clicked.By clicking this button, you can delete all rulescurrently listed in the QoS table. If the QoStable is empty, this button will be grayed outand can not be clicked.Move selected item up.Move selected item down.If you want to erase all values you just entered.Click ‘Reset’When you finished with the settings in this page, you can click ‘Apply’button to save changes you made in this page, or you can click ‘Cancel’to discard changes. After you click ‘Apply’ button, you’ll see thefollowing messages:Please click ‘Apply’ to save changes you made and restart the broadbandrouter, this requires about 30 seconds and the broadband router will stopresponding (this is normal and is not malfunction). You can reconnect tothis broadband router and continue on other settings later.
3-5-1-2 Add a new QoS entryAfter you click ‘Add’ button in QoS menu, a new setting page willappear:Here are descriptions of every setup items:Item NameDescriptionRule Name Please give a name to this QoS rule (up to 15alphanumerical characters).BandwidthSet the bandwidth limitation of this QoS rule.You have to select the data direction of this rule(Upload of Download), and the speed ofbandwidth limitation in Kbps, then select thetype of QoS: ‘guarantee’ (guaranteed usablebandwidth for this rule) or ‘max’ (set themaximum bandwidth for the applicationallowed by this rule).Local IP Address Specify the local (source) IP address that willbe affected by this rule. Please input thestarting IP address in the left field, and inputthe end IP address in the right field to define arange of IP addresses, or just input the IPaddress in the left field to define a single IPaddress.Local Port Range Please input the range of local (source) port
Remote IP AddressRemote Port RangeTraffic TypeProtocolnumber that will be affected by this rule. If youwant to apply this rule on port 80 to 90, pleaseinput ’80-90’; if you want to apply this rule ona single port, just input the port number, like‘80’Specify the remote (destination) IP address thatwill be affected by this rule. Please input thestarting IP address in the left field, and inputthe end IP address in the right field to define arange of IP addresses, or just input the IPaddress in the left field to define a single IPaddress.Please input the range of remote (destination)port number that will be affected by this rule. Ifyou want to apply this rule on port 80 to 90,please input ’80-90’; if you want to apply thisrule on a single port, just input the portnumber, like ‘80’. If the remote (destination) IPaddress and /or port number is universal, justleave it blank.Please select the traffic type of this rule,available options are None, SMTP, HTTP,POP3, and FTP. You can select a specifictraffic type for this rule, if you want to makethis rule as a IP address based rule (apply thelimitation on all traffics from / to the specifiedIP address / port number), select ‘None’.Please select the protocol type of this rule,available options are TCP and UDP. If youdon’t know what protocol your applicationuses, please try ‘TCP’ first, and switch to‘UDP’ if this rule doesn’t seems to work.Please click ‘save’ button to save settings, and the rule you just set willappear in current QoS table; if you did anything wrong, you’ll get anerror message when you click ‘Save’ button, please correct your input bythe instructions given by the error message. If you want to erase all valuesyou just entered, click ‘Reset’.
3-5-2 NATNetwork address translations solve the problem if sharing a single IPaddress to multiple computers. Without NAT, all computers must beassigned with a valid Internet IP address to get connected to Internet, butInternet service providers only provide very few IP addresses to everyuser. Therefore it’s necessary to use NAT technology to share a singleInternet IP address to multiple computers on local network, so everyonecan get connected to Internet.This broadband router supports four types of NAT functions, and theinstructions of these functions will be given below.3-5-2-1 Virtual ServerThis function allows you to redirect a port on Internet IP address (onWAN port) to a specified port of an IP address on local network, so youcan setup an Internet service on the computer on local network, withoutexposing it on Internet directly. You can also build many sets of portredirection, to provide many different Internet services on different localcomputers via a single Internet IP address.
Here are descriptions of every setup items:Item NameEnable Virtual ServerPrivate IPComputer namePrivate PortTypePublic PortCommentAddResetDescriptionCheck this box to enable virtual server, anduncheck this box to disable virtual server.Input the IP address of the computer whichprovides Internet service.All computer names found by this broadbandrouter on local network will be listed here. Youcan select the computer name and click ‘
When you finished with the settings in this page, you can click ‘Apply’button to save changes you made in this page, or you can click ‘Cancel’to discard changes. After you click ‘Apply’ button, you’ll see thefollowing messages:Please click ‘Apply’ to save changes you made and restart the broadbandrouter, this requires about 30 seconds and the broadband router will stopresponding (this is normal and is not malfunction). You can reconnect tothis broadband router and continue on other settings later.
3-5-2-2 Special ApplicationsSome applications require more than one connection a time; theseapplications won’t work with simple NAT rules. In order to make theseapplications work, you can use this function to let these applicationswork.Here are descriptions of every setup items:Item NameEnableIP AddressComputer nameTCP Port to OpenDescriptionCheck this box to enable support for specialapplications, and uncheck this box to disablethis support.Input the IP address of the computer which isgoing to use the special application.All computer names found by this broadbandrouter on local network will be listed here. Youcan select the computer name and click ‘
UDP Port to Open)CommentSelect GameAddResetsingle value, or a range (like 20-50). If youneed to input more than one port number andthey’re not contiguous, list all port numbershere and separate them by comma ( , ). If theapplication does not use TCP port, leave itblank.Input the UDP port number required by thespecial application, the port number can be asingle value, or a range (like 20-50). If youneed to input more than one port number andthey’re not contiguous, list all port numbershere and separate them by comma ( , ). If theapplication does not use UDP port, leave itblank.You can input any text here to help youremember the purpose of this item. This isoptional.This router comes with a numerous portmapping settings of network games. If thegame you wish to set is listed here, you canselect it from dropdown menu.After a game is selected, click ‘Add’ (the onenext to ‘Select Game’ dropdown list) to add theconnection parameters to all respective fields.Click this button to add a new port mappingrule to special applications table.Click this button to remove all values in everyfield.All existing special application mappings will be displayed in this page.To delete one or more mappings, check the box of the mapping, thenclick ‘Delete Selected’ button to remove the mapping. To delete allexisting mappings, click ‘Delete All’ button. If you want to uncheck allboxes, click ‘Reset’.
When you finished with the settings in this page, you can click ‘Apply’button to save changes you made in this page, or you can click ‘Cancel’to discard changes. After you click ‘Apply’ button, you’ll see thefollowing messages:Please click ‘Apply’ to save changes you made and restart the broadbandrouter, this requires about 30 seconds and the broadband router will stopresponding (this is normal and is not malfunction). You can reconnect tothis broadband router and continue on other settings later.
3-5-2-3 FirewallThis broadband router supports several firewall functions which will helpyou to protect your network and computer. In this chapter, instructions forusing these functions will be given, so you can utilize these functions toprotect your network from hackers and malicious intruders.3-5-2-3-1 Access ControlBy using access control, you can restrict your computers from accessingimproper website, or using disallowed applications. You can even onlyallow computers with certain MAC address to access the network, ordeny the computers in the list from accessing your network.Here are descriptions of every setup items:Item NameEnable MAC FilteringDescriptionCheck this box to enable MAC address basedfiltering, and please select ‘Deny’ or ‘Allow’ todecide the behavior of MAC filtering table. Ifyou select deny, all MAC addresses listed infiltering table will be denied from connectingto the network; if you select allow, only MACaddresses listed in filtering table will be able toconnect to the network, and rejecting all other
Client PC MACaddressComputer NameCommentAddResetnetwork devices.Please input the MAC address of computer ornetwork device here, dash ( - ) or colon ( : ) arenot required. (i.e. If the MAC address label ofyour wireless device indicates‘aa-bb-cc-dd-ee-ff’ or ‘aa:bb:cc:dd:ee:ff’, justinput ‘aabbccddeeff’All computer names found by this broadbandrouter on local network will be listed here. Youcan select the computer name and click ‘
All MAC address entries will be listed in this page:To delete one or more entries listed here, please check the box of themapping entry (under ‘Select’), and click ‘Delete Selected’ button.If you wish to delete all mapping entries, click ‘Delete All’ button. Todeselect all checked boxes, click ‘Reset’ button.If you wish to use IP address-based filtering, please use ‘IP FilteringTable’ in this page:Please check ‘Enable IP Filtering Table’ box first, and select ‘Deny’ or‘Allow’ to decide the behavior of IP filtering table (Deny the access of IPaddresses in the list, or allow the access of IP addressees in the list). Youhave to click ‘Add PC’ button to add a new IP address to the list:
Here are descriptions of every setup items:Item NameClient PC DescriptionClient PC IP addressDescriptionPlease input any text to describe this IPaddress, up to 16 alphanumerical characters.Please input the starting IP address in the leftfield, and input the end IP address in the rightfield to define a range of IP addresses, or justinput the IP address in the left field to define asingle IP address.You also have to select the type of Internet services that will be applied tothis access control rule from the list:You can select multiple services here. If you wish to deny or allow allservices of certain IP address(es), please select both ‘TCP’ and ‘UDP’.
If the service you wish to deny or allow is not listed, you can use ‘UserDefine Service’ table to add a new service of your own:Here are descriptions of every setup items:Item NameProtocolPort RangeDescriptionPlease select the protocol type of this service:TCP or UDP, or ‘Both’.Please input the port range if this service. Fora single port number, just input the number ofservice port (like ‘110’).If this service consists multiple continuousports, you can input ‘110-120’ for port number110 to 120, or ’110,115,120’ for port number110, 115, and 120.Click ‘Add’ to add this IP address restriction rule to the list (and back toprevious page), or click ‘Reset’ to clear all texts in every field.When you finished with the settings in this page, you can click ‘Apply’button to save changes you made in this page, or you can click ‘Cancel’to discard changes. After you click ‘Apply’ button, you’ll see thefollowing messages:
Please click ‘Apply’ to save changes you made and restart the broadbandrouter, this requires about 30 seconds and the broadband router will stopresponding (this is normal and is not malfunction). You can reconnect tothis broadband router and continue on other settings later.
3-5-2-3-2 URL BlockingIf you want to prevent computers in local network from accessing certainwebsite (like pornography, violence, or anything you want to block), youcan use this function to stop computers in local network from accessingthe site you defined here.This function is useful for parents and company managers.Please follow the following instructions to set URL blocking parameters:Please click ‘Firewall’ menu on the left of web management interface,then click ‘URL Blocking’, and the following message will be displayedon your web browser:Here are descriptions of every setup items:Item NameEnable URL BlockingURL/KeywordDescriptionCheck this box to enforce URL Blocking,uncheck it to disable URL Blocking.Input the URL (host name or IP address of
AddResetwebsite, like http://www.blocked-site.com orhttp://11.22.33.44), or the keyword which iscontained in URL (like pornography, cartoon,stock, or anything).Click ‘Add’ button to add the URL / keyword tothe URL / Keyword filtering table.Click ‘Reset’ to remove the value you inputtedin URL/Keyword field.All existing URLs will be displayed in ‘Current URL Blocking Table’:If you want to delete a specific URL/Keyword entry, check the ‘select’box of the MAC address you want to delete, then click ‘Delete Selected’button. (You can select more than one MAC addresses). If you want todelete all URL/Keyword listed here, please click ‘Delete All’ button, oryou can also click ‘Reset’ button to unselect all URL/Keywords.When you finished with the settings in this page, you can click ‘Apply’button to save changes you made in this page, or you can click ‘Cancel’to discard changes. After you click ‘Apply’ button, you’ll see thefollowing messages:Please click ‘Apply’ to save changes you made and restart the broadbandrouter, this requires about 30 seconds and the broadband router will stop
esponding (this is normal and is not malfunction). You can reconnect tothis broadband router and continue on other settings later.
3-5-2-3-3 DoSDenial of Service (DoS) is a common attack measure, by transmitting agreat amount of data or request to your Internet IP address and server, theInternet connection will become very slow, and server may stopresponding because it is not capable to handle too much traffics.This router has a built-in DoS attack prevention mechanism; when youactivate it, the router will stop the DoS attack for you:Here lists four kinds of DoS attacks, please select the type of DoS attackyou wish this broadband router to protect, and you can select multipletypes of attacks.The descriptions of every DoS attack is listed below:Item NamePing of DeathDiscard Ping FromWANDescriptionPing of Death is a special packet, and it willcause certain computer to stop responding.Check this box and the router will filter thiskind of packet out.Ping is a common and useful tool to knowthe connection status of a specified remotenetwork device, but some malicious intruderwill try to fill your network bandwidth with alot of PING request data packet, to make yourinternet connection become very slow, evenunusable. Check this box and the router willignore all inbound PING request, but when youactivate this function, you will not be able to
Port ScanSync Floodping your own router from internet, too.Some malicious intruder will try to use a ‘portscanner’ to know how many ports of yourInternet IP address are open, and they cancollect a lot of valuable information by doingso. Check this box and the router will block alltraffics which are trying to scan your InternetIP address.This is another kind of attack, which uses a lotof fake connection request to consume thememory of your server, and try to make yourserver become unusable. Check this box andthe router will filter this kind of traffic out.If you need to specify the details of every DoS attack, please click‘Advanced Settings’ button, and the following settings will appear:The descriptions of every DoS attack is listed below:Item NamePing of DeathDescriptionSet the threshold of when this DoS preventionmechanism will be activated. Please check the
Discard Ping FromWANPort ScanSync Floodbox of Ping of Death, and input the frequencyof threshold (how many packets per second,minute, or hour), you can also input the ‘Burst’value, which means when this number of ‘Pingof Death’ packet is received in very short time,this DoS prevention mechanism will beactivated.Check the box to activate this DoS preventionmechanism.Many kind of port scan methods are listed here,please check one or more DoS attack methodsyou want to prevent.Like Ping of Death, you can set the thresholdof when this DoS prevention mechanism will beactivated.When you finished with the settings in this page, you can click ‘Apply’button to save changes you made in this page, or you can click ‘Cancel’to discard changes. After you click ‘Apply’ button, you’ll see thefollowing messages:Please click ‘Apply’ to save changes you made and restart the broadbandrouter, this requires about 30 seconds and the broadband router will stopresponding (this is normal and is not malfunction). You can reconnect tothis broadband router and continue on other settings later.
3-5-2-4 DDNSDDNS (Dynamic DNS) is a IP-to-Hostname mapping service for thoseInternet users who don’t have a static (fixed) IP address. It will be aproblem when such user wants to provide services to other users onInternet, because their IP address will vary every time when connected toInternet, and other user will not be able to know the IP address they’reusing at a certain time.This router supports DDNS service of following service providers:3322 (http://www.3322.org/)DHS (http://www.dhs.org)DynDNS (http://www.dyndns.org/)ODS (http://ods.org)TZO (http://www.tzo.com/)GnuDIP (http://gnudip2.sourceforge.net/)DyNS (http://www.dyns.cx/)ZoneEdit (http://www.zoneedit.com)DHIS (http://www.dhis.org/)CyberGate (http://cybergate.planex.co.jp/ddns/)Please go to one of DDNS service provider’s webpage listed above, andget a free DDNS account by the instructions given on their webpage.After that, you can use the DDNS page to setup DDNS parameters to useDDNS service:
Here are descriptions of every setup items:Item NameDynamic DNSProviderDomain NameAccount / E-MailPassword / KeyDescriptionIf you want to enable DDNS function, pleaseselect ‘Enabled’; otherwise please select‘Disabled’Select your DDNS service provider here.Input the domain name you’ve obtained fromDDNS service provider.Input account or email of DDNS registration.Input DDNS service password or key.If your DDNS provider is ‘DHIS’, the settings will be different:Here are descriptions of every setup items:Item NameHostIDISAddrAuthentication TypeHostPassDescriptionPlease input the HostID you applied duringDHIS registration.Please input the ISAddr you applied duringDHIS registration.Please select the DHIS user authentication typefrom dropdown menu: password or QRC.Please input the HostID you applied duringDHIS registration.(This field will appear only when
AuthP / AuthQauthentication type is password).Please input the AuthP/AuthQ you appliedduring DHIS registration.(This field will appear only whenauthentication type is QRC).When you finished with the settings in this page, you can click ‘Apply’button to save changes you made in this page, or you can click ‘Cancel’to discard changes. After you click ‘Apply’ button, you’ll see thefollowing messages:Please click ‘Apply’ to save changes you made and restart the broadbandrouter, this requires about 30 seconds and the broadband router will stopresponding (this is normal and is not malfunction). You can reconnect tothis broadband router and continue on other settings later.
3-5-2-5 Port ForwardingThis function allows you to redirect a single port or consecutive ports ofInternet IP address to the same port of the IP address on local network.The port number(s) of Internet IP address and private IP address (the IPaddress on local network) must be the same.If the port number of Internet IP address and private IP address isdifferent, please use ‘Virtual Server’ function.The port forwarding setting page looks like this:Here are descriptions of every setup items:Item NameEnable PortForwardingPrivate IPComputer nameDescriptionCheck this box to enable port forwarding, anduncheck this box to disable port forwarding.Input the IP address of the computer on localnetwork which provides internet service.All computer names found by this broadbandrouter on local network will be listed here. Youcan select the computer name and click ‘
TypePort RangeCommentAddResetSelect the type of connection, TCP or UDP. Ifyou’re not sure, please select ‘Both’.Input the starting port number in the left field,and input the ending port number in the rightfield. If you only want to redirect a single portnumber, just fill the port number in the leftfield.Please input any text to describe this mapping,up to 16 alphanumerical characters.Add the mapping to port forwarding table.Remove all inputted values.All existing URLs will be displayed in ‘Current URL Blocking Table’:If you want to delete a specific port forwarding entry, check the ‘select’box of the port forwarding entry you want to delete, then click ‘DeleteSelected’ button. (You can select more than one port forwarding entries).If you want to delete all port forwarding entries listed here, please click‘Delete All’ button or you can also click ‘Reset’ button to unselect all portforwarding entries.When you finished with the settings in this page, you can click ‘Apply’button to save changes you made in this page, or you can click ‘Cancel’to discard changes. After you click ‘Apply’ button, you’ll see thefollowing messages:
Please click ‘Apply’ to save changes you made and restart the broadbandrouter, this requires about 30 seconds and the broadband router will stopresponding (this is normal and is not malfunction). You can reconnect tothis broadband router and continue on other settings later.
3-5-2-6 DMZDemilitarized Zone (DMZ) is a special area in your local network. Thisarea resides in local network, and all computers in this area uses privateIP address, too. But these private IP addresses are mapped to a certainInternet IP address, so other people on Internet can fully access thosecomputers in DMZ.The DMZ setting page looks like this:Here are descriptions of every setup items:Item NameEnable DMZPublic IP addressClient PC IP addressTypeDescriptionCheck this box to enable DMZ function,uncheck this box to disable DMZ function.You can select ‘Dynamic IP’ or ‘Static IP’ here.If you select ‘Dynamic IP’, you have to selectan Internet connection session from dropdownmenu; if you select ‘Static IP’, please input theIP address that you want to map to a specificprivate IP address.Please input the private IP address that theInternet IP address will be mapped to.Select the type of connection, TCP or UDP. If
Port RangeCommentAddResetyou’re not sure, please select ‘Both’.Input the starting port number in the left field,and input the ending port number in the rightfield. If you only want to redirect a single portnumber, just fill the port number in the leftfield.Please input any text to describe this mapping,up to 16 alphanumerical characters.Add the mapping to port forwarding table.Remove all inputted values.NOTE: Please note that every public IP address can be mapped to a singleClient PC IP address only.All existing DMZ entries will be displayed in ‘Current DMZ Table’:If you want to delete a specific DMZ entry, check the ‘select’ box of theDMZ entry you want to delete, then click ‘Delete Selected’ button. (Youcan select more than one DMZ entries). If you want to delete all DMZentries listed here, please click ‘Delete All’ button or you can also click‘Reset’ button to unselect all DMZ entries.When you finished with the settings in this page, you can click ‘Apply’button to save changes you made in this page, or you can click ‘Cancel’to discard changes. After you click ‘Apply’ button, you’ll see thefollowing messages:
Please click ‘Apply’ to save changes you made and restart the broadbandrouter, this requires about 30 seconds and the broadband router will stopresponding (this is normal and is not malfunction). You can reconnect tothis broadband router and continue on other settings later.
Chapter IV: EZ ViewMany network devices like printer, IP camera, and multi-media adapterssupport UPnP (Universal PnP) function. Those UPnP-compatible devicescan communicate with each other, and make appropriate configurations.This broadband router is capable to scan the local network and find allUPnP-compatible devices out, you can get a list of all UPnP devices onnetwork, and you can connect to the administration interface of thesedevices from web interface directly. EZView also helps you to set thename and IP address of UPnP-compatible network devices, and control itsbandwidth usage. You can also set special network functions like DMZand port forwarding for a specific UPnP-compatible devices.To use EZ View, please follow the following instructions:1. click ‘EZ View’ button from main menu:
2. A pop-up window (or new web browser tab) will appear to show thatbroadband router is scanning for UPnP devices on network, please waitfor 30 seconds until ‘OK’ button appears. Click ‘OK’ button to continue.
3. All UPnP-compatible devices found on the network will be listed here,with the category it belongs to and its name. (For network devices notmanufactured by <strong>Edimax</strong>, or earlier non-PnP <strong>Edimax</strong> products, thecategory and name will not be able to displayed).
You can click ‘’ button to connect to the web administrationinterface of the network device, as shown below. (The following pictureis an example of connecting to an IP camera, you can input its usernameand password to login).
If you want to rescan UPnP devices, click ‘Refresh’ button.If you need to set the detailed information of UPnP devices, please click‘Advanced’ button, and the following settings will appear:You can click ‘?’ icon and a drop-down list will shown, then you canselect an icon for the network device you selected. For example, if thenetwork device you selected is a computer, you can use the person icon torepresent it.
Here are descriptions of every setup items:Item NameAddDELDevice NameConfigUpload / DownloadBlockDescriptionClick this button to add a network device, andyou can set detailed network information likename and IP address for it. Click ‘Apply’button to save changes and new setting willtake effect until next login.Click this button to delete all settings assignedto the network device.You can give this device a name as memoryaid. Also, if the type of UPnP device is notidentified by this broadband router, a questionmark ( ) will appear to the left of device’sname. You can click the question mark, severalicons will appear and you can pick an icon thatis able to represents this device.Click ‘Config’ button to connect to the webconfiguration interface of UPnP device.Please click red dot(located at the right of ‘Upload’), and a newpop-up window will be shown. Please check‘Enable QoS’ box to enable QoS bandwidthcontrol function for this device, and select theupload / download bandwidth you wish toassign to this device from dropdown list.You can block this device so it will not be able
to access the network at certain time period.Click ‘Set’ button and a new window willappear with three time-selection options:No Block: Do not block this UPnP device.Time Interval: This UPnP device will beblocked during the time period you specified.Please input ‘from’ and ‘to’ hour in tworespective fields of this item by 24 hoursformat.Always: This UPnP device will be blockedpermanently.DMZPort ForwardingClick ‘Apply’ to save changes you made, orclick ‘Cancel’ to close pop-up window anddiscard changes.Select ‘DMZ’ to set this device as a DMZserver.Please note that you can only set one DMZserver at the same time.You can set the port-forwarding rules for thisdevice. Click ‘Set’ and a new pop-up windowwill shown, you can set up to 5 sets ofport-forwarding rules for this device. You canclick ‘Apply’ in port-forwarding setting windowto save changes, or click ‘Cancel’ to closewindow and discard changes.You can also click ‘View’ to view currentport-forwarding rules for this device.You can click ‘Refresh’ button to rescan all UPnP-compatible devices onnetwork,
When you finished with the settings in this page, you can click ‘Apply’button to save changes you made in this page, or you can click ‘Cancel’to discard changes. After you click ‘Apply’ button, you’ll see thefollowing messages:Please click ‘Apply’ to save changes you made and restart the broadbandrouter, this requires about 30 seconds and the broadband router will stopresponding (this is normal and is not malfunction). You can reconnect tothis broadband router and continue on other settings later.
Chapter V : StatusIn this menu, you can check the operation status of this broadband router.To view the status, follow the following instructions:1. Click ‘Status’ button from main menu:2. The basic system information will be shown:
You can check the system uptime and firmware version of this broadbandrouter. If you need detailed information about Internet connection orsystem usage log, please choose one of them and click ‘Apply’. If youwant to go back to previous page, please click ‘Previous’.
5-1 Internet ConnectionThis page shows the current status of Internet connection.
5-2 Device StatusThis page shows current wireless LAN and wired LAN configuration.
5-3 System LogThis page shows all logged system information. You can use scroll bar toview the logs, or click ‘Save’ to download the log file to your computer.You can also click ‘Clear’ to remove all logs, or click ‘Refresh’ to reloadlogs.
5-4 Security LogThis page shows all logged security-related information. You can usescroll bar to view the logs, or click ‘Save’ to download the log file to yourcomputer. You can also click ‘Clear’ to remove all logs, or click ‘Refresh’to reload logs.
5-5 Active DHCP ClientThis page shows all current DHCP clients. You can click ‘Refresh’ toreload the list.
5-6 StatisticsThis page shows the statistical information of network interfaces of thisbroadband router, and the total system uptime.
Chapter VI : ToolsThis broadband router comes with several tools that will help you tomanage the configuration of broadband router, upgrade the firmware, andrestart the broadband router.To use these tools, follow the following instructions:1. Click ‘Tools’ button from main menu:
2. The list of tools will appear:Please select the tool you wish to use, then click ‘Apply’ button. If youwish to go back to previous page, click ‘Previous’ button.
6-1 Configuration ToolsIn this page, you can backup and restore current system configuration,and reset all settings to factory default value.Here are descriptions of every setup items:Item NameBackup SettingsRestore SettingsRestore to FactoryDefaultDescriptionClick ‘Save…’ button to download the currentconfiguration as ‘config.bin’ file. Save this fileon your computer to keep currentconfiguration. If you want to keep more thanone version of configuration file, pleaserename the configuration file to another name.Click ‘Browse...’ button to select apreviously-saved configuration file from yourcomputer, then click ‘Upload’ to upload theconfiguration file to broadband router, and theconfiguration of broadband router will bereplaced by the content of uploadedconfiguration file.Click ‘Reset’ button to restore the settings ofthe broadband router to factory default value.A pop-up message window will appear and askyou to confirm the reset.
6-2 Firmware UpgradeNew firmware releases will provide new functions to this broadbandrouter, and you can use firmware upgrade function to upgrade thefirmware to new version.NOTE: It’s recommended to use wired Ethernet connection to upload thefirmware file, please refrain from using wireless connection to upload thefirmware file. Also, please do not switch the broadband router or computeryou used to upload the firmware file off during firmware upgrade. This willcause broadband router become malfunction and unusable.Please download the firmware file from our company’s website and saveit on your computer, and use firmware upgrade function to upgradefirmware:Please click ‘Browse…’ button to select the firmware file saved on yourcomputer, then click ‘Apply’ button to start firmware upload. Thebroadband router will restart after file upload is successful, and allsettings will be lost. Please use default IP address (192.168.2.1) toconnect to the broadband router and set every settings again.
6-3 RestartIf you found that the broadband router is not functioning correctly, orresponding slowly then usual, you can use this function to restart thebroadband router, and this may correct the problem.Click ‘Apply’ button to restart the broadband router. You’ll be promptedto confirm the restart, click ‘OK’ to restart the broadband router.
Chapter VII : LanguageThis broadband router’s web-based user interface supports severallanguages in the future .We will release English version at first, and addothers step by step. You can view website http://www.edimax.com tocheck new firmware. You can change the display language by click‘Language’ button in main menu.To change the display language, follow the following instructions:1. Click ‘Language’ button from main menu:N20379