Technical Manual - BoXXer R2C2 - 2011 - SRAM.com
Technical Manual - BoXXer R2C2 - 2011 - SRAM.com
Technical Manual - BoXXer R2C2 - 2011 - SRAM.com
- No tags were found...

You also want an ePaper? Increase the reach of your titles
YUMPU automatically turns print PDFs into web optimized ePapers that Google loves.
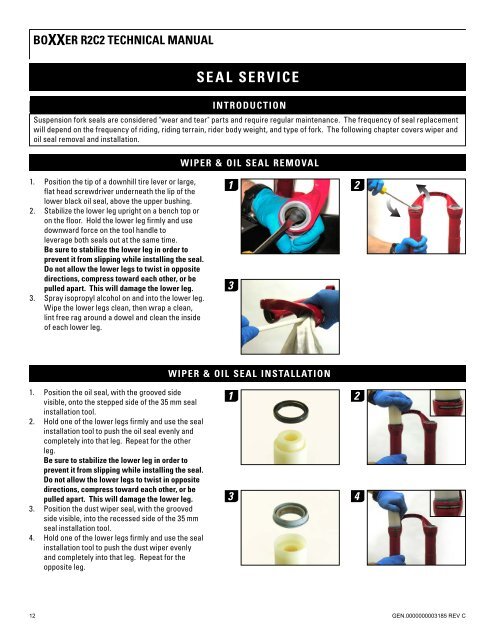
<strong>BoXXer</strong> <strong>R2C2</strong> technical manualseal serviceintroductionSuspension fork seals are considered "wear and tear" parts and require regular maintenance. The frequency of seal replacementwill depend on the frequency of riding, riding terrain, rider body weight, and type of fork. The following chapter covers wiper andoil seal removal and installation.wiper & oil seal removal1. Position the tip of a downhill tire lever or large,flat head screwdriver underneath the lip of thelower black oil seal, above the upper bushing.2. Stabilize the lower leg upright on a bench top oron the floor. Hold the lower leg firmly and usedownward force on the tool handle toleverage both seals out at the same time.Be sure to stabilize the lower leg in order toprevent it from slipping while installing the seal.Do not allow the lower legs to twist in oppositedirections, <strong>com</strong>press toward each other, or bepulled apart. This will damage the lower leg.3. Spray isopropyl alcohol on and into the lower leg.Wipe the lower legs clean, then wrap a clean,lint free rag around a dowel and clean the insideof each lower leg.1 23wiper & oil seal installation1. Position the oil seal, with the grooved sidevisible, onto the stepped side of the 35 mm sealinstallation tool.2. Hold one of the lower legs firmly and use the sealinstallation tool to push the oil seal evenly and<strong>com</strong>pletely into that leg. Repeat for the otherleg.Be sure to stabilize the lower leg in order toprevent it from slipping while installing the seal.Do not allow the lower legs to twist in oppositedirections, <strong>com</strong>press toward each other, or bepulled apart. This will damage the lower leg.3. Position the dust wiper seal, with the groovedside visible, into the recessed side of the 35 mmseal installation tool.4. Hold one of the lower legs firmly and use the sealinstallation tool to push the dust wiper evenlyand <strong>com</strong>pletely into that leg. Repeat for theopposite leg.1 23 412GEN.0000000003185 REV C