Technical Manual - BoXXer R2C2 - 2011 - SRAM.com
Technical Manual - BoXXer R2C2 - 2011 - SRAM.com
Technical Manual - BoXXer R2C2 - 2011 - SRAM.com
- No tags were found...

Create successful ePaper yourself
Turn your PDF publications into a flip-book with our unique Google optimized e-Paper software.
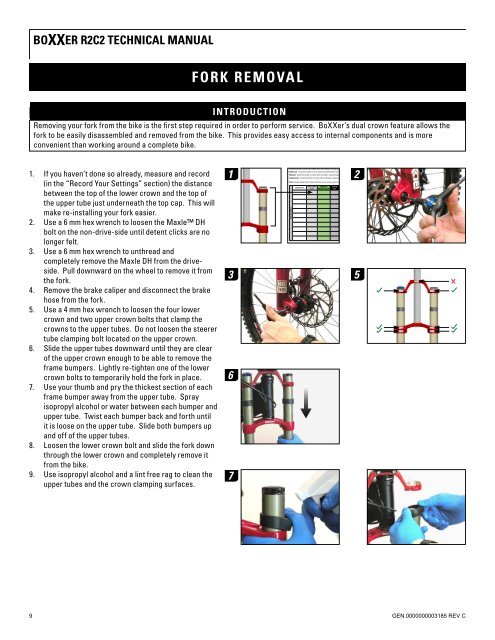
<strong>BoXXer</strong> <strong>R2C2</strong> technical manualFORK removalintroductionRemoving your fork from the bike is the first step required in order to perform service. <strong>BoXXer</strong>’s dual crown feature allows thefork to be easily disassembled and removed from the bike. This provides easy access to internal <strong>com</strong>ponents and is moreconvenient than working around a <strong>com</strong>plete bike.BoXXER TEAM TEchnicAl MAnuAl1. If you haven’t done so already, measure and record(in the “Record Your Settings” section) the distancebetween the top of the lower crown and the top ofthe upper tube just underneath the top cap. This willmake re-installing your fork easier.2. Use a 6 mm hex wrench to loosen the Maxle DHbolt on the non-drive-side until detent clicks are nolonger felt.3. Use a 6 mm hex wrench to unthread and<strong>com</strong>pletely remove the Maxle DH from the driveside.Pull downward on the wheel to remove it fromthe fork.4. Remove the brake caliper and disconnect the brakehose from the fork.5. Use a 4 mm hex wrench to loosen the four lowercrown and two upper crown bolts that clamp thecrowns to the upper tubes. Do not loosen the steerertube clamping bolt located on the upper crown.6. Slide the upper tubes downward until they are clearof the upper crown enough to be able to remove theframe bumpers. Lightly re-tighten one of the lowercrown bolts to temporarily hold the fork in place.7. Use your thumb and pry the thickest section of eachframe bumper away from the upper tube. Sprayisopropyl alcohol or water between each bumper andupper tube. Twist each bumper back and forth untilit is loose on the upper tube. Slide both bumpers upand off of the upper tubes.8. Loosen the lower crown bolt and slide the fork downthrough the lower crown and <strong>com</strong>pletely remove itfrom the bike.9. Use isopropyl alcohol and a lint free rag to clean theupper tubes and the crown clamping surfaces.GETTinG STARTED (conTinuED)REcoRD YouR SETTinGSTake a moment and record all of your <strong>BoXXer</strong> fork’s settings in the chart below. This will allow you to return your fork to its originalsettings after service. Be sure to record the service date as well, this will help you keep track of service intervals.To determine your bottom out, <strong>com</strong>pression, and rebound settings perform the following:Bottom out - Count the number of clicks while turning the bottom out adjuster fully counter-clockwise.Rebound - Count the number of clicks while turning the rebound adjuster fully counter-clockwise .1 <strong>com</strong>pression - Count the number of clicks while turning the <strong>com</strong>pression adjuster fully counter-clockwise 2.note: Spring preload will be determined later during spring system service.uppER cRown nuMBER of BoTToM low SpEED hiGh SpEED BEGinninGEnDinGSERvicE DATEhEiGhT pREloAD SpAcERS ouT coMpRESSion coMpRESSion STRokE REBounD STRokE REBounDMY SETTinGSThe following chart lists all of the oil volumes and weights for your <strong>BoXXer</strong> as well as tool sizes and torque values for all of thefasteners.oil voluME chARTVolume Height Oil Volume OilVolumeVolumeDamper(mL) (mm) wt (mL) wtSpringOil wtOil wt(mL)(mL)technologytechnology(drive side)Upper leg Lower leg (non-drive side) Upper leg Lower legBoxxer World Cup Mission Control DH 245 153 5 10 15 Coil with Drop Stop - - 40 15ToRquE chARTPart/fastener Tool size TorqueMaxle DH (non drive-side) 6 mm 8 clicksMaxle DH (drive-side) 6 mm 5.7 N·m (50 in-lb)3 5Crown bolts 4 mm 7.3 N·m (65 in-lb)Bottom bolts 5 mm 7.3 N·m (65 in-lb)Top caps 24 mm 7.3 N·m (65 in-lb)5 Copyright © <strong>SRAM</strong> LLC • 2009679GEN.0000000003185 REV C