Technical Manual - BoXXer R2C2 - 2011 - SRAM.com
Technical Manual - BoXXer R2C2 - 2011 - SRAM.com
Technical Manual - BoXXer R2C2 - 2011 - SRAM.com
- No tags were found...

Create successful ePaper yourself
Turn your PDF publications into a flip-book with our unique Google optimized e-Paper software.
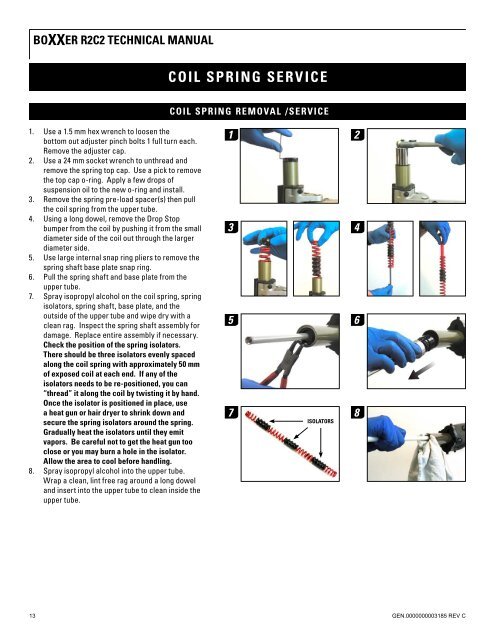
<strong>BoXXer</strong> <strong>R2C2</strong> technical manualcoil spring service1 2coil spring removal /service1. Use a 1.5 mm hex wrench to loosen thebottom out adjuster pinch bolts 1 full turn each.Remove the adjuster cap.2. Use a 24 mm socket wrench to unthread andremove the spring top cap. Use a pick to removethe top cap o-ring. Apply a few drops ofsuspension oil to the new o-ring and install.3. Remove the spring pre-load spacer(s) then pullthe coil spring from the upper tube.4. Using a long dowel, remove the Drop Stopbumper from the coil by pushing it from the smalldiameter side of the coil out through the largerdiameter side.5. Use large internal snap ring pliers to remove thespring shaft base plate snap ring.6. Pull the spring shaft and base plate from theupper tube.7. Spray isopropyl alcohol on the coil spring, springisolators, spring shaft, base plate, and theoutside of the upper tube and wipe dry with aclean rag. Inspect the spring shaft assembly fordamage. Replace entire assembly if necessary.Check the position of the spring isolators.There should be three isolators evenly spacedalong the coil spring with approximately 50 mmof exposed coil at each end. If any of theisolators needs to be re-positioned, you can“thread” it along the coil by twisting it by hand.Once the isolator is positioned in place, usea heat gun or hair dryer to shrink down andsecure the spring isolators around the spring.Gradually heat the isolators until they emitvapors. Be careful not to get the heat gun tooclose or you may burn a hole in the isolator.Allow the area to cool before handling.8. Spray isopropyl alcohol into the upper tube.Wrap a clean, lint free rag around a long doweland insert into the upper tube to clean inside theupper tube.1 23 45 67 8isolators13GEN.0000000003185 REV C