

INSTRUCTION BOOK - Janome
INSTRUCTION BOOK - Janome
INSTRUCTION BOOK - Janome

You also want an ePaper? Increase the reach of your titles
YUMPU automatically turns print PDFs into web optimized ePapers that Google loves.
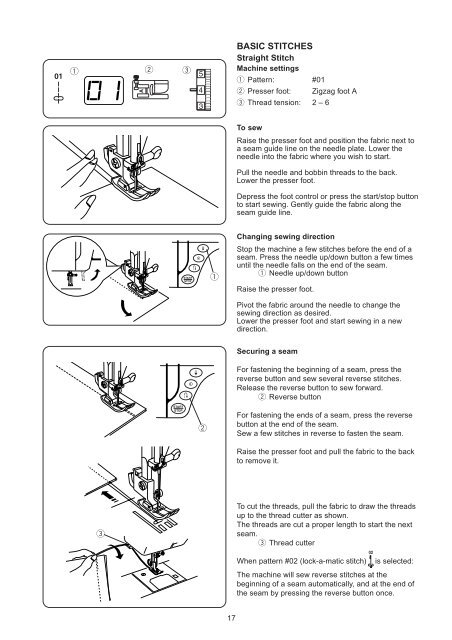
q w eBASIC STITCHESStraight StitchMachine settingsq Pattern: #01w Presser foot: Zigzag foot Ae Thread tension: 2 – 6To sewRaise the presser foot and position the fabric next toa seam guide line on the needle plate. Lower theneedle into the fabric where you wish to start.Pull the needle and bobbin threads to the back.Lower the presser foot.Depress the foot control or press the start/stop buttonto start sewing. Gently guide the fabric along theseam guide line.qChanging sewing directionStop the machine a few stitches before the end of aseam. Press the needle up/down button a few timesuntil the needle falls on the end of the seam.q Needle up/down buttonRaise the presser foot.Pivot the fabric around the needle to change thesewing direction as desired.Lower the presser foot and start sewing in a newdirection.Securing a seamFor fastening the beginning of a seam, press thereverse button and sew several reverse stitches.Release the reverse button to sew forward.w Reverse buttonwFor fastening the ends of a seam, press the reversebutton at the end of the seam.Sew a few stitches in reverse to fasten the seam.Raise the presser foot and pull the fabric to the backto remove it.eTo cut the threads, pull the fabric to draw the threadsup to the thread cutter as shown.The threads are cut a proper length to start the nextseam.e Thread cutterWhen pattern #02 (lock-a-matic stitch) is selected:The machine will sew reverse stitches at thebeginning of a seam automatically, and at the end ofthe seam by pressing the reverse button once.17


